Ok.. This is a mod Ive had in the back of my mind for a long time.. In fact ever since my missus flattened our lux's starting battery not once but twice.. 'Apparently' the buzzer that goes off when you leave the lights on and remove the keys 'isnt enough' to alert you when you have screaming kids and a million other things on your mind..
What I wanted was a way that you could leave the headlights turned ON on the headlight stalk, but if you turned the keys off in the ignition then the lights would automatically turn off, not stay on like they do normally allowing batteries to get flattened...
Enter Steve9R's Auto-Headlight Off Mod..
This mod is pretty simple to do, however I must warn people that the 'potential' for failure of your headlights is a possibility if you dont follow the instructions below, OR if the relay you purchase fails OR if the wires fall off the Relay.. (I have a spare relay in my toolbox just in case).
What this mod basically does is it breaks the earth on the parking light and headlight circuit with a Dual Pole Dual Throw 10A Power Relay which is hooked to the Accessory circuit. So once the key in the ignition is turned off the ACC circuit is powered down and so is the relay breaking the headlight/parking light circuit and turning off the lights. Once you turn the key back to ACC or start the vehicle then your headlights (if you leave them turned ON on the stalk) will automatiicaly come back on. (Dont worry if you dont understand exactly how it works, just follow the pics below).
Skill level required to do mod :
----------------
LOW (even Alby could do it !)
Time to install :
----------------
1hr (ish)
Tools required :
-----------------
No2 phillips head screwdriver
Soldering iron & solder
Heat shrink (couple of different sizes is good)
Electrical Tape
5 pieces of wire about 10cm long each (I used Brown)
1 piece of wire about 30cm long (I used Red)
8 x Insulated Female crimp connectors ( I used 6 x Blue and 2 x Red ones)
Items to buy :
--------------
This is the heart of the mod.. the DPDT 20A power relay.
***** Amendment to Mod ****
The original mod used a 10A DPDT relay, however upon further testing it is revealed that :
The parking circuit is drawing 3.4A - no problems there.
The headlight circuit is drawing a constant 8.8A on Low Beam
The headlight circuit is drawing a constant 9.7A on High Beam
So this means that by using a 10A relay its too close to the 10A limit, and this is obviously going to be dependant on the types of globes that you run as well.. Im running standard parking light globes and my headlights are the Phillips X-Treme globes which are a 60/55W globe in both sides.
Now what this means though is exactly what bansheebuzz has pointed out below .. we need to run a 20A relay.. the 10A relay will work, but because it's running so close to its rated limit it'll get hot and deteriorate / fail.
Here is a picture of the 10A relay I originally specified and the new 20A version of the same relay.

Ive found the BEST and cheapest place to get this is ebay.. go to ebay and search for 'HG2-DC12V' at the moment these are only available from international sellers, but i just had two delivered for $28USD including delivery via UPS Airmail and i had them within the week. (mine were purchased from 'goldenopportunities1') if that helps anyone..
The pinouts on the new relay are numbered differently as well, but the physical pins are identical (Ill update the document below to reflect the new numbering now).
Step 1 :/
So.. what we're going to do is firstly strip and connect the crimp plugs to the 6 pieces of wire as follows (dont worry about plugging them onto the relay I did that just to show they are all crimped):

Now that you have already crimped the extension wires, a little tip, 'lightly' crush the ends of the plugs so that when you connect them to the relay they are really hard to remove. This will stop the crimp connectors coming loose when you're travelling!
Step 2 :/
Leave Keys OUT of ignition. Note : You can leave the Battery connected for this if you wish as we are only soldering onto earth wires. But its up to you.. if you are not comfortable with your skills then by all means disconnect the battery but you'll have to reconnect / disconnect multiple times to test..
Into the cab and remove the surrounds from around the steering column. there is a screw either side of the steering wheel and one underneath securing the bottom. once these 3 screws are removed you will be able to remove the lower and upper pieces exposing the steering column.

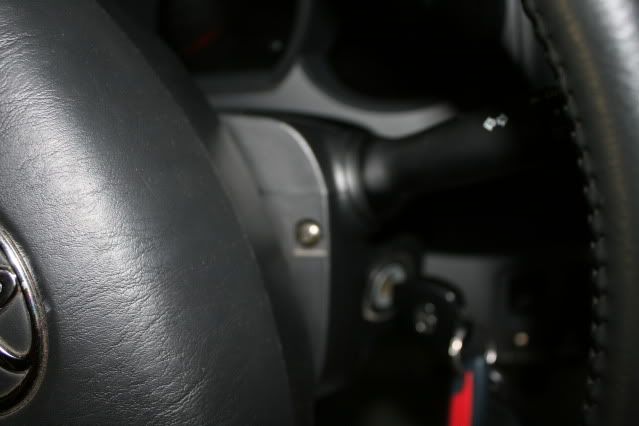
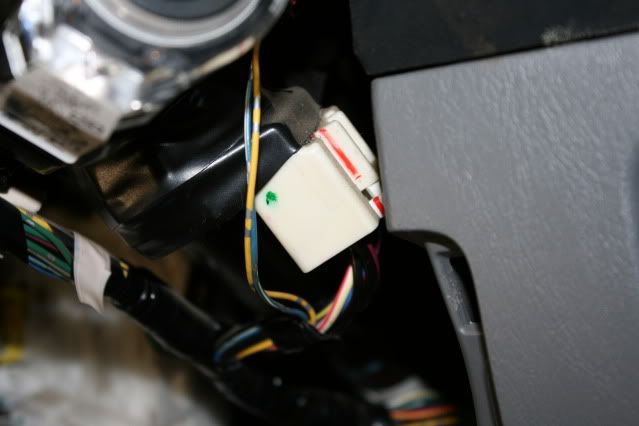
Step 3 :/
Identify the plugs shown below :
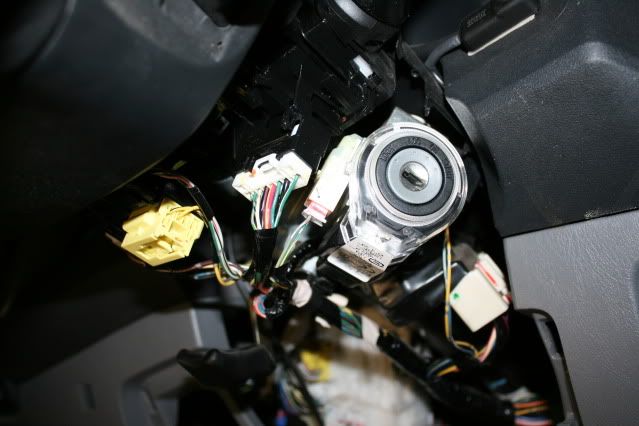
This is the main plug we're going to be working on :
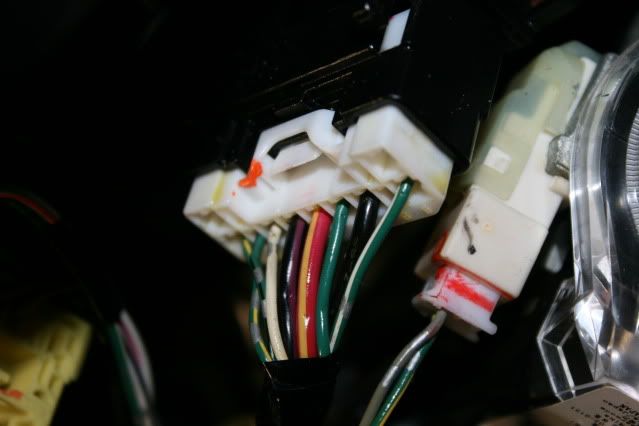
and these are the two wires we will need to cut and join our 'extension' wires onto :

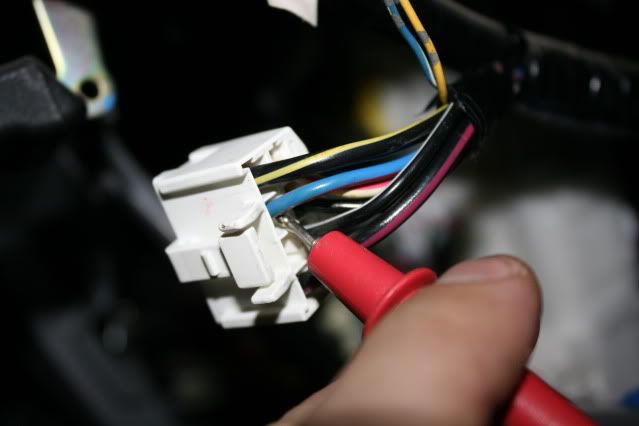
Step 4 :/
Now.. leave the connectors plugged in and cut the small green wire in position 4 as shown :
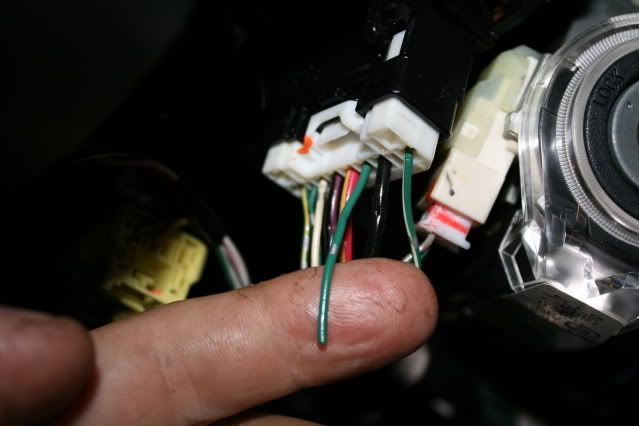
This wire is the earth for the parking light circuit. Once you've cut it, test it by leaving your keys out of the ignition and turning your parkers on they shouldnt work, but turn your headlights on and they will.. Turn the headlight stalk back to OFF
Step 5 :/
Now cut the Black wire located in position 3 as shown :
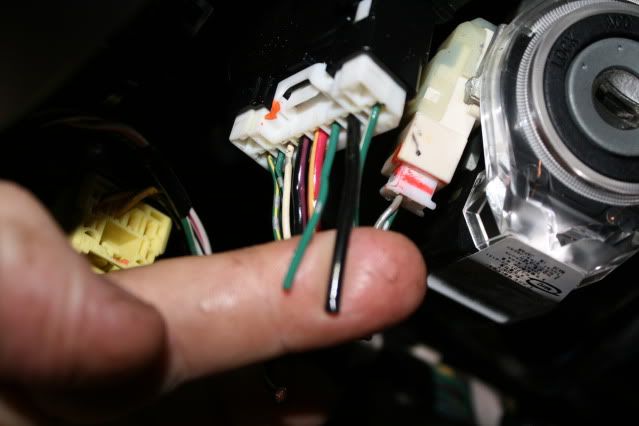
This wire is the earth for the Headlight Circuit. Do the same test as above. Leave your keys OUT of the ignition and turn your parkers on.. should be nothing, now continue and turn your headlights on. Should also be nothing ? we're getting somewhere now !
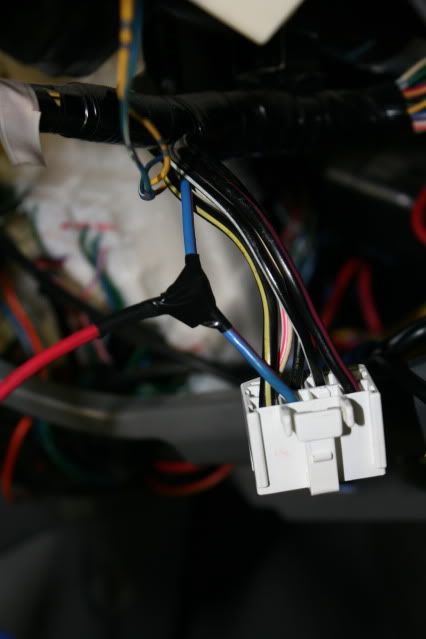
Step 6 :/
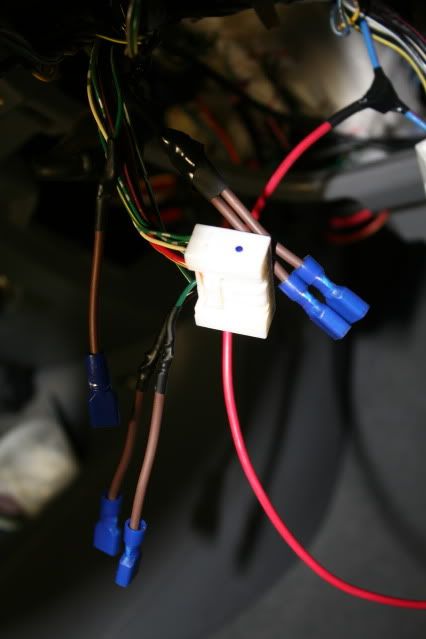
So, now we need to solder the extension wires we made earlier onto the ends of the wires we have just cut.
1 x extension wire to the white plug side joined to the Green small wire
1 x extension wire to the white plug side joined to the Black thicker wire
1 x extension wire to the harness side joined to the Green small wire
2 x extension wires to the harness side joined to the Black thicker wire ** (note 2 x wires)
like this :
Step 7:/
As per the image above we also need to connect the Red Extension wire to the ACC circuit. You can pick this circuit up wherever you want really, but i have used the following :
Locate the Ignition plug under the key and unplug it :
I used the Blue wire wih Red Trace pictured to connect the red extension wire to :
like this :
Now you should have 6 x Terminal Crimped ends ready to connect to the relay.
** You should also have 2 x spare terminal connectors.. thats good.. you need them next ! **
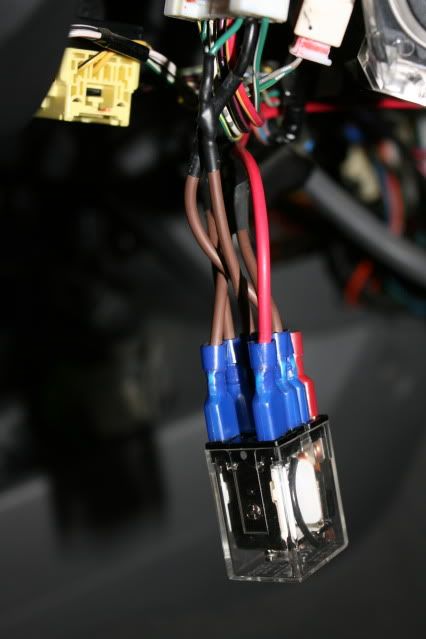
Step 8:/
Connecting the wires to the relay. leave the White Plugs disconnected from their connectors until you've finished this step.
You'll notice on the relay that each of the silver pins has a number next to it. These numbers are going to correspond to the wires we attach.
Firstly though, the two spare (non-used) insulated crimp connectors (2 x red ones).
Put the First one on PIN 4 and the Second one on PIN 5.
We dont need to use PIN4 or PIN5 so these empty crimp connectors are there to purely stop anything touching the terminals.
Now the connections to make to the wires we joined are as follows :
Extension wire on the White plug side joined to the Green small wire -> PIN 3
Extension wire to the White plug side joined to the Black thicker wire -> PIN 6
Extension wire to the harness side joined to the Green small wire -> PIN 1
Extension wire 1 to the harness side joined to the Black thicker wire -> PIN 8
Extension wire 2 to the harness side joined to the Black thicker wire -> PIN 2
Red Extension wire to the ACC Circuit -> PIN 7
so it should look something like this :
Now plug the white connector with the brown wires back into the steering column and also plug the white connector with the Red wire back into the steering column.
Now test.. If everything is wired correctly you should perform the following tests :
* Keys out of ignition / Battery connected
1 - Turn Parkers on - Should be nothing
2 - Turn Headligts on - Should be nothing. Turn headlight stalk to OFF
* Insert key in ignition and turn to ACC
3 - Turn Parkers on - Should now work
4 - Turn Headlights on - Should now work. Turn headlight stalk to OFF
* Start vehicle
6 - Turn Parkers on - should now work
7 - Turn headlights on - should now work
8 - Turn OFF vehicle and remove keys - ALL lights should now go off automatically as soon as keys turned to off.
Now simply find a little spot to put the relay (Mine slotted nicely up above the yellow airbag connector) and secure it with a wire tie / velcro / etc.. and reinstall your steering column surrounds and clean up your mess !
CONGRATULATIONS ! You're done !
Hope you all enjoy this mod !.. Post up and let me know !
Cheers
Steve