Hi all my name is Sam or (davis.16). I have decided to begin a thread on my hilux and my never ending journey to get it just right. I have a long list of mods i wish to do and like several other members i am going to post pic and info on how i go about doing these mods.
Anyway feel free to say something or just have a look.
Cheers Sam
Sam's Build up
39 posts
• Page 1 of 2 • 1, 2
Sam's Build up
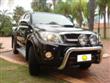
![]() by davis.16 on Tue, 06 Jan 2009 3:40 +0000
by davis.16 on Tue, 06 Jan 2009 3:40 +0000
Last edited by davis.16 on Mon, 04 May 2009 12:54 +0000, edited 1 time in total.
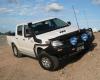
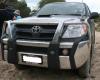
Yes this is my ute...... No i won't help you move house.
-
davis.16 - Posts: 402
- Joined: Sun, 21 Sep 2008 4:29 +0000
- Location: Sydney
Re: Sam's new truck
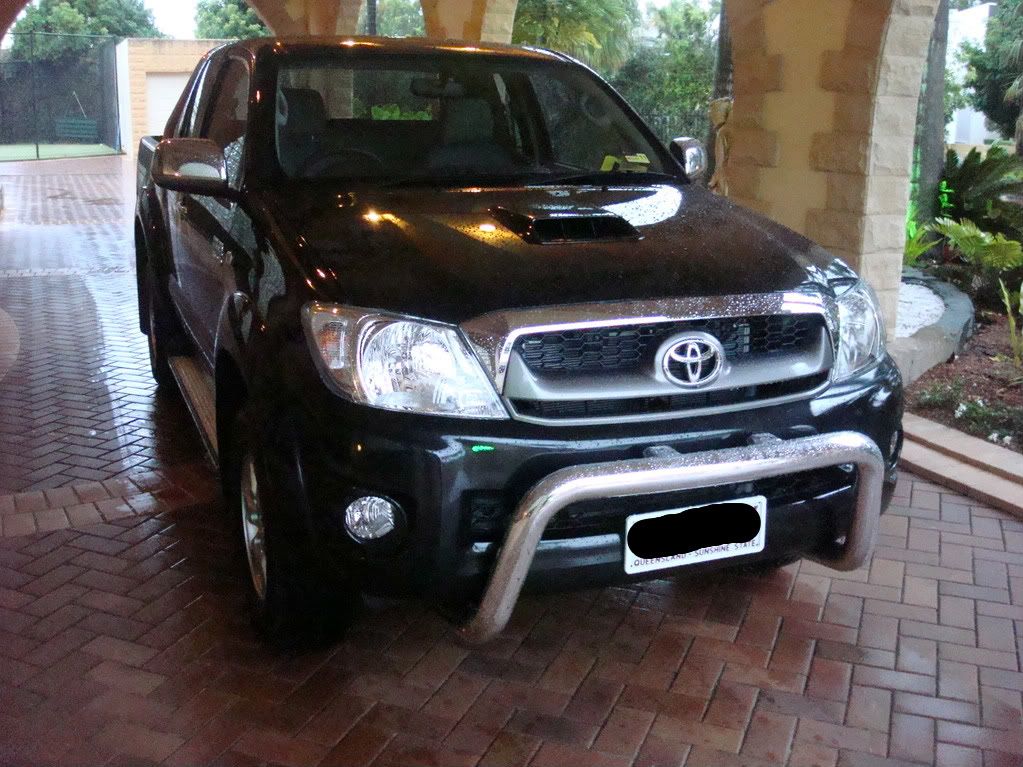
![]() by davis.16 on Tue, 06 Jan 2009 4:27 +0000
by davis.16 on Tue, 06 Jan 2009 4:27 +0000
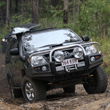
This is my new truck the day i got it (it was raining) 
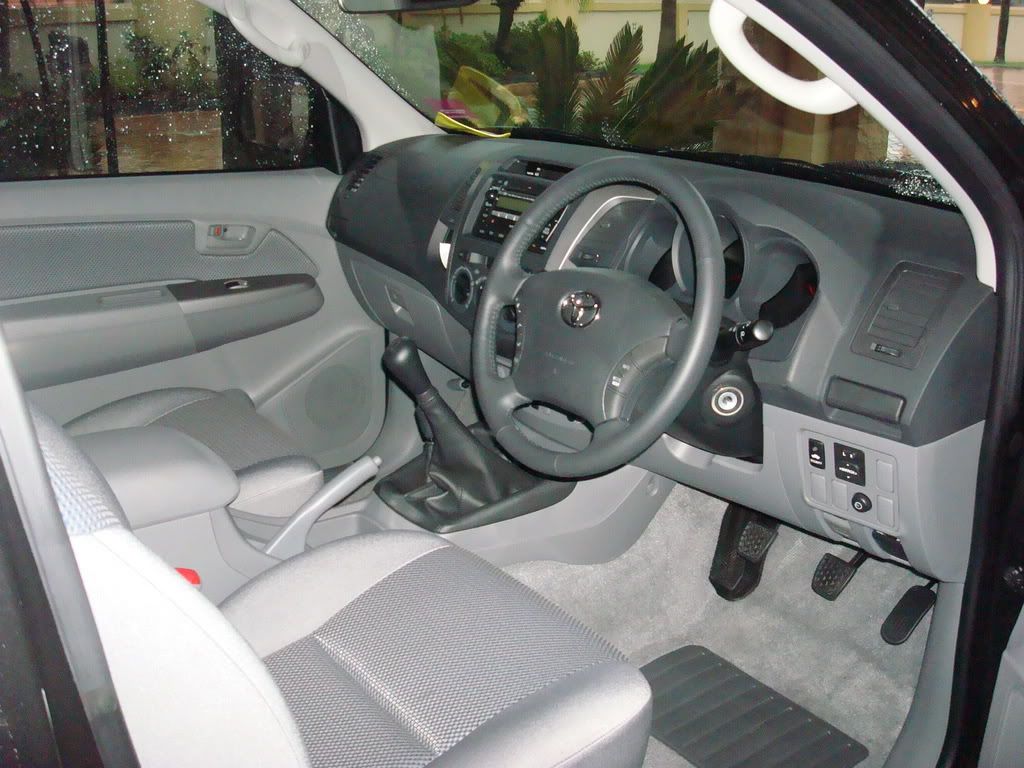
i know that you know what the inside looks like but here is a pic anyway
From here it was just a matter of going and getting my Ps so i could drive the darn thing... and with inspiration like this i got my licence the first go!!!!
i know that you know what the inside looks like but here is a pic anyway
From here it was just a matter of going and getting my Ps so i could drive the darn thing... and with inspiration like this i got my licence the first go!!!!
Yes this is my ute...... No i won't help you move house.
-
davis.16 - Posts: 402
- Joined: Sun, 21 Sep 2008 4:29 +0000
- Location: Sydney
Re: Sam's new truck
![]() by HiruxHijinx on Tue, 06 Jan 2009 4:36 +0000
by HiruxHijinx on Tue, 06 Jan 2009 4:36 +0000
somethin tells me you're olds are rich?
well done on gettin your licence too, always a good start!!
Sam.
well done on gettin your licence too, always a good start!!
Sam.
-
HiruxHijinx - Posts: 290
- Joined: Mon, 04 Jun 2007 1:00 +0000
- Location: North Brisbane, QLD
Re: Sam's new truck
![]() by Skog07 on Tue, 06 Jan 2009 4:38 +0000
by Skog07 on Tue, 06 Jan 2009 4:38 +0000
Congrats Sam on getting your P's.
Great first choice of truck as well. ( My first car on my Ps was on old Suzuki LJ 50. was a pig on the road but a great 4wd out in the bush)
Mate, the mods never seem to stop. You always seem to want more.
Cheers
Skog
Great first choice of truck as well. ( My first car on my Ps was on old Suzuki LJ 50. was a pig on the road but a great 4wd out in the bush)
Mate, the mods never seem to stop. You always seem to want more.
Cheers
Skog
-

Skog07 - Moderator
- Posts: 4940
- Joined: Tue, 08 Jan 2008 2:00 +0000
- Location: Baulkham Hills, NSW
Re: Sam's new truck
![]() by Bull on Tue, 06 Jan 2009 6:50 +0000
by Bull on Tue, 06 Jan 2009 6:50 +0000
You got a brand new SR5 4WD extra cab for your first car at 16?
Way to go.
Way to go.
-

Bull - Posts: 681
- Joined: Thu, 11 Dec 2008 9:54 +0000
- Location: Northern Territory
Re: Sam's new truck
![]() by rodw on Tue, 06 Jan 2009 7:09 +0000
by rodw on Tue, 06 Jan 2009 7:09 +0000
We'll be interested to see this unfolds Sam.
-
rodw - Posts: 3195
- Joined: Tue, 19 Feb 2008 2:00 +0000
- Location: Brisbane, QLD
The sterio (first project)
![]() by davis.16 on Tue, 06 Jan 2009 8:00 +0000
by davis.16 on Tue, 06 Jan 2009 8:00 +0000
First on my to do list was to put in an earth shattering stereo... (Being a teenager it seemed like a good place to start the mods.
I went ahead and got all my stereo gear from gold coast car sound in bundall on the gold coast.
I bought the following supplies...
An alpine CDA-9886i head unit
An alpine pdx4.150 amp
An alpine Mrp-m850 Mono amp
Focal 165kr2 splits for the front
Focal 165cvx speakers for the rear
An alpine 12 r type sub
A Toyota pocket kit
A dynamat bulk pack
And some cable, fuses and other little goodies
All together it came to around $5000 retail but I didn’t pay half that
I started by breaking down the car systematically so I had half a chance of being able to put it back together
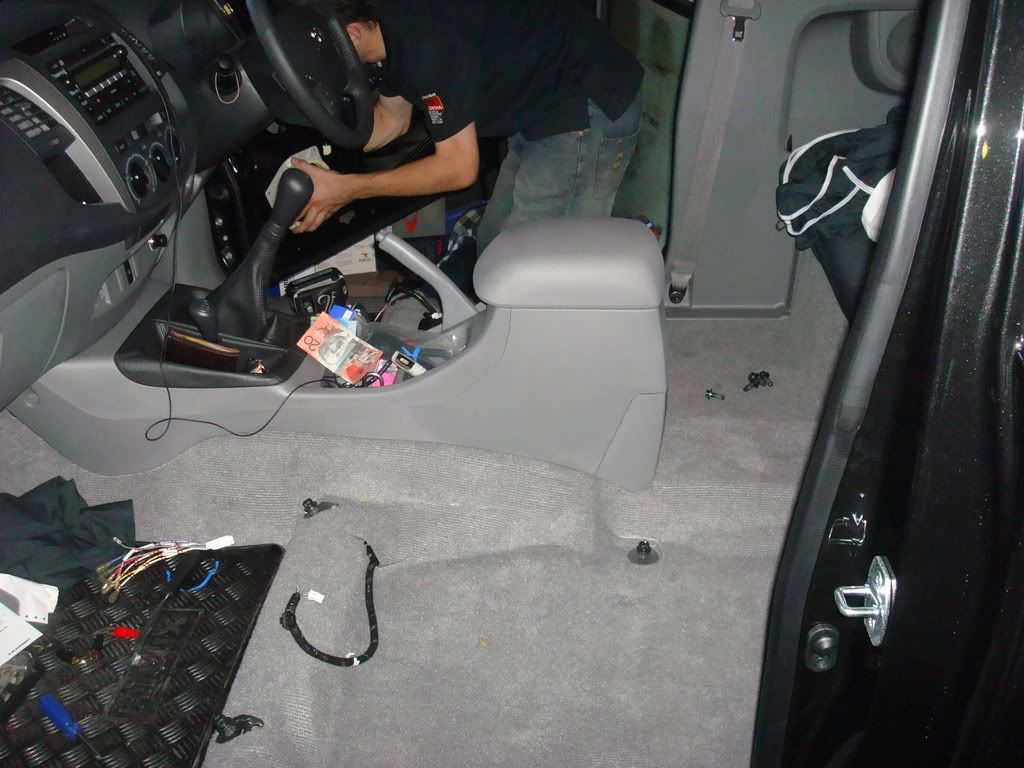
Once the front seats were out I began to remove the door trim and the back seats

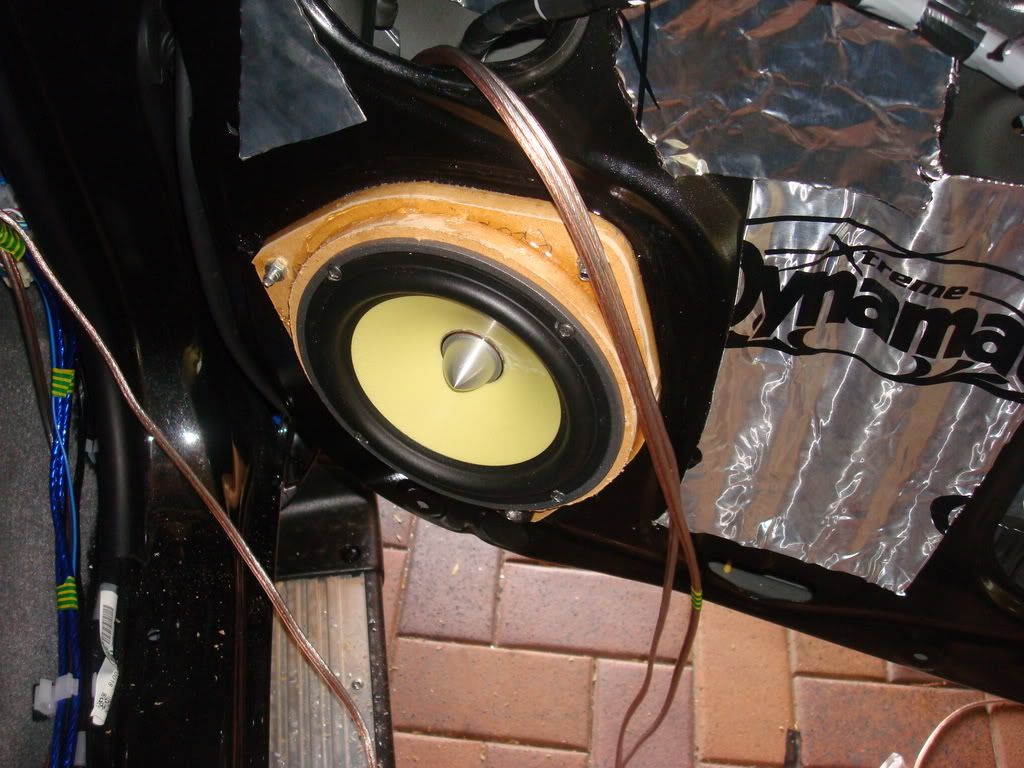
The picture above is of the rear wall of the cab
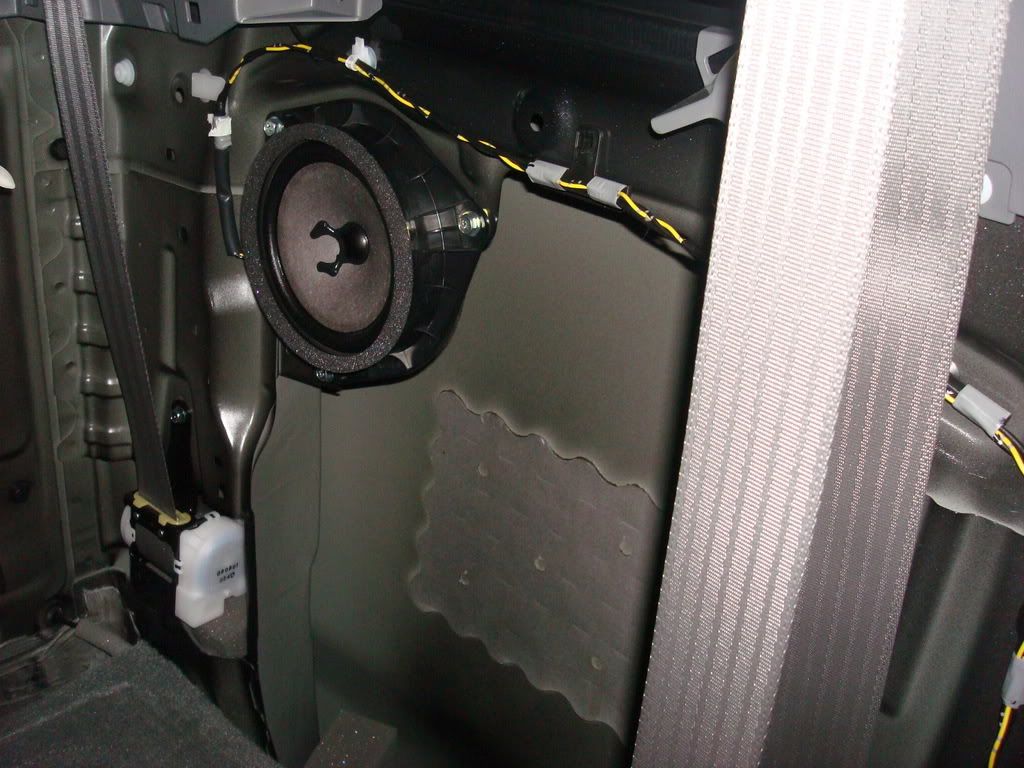
Above is the Rear left speaker (stock)
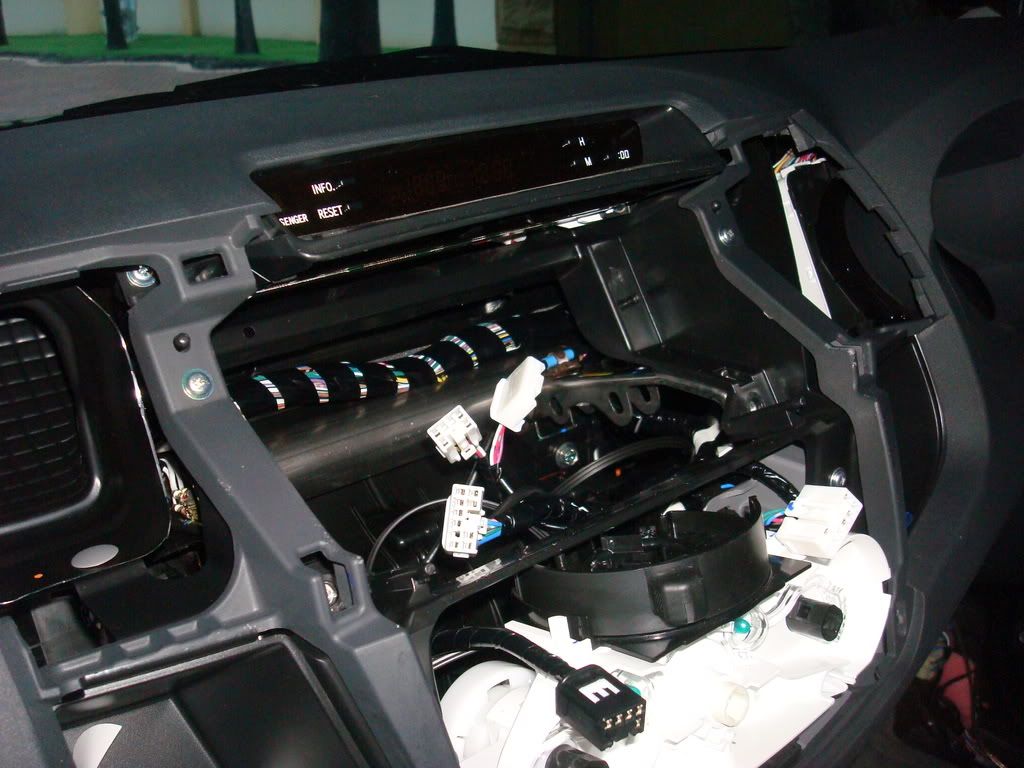
I then began to pull the old head unit out and fiddle with the wiring so that I could run the head unit from the stock power but use preouts for the speakers via an amp.
I then ran the power leads for the amps under the driver seat and the passenger seat where the amps would be located.
I then ran the speaker cable to each speaker location or crossover location (a crossover for those that don’t know is were the signal gets split into high and lower frequencies for the front split speakers)
Then came the fun part DYNAMAT. I began to dynamat all of the exposed steel inside the doors and the rear wall of the cab. Dynamat is a product that deadens sound and stops vibrations and rattles and retains sound and to some extent blocks out road noise.
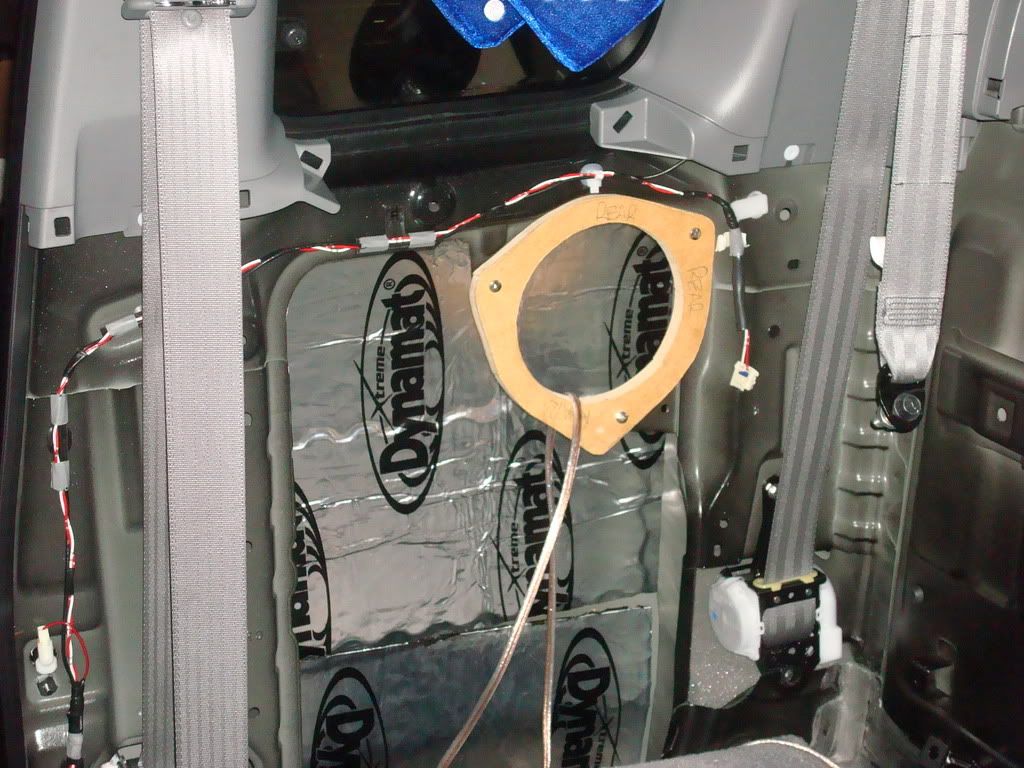
Above is the rear right speaker location with the dynamat on the inside skin of the car. By the time I took this photo I had also finished the mdf speaker mounts which are made from 12mm mdf.
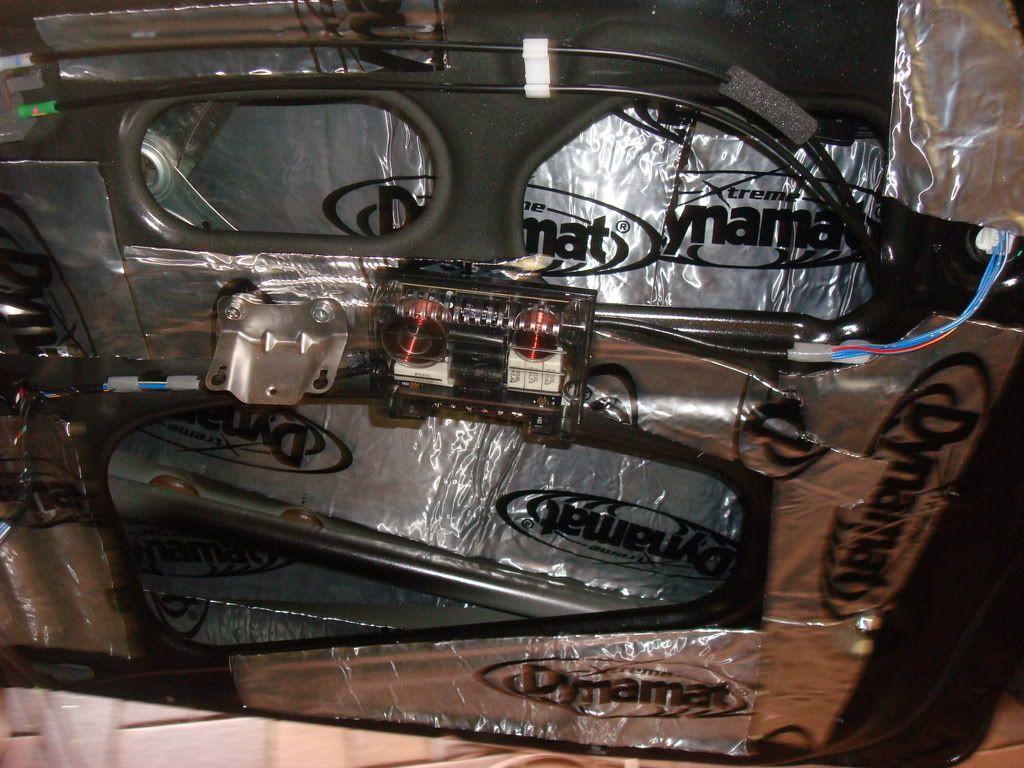
Above is a shot of the door once the dynamat was in and the crossover was put in place.

Above is a picture of the back seat with the rear wall of the cab exposed with the new dynamat. By the time I took this photo I had also put the speaker in.
After the dynamiting was in place I went about making the mdf mounts as seen in the photos above. The rear ones had no clearance problems what so ever however I did have trouble with the fronts. Due to the depth of the speaker the power window bottomed out on the back of the speaker so I made a mdf spacer and glued and screwed it to the mdf mount.
Once I knew that the speakers were all good I soldered them up and then linked the front ones up to the crossovers and then to the amp and the rears went straight to the amp. Then I screwed the speakers in place.
I then got a whole saw and went about drilling into the doors to make way for the tweeter. BE AWARE when using a hole saw on door make sure you measure 10 times before you get the drill. And when drilling drill from the inside out so that went you make it through the plastic you don’t leave halos around your tweeter you will notice I didn’t
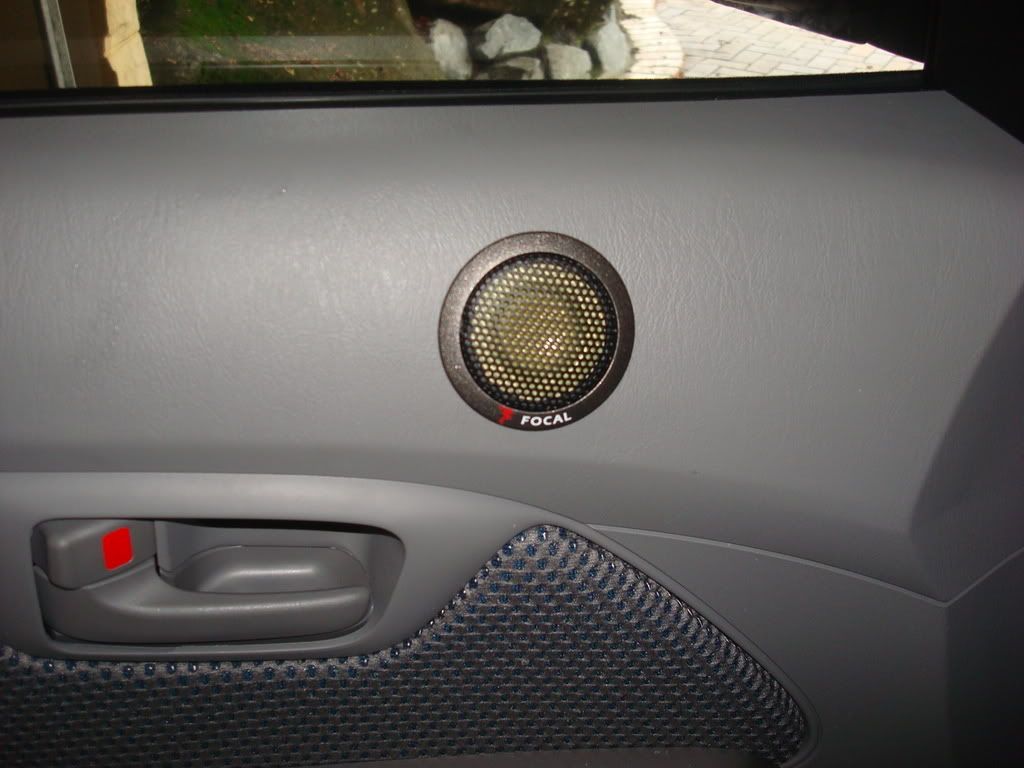
I then wired the tweeter into the crossover and put the door trim and plastic dust sheet back.
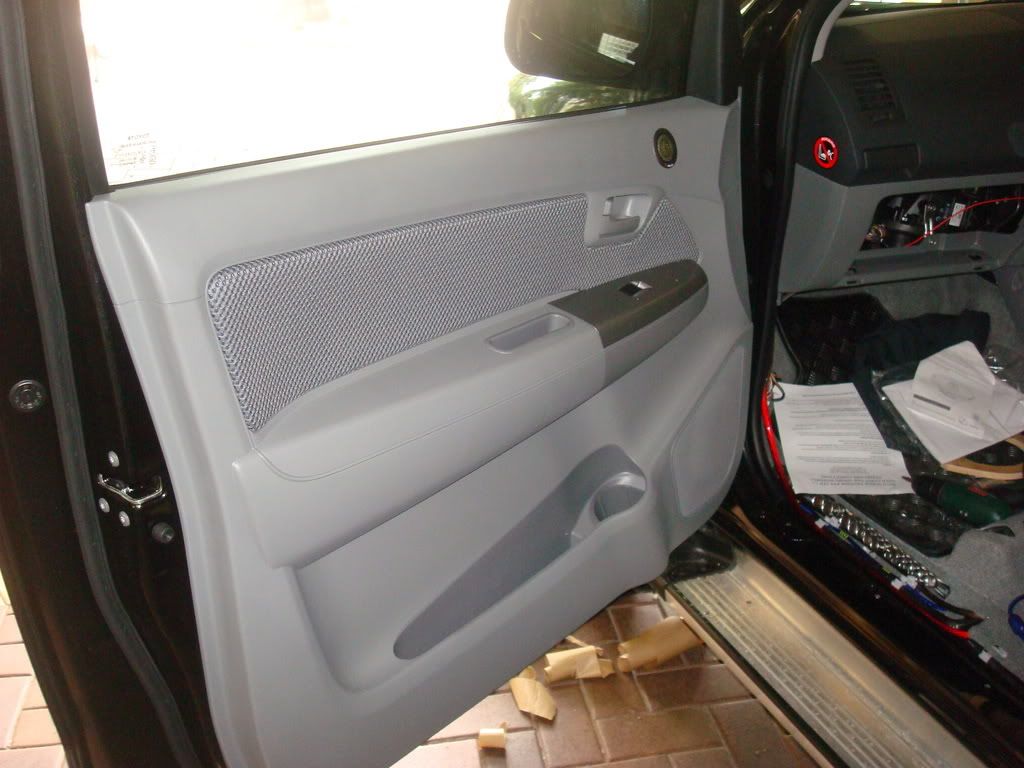
Then I finished up putting the head unit in place and plugged in the leads running to the respective amps.
AND..... it worked
But it wasn’t over yet I was yet to make the sub enclosure
Subs are interesting and when taking the enclosure into account it can get a little bit technical.
For a sub to work well the box bust be of a certain size in my case with a 12" sub my box has to be between 45 and 70L mine is closer to 45. And also the port must have a certain surface are depending on the volume of the box NOT the size of the sub. My box has a volume of I guessed 50-55L so my port has 16 square inches of face. Yes I no it gets a little bit hard to understand. And being in an xtracab it was hard to come up with something that sounds good but here is what I came up with.
I started out with some 16mm thick mdf and went about cutting out the pieces I wanted for the box I had designed I then fiber glassed the inside of the box. Once the glass was dry I put it in the car to how it fits.
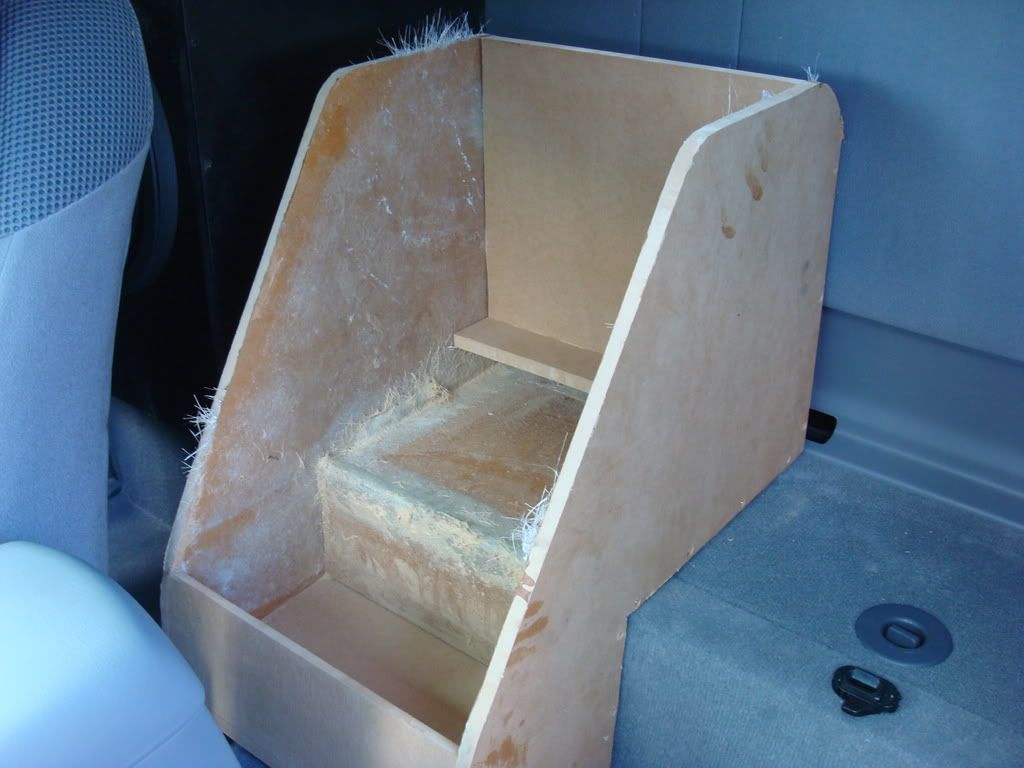
I then made a front for it and cut the hole for the sub. For a bit of fun I also hooked up a row of leds inside the port that is at the back of the box that is directed towards the roof of the car. At night it makes the back 6" of the roof a bright blue. (Very cool if I do say so myself)
I then had the box trimmed up by a mate and put the sub in then I put it into the car.
This is the finished result.
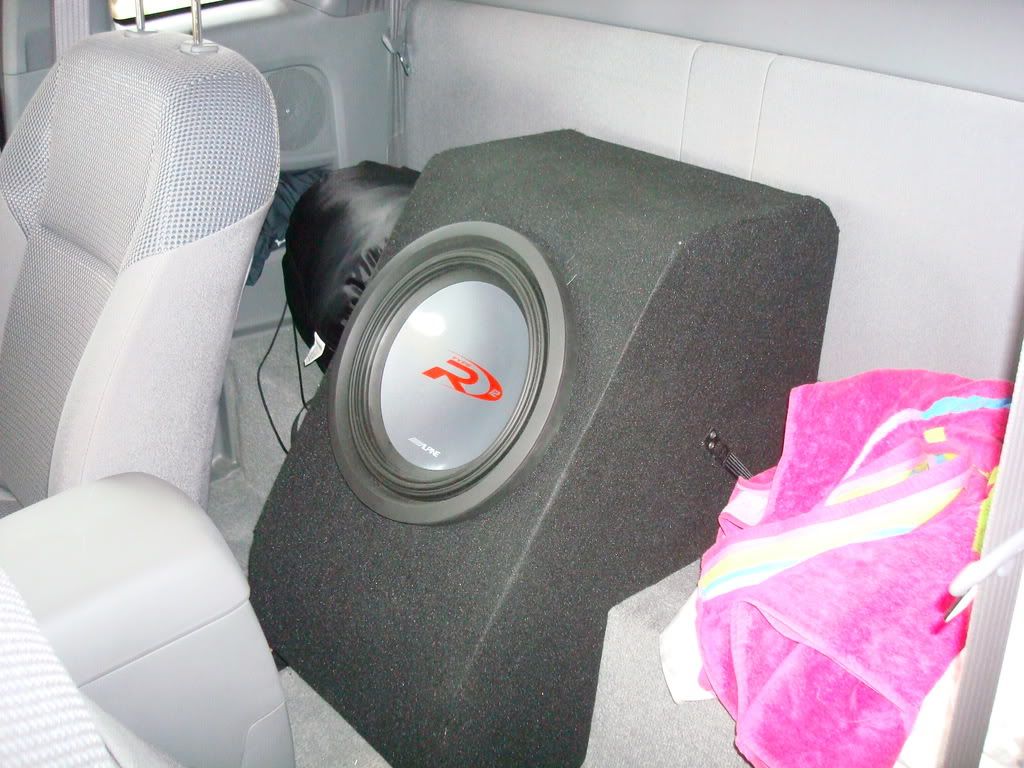
I have to say I am proud of my little DIY box and I suppose the entire system it is a nice clean sound and I got to know my car.
If anyone has any questions just ask.
Cheers SAM (davis.16)
I went ahead and got all my stereo gear from gold coast car sound in bundall on the gold coast.
I bought the following supplies...
An alpine CDA-9886i head unit
An alpine pdx4.150 amp
An alpine Mrp-m850 Mono amp
Focal 165kr2 splits for the front
Focal 165cvx speakers for the rear
An alpine 12 r type sub
A Toyota pocket kit
A dynamat bulk pack
And some cable, fuses and other little goodies
All together it came to around $5000 retail but I didn’t pay half that
I started by breaking down the car systematically so I had half a chance of being able to put it back together
Once the front seats were out I began to remove the door trim and the back seats
The picture above is of the rear wall of the cab
Above is the Rear left speaker (stock)
I then began to pull the old head unit out and fiddle with the wiring so that I could run the head unit from the stock power but use preouts for the speakers via an amp.
I then ran the power leads for the amps under the driver seat and the passenger seat where the amps would be located.
I then ran the speaker cable to each speaker location or crossover location (a crossover for those that don’t know is were the signal gets split into high and lower frequencies for the front split speakers)
Then came the fun part DYNAMAT. I began to dynamat all of the exposed steel inside the doors and the rear wall of the cab. Dynamat is a product that deadens sound and stops vibrations and rattles and retains sound and to some extent blocks out road noise.
Above is the rear right speaker location with the dynamat on the inside skin of the car. By the time I took this photo I had also finished the mdf speaker mounts which are made from 12mm mdf.
Above is a shot of the door once the dynamat was in and the crossover was put in place.
Above is a picture of the back seat with the rear wall of the cab exposed with the new dynamat. By the time I took this photo I had also put the speaker in.
After the dynamiting was in place I went about making the mdf mounts as seen in the photos above. The rear ones had no clearance problems what so ever however I did have trouble with the fronts. Due to the depth of the speaker the power window bottomed out on the back of the speaker so I made a mdf spacer and glued and screwed it to the mdf mount.
Once I knew that the speakers were all good I soldered them up and then linked the front ones up to the crossovers and then to the amp and the rears went straight to the amp. Then I screwed the speakers in place.
I then got a whole saw and went about drilling into the doors to make way for the tweeter. BE AWARE when using a hole saw on door make sure you measure 10 times before you get the drill. And when drilling drill from the inside out so that went you make it through the plastic you don’t leave halos around your tweeter you will notice I didn’t
I then wired the tweeter into the crossover and put the door trim and plastic dust sheet back.
Then I finished up putting the head unit in place and plugged in the leads running to the respective amps.
AND..... it worked
But it wasn’t over yet I was yet to make the sub enclosure
Subs are interesting and when taking the enclosure into account it can get a little bit technical.
For a sub to work well the box bust be of a certain size in my case with a 12" sub my box has to be between 45 and 70L mine is closer to 45. And also the port must have a certain surface are depending on the volume of the box NOT the size of the sub. My box has a volume of I guessed 50-55L so my port has 16 square inches of face. Yes I no it gets a little bit hard to understand. And being in an xtracab it was hard to come up with something that sounds good but here is what I came up with.
I started out with some 16mm thick mdf and went about cutting out the pieces I wanted for the box I had designed I then fiber glassed the inside of the box. Once the glass was dry I put it in the car to how it fits.
I then made a front for it and cut the hole for the sub. For a bit of fun I also hooked up a row of leds inside the port that is at the back of the box that is directed towards the roof of the car. At night it makes the back 6" of the roof a bright blue. (Very cool if I do say so myself)
I then had the box trimmed up by a mate and put the sub in then I put it into the car.
This is the finished result.
I have to say I am proud of my little DIY box and I suppose the entire system it is a nice clean sound and I got to know my car.
If anyone has any questions just ask.
Cheers SAM (davis.16)
Yes this is my ute...... No i won't help you move house.
-
davis.16 - Posts: 402
- Joined: Sun, 21 Sep 2008 4:29 +0000
- Location: Sydney
Re: Sam's new truck
![]() by Hilux Max on Tue, 06 Jan 2009 9:24 +0000
by Hilux Max on Tue, 06 Jan 2009 9:24 +0000
congratulations sam on your truck.
but, strewth......
 5 grand for a stereo??????
That would gimme new diff gears and lockers! Id rather hear the gears whining as they're working hard!
Each to their own...please dont tell me your gonna be playing Doof Doof! Then again I guess the sub in the back isnt for Brooks and Dunn huh?
Whats next on the to do list?
24 inch rims?

but, strewth......
That would gimme new diff gears and lockers! Id rather hear the gears whining as they're working hard!
Each to their own...please dont tell me your gonna be playing Doof Doof! Then again I guess the sub in the back isnt for Brooks and Dunn huh?
Whats next on the to do list?
24 inch rims?
The Punisher 2.0 N80 Build - http://www.newhilux.net/phpbb/viewtopic.php?f=119&t=26631
The Punisher 1.0 N70 Build - http://www.newhilux.net/phpbb/viewtopic.php?f=41&t=747&hilit=Punisher
The Punisher 1.0 N70 Build - http://www.newhilux.net/phpbb/viewtopic.php?f=41&t=747&hilit=Punisher
-

Hilux Max - Valued Contributor
- Posts: 12434
- Joined: Sun, 07 Jan 2007 12:00 +0000
Re: Sam's new truck
![]() by rodw on Wed, 07 Jan 2009 3:49 +0000
by rodw on Wed, 07 Jan 2009 3:49 +0000
Very impressive Sam. Wish I could have justified buying some Focal speakers, but I am happy with the JL splits in the front. I do remember holding my breath when I drilled hole for the splits in the front door trims. It must sound awesome. I've got a similar alpine head unit in my car at the moment. were you able to mount the Alpine trim around the head unit once you got the dash panel back on? I ended up leaving the trimm off. Can you post a pic of the head unit when it is all back together?
Where do you get the Dynamat from?
Don't worry about Mmaaxx, he's got diesel in his veins and a welding torch in his hand these days, but he sure as hell loves his truck! He'll never understand the simple pleasure of listening to Mozart's 5th while driving down the highway in a Hilux. Given the setup you have, you must like classical music don't ya Sam?
-
rodw - Posts: 3195
- Joined: Tue, 19 Feb 2008 2:00 +0000
- Location: Brisbane, QLD
Re: Sam's new truck
![]() by davis.16 on Wed, 07 Jan 2009 5:50 +0000
by davis.16 on Wed, 07 Jan 2009 5:50 +0000
Thanks guys,
Now max as i sain in the sterio post its worth 5 grand i didnt pay that i payed less than half that... it helps when you know someone in that feild.
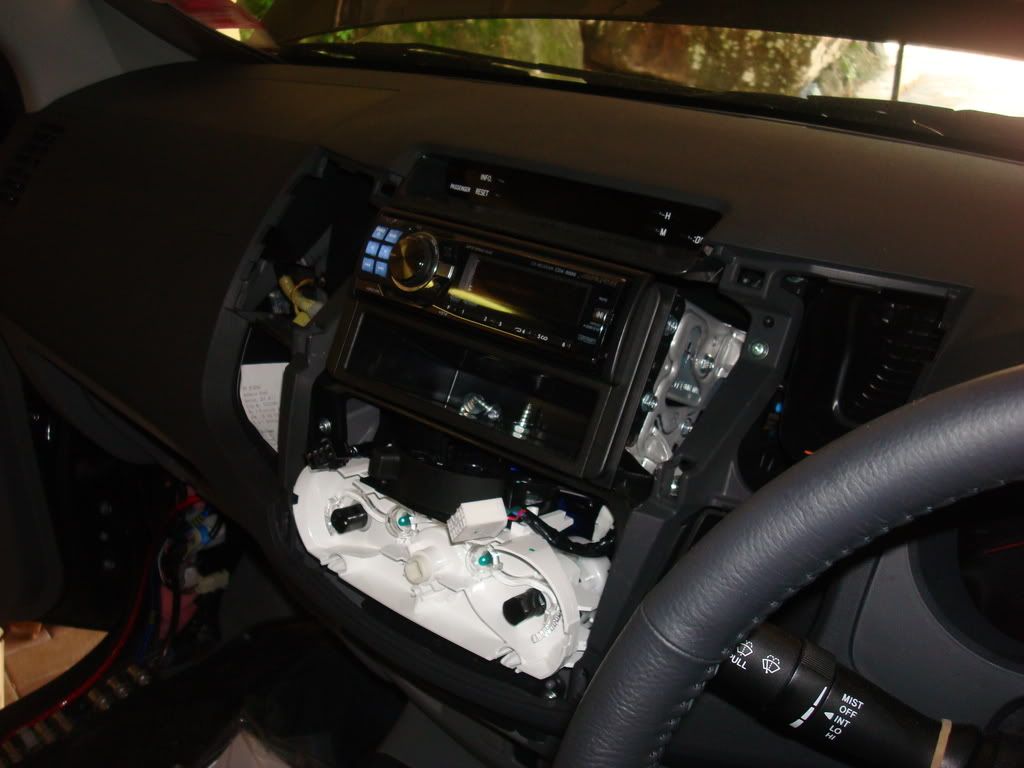
and rodw because the stock toyota sterio is a double din in hight and then a little bit wider than a normal head unit i bought a toyota kit that has a surround to go around the head unit and it also had a din sized pocket to finish off the dash. however i have plans of taking out the pocket and putting a 2way i have sitting on my desk. just a matter of getting around to it.... anyway i will put up a pic of it once i take the photo of the finished product.
cheers SAM
Now max as i sain in the sterio post its worth 5 grand i didnt pay that i payed less than half that... it helps when you know someone in that feild.
and rodw because the stock toyota sterio is a double din in hight and then a little bit wider than a normal head unit i bought a toyota kit that has a surround to go around the head unit and it also had a din sized pocket to finish off the dash. however i have plans of taking out the pocket and putting a 2way i have sitting on my desk. just a matter of getting around to it.... anyway i will put up a pic of it once i take the photo of the finished product.
cheers SAM
Yes this is my ute...... No i won't help you move house.
-
davis.16 - Posts: 402
- Joined: Sun, 21 Sep 2008 4:29 +0000
- Location: Sydney
Re: Sam's new truck
![]() by dute on Wed, 07 Jan 2009 6:01 +0000
by dute on Wed, 07 Jan 2009 6:01 +0000
Good write up Sam well done . . . . .and the ute looks good to . . . .
-
dute - Moderator
- Posts: 5102
- Joined: Sun, 14 Sep 2008 10:17 +0000
- Location: Melbourne Vic
Re: Sam's new truck
![]() by davis.16 on Wed, 07 Jan 2009 9:00 +0000
by davis.16 on Wed, 07 Jan 2009 9:00 +0000
thanks dute
Yes this is my ute...... No i won't help you move house.
-
davis.16 - Posts: 402
- Joined: Sun, 21 Sep 2008 4:29 +0000
- Location: Sydney
Re: Sam's new truck
![]() by davis.16 on Wed, 07 Jan 2009 5:49 +0000
by davis.16 on Wed, 07 Jan 2009 5:49 +0000
Just to keep this up to date once the stereo was in I went about making miner but important changes to the hilux. First order of business was to remove the large silver Toyota sicker that covered the tail gate. (Easy enough)
Then I put in a navman touch screen GPS unit that is stuck to my windscreen. Now being that I am a lazy teenager I would rather go that little bit further the first time than have to do something twice. So I chose the spot where I wanted to mount the GPS I then removed the cigarette lighter power plug but I saved all the smart little things in it so I wouldn’t blow it up. I then ran the cable behind the dash and then soldered it into the back of the cigarette lighters power source. Now all I have to do is get into the car and turn the key and I have music and direction.
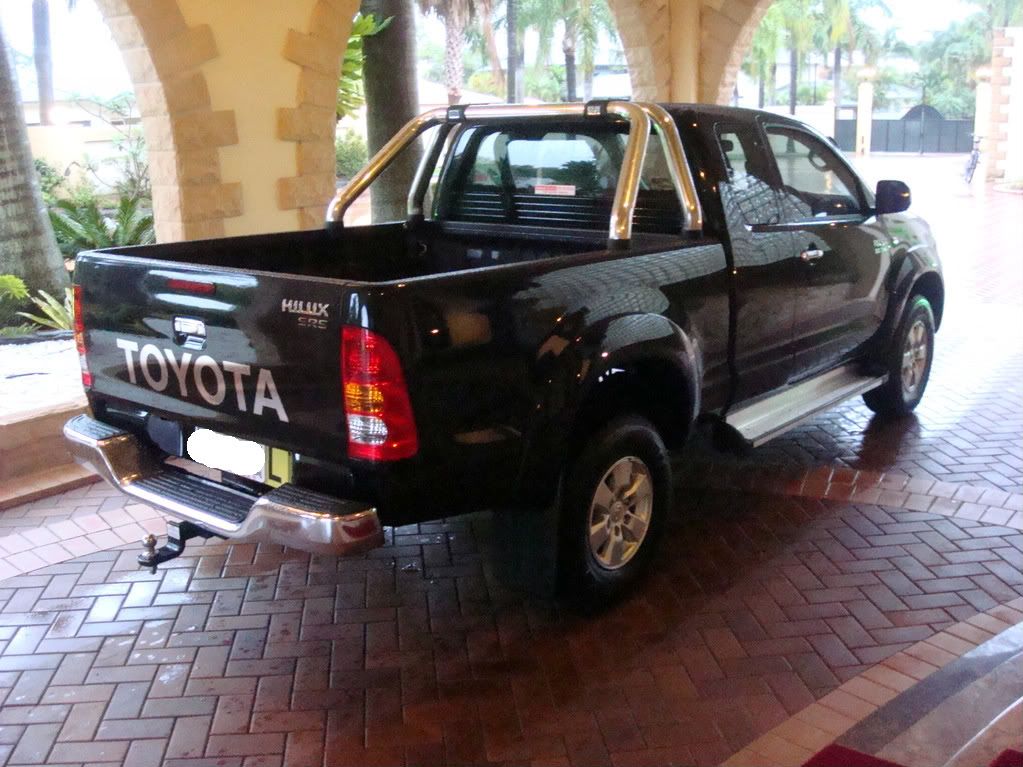
I then removed the little black plastic things that cover the sports bar. (They are one of my pet hates) then I polished the bar with an aluminum polish I got at auto barn.
The little black things I am referring to have big red arrows pointed at them in the pic below (just incase you didn’t notice)
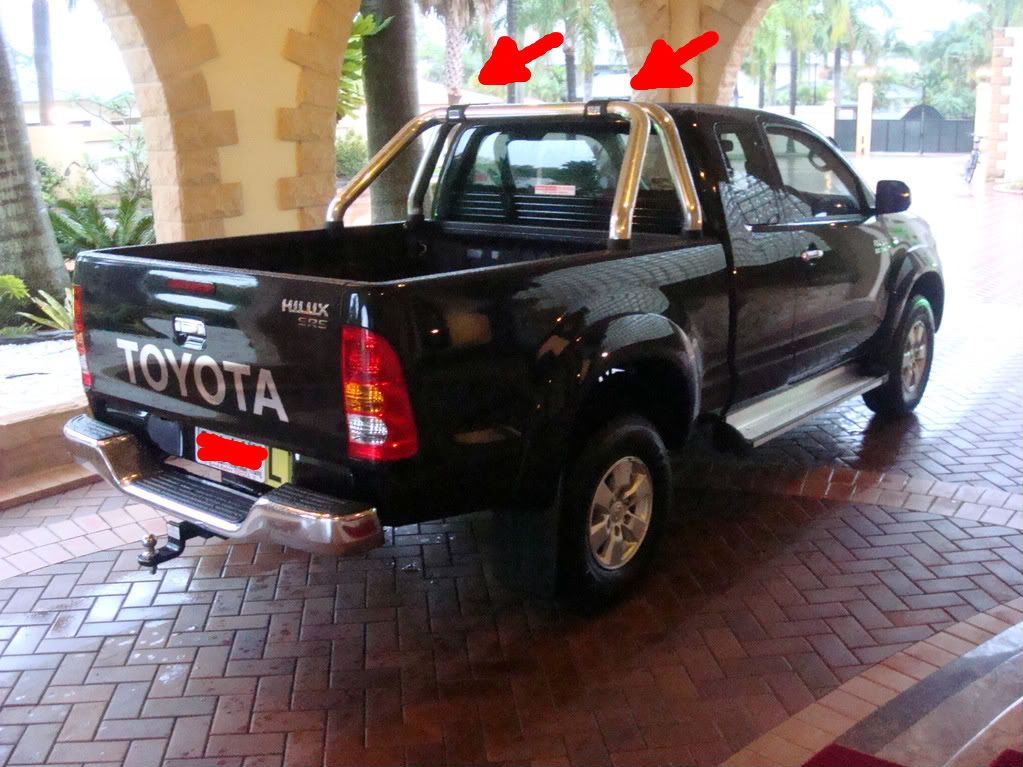
whats next??? SAM
Then I put in a navman touch screen GPS unit that is stuck to my windscreen. Now being that I am a lazy teenager I would rather go that little bit further the first time than have to do something twice. So I chose the spot where I wanted to mount the GPS I then removed the cigarette lighter power plug but I saved all the smart little things in it so I wouldn’t blow it up. I then ran the cable behind the dash and then soldered it into the back of the cigarette lighters power source. Now all I have to do is get into the car and turn the key and I have music and direction.
I then removed the little black plastic things that cover the sports bar. (They are one of my pet hates) then I polished the bar with an aluminum polish I got at auto barn.
The little black things I am referring to have big red arrows pointed at them in the pic below (just incase you didn’t notice)
whats next??? SAM
Yes this is my ute...... No i won't help you move house.
-
davis.16 - Posts: 402
- Joined: Sun, 21 Sep 2008 4:29 +0000
- Location: Sydney
Re: Sam's new truck
![]() by davis.16 on Wed, 07 Jan 2009 5:54 +0000
by davis.16 on Wed, 07 Jan 2009 5:54 +0000
Rodw here is my head unit set up ath the moment but i am not done/happy with it yet and as you can see i havnt got around to putting in the uhf yet but it is ON MY TO DO LIST.
And yes the clasical music sounds GREAT on the focals. and i bought the dynamat at gold coast car sound in a bulk pack.
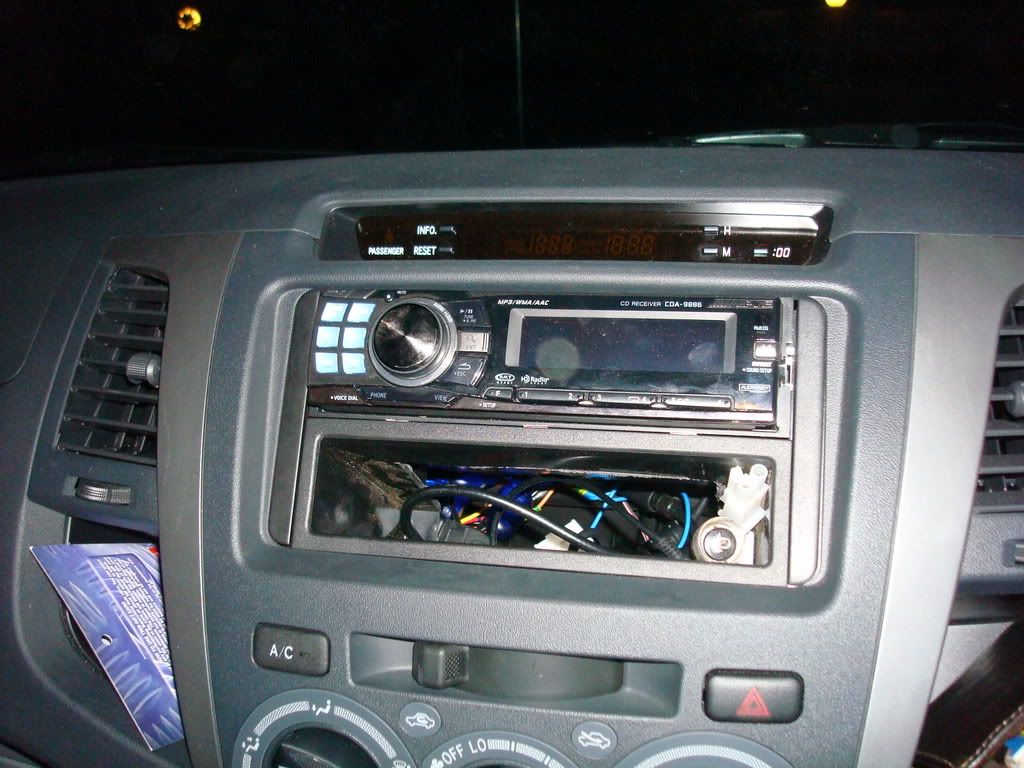
Hope this helps i will post some more pics once it is just how i like it.
Cheers SAM
And yes the clasical music sounds GREAT on the focals. and i bought the dynamat at gold coast car sound in a bulk pack.
Hope this helps i will post some more pics once it is just how i like it.
Cheers SAM
Yes this is my ute...... No i won't help you move house.
-
davis.16 - Posts: 402
- Joined: Sun, 21 Sep 2008 4:29 +0000
- Location: Sydney
Re: Sam's new truck
![]() by rodw on Wed, 07 Jan 2009 8:11 +0000
by rodw on Wed, 07 Jan 2009 8:11 +0000
Thanks mate, just as I thought, there is no room for the head unit surround that is attached to the mounting sleeve we don't use on the Hilux. I see you have not mounted it either and there is not enough room at the top without trimming it right down. I think it is better leaving it the way you have it otherwise, you'll have to try and get the surround off everytime you remove the dash fascia which will be hepas of times by the look of what you have been doing already. good to see a thinker who tidys up the wiring etc. You will have a much more reliable setup becasue of this approach.
-
rodw - Posts: 3195
- Joined: Tue, 19 Feb 2008 2:00 +0000
- Location: Brisbane, QLD
Re: Sam's new truck
![]() by TLux on Thu, 08 Jan 2009 4:39 +0000
by TLux on Thu, 08 Jan 2009 4:39 +0000
Nice work Sam and welcome to the wonderful money-pit we call "Hilux".
"You don't have to be blind to not see what's going on right in front of you if it's behind your back" Pascal, Outrageous Fortune.
-
TLux - Posts: 165
- Joined: Sun, 19 Aug 2007 1:00 +0000
- Location: Oxenford, QLD
Re: Sam's new truck
![]() by biglux on Thu, 08 Jan 2009 5:05 +0000
by biglux on Thu, 08 Jan 2009 5:05 +0000
G'day Sam,
You might want to scrub out the rego numbers on the top photo if don't want people to see them. Good to see a young bloke do a professional job on his rig and take a bit of pride in his work.
You might want to scrub out the rego numbers on the top photo if don't want people to see them. Good to see a young bloke do a professional job on his rig and take a bit of pride in his work.
-
biglux - Posts: 55
- Joined: Fri, 29 Aug 2008 4:54 +0000
- Location: QLD
Re: Sam's new truck
![]() by Shrek on Thu, 08 Jan 2009 5:59 +0000
by Shrek on Thu, 08 Jan 2009 5:59 +0000
Yeah Sam, nice write up. But as biglux said, edit those first couple of photo's. As much as I'd like to think HiLux drivers are all good honest people, some just arent. And there's nothing more inviting than knowing that a nice brand new 'Lux has $5k of audio gear as a bonus incentive to steal it.
But all-in-all this is going to be an interesting thread to keep an eye on. It looks like you are the sort of bloke whom does things properly the first time. I love watching these builds (like rod's rig).
But all-in-all this is going to be an interesting thread to keep an eye on. It looks like you are the sort of bloke whom does things properly the first time. I love watching these builds (like rod's rig).
pǝɹoq ʎɐʍ ǝq ʇsnɯ noʎ 'sıɥʇ ƃuıpɐǝɹ ǝɹ,noʎ ɟı
-
Shrek - Posts: 242
- Joined: Thu, 06 Mar 2008 2:00 +0000
- Location: , QLD
Re: Sam's new truck
![]() by davis.16 on Thu, 08 Jan 2009 7:26 +0000
by davis.16 on Thu, 08 Jan 2009 7:26 +0000
Thanks guys i was thinking of doing that you just never know who might be taking note of regos....
Anyway cheers SAM!!!:):):)
Anyway cheers SAM!!!:):):)
Yes this is my ute...... No i won't help you move house.
-
davis.16 - Posts: 402
- Joined: Sun, 21 Sep 2008 4:29 +0000
- Location: Sydney
Re: Sam's new truck
![]() by rodw on Thu, 08 Jan 2009 7:26 +0000
by rodw on Thu, 08 Jan 2009 7:26 +0000
Yes great work Sam, the other good reason to hide number plates is that I have heard of some guys getting targeted and defected as they have been identified on a forum for fitting illegal modifications....
-
rodw - Posts: 3195
- Joined: Tue, 19 Feb 2008 2:00 +0000
- Location: Brisbane, QLD
39 posts
• Page 1 of 2 • 1, 2
Who is online
Users browsing this forum: No registered users and 115 guests
![]()