Rod's Rig - Round 2

Want to show off what you've done to your rig? or have a custom project to show? Post it up here!

Re: Rod's new Rig

Postby rodw on Mon, 13 Apr 2009 6:57 +0000

mmaaxx wrote:Geez,

You just keep on surprising me with the electronic gadget you keep managing to fit in the hilux.

I gotta admit, you hilux looks good dirty.....just need 33's and sliders to really make her stand out.

did anyone get any video footage of your truck?

and yes, the hilux rear does have good flex. :D


Hate to admit it but that pic was before we started and being on crutches I had not been able to wash it for 7 weeks but it did get dirty enough for me to run it through the car wash before I got home for the missus to see, Think the last time I washed it was before we went to a wedding south of Wooloongong in February. :lol: :lol:

And yes I chastised one of the Triton guys for wasting video footage on a Hilux. Not sure who it was, Mark, I think his name was. It was not very testing.

One of the Tritons had a set of Ironman side rails mounted on the chassis rails that you can get for $600. I really got to do something about them, It's about the only hardware thing left to do.
User avatar
rodw
 
Posts: 3195
Joined: Tue, 19 Feb 2008 2:00 +0000
Location: Brisbane, QLD


Re: Rod's new Rig

Postby Steve9R on Fri, 17 Apr 2009 9:46 +0000

Rod .. Ive found someone who is even 'more' obsessive compulsive than you ! ;)

http://www.bwired.nl/

now just imagine how you could implement some of those sensors into your system !!!
User avatar
Steve9R
Valued Contributor
 
Posts: 5248
Joined: Wed, 11 Apr 2007 1:00 +0000
Location: Melbourne, VIC

Re: Rod's new Rig

Postby Quinny34 on Fri, 17 Apr 2009 10:43 +0000

LMAO... we have a guy at work with most of this shit... not as pollished of for the public but all run from his handheld or web server... Although its funky... I just couldnt be stuffed with it.. even as an IT person its just to much... I guess Im getting old... I can handle using the old fashion methods... like using a remote, having a normal cordless phone, using my laptop wirelessly instead of my phone to browse the web... :D
FCCW
Application for G##C membership REVOKED
quinny23@newhilux.net
User avatar
Quinny34
Platinum Subscriber
 
Posts: 5169
Joined: Sun, 19 Aug 2007 1:00 +0000
Location: Lavington, NSW

Re: Rod's new Rig

Postby rodw on Fri, 17 Apr 2009 7:28 +0000

Steve9R wrote:Rod .. Ive found someone who is even 'more' obsessive compulsive than you ! ;)

My bad, I immediatey thought of Mmaaxx! He's obsessed with all things Hilux. :roll: I will never be going that far. Looks like I better grab my camera and take a pic of my latest mod. Nothing to do with PC's :D
User avatar
rodw
 
Posts: 3195
Joined: Tue, 19 Feb 2008 2:00 +0000
Location: Brisbane, QLD

Re: Rod's new Rig

Postby Hilux Max on Fri, 17 Apr 2009 7:32 +0000

rodw wrote:My bad, I immediatey thought of Mmaaxx! He's obsessed with all things Hilux. :roll:


And ?????

something wrong with that? :P

rodw wrote: Looks like I better grab my camera and take a pic of my latest mod. Nothing to do with PC's :D


Im hoping your gonna say you fitted 33/10.5x15's on your rig, but my educated guess is the water tank...... ;)

can you fill it with beer? :lol:
User avatar
Hilux Max
Valued Contributor
 
Posts: 12434
Joined: Sun, 07 Jan 2007 12:00 +0000

Re: Rod's new Rig

Postby rodw on Fri, 17 Apr 2009 8:05 +0000

Here you go guys, sorry I keep taking photos of my rig in the dark. After a work meeting down the Gold Coast and lunch at Fisherman's Wharf overlooking the marina :D :D , I excused myself early and made a detour on the way home to Scotty's place. Got there about 5:00 and left at 8:00, but the Water tank is in!

Image

You can see I made it full width and becasue Scotty is a bit of a pro on water and fuel tanks for cars, he made the sides and top a very tight fit against the canopy but left a bit of room down the bottom to make sure we could get pipework out of the tub.

Here is the filler and breather:

Image

Scotty used a poly pipe end cap for the filler cap and fitted a breather hose that can hang out over the tub. He said he does this so that when filling, you often get a glug that can spill up to a litre out of the breather and doing it this wayit does not end up in the tray and wet all your gear. He said if I wanted to I could coil the pipe up and it would act as an air lock so it would not leak if I forgot to keep the shiny side up :lol: Any I've done the shiny side down thing in my last fourby and found it hurt a fair bit, so I don't want to do that again, so will probably work out a way to clip it up somehow.

The tank is 280mm wide and I bought 1.2 m of 300mm wide x 4.5mm thick rubber sheet from Clark Rubber and we contact cemented that to the base of the tank so it does not rub on the tray. Scotty initially drilled holes and screwed the tank into place so everything fitted. The tank was a little bit warped because he said he welded it hotter than he normally would so there was no chance a weld would split out in the desert, but it screwed down fine. we then removed the tank again and he drilled them out with a bigger drill and fitted nutsert threads wth a tool a bit like a pop riveter. He driled a 25mm hole in the corner of the tub floor for the outlet. After vacuuming all the swarf up and wiping the tub down with thinners, we bolted it in with 8 x 5mm bolts. 4 along the bottom:
Image

and 4 along the top:
Image

Sorry, I did not take a pic of the outlet, but it comes straight out like the breather and we used a short piece of drinking waterhose and a couple of hose clamps. This then feeds into a stainless elbow which goes straight down throught the tub underneath:
Image

So basically, to remove the tank, all I will have to do is to undo one hose clamp and 8 bolts. So apparently I have to clean it off with thinners and polish it with Mr Sheen to stop fingerprints from showing.
User avatar
rodw
 
Posts: 3195
Joined: Tue, 19 Feb 2008 2:00 +0000
Location: Brisbane, QLD

Re: Rod's new Rig

Postby rodw on Fri, 17 Apr 2009 8:12 +0000

mmaaxx wrote:
rodw wrote:
Im hoping your gonna say you fitted 33/10.5x15's on your rig, but my educated guess is the water tank...... ;)

can you fill it with beer? :lol:


Sorry mate, I am an old crippled bugger these days and personal comfort and a hot shower is a top priority, so I did th ewater tank first.

And no I am more cvilised than that, I keep my beer in the fridge in the back!
User avatar
rodw
 
Posts: 3195
Joined: Tue, 19 Feb 2008 2:00 +0000
Location: Brisbane, QLD

Re: Rod's new Rig

Postby Skog07 on Fri, 17 Apr 2009 9:19 +0000

Can I have a guess at the capacity???
130l
Using the dimensions available and a bit of nouse on tray dimensions.
Closest guess wins...lol
Cheers
Skog
User avatar
Skog07
Moderator
 
Posts: 4940
Joined: Tue, 08 Jan 2008 2:00 +0000
Location: Baulkham Hills, NSW

Re: Rod's new Rig

Postby rodw on Sat, 18 Apr 2009 6:06 +0000

Skog07 wrote:Can I have a guess at the capacity???
130l
Using the dimensions available and a bit of nouse on tray dimensions.
Closest guess wins...lol
Cheers
Skog


Well I measured it up this morning but it looks like i'm not allowed to tell for a while. :?: :?: :?: :?:
User avatar
rodw
 
Posts: 3195
Joined: Tue, 19 Feb 2008 2:00 +0000
Location: Brisbane, QLD

Re: Rod's new Rig

Postby Brookster on Sat, 18 Apr 2009 7:03 +0000

Rod,
It's a neat looking job; well thought out and executed; although I don't see any electronic/electrical gizmos incorporated into its function (eg LCD screen internet connected like on the samsung fridges a while back). 8-) 8-) 8-) .
I reckon the tank has about 120 litre capacity.

Brookster
IF A MAN TALKS IN THE FOREST AND THERE IS NO WOMAN TO HEAR HIM, IS HE STILL WRONG?
Brookster
 
Posts: 327
Joined: Sun, 13 Jul 2008 1:00 +0000
Location: Mornington Peninsula, VIC

Re: Rod's new Rig

Postby rodw on Sun, 19 Apr 2009 8:13 +0000

Mark, looks like nobody else wants to play your game and I even updated my profile to put a clue on the forum for them. Correct answer is 107 litres. Just about got the plumbing done and will put up a few more pics. I just got to finish off the ultrasonic/infrared temperature/water level/pH sensors interfaced to the bluetooth sender unit. :lol: :lol: :lol:

Bugger! if it wasn't for Brookster's smart arsed comments,I wouldn't have had to bother :evil: :evil: :evil:

Just kidding mate, not going there, but you know me, couldn't help myself when it came to the plumbing, so stay tuned...
User avatar
rodw
 
Posts: 3195
Joined: Tue, 19 Feb 2008 2:00 +0000
Location: Brisbane, QLD

Re: Rod's new Rig

Postby Quinny34 on Sun, 19 Apr 2009 8:25 +0000

LMAO..... I would have believed... :)
FCCW
Application for G##C membership REVOKED
quinny23@newhilux.net
User avatar
Quinny34
Platinum Subscriber
 
Posts: 5169
Joined: Sun, 19 Aug 2007 1:00 +0000
Location: Lavington, NSW

Re: Rod's new Rig

Postby rodw on Sun, 19 Apr 2009 3:26 +0000

Well, I got most of the plumbing done today. I wanted to be able to select between using an external water source and the water tank. To do this, you can get a two way valve (often called an L port valve). Just sticking in an L port valve is not enough as you could contaminate your drinking water so you need to use some check valves. They only let water flow one way so there is no chance of any cross contamination when you switch the valve over. So here is a smaller version of what the council wanted when they connnected town water to a house I owned once which was just on rain water:

Image

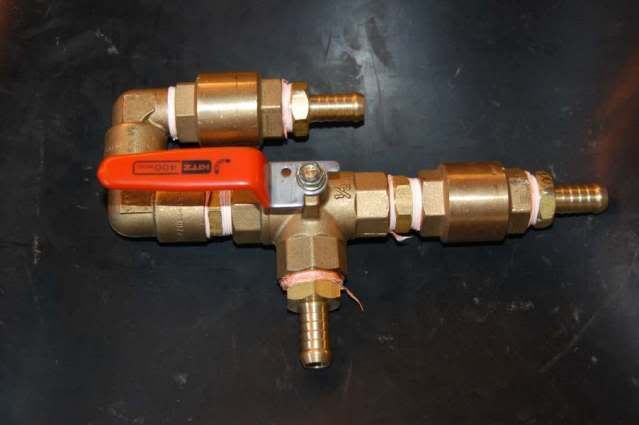
Believe it or not, you are looking at about $90 worth of fittings. The shiny round fittings are the check valves.

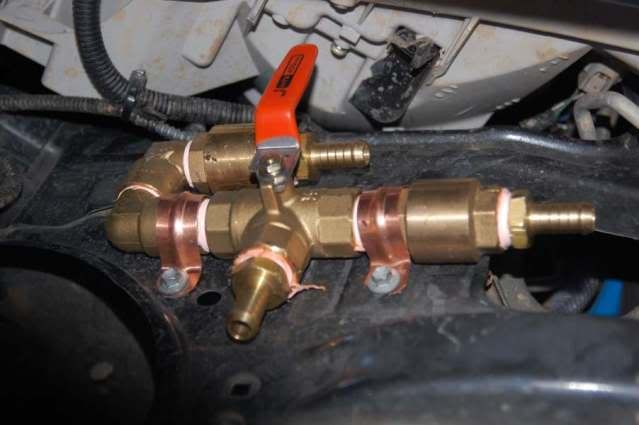
The two tails pointing to the right are the inlets. One for the tank and one for the existing shower inlet I already had. The other goes to the tank. The tail pointing to the bottom ofthe pic is the outlet that goes to my pressure pump. So where to fit it? There looked like to be a good place just under the right hand side headight that would be easy for me to reach the valve. I used a couple of copper saddles to hold the fittings on. I have found the box of self-drilling galvanised roofing screws I had left over from building my shed to be great for mounting this sort of stuff.

Image

It really would have been better if I had bought another brass elbow for the bottom tail so it also pointed to the right as well. No matter, I just used a low density poly irrigation elbow:

Image

Some people reckon plastic fittings are the way to go on a verhicle as they are nice and light and thus stand up to vibrations well.

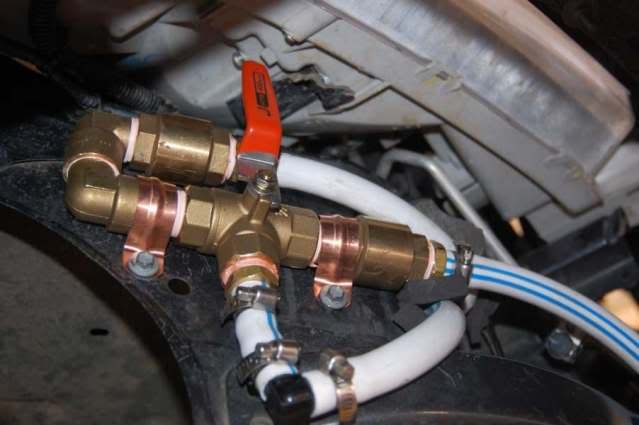
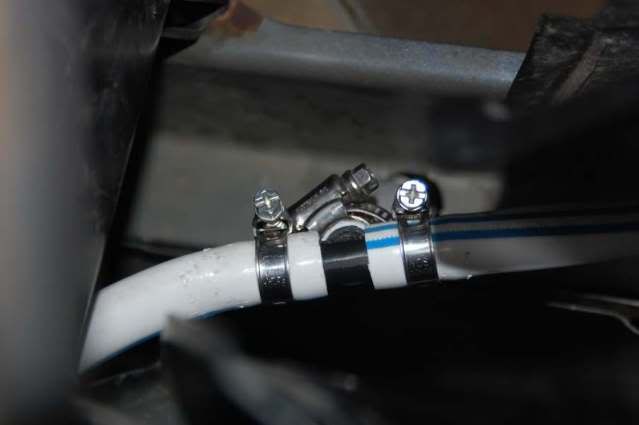
The white hose is certified drinking water hose so there should be no taints in the water.

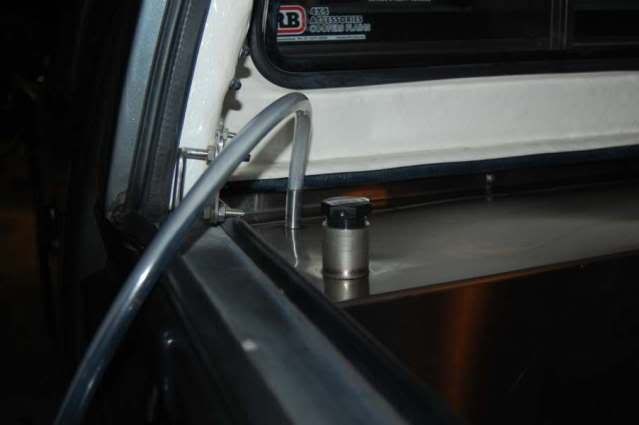
You need to explore this thread a bit to find pics of the Shurflo pressure pump fitted in the engine bay.The hose from the water tank runs along the outside of the chassis rail to keep it away from the heat of the exhaust.

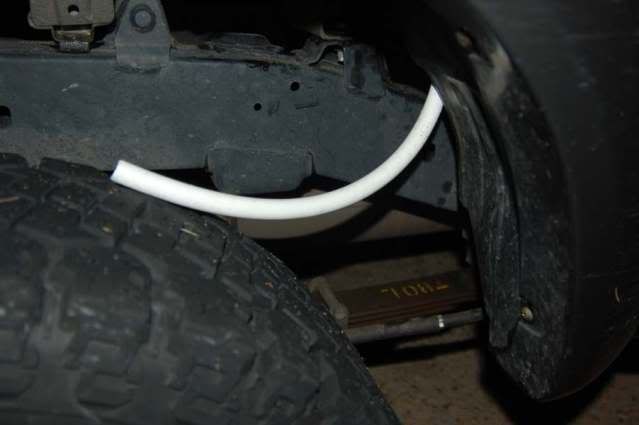
This shows where the pipe comes down in front of the rear wheel.

Image

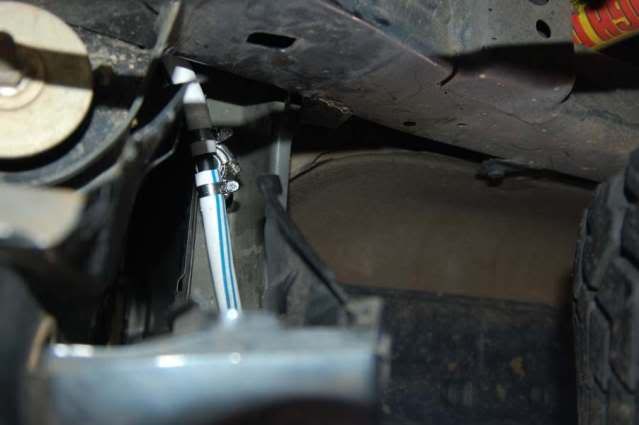
I decided to put a T piece in here and run a pipe back to a tap at the rear of the car so I could gravitate water out of the tank if the pump stuffs up or the battery is flat.

Image

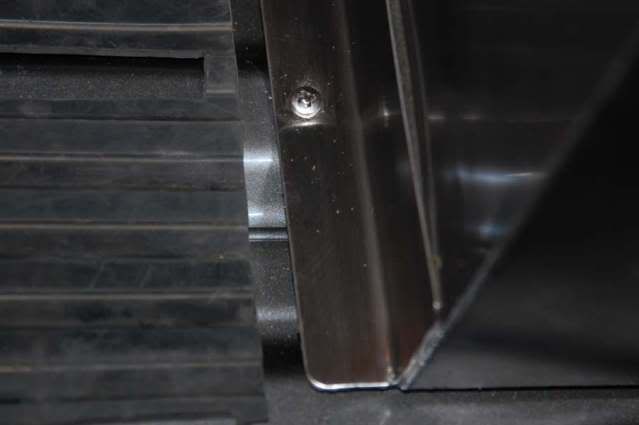
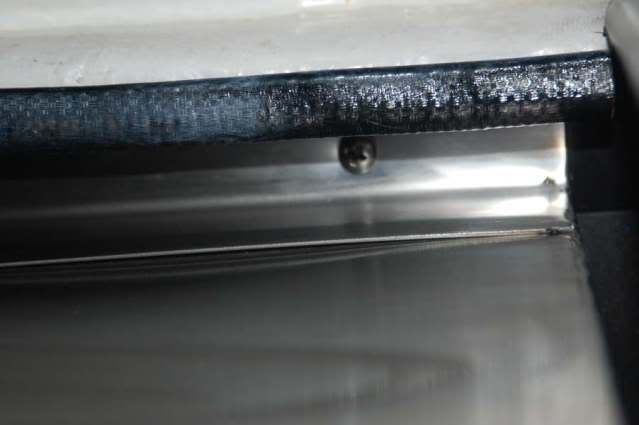
It is easy to get pipes back behind the rear wheel as you can push them over the top of the plastic inner guard.

So this is where I decided to mount the tap.

Image

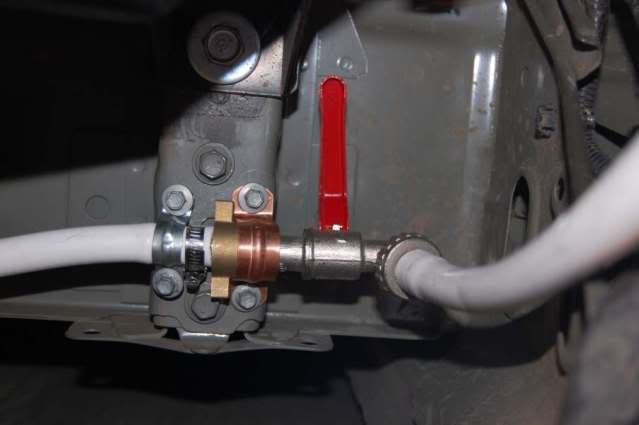
The tap handle is tucked right in behind a cross member so it should not get knocked open.

Just for now, I just added a short piece of hose to the tap for testing:

Image

Anyway normally I would remove this hose to keep it clean and only fit it if ever it is required.

I still have to Tee into the outlet side and run a line back to the tub for cooking but I have not quite sorted out how I want to do and it may need to wait until I put in my drawer unit.

I filled the tank and ran it all out through the shower to test for leaks and give it a good flush. Took 21 minutes to empty the tank, so that should be a pretty good shower :) :)
User avatar
rodw
 
Posts: 3195
Joined: Tue, 19 Feb 2008 2:00 +0000
Location: Brisbane, QLD

Re: Rod's new Rig

Postby Quinny34 on Sun, 19 Apr 2009 5:35 +0000

As always... Nice work Rod... A much better solution than mine... A few stubbies and into the river :shock:
FCCW
Application for G##C membership REVOKED
quinny23@newhilux.net
User avatar
Quinny34
Platinum Subscriber
 
Posts: 5169
Joined: Sun, 19 Aug 2007 1:00 +0000
Location: Lavington, NSW

Re: Rod's new Rig

Postby Skog07 on Sun, 19 Apr 2009 8:59 +0000

Just be a bit careful Rod.
You may have a "metal fire" happening there on that last pic.
Copper and Gal a firery relationship at best screwed into a steel body with an active earth. Not to mention a bit of Nickel in the stainelss :?
Is your shureflow pump "completely" isolated negative and positive between the body and the battery when not in use?
The only reason I ask is you dont want to set up an anodic and cathiodic effect.
Cheers
Skog
User avatar
Skog07
Moderator
 
Posts: 4940
Joined: Tue, 08 Jan 2008 2:00 +0000
Location: Baulkham Hills, NSW

Re: Rod's new Rig

Postby rodw on Mon, 20 Apr 2009 4:47 +0000

Please expand on the risks and the wiring here Mark. Are you refering to the use of copper saddles and the Gal screws :?: :?:

Pretty sure the pump is isolated as there is a relay on the positive side. I was going to rethink the wiring as currently the switch is out on the bull bar where I put it to be able to get to it when using the shower. Now I think I could find a better spot for the switch. Should the earth also be switched with another relay?
User avatar
rodw
 
Posts: 3195
Joined: Tue, 19 Feb 2008 2:00 +0000
Location: Brisbane, QLD

Re: Rod's new Rig

Postby rick13 on Mon, 20 Apr 2009 6:06 +0000

Very neat Rod.... Great looking tank..
I will be trying to do something very similar, just with the tank under the tray.
I am sure I will be looking back at your pics when I do mine.
rick13
 
Posts: 32
Joined: Thu, 07 Aug 2008 1:00 +0000
Location: Thorneside, QLD

Re: Rod's new Rig

Postby Hilux Max on Mon, 20 Apr 2009 7:00 +0000

post moved to water tank thread.
Last edited by Hilux Max on Mon, 20 Apr 2009 7:40 +0000, edited 1 time in total.
User avatar
Hilux Max
Valued Contributor
 
Posts: 12434
Joined: Sun, 07 Jan 2007 12:00 +0000

Re: Rod's new Rig

Postby Quinny34 on Mon, 20 Apr 2009 7:21 +0000

Probably best to Crack open another thread on Water Tanks as they seem to be a mod of choice for many... Will make it easier to search and point out to new members...
FCCW
Application for G##C membership REVOKED
quinny23@newhilux.net
User avatar
Quinny34
Platinum Subscriber
 
Posts: 5169
Joined: Sun, 19 Aug 2007 1:00 +0000
Location: Lavington, NSW

Re: Rod's new Rig

Postby Skog07 on Mon, 20 Apr 2009 8:18 +0000

Maybe a little exageration on my part there Rod with a "metal fire"
Sometimes Gal screws and copper can set up a premature rusting effect into the object that it is screwed into. You may find after a long period of time that the actual material that the gal screw threads into actually rusts away. If you were to use the Gal screws I would remove them one by one and coat them in grease and screw each on back in. This would seal the metal and insulate it against this effect. The grease will also prevent oxidiation "rust" due to the paint protection of the body being removed where it it screwed in.
Self drilling screws do leave traces of swarf around as well an this can promote rust as well. Best to try and remove it all with a magnet and a vacuum cleaner if possible.
Cheers
Skog
User avatar
Skog07
Moderator
 
Posts: 4940
Joined: Tue, 08 Jan 2008 2:00 +0000
Location: Baulkham Hills, NSW

PreviousNext

Return to Member Build Ups

Who is online

Users browsing this forum: No registered users and 72 guests