ARB Compressor Install Under Dual Cab Rear Seat

ARB Compressor Install Under Dual Cab Rear Seat

Postby bill_i_am on Sat, 18 Sep 2010 6:18 +0000

To ease the pain for others installing an ARB compressor in one of the cavities under the rear seats I thought I'd put together a bit of a simple guide. For those that have installed the CKMA12, you will know just how painful it can be to mount due to the positioning of the mounting bolts. This pain is increased exponentially if you are completing the install without the use of the backing plate (due to access restrictions).
Before we even get started, I highly recommend to anyone doing any sort of modifications to their vehicle to purchase a nutsert tool. These tools really can be a lifesaver when trying to mount something with limited accessibility. Anyone that has read RodW's buildup will know that he is a big supporting of nutserts.
Ok here we go, first and foremost, spend the time to get the positioning of your compressor right. Once that is done take your backing plate and mark where the four holes for your mounting bolts will go.

Image
note: holes already drilled in the pic, i forgot to take pics from the start.

Once the holes are marked, take to them with a centre punch to provide a good starting point for your drill. Please be a little careful when drilling these holes as the fuel tank is positioned directly below if you are installing the compressor on the passengers side. I can't say exactly how close it is, but just be a little cautious and you'll avoid any catastrophes.
The bolts supplied with the compressor are an M6 and will require you to drill a 10mm hole to fit the correct sized nutsert in. I recommended starting off with a pilot hole and working your way up to 10mm. Be sure to hit your holes with a primer or something of the sort to prevent any rust.
Once the holes are drilled and the primer dry, it's nutsert time.

Image

Nutserts installed, then came the grief. Myself and another member on this forum (Sprocket00) spent approximately 45minutes trying to get even one of the mounting bolts in. After about an hour we had one bolt in after approximately 445 quarter turns of the bolt. There also appeared to be next to no chance of us getting any of the other bolts in and i was about ready to throw the compressor through the shed window.
That's when the brain (finally) kicked into gear and I realised that I could simply remove the base plate from the
compressor itself.This left me with all the access in the world and the plate was soon mounted. The breakthrough screw (i believe it was a size 6 hex head)
Image

Plate mounted
Image

Next up, the compressor. Starting with the bottom two hex screws
Image

and finally the top two screws, all done. Just the airlines and wiring to go.

Image

A very simple install in hindsight, but a whole lot of swearing and b1tching for the uninitiated. Hopefully this little guide will simplify things for others and keep a couple of bucks in your pocket.
I might be slow, but I'm rough.......
User avatar
bill_i_am
 
Posts: 546
Joined: Thu, 10 Jun 2010 9:52 +0000
Location: Kingaroy


Re: ARB Compressor Install Under Dual Cab Rear Seat

Postby 9W6VX on Sat, 18 Sep 2010 10:01 +0000

Thanks for the write up.

8-) 8-)
Cheers

Brendon
73 de 9W6VX
User avatar
9W6VX
Site Admin
 
Posts: 6733
Joined: Sun, 07 Jan 2007 12:00 +0000
Location: KK - The Land Below The Wind, Not in OZ

Re: ARB Compressor Install Under Dual Cab Rear Seat

Postby kevinbauer on Sun, 19 Sep 2010 9:23 +0000

I have mine here also, however it has over heated and blown a fuse. I have cleaned the filter and thought about taking off the carpet cover to allow ventilation or putting in a small fan, like a PC style or moving it to under the front passenger seat. Have you had similar experience.

Regards,

Kev
User avatar
kevinbauer
 
Posts: 12
Joined: Tue, 09 Sep 2008 2:03 +0000
Location: Sydney

Re: ARB Compressor Install Under Dual Cab Rear Seat

Postby Downunderlux on Sun, 19 Sep 2010 4:23 +0000

Nice write up, pitty you did not write it up before i installed mine. !!! :lol:

I drilled the bolts and using two people, me with my hand stretched over the fuel tank to get the lock nuts on the other side of the bolts.

Hmm, i might look into that tool.
Downunderlux
 
Posts: 50
Joined: Tue, 25 Aug 2009 2:18 +0000

Re: ARB Compressor Install Under Dual Cab Rear Seat

Postby bill_i_am on Sun, 19 Sep 2010 6:41 +0000

kevinbauer wrote:I have mine here also, however it has over heated and blown a fuse. I have cleaned the filter and thought about taking off the carpet cover to allow ventilation or putting in a small fan, like a PC style or moving it to under the front passenger seat. Have you had similar experience.

Regards,

Kev


There are plenty of people on the forum that have it installed in this position Kev (try Alby, I found him pretty helpful), ARB also install it here. I personally can't comment as I haven't even wired it up yet. What lead you to the conclusion that the compressor overheated? Is your pressure switch working?
I might be slow, but I'm rough.......
User avatar
bill_i_am
 
Posts: 546
Joined: Thu, 10 Jun 2010 9:52 +0000
Location: Kingaroy

Re: ARB Compressor Install Under Dual Cab Rear Seat

Postby bill_i_am on Sun, 19 Sep 2010 6:42 +0000

Downunderlux wrote:Nice write up, pitty you did not write it up before i installed mine. !!! :lol:

I drilled the bolts and using two people, me with my hand stretched over the fuel tank to get the lock nuts on the other side of the bolts.

Hmm, i might look into that tool.


I got mine from ebay - http://cgi.ebay.com.au/112-PC-NUTSERT-RIVNUT-RIVET-TOOL-COMPLETE-KIT-METRIC-/170542345859?pt=AU_Hand_Tools&hash=item27b51dae83#ht_2725wt_911
I might be slow, but I'm rough.......
User avatar
bill_i_am
 
Posts: 546
Joined: Thu, 10 Jun 2010 9:52 +0000
Location: Kingaroy

Re: ARB Compressor Install Under Dual Cab Rear Seat

Postby 2007Lux on Wed, 20 Jun 2012 10:39 +0000

I'm currently in the middle of installing my CKMA12 under the rear left side passenger seat and found this usefull write up on the pradopoint website.

http://www.pradopoint.com/showthread.ph ... sor-CKMA12

I'm taking a few pics myself which i hope to add in the coming weeks.

I have one question though regarding the illumination of the switch which I am hoping to do tonight.
"Is the switch really bright when installed as per instructions?"

Be warned this is a rather fidley install, ie: you have to pull the interior half apart to get the wires through.
"of all the things I've lost I miss my mind the most"
User avatar
2007Lux
 
Posts: 381
Joined: Sat, 13 Nov 2010 10:56 +0000
Location: Eastern Goldfields, WA

ARB Compressor Install Under Dual Cab Rear Seat

Postby Glenn k on Wed, 20 Jun 2012 11:43 +0000

I don't find it annoying


due to recent financial difficulties, the light at the end of the tunnel has been shut off until further notice !
User avatar
Glenn k
 
Posts: 2006
Joined: Wed, 21 Mar 2007 1:00 +0000
Location: southern sydney, NSW

Re: ARB Compressor Install Under Dual Cab Rear Seat

Postby 2007Lux on Wed, 20 Jun 2012 12:15 +0000

taa.

I skimmed through the pradopoint thread and one guy was complaining about the light being bright at night. I didn't have time to read the 18 page thread in detail to find out if he had his "wires crossed" so to speak. Tonight my wires get linked up so I'll soon know :D
"of all the things I've lost I miss my mind the most"
User avatar
2007Lux
 
Posts: 381
Joined: Sat, 13 Nov 2010 10:56 +0000
Location: Eastern Goldfields, WA

Re: ARB Compressor Install Under Dual Cab Rear Seat

Postby lmichie on Wed, 20 Jun 2012 1:50 +0000

How do you run the air line from there?

I'd love to move mine there from under the front seat as those rear pockets are a bugger to get to with two kids seats mounted. If I could put something that I don't need to get to it would be great use of space.
Stop laughing and give me a hand with the winch!
User avatar
lmichie
 
Posts: 457
Joined: Sun, 15 Nov 2009 7:52 +0000
Location: Baulkham Hills, NSW

Re: ARB Compressor Install Under Dual Cab Rear Seat

Postby 2007Lux on Wed, 20 Jun 2012 2:45 +0000

I have the same issue with a child seat. Without pictures it's a bit hard to show but I'll try:

Mount the compressor using the instructionss above. Be careful to really think about where in the compartment you put it as too close to the out side will result in hard to get to allen key hex bolts, too far towrds the centre and the nutsert holes you drill will hit a double skin in the floor pan, too high and you will not be able to close the lid.

As for the airline I am only setting mine up for pumping my tyres and not diff lock solenoids. For this I used the 1/4" NPT port where the pressure switch goes. To get the air to the outside I first used a male-male threaded 1/4 NPT 90 degree elbow screwed to a female-female 1/4" NPT T piece (to put the pressure switch on), which I then screwed another male-barbed 1/4" NPT 90 elbow to. However this last elbow had a barbed end suitable for a 10mm (ID) airline. I then used a piece of 10mm airline threaded through a gap in the front of the compartment, under the floor vinyl and then made a small cut in the vinyl near the door to exit the hose. I then put a nitto female coupling on it to which I am attaching the orange ARB hose to which I have changed the end male fitting to nitto. I only used 10mm airline as I had a piece in the garage, I guess you could use other diameters?

More tips. I turned the compressor around 180 degrees in it's blue alloy holder in order to get the 1/4 inch port facing the correct way. To do this you have to take the manifold off the compressor. I also did this to gain access to the two small allen key bolts on the blue alloy part as it allowed me to move the compressor around more to get access to the silver hex allen key bolts. If you simply turnt he compressor around 180 degrees (to get the ports facing inwards) these small allen key bolts are inaccessable.

Hope you get the gist of this. As I said earlier I hope to insert photos in the next week or so, but am short of time due to my fishing trip in a week.

Please note this is a work in progress which I have designed myself so I am hoping it all works out.
"of all the things I've lost I miss my mind the most"
User avatar
2007Lux
 
Posts: 381
Joined: Sat, 13 Nov 2010 10:56 +0000
Location: Eastern Goldfields, WA

Re: ARB Compressor Install Under Dual Cab Rear Seat

Postby lmichie on Wed, 20 Jun 2012 3:18 +0000

Thanks for that. I'd have a look at doing it soon but I'm getting ready for a couple of weeks away. I'll just wait 'till you've done the hard work. :grin:

Lachlan
Stop laughing and give me a hand with the winch!
User avatar
lmichie
 
Posts: 457
Joined: Sun, 15 Nov 2009 7:52 +0000
Location: Baulkham Hills, NSW

Re: ARB Compressor Install Under Dual Cab Rear Seat

Postby 2007Lux on Tue, 17 Jul 2012 10:01 +0000

I am probably going to be guilty of repeating myself but it's best to have the words and pictures together. Also read bill_i_am's posts. The CKMA12 is a highly adjustable compressor in respects to mounting so have a play around with it prior to drilling to get an idea of how it all works

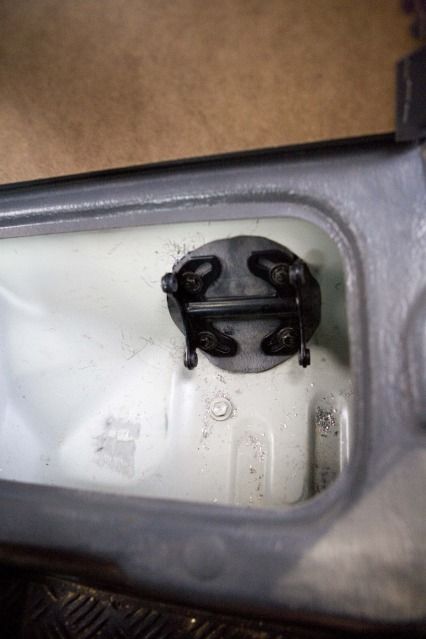
Be careful to really think about where in the compartment you put the compressor as too close to the out side will result in hard to get to silver allen key hex bolts, too far towrds the centre and the nutsert holes you drill will hit a double skin in the floor pan, too high and you will not be able to close the lid. Note the double skin didn't matter in the end as the nutsert pulled tight against it.

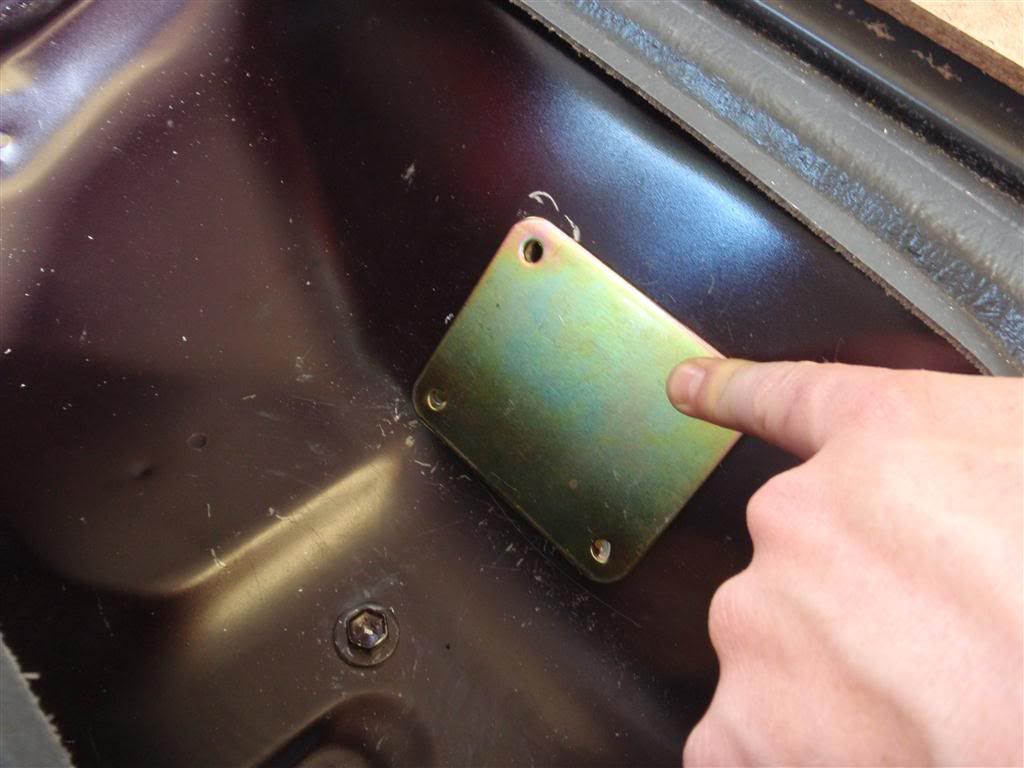
As suggested by bill_i_am take the black mounting plate off and mark where you want it. I have already put the nutserts in in this photo. When drilling the holes do one at a time and check your other hole marks, remark if needed.
Image

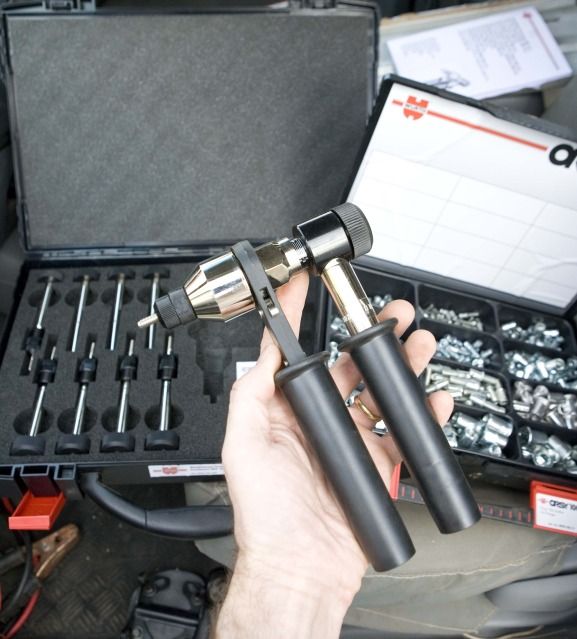
I was lucky enough to have a friend who had access this delux nutsert tool
Image

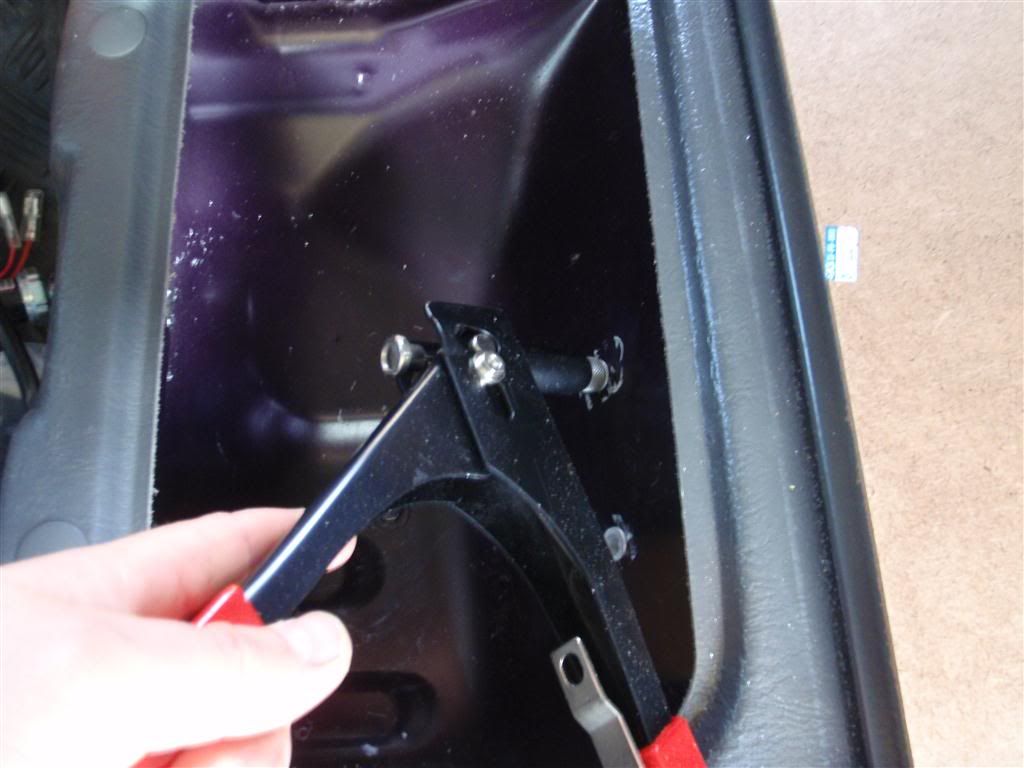
Not sure if necessary but I cut a piece of old tyre tube up to put between the bracket and the car body
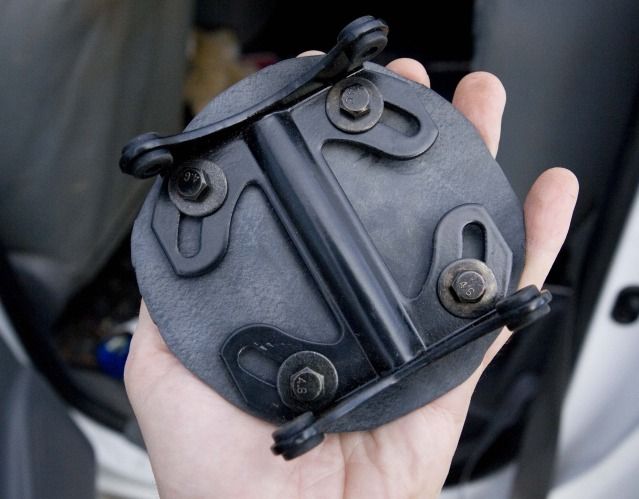
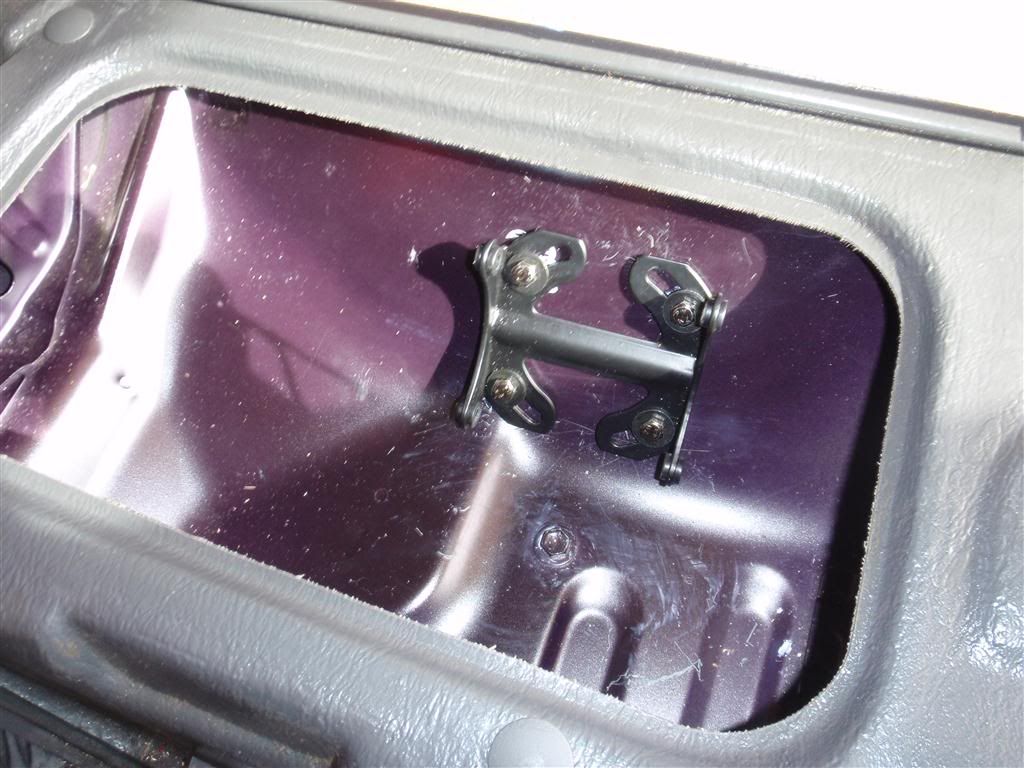
Image

Image

The mounted bracket
Image

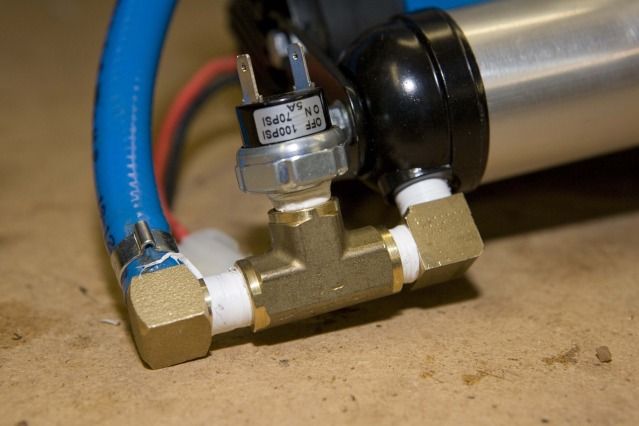
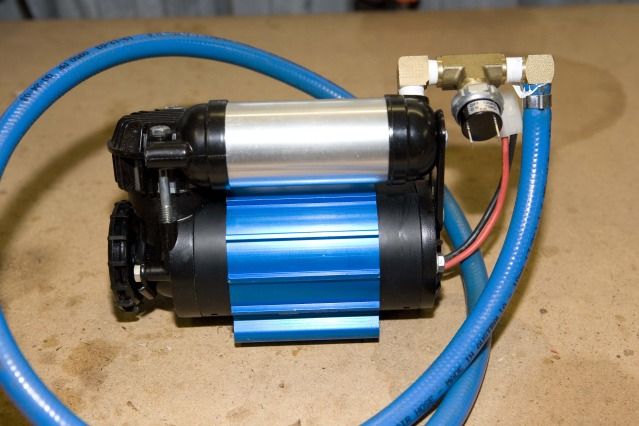
Now prepare your compressor and fittings. As for the airline I am only setting mine up for pumping my tyres and not diff lock solenoids. I set my air line up on the 1/4" NPT port where the pressure switch goes. To get the air to the outside of the vehicle I first used a male-male threaded 1/4" NPT 90 degree elbow screwed to a female-female 1/4" NPT T piece (to put the pressure switch on), which I then screwed another male-barbed 1/4" NPT 90 elbow to. This last elbow had a barbed end suitable for a 10mm (ID) airline (I used this ID as I had a piece of hose in the garage). I crimped the hose on using a clamp which I bought from Pirtek which only requires the use od bull nose pliers. I also purchased the fittings from there.
Image

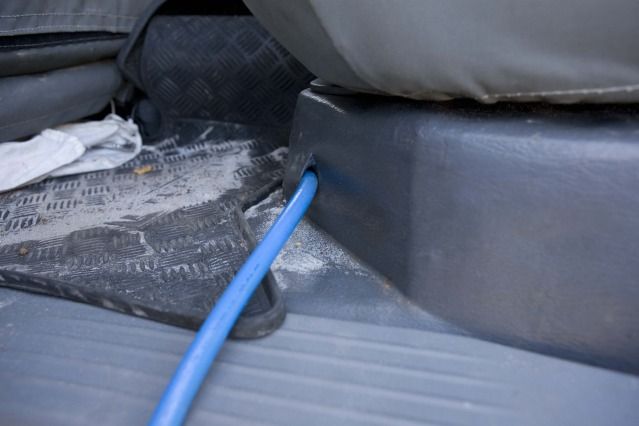
The exit point of the 10mm hose
Image

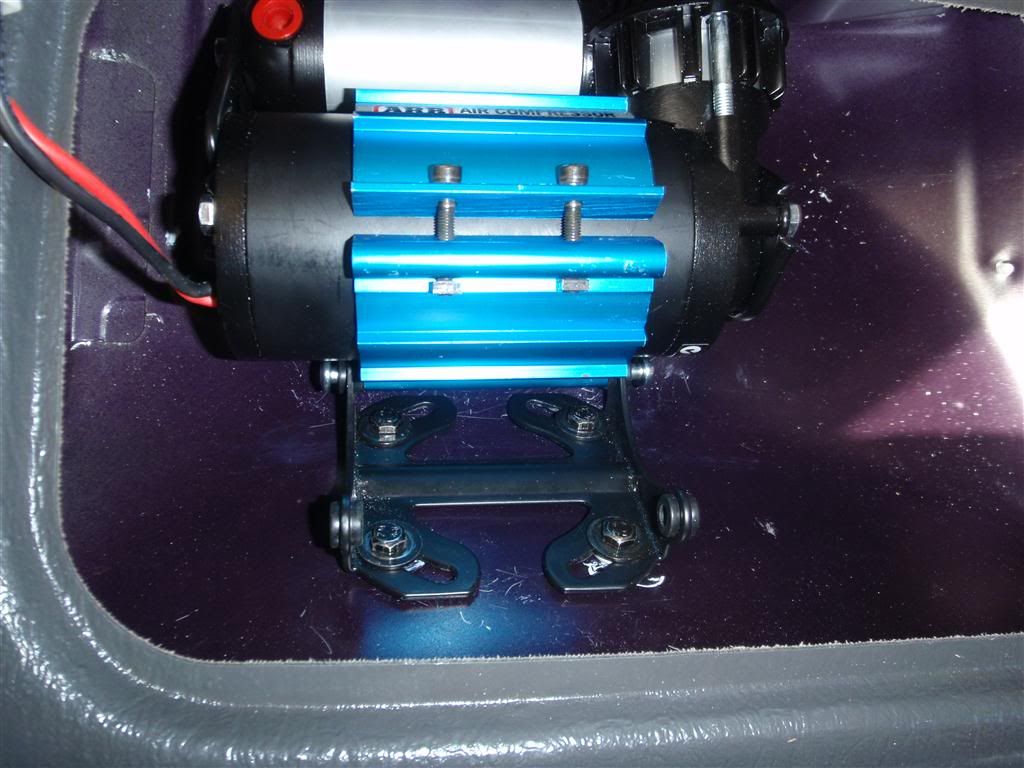
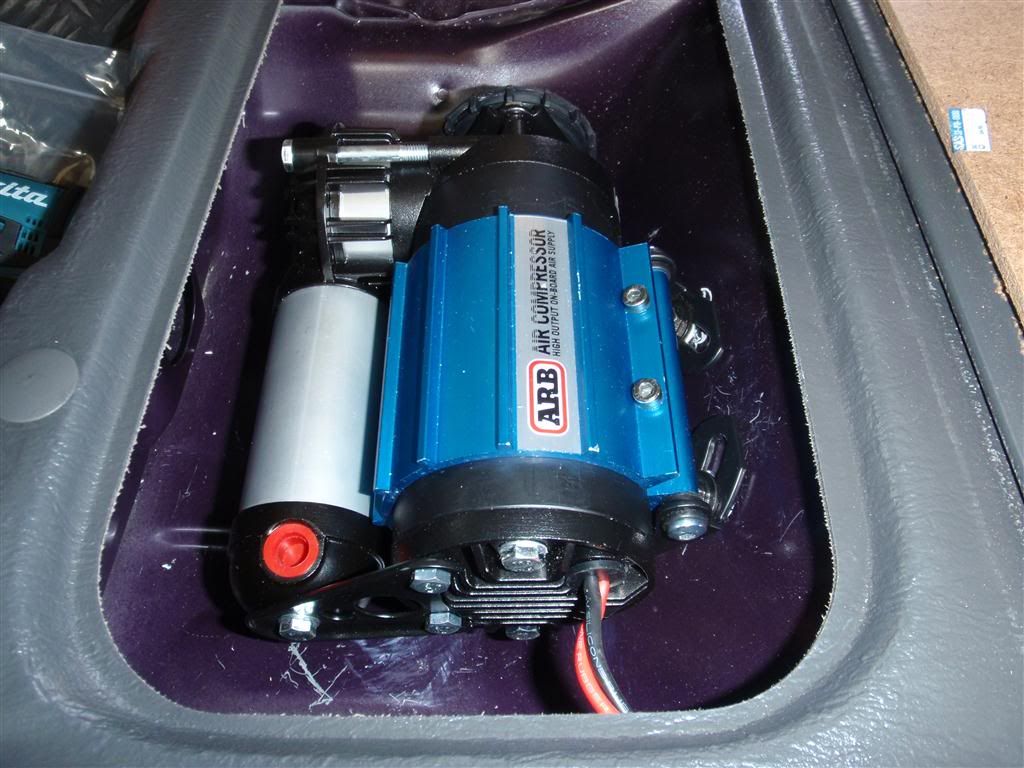
The finished compressor. However you now have to take the silver manifold off turn the compressor body around 180 degrees and put it back into the blue alloy mounting bracket. This is because you need to access the small black allen key bolts to tighten it up at the end of the install.
Image

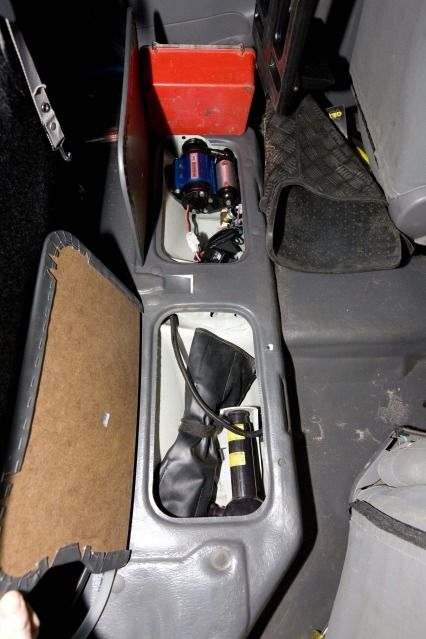
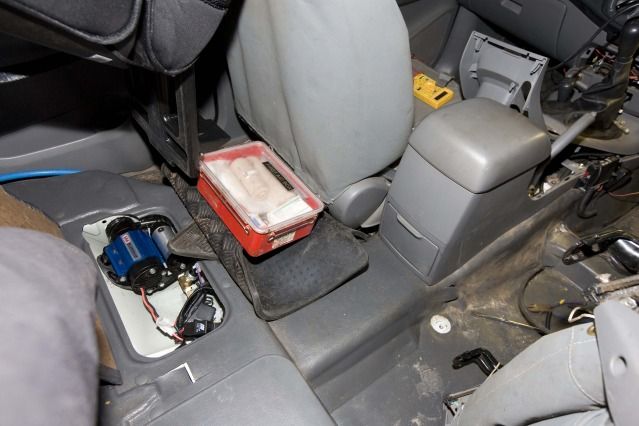
The mounted compressor. Note the air filter is to the outside and the air fittings are to the front and inside of the compartment. I had to cut away some of the floor vinyl (yeh it's rough but it was late) in order to get access to the silver hex head bolts which attach the compressor to the black bracket mounted in the previous steps. Screwing these bolts up with an allen key was about an 8.5 on the fiddly scale so try and keep your cool. I neatly rolled my cables up and cable tied them as far away form the compressor/fittings as possible.
Image

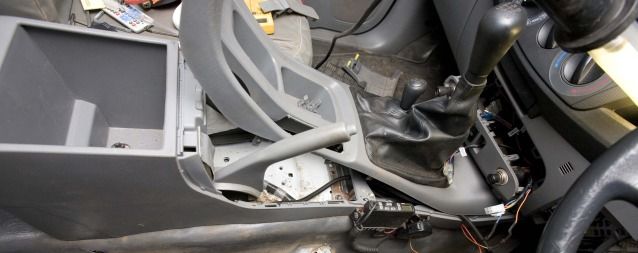
Now for routing the cables. There is two parts to the electrical system, one is the power supply to the main battery, the other is to activate the relay via a dash mounted switch. I chose to route the relay wire first across to the right hand side under seat compartment, then to the dash under the floor vinyl and center consol. Also before I threaded the wire I first put flexiable corrugated conduit on it for a bit of protection. Now to thread the cable under the floor remove the front seat completely (four bolts and a little white clip under the seat), pop the door sill trims up (front and back) with a big flat head screw driver, remove the seat belt anchor bolt on the B pillar, remove the lower trim on the B pillar (just pull up the rubber strips on either side and pull), unclip the floor vinyl/carpet and thread to the center consol.
Image

You do not have to fully remove the center consol. Undo the two bolts inside the main compartment, pull up trim around gear stick ( I can't remember exactly what I did here but have a fiddle), thread wire through to the cigarette lighter socket area.
Image

As for the power supply cable to the main battery I extended the wiring loom by soldering on a piece of dual core 6mm wire. I routed that under the floor vinyl in the back seat to the left hand door sill and followed this along to the fire wall on the left side where there is a good gromet behind the glove box. I then routed the wire behind the dual battery to the main battery. You'll have to remove some more trims but not the seat. I also put another jumbo fuse at the battery as the one on the ARB loom is too close to the compressor, I guess one fuse is best but I didn't want to cut into the loom. Just measn I have to carry twice as many fuses. Sorry no photos here.

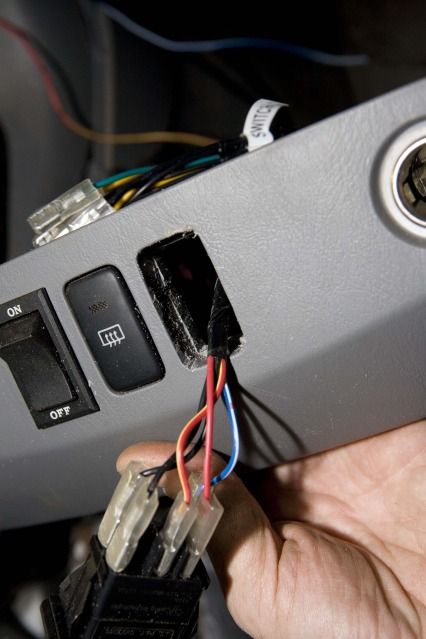
Ok for the sourcing of the power for the switch I tapped into the cigarette ligther at towo points. For the blue/white wire I tapped into the illumination light around the cig plug and for the red wire I used the positive for the cig lighter itself. Note the positive (on my cig lighter anyway) is black!!
Image

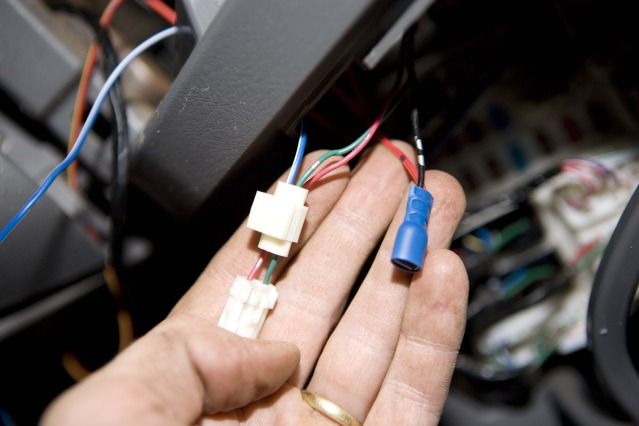
Now read the instructions form ARB at this point rather carefully as there is some great points to adhere to. I now mounted the switch next to the rear demister switch which you have to file out first (another fiddly job).
Image

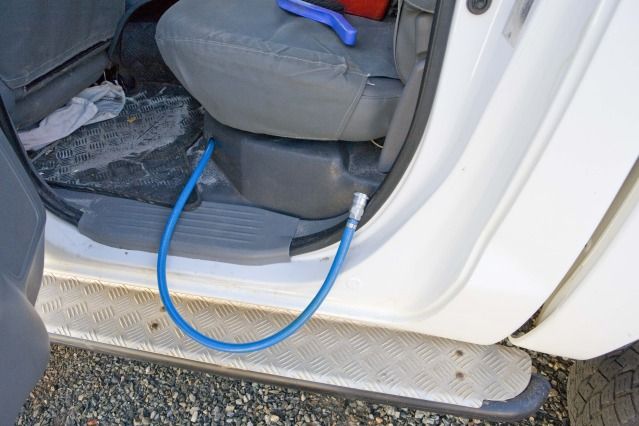
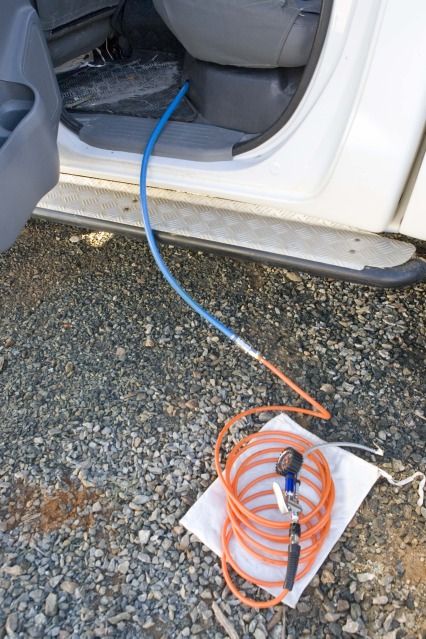
On the outside I crimped a Nitto female fitting. I left the 10mm hose long enough so I could tuck it away under the rear seat. I could have also cut it short but I can see the door slamming in the wind on the thinner (more expensive) ARB air line. However do not make the blue hose too long as it will drag in the dirt when you uncouple.
Image

Image

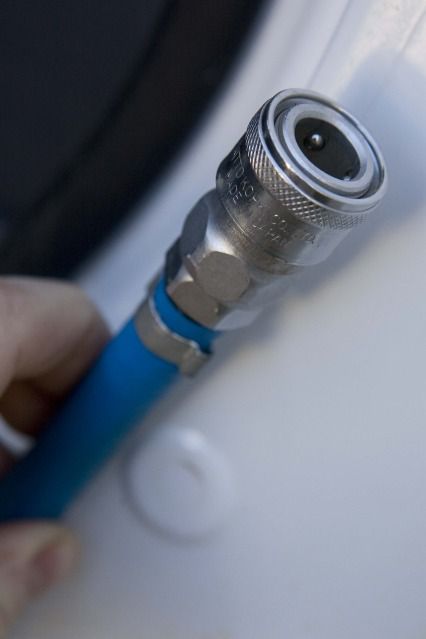
I connected the ARB hose to the Nitto female with a male Nitto (kind of obvious I know). I now store my inflator and hose in a nice little calico bag under the front passenger seat ready for action at anytime
Image

Final notes. I believe I have left enough room in the compartment to set up diff lock solenoids if necessary but don't quote me on it. Also I have just completed a 950km road trip (see my pics in the trips section) where the car copped a beating and I used the compressor a lot. As expected no hassles and it is still tight in it's bracket. I ended up pumping my mates car most of the time as well because he couldn't be bothered setting his compressor up (also an ARB one in a carry box).

Good luck
"of all the things I've lost I miss my mind the most"
User avatar
2007Lux
 
Posts: 381
Joined: Sat, 13 Nov 2010 10:56 +0000
Location: Eastern Goldfields, WA

Re: ARB Compressor Install Under Dual Cab Rear Seat

Postby 2007Lux on Thu, 19 Jul 2012 8:09 +0000

Here is the picture of my center console pulled up and my cable (in black corro) running through it.
Image

One more note. After doing the install and knowing how the compressor can be move around for mounting I have looked over bill_i_am's pics and I think you could also mount it his way with no problems (that is with the air filter to the inside). You might have to drill a hole to get your air out though, then again you could run it through the same hole I did. As for diff lock solenoids I can't comment with confidence, but the silver manifold in bill last picture can be twisted around so the twin 1/8" BSPT ports face up, thus allowing the connection of the two solenoids????
"of all the things I've lost I miss my mind the most"
User avatar
2007Lux
 
Posts: 381
Joined: Sat, 13 Nov 2010 10:56 +0000
Location: Eastern Goldfields, WA

Re: ARB Compressor Install Under Dual Cab Rear Seat

Postby Darkie79 on Fri, 22 Feb 2013 2:32 +0000

I have completed this mod in my 2010 Lux. Love it thanks for the detailed information!
Darkie79
 
Posts: 28
Joined: Thu, 11 Oct 2012 5:30 +0000

Re: ARB Compressor Install Under Dual Cab Rear Seat

Postby 2007Lux on Fri, 22 Feb 2013 7:16 +0000

No worries. Mine still work so I must have used the right wires :D
"of all the things I've lost I miss my mind the most"
User avatar
2007Lux
 
Posts: 381
Joined: Sat, 13 Nov 2010 10:56 +0000
Location: Eastern Goldfields, WA

Re: ARB Compressor Install Under Dual Cab Rear Seat

Postby Stu.wrf450 on Fri, 22 Feb 2013 7:20 +0000

Pros and cons on it being installed here and in the engine bay?
Cheers, Stuart

Check out my build viewtopic.php?f=41&t=18521&p=284916#p276157
Stu.wrf450
 
Posts: 968
Joined: Mon, 27 Aug 2012 6:44 +0000

Re: ARB Compressor Install Under Dual Cab Rear Seat

Postby 2007Lux on Fri, 22 Feb 2013 7:42 +0000

I don't have to take my fishing rods off to pump my tyres, but I acknowledge this may not be of great importance to those who say do high country touring. I basically like it as it uses a dead space under the seat. I also run a dual batt, with manual override 100A solenoid on the right side and on the left I now have a Racor pre filter so I basically don't have room for a compressor under the hood anymore.
"of all the things I've lost I miss my mind the most"
User avatar
2007Lux
 
Posts: 381
Joined: Sat, 13 Nov 2010 10:56 +0000
Location: Eastern Goldfields, WA

Re: ARB Compressor Install Under Dual Cab Rear Seat

Postby blkrota on Fri, 28 Jun 2013 5:14 +0000

Hi all , does anyone have some pics of the dual ARB compressor installed in ther ute.

I was thinking on the inside of the tub above the wheel arch, with a plate made up so it can be hung upside down using the hard cover and sports bar mounts.

Engine bay is a no go .

Any ideas
User avatar
blkrota
 
Posts: 417
Joined: Sun, 04 Dec 2011 5:32 +0000

Re: ARB Compressor Install Under Dual Cab Rear Seat

Postby patl on Fri, 28 Jun 2013 5:45 +0000

I have the ARB dual compressor mounted under the backseat of a extra cab, its tight but it works.
Patrick
User avatar
patl
 
Posts: 207
Joined: Mon, 28 Jan 2008 2:00 +0000
Location: Mackay, Qld

Next

Return to Tips & Tricks

Who is online

Users browsing this forum: No registered users and 12 guests