Hi Guys,
Just introducing myself as I hope to pick up my new SR tomorrow or Friday. Needed a new car in a hurry on account of wrecking my last one.
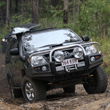
Darn thing lost the steering on the Cunningham Highway on the way up to Tough Tracks and took on the largest gum tree it could find before flipping. AMazed I am still alive. Pretty keen on the thought of buying a brand new car after that. couldn'd afford a Landcruiser so got a SR Dual cab Auto diesel on the way!
Found your site and already fond some useful info here. Can't wait until I get an insurance payout so i can kit it out a bit better. Booked in fro a Dual battery before Easter for the fridge and have some 15x7" SR5 rims lined up for some decent 31" rubber.
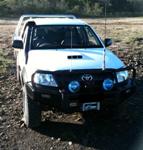
Rod's Rig - Round 2
Rod's Rig - Round 2
![]() by rodw on Thu, 21 Feb 2008 10:21 +0000
by rodw on Thu, 21 Feb 2008 10:21 +0000
Last edited by rodw on Thu, 25 Nov 2010 3:08 +0000, edited 11 times in total.
-
rodw - Posts: 3195
- Joined: Tue, 19 Feb 2008 2:00 +0000
- Location: Brisbane, QLD
![]() by Hilux Max on Thu, 21 Feb 2008 10:32 +0000
by Hilux Max on Thu, 21 Feb 2008 10:32 +0000
welcome aboards mate, lucky you survived it, enjoy the site.
The Punisher 2.0 N80 Build - http://www.newhilux.net/phpbb/viewtopic.php?f=119&t=26631
The Punisher 1.0 N70 Build - http://www.newhilux.net/phpbb/viewtopic.php?f=41&t=747&hilit=Punisher
The Punisher 1.0 N70 Build - http://www.newhilux.net/phpbb/viewtopic.php?f=41&t=747&hilit=Punisher
-

Hilux Max - Valued Contributor
- Posts: 12434
- Joined: Sun, 07 Jan 2007 12:00 +0000
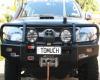
![]() by rodw on Tue, 01 Apr 2008 7:28 +0000
by rodw on Tue, 01 Apr 2008 7:28 +0000
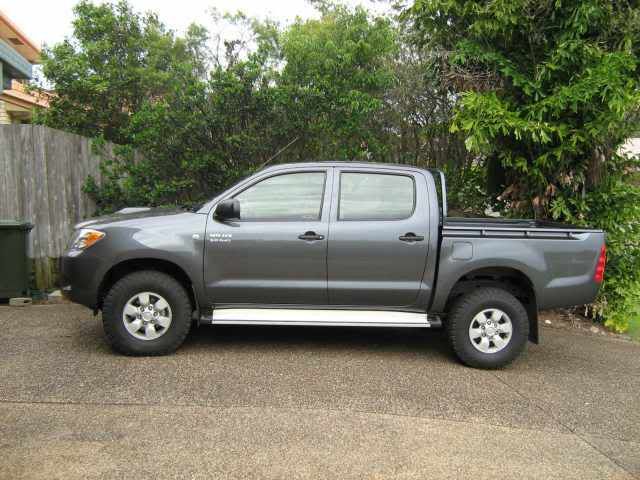
Hi GuysSeeing I am starting to get a bit underway, I thought I'd continue this thead with a few projects I have underway.Once I got my SR Hilux Rig, I added SR5 Rims and some 31x10.5's within 48 hours...
First off before Easter, I got aARB to shoehorn in an 80 amp hour battery for the fridge.
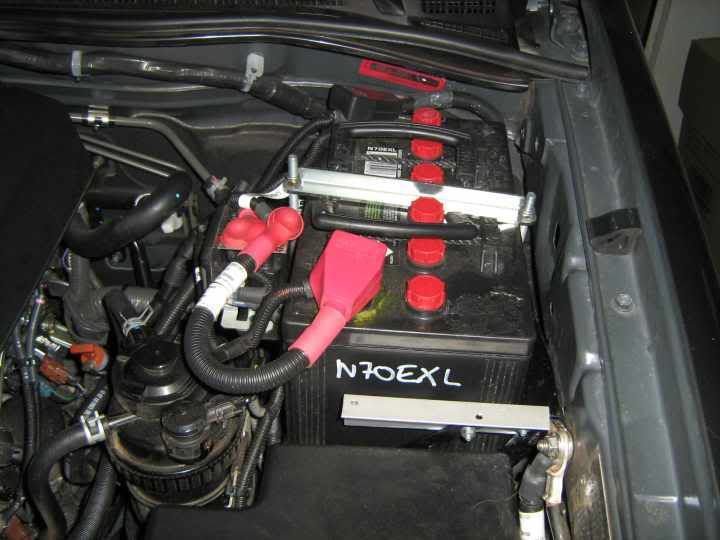
I got them to put in three points in the tray (2 Hella's and 1 cig lighter socket)
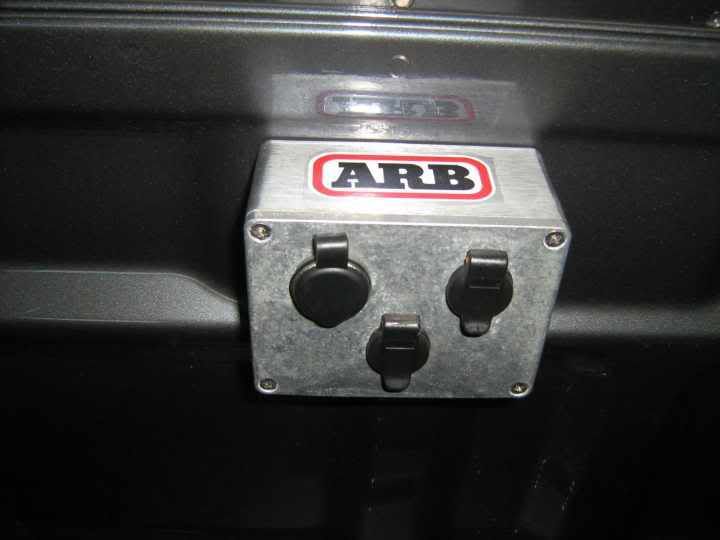
They also put a link switch in the cab so that you can join the 2 batteries together (eg. Winching or jump starting from the secondary battery.
Not saying I am 100% happy with the install, i would have used heavier cable to the rear, but it is certainly adequate for now as the fridge does not draw much power..
First off before Easter, I got aARB to shoehorn in an 80 amp hour battery for the fridge.
I got them to put in three points in the tray (2 Hella's and 1 cig lighter socket)
They also put a link switch in the cab so that you can join the 2 batteries together (eg. Winching or jump starting from the secondary battery.
Not saying I am 100% happy with the install, i would have used heavier cable to the rear, but it is certainly adequate for now as the fridge does not draw much power..
-
rodw - Posts: 3195
- Joined: Tue, 19 Feb 2008 2:00 +0000
- Location: Brisbane, QLD
![]() by rodw on Tue, 01 Apr 2008 7:41 +0000
by rodw on Tue, 01 Apr 2008 7:41 +0000
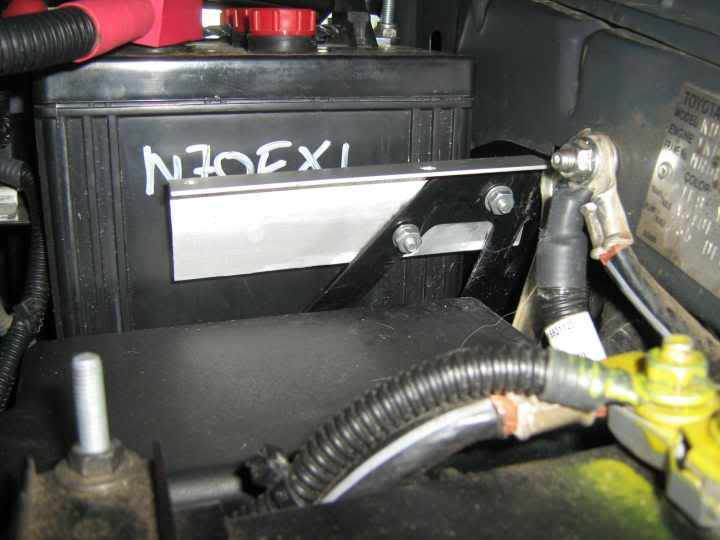
So I will have a few things to add to theRig in the near future as I ahve planned to add a power outlet in the cab, a CB and a compressor. So I decided to add a fuse block to distribute some power. I found a bit of aluminium angle iron and bolted it to the battery tray.
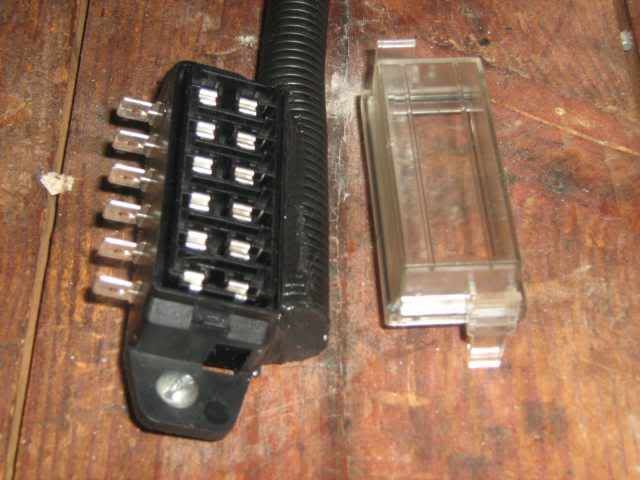
I bought a Maxi Fuse holder and a six way fuse block from Super Cheap. Probably don't need the fuse, but the fridge and solar web site ([URL]http://www.fridge-and-solar.net/[/URL]) thinks they are a good idea.
I bent the tabs of the fuse block over to make a flat surface and soldered on some thick wire.

Here is a close up of the fuse block
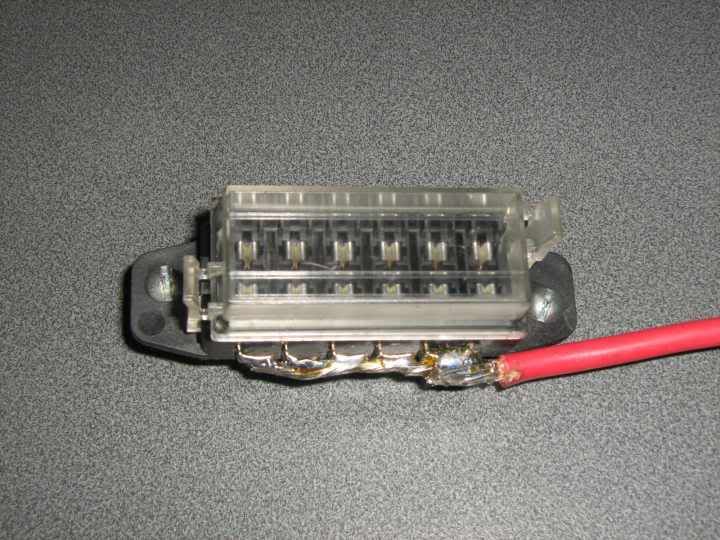
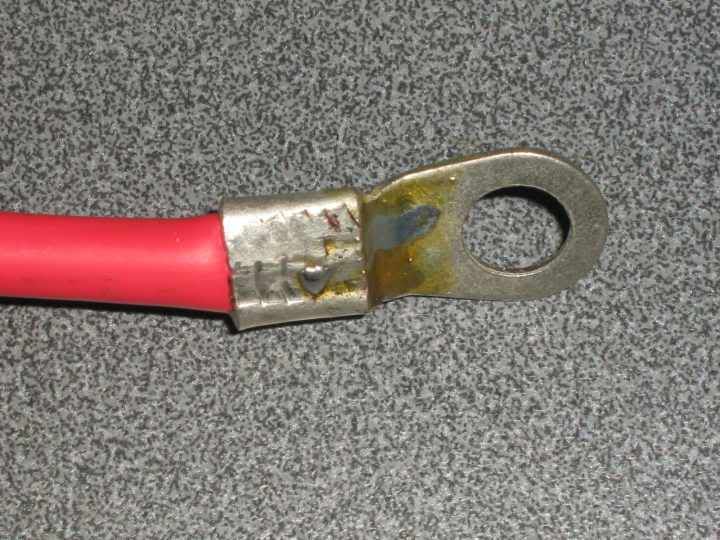
I got a lug and crimpred it on and soldered it on. Did not have a gas torch, so heated the lug using a gas camping stove..
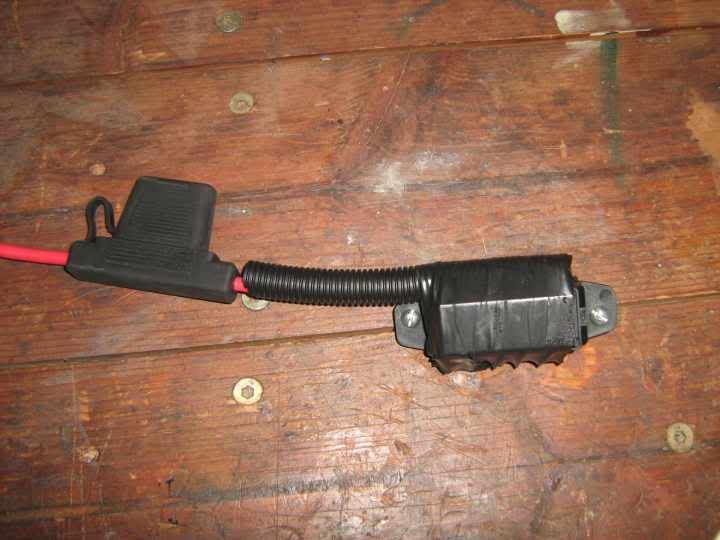
So the next step was to ladle on some sikaflex over the raw solder on the fuse block and use the sikaflex to glue on some cable conduit. Wrapped it up with some insulation tape temporarilly until the sikalflex cures.
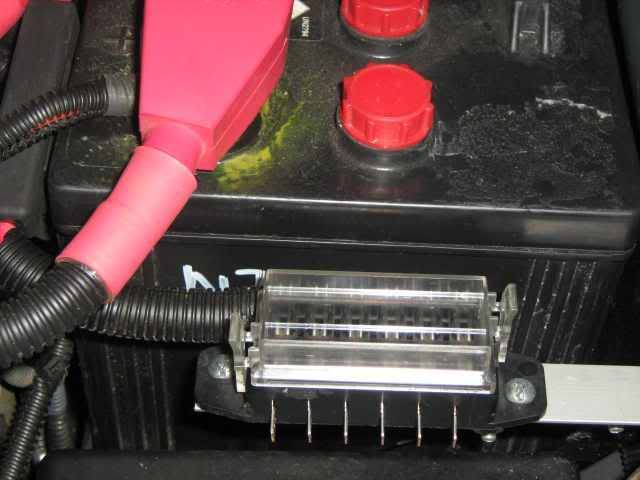
So when it dries, the lug goes to the battery terminal, and the fuse block goes on the aluminium bracket I made
I bought a Maxi Fuse holder and a six way fuse block from Super Cheap. Probably don't need the fuse, but the fridge and solar web site ([URL]http://www.fridge-and-solar.net/[/URL]) thinks they are a good idea.
I bent the tabs of the fuse block over to make a flat surface and soldered on some thick wire.
Here is a close up of the fuse block
I got a lug and crimpred it on and soldered it on. Did not have a gas torch, so heated the lug using a gas camping stove..
So the next step was to ladle on some sikaflex over the raw solder on the fuse block and use the sikaflex to glue on some cable conduit. Wrapped it up with some insulation tape temporarilly until the sikalflex cures.
So when it dries, the lug goes to the battery terminal, and the fuse block goes on the aluminium bracket I made
-
rodw - Posts: 3195
- Joined: Tue, 19 Feb 2008 2:00 +0000
- Location: Brisbane, QLD
.jpg)
![]() by rodw on Tue, 01 Apr 2008 9:22 +0000
by rodw on Tue, 01 Apr 2008 9:22 +0000
I did not install it. But there is an aluminium heatsink on the firewall that they moved onto the ARB battey tray itself. It is located at the back of the tray on the engine side. I think that is all. There is also a flat plate on the tray there where you could mount the fuses, but it was a bit hard to get to. Someone on this forum has mounted a similar fuse block there. Might be the tech article about dual batteries.
I thought I had a tight fit to get 65 amp/hours in my Suzuki, but tte Hilux is even tighter. I took the battery out to drill the holes to mount the bracket and it was hard work. Goes in and out on an angle...
I thought I had a tight fit to get 65 amp/hours in my Suzuki, but tte Hilux is even tighter. I took the battery out to drill the holes to mount the bracket and it was hard work. Goes in and out on an angle...
-
rodw - Posts: 3195
- Joined: Tue, 19 Feb 2008 2:00 +0000
- Location: Brisbane, QLD
![]() by rodw on Tue, 01 Apr 2008 10:13 +0000
by rodw on Tue, 01 Apr 2008 10:13 +0000
Jason,One way or the other you have to buy a battery tray. You might as well buy the ARB one. It also bolts onto the guard to spread the weight and all of the mounting points and the like are there, including the spot to mount the heatsink. In my Suzi, I did it all myself. Started with a $20 battery tray and found this was rusting out and then paid $100 for a stainless one for a Rodeo which I modified. I used a Supercheap dual battery kit ($95) which is fine, no better or worse than the one ARB uses. it has a LED to tell you when it is charging the Aux battery. ARB's does not! It comes with most of the cable you need but the terminals are no good. I used the instructions here [URL]http://www.fridge-and-solar.net/dual_bat.htm[/URL]. The RedArc Isolator sounds a good one, and fairly cheap. I used two cables 4.58 square mm to get 30 amps to the back though about 5 metres of cabling with acceptible voltage loss according to Fridge and Solar's site. The formula is there somewhere.Once I want some more power to the back, I'll probably replace the 6mm twin core auto cable they used to the back using BS6 Cable which is 13.5mm dia. That'll handle an inverter or another third battery no worries.6 meters of BS6 cable will provide 47 amps with 0.36 volt loss, to get more, you need to go to BS4 cable (20mm square) which will get 70 amps down there.
-
rodw - Posts: 3195
- Joined: Tue, 19 Feb 2008 2:00 +0000
- Location: Brisbane, QLD
![]() by rodw on Wed, 02 Apr 2008 7:29 +0000
by rodw on Wed, 02 Apr 2008 7:29 +0000
So after the Sikaflex dried overnight, this is what it looked like when I removed the tape. You can see how I cut the conduit in half to make it fit.
So now it is a simple matter of bolting it in and connecting it to the battery.
I will be moving the existing ARB wiring for the rear outlet and the link switch onto this fuse block. I just need to make sure that the MaxiFuse is big enough to take all of the circuits. The rest of the fuses will be for power outlets in the cab, compressor, inverter, CB and anything else I can think of.
Rod
-
rodw - Posts: 3195
- Joined: Tue, 19 Feb 2008 2:00 +0000
- Location: Brisbane, QLD
![]() by Lancair on Sat, 05 Apr 2008 8:32 +0000
by Lancair on Sat, 05 Apr 2008 8:32 +0000
Nice work there Rod. Please keep up with the pics and notes.
I'll probably do something similar myself as I also want power to the tray for fridge, compressor (30 amp max), lights etc. I was thinking of running some bigger cable (maybe 8mm ?) to the tray then a fuse block for individual items. Also had planned on a fuse close to the battery for the rear power.
I'll probably do something similar myself as I also want power to the tray for fridge, compressor (30 amp max), lights etc. I was thinking of running some bigger cable (maybe 8mm ?) to the tray then a fuse block for individual items. Also had planned on a fuse close to the battery for the rear power.
-
Lancair - Posts: 261
- Joined: Fri, 15 Feb 2008 2:00 +0000
- Location: Ballina, NSW
![]() by TOMUCH on Sat, 05 Apr 2008 9:27 +0000
by TOMUCH on Sat, 05 Apr 2008 9:27 +0000
Rod, that would go well in the Technical section under articles by members, then it can be referenced easily. Good work, I have done a similar thing, and for those that are a bit techniclay challanged, you can buy the finished product from ARB, ( with all one side already connected together. BUt they are a lot more expensive than Rods. Cheers Mate, keep up the good work. TOMUCH
DONT FOLLOW ME ...... YOU WONT MAKE IT !
-
TOMUCH - Posts: 958
- Joined: Sun, 21 Jan 2007 2:00 +0000
- Location: Darwin, NT
![]() by rodw on Sun, 06 Apr 2008 7:35 +0000
by rodw on Sun, 06 Apr 2008 7:35 +0000
Lancair, Tomuch,
The intention on this thread is to keep a history of what happens to my Rig over time, so people can see what is evolving. Some of the projects might find their way into an article, so if you think a modification should be published let me know on this thread.
The cost of the fuse bolck is $15 for the fuse block and $15 for the Maxi Fuse from Super Cheap. I might add, I had the glove box out this morning, and was dismayed at ARB's wiring handiwork, runns under the passenger feet, not good at all. I'll fix it one day.
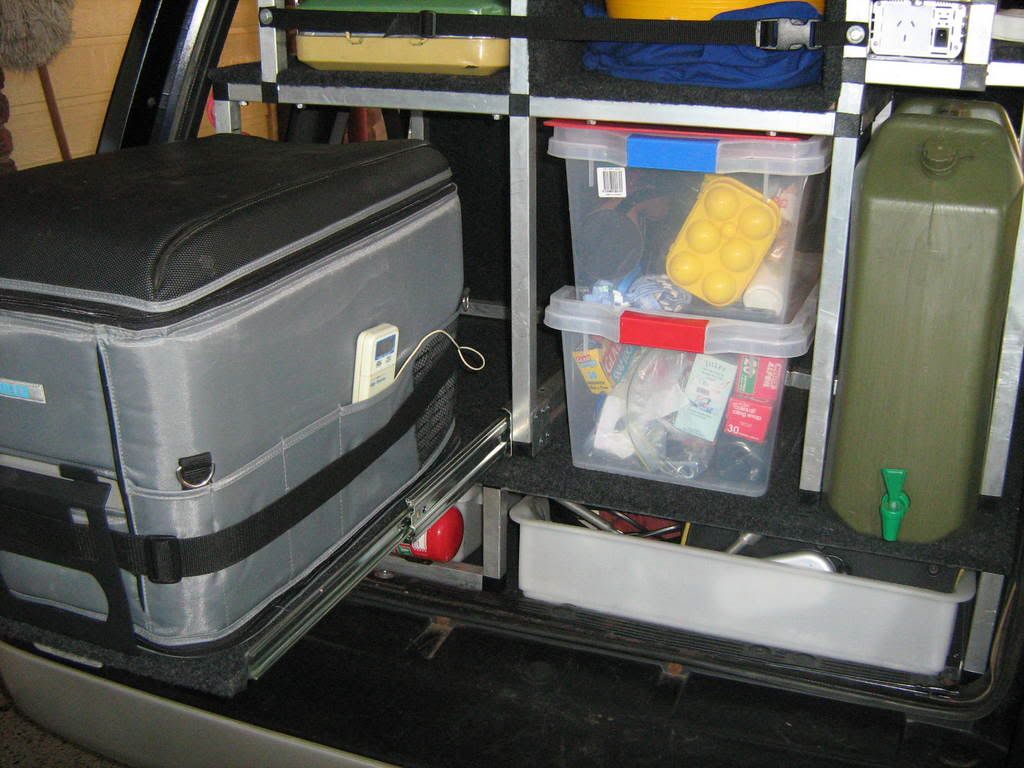
So let me see what is on the agenda..... I have most of the material to do DIY diff breathers. This morning I mounted the auxillary cig socket and a Hella socket in the front, still got the wiring to go, got interrupted as I wnent down to meet Leon at Utemart at Burleigh Heads on the Gold Coast. Had a look at his canopy (Broke on this forum has one). Pretty smart, more on this on another thread. Anyway, brought home a set of flares which I fitted this afternoon, will post some photos tomorrow after I look at it in the sunlight. Pretty happy with them.
I have the rig booked in on Thursday to get the TJM underbody and transmission gurads fitted, The K&N recovery points are in the mail, and I have an ARB commercial bar and rear step towbar on order. Will probably add side step/rails either custom made or the ARB. I got one of those Oz tents which are 2.0m long, so have to sort out a roofrack to carry it somehow.
I have in mind a false floor with drawers, stainless water tank, compressor and air tank, drawers, custom stainless hot water system
Here is what I built for the poor old Suzi at the top of the thread (It even survived the crash), so I think the final product will be pretty interesting....
Cheers
Rod
The intention on this thread is to keep a history of what happens to my Rig over time, so people can see what is evolving. Some of the projects might find their way into an article, so if you think a modification should be published let me know on this thread.
The cost of the fuse bolck is $15 for the fuse block and $15 for the Maxi Fuse from Super Cheap. I might add, I had the glove box out this morning, and was dismayed at ARB's wiring handiwork, runns under the passenger feet, not good at all. I'll fix it one day.
So let me see what is on the agenda..... I have most of the material to do DIY diff breathers. This morning I mounted the auxillary cig socket and a Hella socket in the front, still got the wiring to go, got interrupted as I wnent down to meet Leon at Utemart at Burleigh Heads on the Gold Coast. Had a look at his canopy (Broke on this forum has one). Pretty smart, more on this on another thread. Anyway, brought home a set of flares which I fitted this afternoon, will post some photos tomorrow after I look at it in the sunlight. Pretty happy with them.
I have the rig booked in on Thursday to get the TJM underbody and transmission gurads fitted, The K&N recovery points are in the mail, and I have an ARB commercial bar and rear step towbar on order. Will probably add side step/rails either custom made or the ARB. I got one of those Oz tents which are 2.0m long, so have to sort out a roofrack to carry it somehow.
I have in mind a false floor with drawers, stainless water tank, compressor and air tank, drawers, custom stainless hot water system
Here is what I built for the poor old Suzi at the top of the thread (It even survived the crash), so I think the final product will be pretty interesting....
Cheers
Rod
-
rodw - Posts: 3195
- Joined: Tue, 19 Feb 2008 2:00 +0000
- Location: Brisbane, QLD
![]() by rodw on Mon, 07 Apr 2008 4:05 +0000
by rodw on Mon, 07 Apr 2008 4:05 +0000
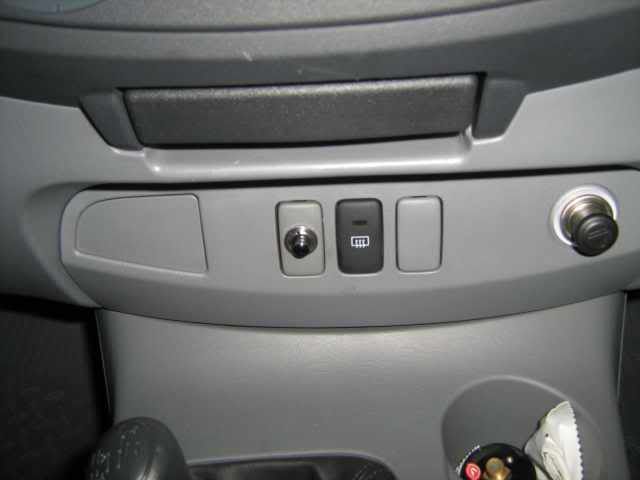
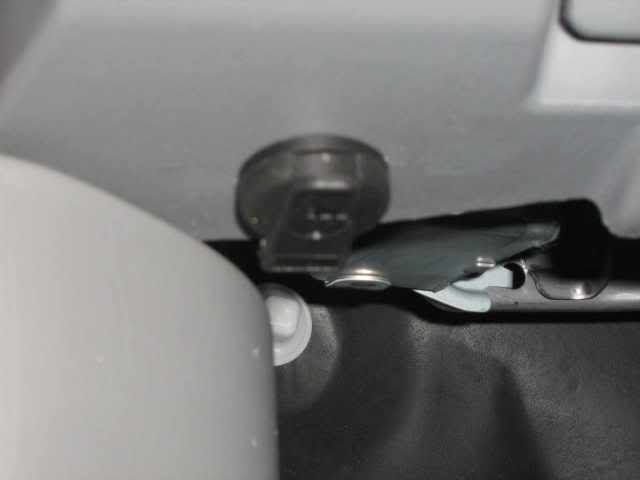
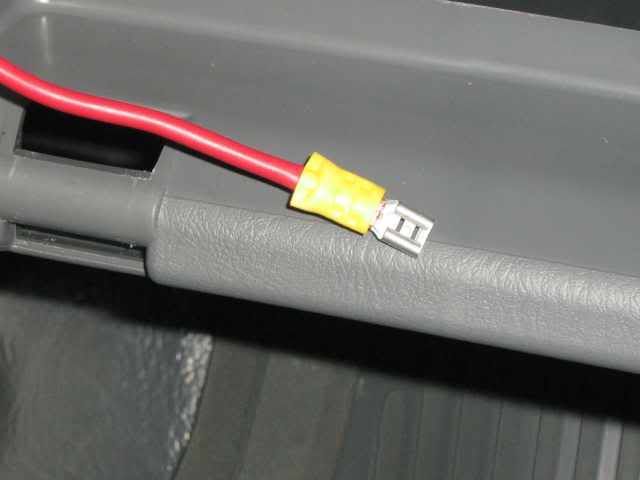
So now to finish of the wiring for the two accessory points I have added in the cab. I removed the blanking plate in my SR where the SR5 has a 2nd point. I found there is a hole drilled in the back panel to accept a cig lighter, but I did not like the recessed look, so I drilled out the plug with a 23.5mm bit. I fitted a marine cig socket with a plastic cover. I bought this from ARB so it matches the one in the rear.
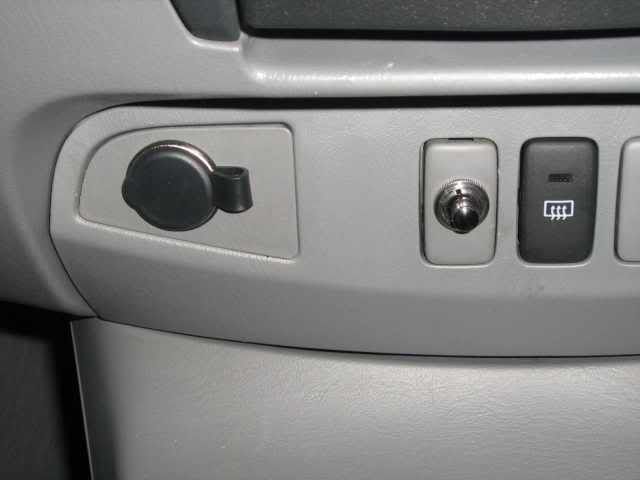
I wanted to fit a Hella socket in the cab and after a bit of searching, decided the perfect position was under the dash left of the glove box.
When I run wires, I often run some wire up to use as a draw wire. (eg. coathanger wire). Wrap the draw wire around the wires you are pullling and run insulation tape over it. I am installing a wire for a CB while I am at it as it will go in soon.
This is BS8 wire with a wire crossectional area of 4.6 mm square. That will easilly handle 30 amps.
When doing wiring, I use a crimping tool like this:
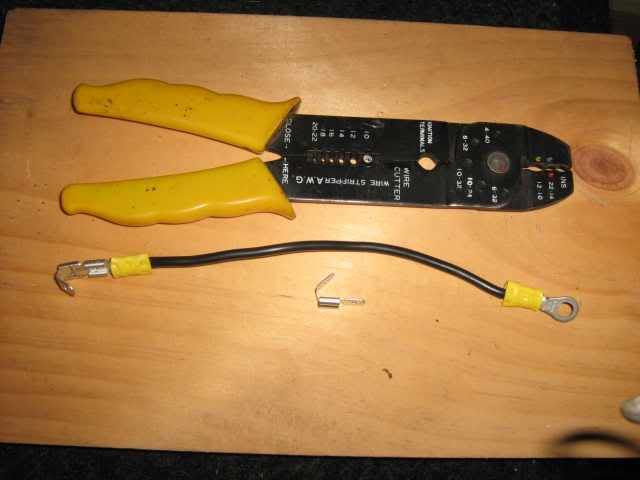
The litte part in the centre is a double adaptor for spade lugs which make it really easy to run wire from one point to another.
Here is a crimped spade lug. You can get ones that are fully insulated, but I could not find any.
There is no need to run a negative (earth) wire back to the battery, I found a bolt to earth to. This pic shows the Hella, and the earth, still got an earth to daisy chain to the cig socket to run.
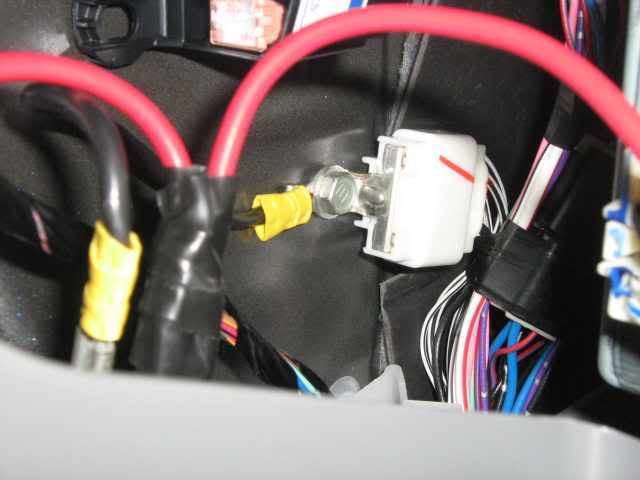
I wanted to fit a Hella socket in the cab and after a bit of searching, decided the perfect position was under the dash left of the glove box.
When I run wires, I often run some wire up to use as a draw wire. (eg. coathanger wire). Wrap the draw wire around the wires you are pullling and run insulation tape over it. I am installing a wire for a CB while I am at it as it will go in soon.
This is BS8 wire with a wire crossectional area of 4.6 mm square. That will easilly handle 30 amps.
When doing wiring, I use a crimping tool like this:
The litte part in the centre is a double adaptor for spade lugs which make it really easy to run wire from one point to another.
Here is a crimped spade lug. You can get ones that are fully insulated, but I could not find any.
There is no need to run a negative (earth) wire back to the battery, I found a bolt to earth to. This pic shows the Hella, and the earth, still got an earth to daisy chain to the cig socket to run.
-
rodw - Posts: 3195
- Joined: Tue, 19 Feb 2008 2:00 +0000
- Location: Brisbane, QLD
![]() by rodw on Mon, 07 Apr 2008 4:17 +0000
by rodw on Mon, 07 Apr 2008 4:17 +0000
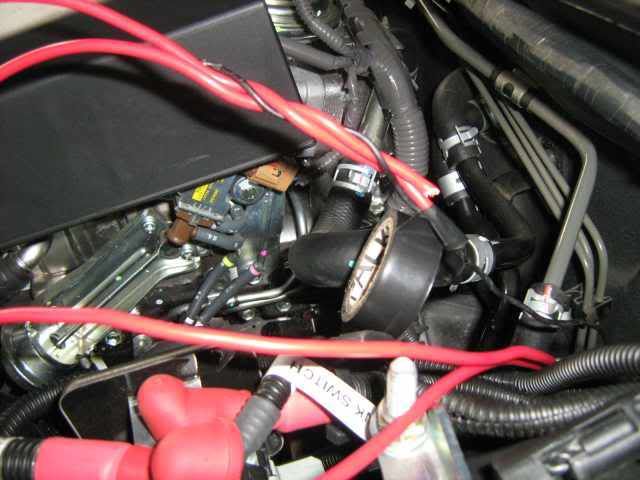
So now the inside is sorted, just need to sort out the engine bay. I ran the 2 wires through corrugated conduit under the battery tray up to my distribution block. Because I did not have insulated spades, I used some heatshrink to insulate them and put some bigger heatshrink around the conduit end.

Before powering it up, I checked the earth in the power sockets for continuity with a multimeter. The outside of both sockets is negative (earthed), the centre terminal on both is positive which goes to the battery. Everything was perfect. So then I installed the fuse. I put a 30amp fuse in as I have 2 points. You could probably get away with a 20-25 amp one as cig lighters are usually rated for 10 amps and the Hellas believe it or not are rated for only 8 amps!
Note that is is not necessary to insulate earth wires as if they rub through onto the metal frame, nothing will happen. It is just the positive (red) wires you need to worry about.
-
rodw - Posts: 3195
- Joined: Tue, 19 Feb 2008 2:00 +0000
- Location: Brisbane, QLD
![]() by rodw on Thu, 10 Apr 2008 3:08 +0000
by rodw on Thu, 10 Apr 2008 3:08 +0000
Well the K&N recovery points finally turned up in the mail today, so I fitted them. This is one installed:
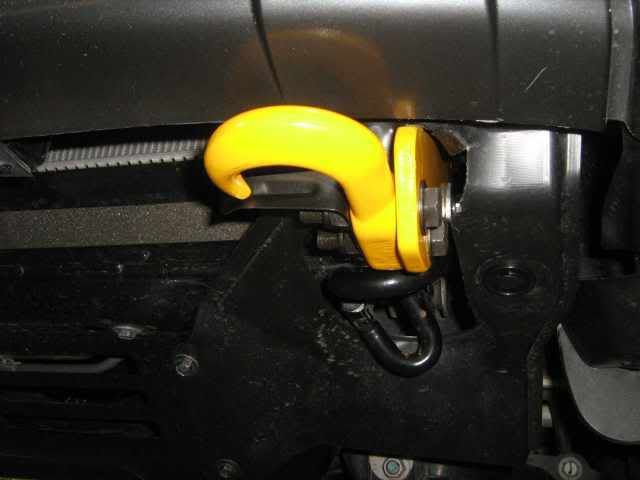
To find out how I did this, read this thread where there are a few more pics:
[URL]http://www.newhilux.net/phpbb/viewtopic.php?t=1629[/URL]
Rod
To find out how I did this, read this thread where there are a few more pics:
[URL]http://www.newhilux.net/phpbb/viewtopic.php?t=1629[/URL]
Rod
-
rodw - Posts: 3195
- Joined: Tue, 19 Feb 2008 2:00 +0000
- Location: Brisbane, QLD
![]() by rodw on Mon, 14 Apr 2008 5:52 +0000
by rodw on Mon, 14 Apr 2008 5:52 +0000
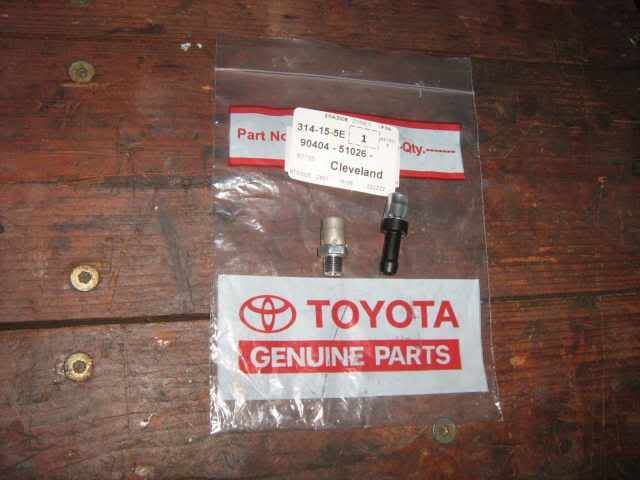
Added some Diff Breathers today. This is easy. Got the magic part (a Union) from Toyota 9404-51026 ( found out about it on this forum and it cost me $7.25.). It screws on in place of the factory rear breather so you can attach some 6mm fuel line. I was going to use a brass air line fitting but somebody here said brass can react with the diff oil, so I played safe for the sake of an extra $5. In my travels looking for hose fittings, I saw some stainless steel ones at Tony Powell Hose Supplies, Beaudesert Road which would also suit I guess.
I bought 6 metres of fuel line and had a about a metre left over.
My Auto has one less breather than the manuals at the front. (ie. Only got a Diff Breather.)
I mounted a fuel filter for the breathers right up on the firewall behind the engine.
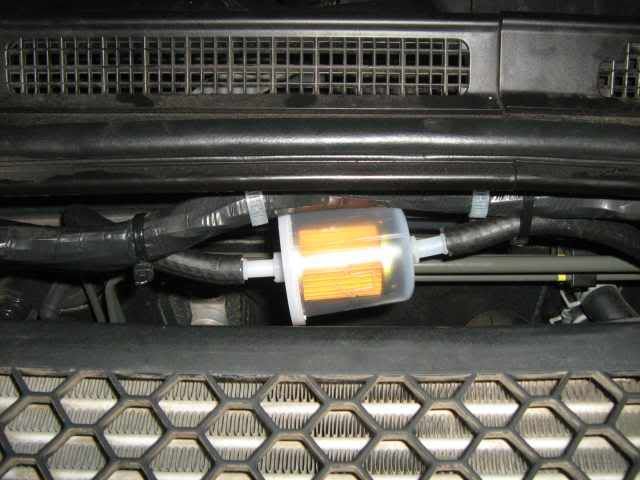
I got a plastic T piece from Repco which was a multi size for both 6mm and 8mm hose. The guy at EnZed suggested that I get a plastic fitting as it would be a lot lighter and would not bounce around in the engine bay. I removed the existing breathers. The front breather is located up near the fuel filter on the Diesel engine (behind the battery). It pulled out of the hose easilly. The hose to the front diff is 8mm, not 6mm.
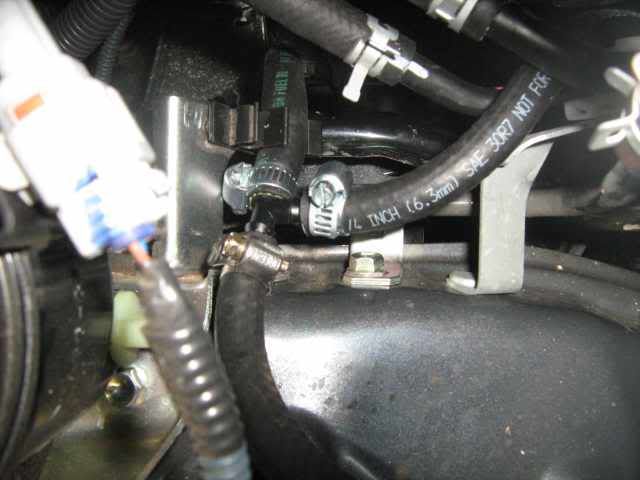
I used a couple of hose clamps on the T-piece. Than it was a simple matter of running a hose along the brake lines on the left hand side and securing it with some cable ties.
Because I do no thave a lift in yet, I made a loop in the hose at the back up high near the spare tyre and put a cable tie round it. once the lift goes in, i will just need to remove the cable tie.
The factory breather looks like this. The plastic bag shows the union part number:
[
I bought 6 metres of fuel line and had a about a metre left over.
My Auto has one less breather than the manuals at the front. (ie. Only got a Diff Breather.)
I mounted a fuel filter for the breathers right up on the firewall behind the engine.
I got a plastic T piece from Repco which was a multi size for both 6mm and 8mm hose. The guy at EnZed suggested that I get a plastic fitting as it would be a lot lighter and would not bounce around in the engine bay. I removed the existing breathers. The front breather is located up near the fuel filter on the Diesel engine (behind the battery). It pulled out of the hose easilly. The hose to the front diff is 8mm, not 6mm.
I used a couple of hose clamps on the T-piece. Than it was a simple matter of running a hose along the brake lines on the left hand side and securing it with some cable ties.
Because I do no thave a lift in yet, I made a loop in the hose at the back up high near the spare tyre and put a cable tie round it. once the lift goes in, i will just need to remove the cable tie.
The factory breather looks like this. The plastic bag shows the union part number:
[
-
rodw - Posts: 3195
- Joined: Tue, 19 Feb 2008 2:00 +0000
- Location: Brisbane, QLD
![]() by rodw on Mon, 14 Apr 2008 6:01 +0000
by rodw on Mon, 14 Apr 2008 6:01 +0000
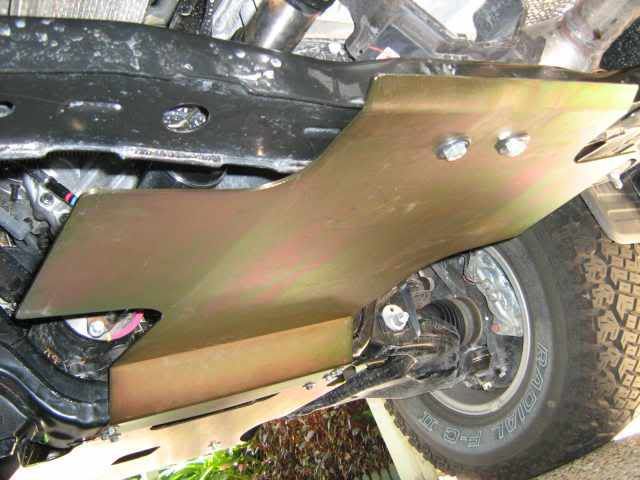
Also installed the TJM Underbody Guards for the sump and transmission today. It was an easy job except that I found that the bolts provided for the tranmission guard are too short so I had to leave off the spring washers. This should not be a drama as there were no spring washers on any of the bolts holding the factory guards on. I used a torque wrench and set the bolts to TJM's specs.
The tranmission font bolts go into a plate which has a piece of wire attached to let you fish it into position inside the Cross member. I levered the plates through the hole to bend this wire so the plates sat flat before I tried to screw the bolts on.
The front Guard wes really easy to install and overall, not worth the $35 TJM wanted to fit them both. Here is the finished product:
Front:
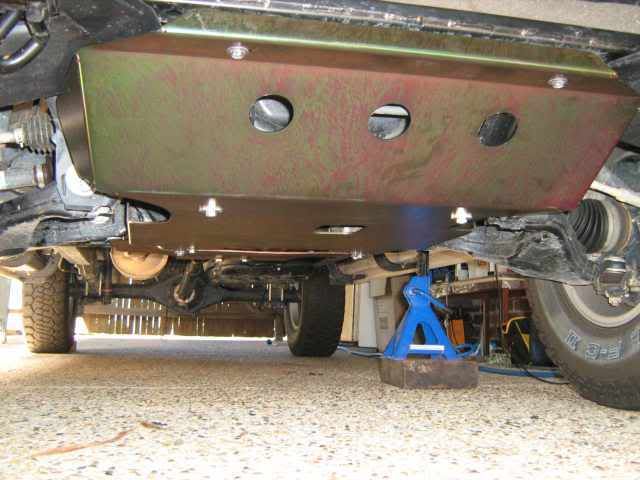
Transmission:
The tranmission font bolts go into a plate which has a piece of wire attached to let you fish it into position inside the Cross member. I levered the plates through the hole to bend this wire so the plates sat flat before I tried to screw the bolts on.
The front Guard wes really easy to install and overall, not worth the $35 TJM wanted to fit them both. Here is the finished product:
Front:
Transmission:
-
rodw - Posts: 3195
- Joined: Tue, 19 Feb 2008 2:00 +0000
- Location: Brisbane, QLD
Who is online
Users browsing this forum: No registered users and 77 guests
![]()