Post any videos or images of any inner guard / pinch weld plastic chopping!!!
What tools and finishes used etc.
Looking to make some room under my front guard for bigger tyres down the track and to lose the slight knock on full lock!
Cheers
Sent from my iPhone using Tapatalk
Guard chopping
6 posts
• Page 1 of 1
Guard chopping
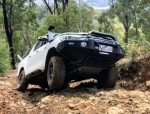
![]() by GC_Hilux on Mon, 03 Jun 2019 7:30 +0000
by GC_Hilux on Mon, 03 Jun 2019 7:30 +0000
- GC_Hilux
- Posts: 48
- Joined: Fri, 04 Nov 2016 12:12 +0000
- Location: Kingscliff
Re: Guard chopping
![]() by ggreenie on Mon, 03 Jun 2019 7:40 +0000
by ggreenie on Mon, 03 Jun 2019 7:40 +0000
- ggreenie
- Posts: 104
- Joined: Mon, 28 Feb 2011 1:17 +0000
Re: Guard chopping
![]() by GC_Hilux on Mon, 03 Jun 2019 7:53 +0000
by GC_Hilux on Mon, 03 Jun 2019 7:53 +0000
Thanks mate - tidy work!
Not sure if I’m that capable haha
Not sure if I’m that capable haha
- GC_Hilux
- Posts: 48
- Joined: Fri, 04 Nov 2016 12:12 +0000
- Location: Kingscliff
Re: Guard chopping
![]() by GC_Hilux on Tue, 04 Jun 2019 8:43 +0000
by GC_Hilux on Tue, 04 Jun 2019 8:43 +0000
Any good vids?
I have a heat gun and will start there but may need a dremel, or could use a box cutter.
Sent from my iPhone using Tapatalk
I have a heat gun and will start there but may need a dremel, or could use a box cutter.
Sent from my iPhone using Tapatalk
- GC_Hilux
- Posts: 48
- Joined: Fri, 04 Nov 2016 12:12 +0000
- Location: Kingscliff
Re: Guard chopping
![]() by Hilux Max on Thu, 12 Dec 2019 8:30 +0000
by Hilux Max on Thu, 12 Dec 2019 8:30 +0000
go check out my album on instagram, i have documented my guard chopping process from a couple years back.
first to run 295s, then onto 35's.
#hilux_max
first to run 295s, then onto 35's.
#hilux_max
The Punisher 2.0 N80 Build - http://www.newhilux.net/phpbb/viewtopic.php?f=119&t=26631
The Punisher 1.0 N70 Build - http://www.newhilux.net/phpbb/viewtopic.php?f=41&t=747&hilit=Punisher
The Punisher 1.0 N70 Build - http://www.newhilux.net/phpbb/viewtopic.php?f=41&t=747&hilit=Punisher
-

Hilux Max - Valued Contributor
- Posts: 12434
- Joined: Sun, 07 Jan 2007 12:00 +0000
Re: Guard chopping
![]() by timbo9431 on Sat, 07 Mar 2020 9:05 +0000
by timbo9431 on Sat, 07 Mar 2020 9:05 +0000
285/70/17 TYRES NO BODY MOUNT OR FENDER CHOP AND WITH MUD FLAPS ON!
Hi,
I have read many threads regarding how to fit 285 (or 33’) tyres onto the current model Hilux. I also wanted to achieve this but was very reluctant to chop my front body mounts and wanted to maintain the original look so I decided to try some other methods first. I now have 285/70/17 tyres on the car with no body mount chop and I still have the original mud flaps on. There is no rubbing of the tyre at compression. I thought I would share what I have done to achieve this and hopefully it helps some others…..
Here is the Hilux with 285/70/17 Cooper STT Pro tyres. These measure 839mm diameter new. Mine have 2 to 3mm worn off them. These four pics are taken at almost full compression of the front suspension. Clearance is about 8mm at full lock and full compression.


To achieve this, a big lift is not essential as the important clearance achieved is at full compression. On the vehicle I have…….
• Caloffroad Bilstein struts, which have settled at about 50mm lift
• offset lower control arm bushes to push the wheel forward in the wheel arch. I am using a Fulcrum, complete lower control arm replacement, with offset bushes. This is the critical component to bring the wheel forward more than just the UCA alone.
• 30mm diff drop
• an aftermarket upper control arm to achieve an acceptable caster. I am using Caloffroad UCAs
• a sway bar relocation plate to move the bar forward
• wheels with P12 offset. Mine are 17 x 8 ET12
Here is what I did……..
Remove the mud flap and mark out the area to cut from the plastic wheel arch trim.

Cut this out. (Maintain the scrivet mounting holes)

On the pinch weld, mark the area to be cut off. This is only about 10 to 15 mm and should still maintain the welds holding the pinch together. (You could fold the pinch weld if preferred) This cut goes up past the cutout section of the wheel arch liner so you will need to remove the scrivets from the lower section including one pop-out scrivet The square scrivets will be destroyed in the removal process so get new ones from eBay before starting.
Also mark a line along the bottom sill as shown in the pic and include a small front-to-back cut behind the plastic.
The bottom sill can be cut off but I chose to fold it upwards to maintain rigidity in the structure.
Cut off a small amount of the ridge from the plastic cover.

Clean up any sharp edges and corners from the cutting work.
Treat the exposed metal areas to prevent rust.

Replace the wheel arch liner using the new scrivets

Now it is time to start modifying the plastic components with a heat gun.
Gently heat and push in, the section of the wheel arch liner which sits directly above the pinch weld that was reduced in size earlier


Screw on the mudflap (all the previous work should now be concealed behind the mudflap).
Behind the marked area on the mudflap is now vacant space. The idea now is to heat the protruding section of the mudflap and work the softened plastic back into the cavity behind.


The last thing to do is pull the mudflap back hard against the body mount with chain or some other similar means.

I have used a small wire-rope clamp. This has lasted 80 000km so far
https://wjzswa.ch.files.1drv.com/y4mRMt ... pmode=none
Now it should look like this…….

Hi,
I have read many threads regarding how to fit 285 (or 33’) tyres onto the current model Hilux. I also wanted to achieve this but was very reluctant to chop my front body mounts and wanted to maintain the original look so I decided to try some other methods first. I now have 285/70/17 tyres on the car with no body mount chop and I still have the original mud flaps on. There is no rubbing of the tyre at compression. I thought I would share what I have done to achieve this and hopefully it helps some others…..
Here is the Hilux with 285/70/17 Cooper STT Pro tyres. These measure 839mm diameter new. Mine have 2 to 3mm worn off them. These four pics are taken at almost full compression of the front suspension. Clearance is about 8mm at full lock and full compression.
To achieve this, a big lift is not essential as the important clearance achieved is at full compression. On the vehicle I have…….
• Caloffroad Bilstein struts, which have settled at about 50mm lift
• offset lower control arm bushes to push the wheel forward in the wheel arch. I am using a Fulcrum, complete lower control arm replacement, with offset bushes. This is the critical component to bring the wheel forward more than just the UCA alone.
• 30mm diff drop
• an aftermarket upper control arm to achieve an acceptable caster. I am using Caloffroad UCAs
• a sway bar relocation plate to move the bar forward
• wheels with P12 offset. Mine are 17 x 8 ET12
Here is what I did……..
Remove the mud flap and mark out the area to cut from the plastic wheel arch trim.
Cut this out. (Maintain the scrivet mounting holes)
On the pinch weld, mark the area to be cut off. This is only about 10 to 15 mm and should still maintain the welds holding the pinch together. (You could fold the pinch weld if preferred) This cut goes up past the cutout section of the wheel arch liner so you will need to remove the scrivets from the lower section including one pop-out scrivet The square scrivets will be destroyed in the removal process so get new ones from eBay before starting.
Also mark a line along the bottom sill as shown in the pic and include a small front-to-back cut behind the plastic.
The bottom sill can be cut off but I chose to fold it upwards to maintain rigidity in the structure.
Cut off a small amount of the ridge from the plastic cover.
Clean up any sharp edges and corners from the cutting work.
Treat the exposed metal areas to prevent rust.
Replace the wheel arch liner using the new scrivets
Now it is time to start modifying the plastic components with a heat gun.
Gently heat and push in, the section of the wheel arch liner which sits directly above the pinch weld that was reduced in size earlier
Screw on the mudflap (all the previous work should now be concealed behind the mudflap).
Behind the marked area on the mudflap is now vacant space. The idea now is to heat the protruding section of the mudflap and work the softened plastic back into the cavity behind.
The last thing to do is pull the mudflap back hard against the body mount with chain or some other similar means.
I have used a small wire-rope clamp. This has lasted 80 000km so far
https://wjzswa.ch.files.1drv.com/y4mRMt ... pmode=none
Now it should look like this…….
-
timbo9431 - Posts: 23
- Joined: Thu, 21 Apr 2016 5:47 +0000
- Location: Eltham, Victoria
6 posts
• Page 1 of 1
Who is online
Users browsing this forum: No registered users and 2 guests
![]()