I have just installed the A-Sure unit (First on the list) Arrived 3 days after ordering it, Easy as to fit, all plug and play, Installed a camera at the back and it works great.
The only issue I have is I couldn't copy the IGO8 folder onto my PC from the 2GB card. I then got another copy of IGO from my 5" GPS, installed that card and for some reason the In dash GPS will not read the card, must be some special copy right on the original SD card ?? and maybe the SD card has a code that talks to the GPS ( I am not that good with computers )
I then installed Ozi Explorer on the SD card that came with the unit, went to Navi, changed the paths, all good at this stage, but when it came on and you try use the pop ups or use the Keyboard the screen keeps switching back to the front page. After reading the Pradopoint forum it looks like Ozi Explorer does not like the 800x480 screen resolutions,
I think the A-Sure and DIG Options units are the same unit as I have read that Dig Options are having the same issues with there newer units and have been in contact with Ozi Explorer.
I am sure the issue will be resolved in time
With the above in mind it may be worth while paying the extra $144.00 (If you want the camera, Its great) as you will get local Australian support.
Happy shopping
Dennis
2008 SR5
How To - DIG Options TP09X1 Unit Install Part 2 Camera Done!
Re: DIG Options GPS
![]() by bardenboy on Sun, 18 Apr 2010 5:34 +0000
by bardenboy on Sun, 18 Apr 2010 5:34 +0000
- bardenboy
- Posts: 51
- Joined: Wed, 22 Oct 2008 4:51 +0000
Re: DIG Options GPS
![]() by Flecky on Sun, 18 Apr 2010 6:27 +0000
by Flecky on Sun, 18 Apr 2010 6:27 +0000
Thanks Alby & Dennis for the quick reply....
I think i'll go with the Dig Options one. I had a look at the feedback for the seller of the one ending tonight and he had a lot of negitive comments left for him. Also (as Dennis said) its good to have the local support in case there are any issues.
Thanks again
Chris
I think i'll go with the Dig Options one. I had a look at the feedback for the seller of the one ending tonight and he had a lot of negitive comments left for him. Also (as Dennis said) its good to have the local support in case there are any issues.
Thanks again
Chris
-

Flecky - Posts: 26
- Joined: Fri, 16 Apr 2010 8:24 +0000
Re: DIG Options GPS
![]() by Alby on Sun, 18 Apr 2010 6:36 +0000
by Alby on Sun, 18 Apr 2010 6:36 +0000
Flecky wrote:Thanks Alby & Dennis for the quick reply....
I think i'll go with the Dig Options one. I had a look at the feedback for the seller of the one ending tonight and he had a lot of negitive comments left for him. Also (as Dennis said) its good to have the local support in case there are any issues.
Thanks again
Chris
As happy as I am with my unit and I have had no problems, I tend to agree that it would be good to have local support if needed.
Originally I ordered a Digi Options unit but they were out of stock at the time so went with the other one.
On the internet you can be anything you want. It is strange that so many people choose to be stupid!
-

Alby - Posts: 6673
- Joined: Tue, 03 Jul 2007 1:00 +0000
- Location: Sydney, NSW
Re: DIG Options GPS
![]() by asmo on Sun, 18 Apr 2010 8:33 +0000
by asmo on Sun, 18 Apr 2010 8:33 +0000
Hi Bardenboy
I have had my dig options model a few months now and it does the same with getting kicked out of ozi with pop up boxes,
I havent found an answer yet
It really isnt a problem though as this is the only issue.... operationally its Perfect..
I did try 3 different versions ( releases ) of ozi ( older ones etc) every one the same
As you said, someone will solve soon enough..
Great units and as said reverse camera is very clear and better than 2 others i compared on mates cars that are both different brands (wireless and hard wired)
Cheers asmo
-
asmo - Posts: 180
- Joined: Thu, 04 Feb 2010 11:36 +0000
- Location: South West WA
Re: DIG Options GPS
![]() by gruntre69 on Mon, 19 Apr 2010 8:05 +0000
by gruntre69 on Mon, 19 Apr 2010 8:05 +0000
Hi Asmo,
Is the camera you refer to the one that comes bundled with the Dig Options unit?
Is the camera you refer to the one that comes bundled with the Dig Options unit?
-

gruntre69 - Posts: 384
- Joined: Mon, 18 Jan 2010 2:25 +0000
- Location: Perth WA
Re: DIG Options GPS
![]() by asmo on Mon, 19 Apr 2010 2:12 +0000
by asmo on Mon, 19 Apr 2010 2:12 +0000
gruntre69 wrote:Hi Asmo,
Is the camera you refer to the one that comes bundled with the Dig Options unit?
Yes mate the one they supply hard wired to the unit
Cheers asmo
-
asmo - Posts: 180
- Joined: Thu, 04 Feb 2010 11:36 +0000
- Location: South West WA
Re: DIG Options GPS
![]() by Steve9R on Mon, 19 Apr 2010 2:51 +0000
by Steve9R on Mon, 19 Apr 2010 2:51 +0000
asmo wrote:Hi Bardenboy
I have had my dig options model a few months now and it does the same with getting kicked out of ozi with pop up boxes,
I havent found an answer yet
It really isnt a problem though as this is the only issue.... operationally its Perfect..
I did try 3 different versions ( releases ) of ozi ( older ones etc) every one the same
As you said, someone will solve soon enough..
Great units and as said reverse camera is very clear and better than 2 others i compared on mates cars that are both different brands (wireless and hard wired)
Cheers asmo
are you trying to run a cracked version of OZI or a legit license ? Ive heard of people who've used the common Maurico whatever license were kicked out all the time.. we simply bought a legit license and havent been kicked out once..
Steve
-

Steve9R - Valued Contributor
- Posts: 5248
- Joined: Wed, 11 Apr 2007 1:00 +0000
- Location: Melbourne, VIC
Re: DIG Options GPS
![]() by Rich on Mon, 19 Apr 2010 3:22 +0000
by Rich on Mon, 19 Apr 2010 3:22 +0000
Just for your info guys, I e-mailed the A-Sure company and they are in the throws of updating their model to incorporate an integrated DVB-T Digital Tv Tuner. It will also have 2 X SD Card slots.
This will be plug and play for Toyotas.
I think the third one on the list had a less resolution touch screen (480 x 234 )??
I have decided to wait another month or so and see what comes out from A-sure.
Rich.
This will be plug and play for Toyotas.
I think the third one on the list had a less resolution touch screen (480 x 234 )??
I have decided to wait another month or so and see what comes out from A-sure.
Rich.
-

Rich - Posts: 986
- Joined: Sun, 07 Jan 2007 12:00 +0000
- Location: Gold Coast
Re: DIG Options GPS
![]() by asmo on Mon, 19 Apr 2010 8:00 +0000
by asmo on Mon, 19 Apr 2010 8:00 +0000
Hi Steve
mmm ...Interesting..maybe thats it as i got the maps from others and the Ozi operating software from there site
Never put a code in ... Dont have one so yes i would be on Demo as far as i know .
How much did the code set you back (or PM me)
Cheers for that
asmo
mmm ...Interesting..maybe thats it as i got the maps from others and the Ozi operating software from there site
Never put a code in ... Dont have one so yes i would be on Demo as far as i know .
How much did the code set you back (or PM me)
Cheers for that
asmo
-
asmo - Posts: 180
- Joined: Thu, 04 Feb 2010 11:36 +0000
- Location: South West WA
Re: DIG Options GPS
![]() by Steve9R on Tue, 20 Apr 2010 8:14 +0000
by Steve9R on Tue, 20 Apr 2010 8:14 +0000
Looking at their site its $40 for the license.
http://www.oziexplorer3.com/eng/aussiepurchase.html
If you havent put in a code then yes the Demo mode version will hang / stop responding all sorts of things..
Steve
http://www.oziexplorer3.com/eng/aussiepurchase.html
If you havent put in a code then yes the Demo mode version will hang / stop responding all sorts of things..
Steve
-
Steve9R - Valued Contributor
- Posts: 5248
- Joined: Wed, 11 Apr 2007 1:00 +0000
- Location: Melbourne, VIC
Re: DIG Options GPS
![]() by woody7 on Tue, 20 Apr 2010 2:40 +0000
by woody7 on Tue, 20 Apr 2010 2:40 +0000
So what do you get for the $40 license fee? As the maps appear to be $199?
- woody7
- Posts: 115
- Joined: Mon, 01 Mar 2010 6:18 +0000
Re: DIG Options GPS
![]() by asmo on Tue, 20 Apr 2010 8:35 +0000
by asmo on Tue, 20 Apr 2010 8:35 +0000
woody7 wrote:So what do you get for the $40 license fee? As the maps appear to be $199?
Im not 100% sure but i think the 40 bucks is the operating system that allows you to see the maps navigate customise etc etc etc...
You dont have to use Ozi maps on the system and can use Raster maps and many others, as all digital maps can be converted to the type of file Ozi uses .. ( .map file ) It is a bit of mucking around on your computer though..If you dont operate a computer very well then get someone to do it or just get the Ozi maps ...
Sometimes days of pure frustration is with something ...
All up have a play in the demo on the unit or home computer, then ask yourself if you want to buy it, thats what the demo is for
-
asmo - Posts: 180
- Joined: Thu, 04 Feb 2010 11:36 +0000
- Location: South West WA
Re: DIG Options GPS
![]() by Steve9R on Wed, 21 Apr 2010 9:45 +0000
by Steve9R on Wed, 21 Apr 2010 9:45 +0000
yeah for the $40 you get your license / activation key to enable the main program only.. no maps..
-
Steve9R - Valued Contributor
- Posts: 5248
- Joined: Wed, 11 Apr 2007 1:00 +0000
- Location: Melbourne, VIC
How To - DIG Options TP09X1 Unit Install Part 2 Camera Done!
![]() by johnny5x on Wed, 21 Apr 2010 6:21 +0000
by johnny5x on Wed, 21 Apr 2010 6:21 +0000
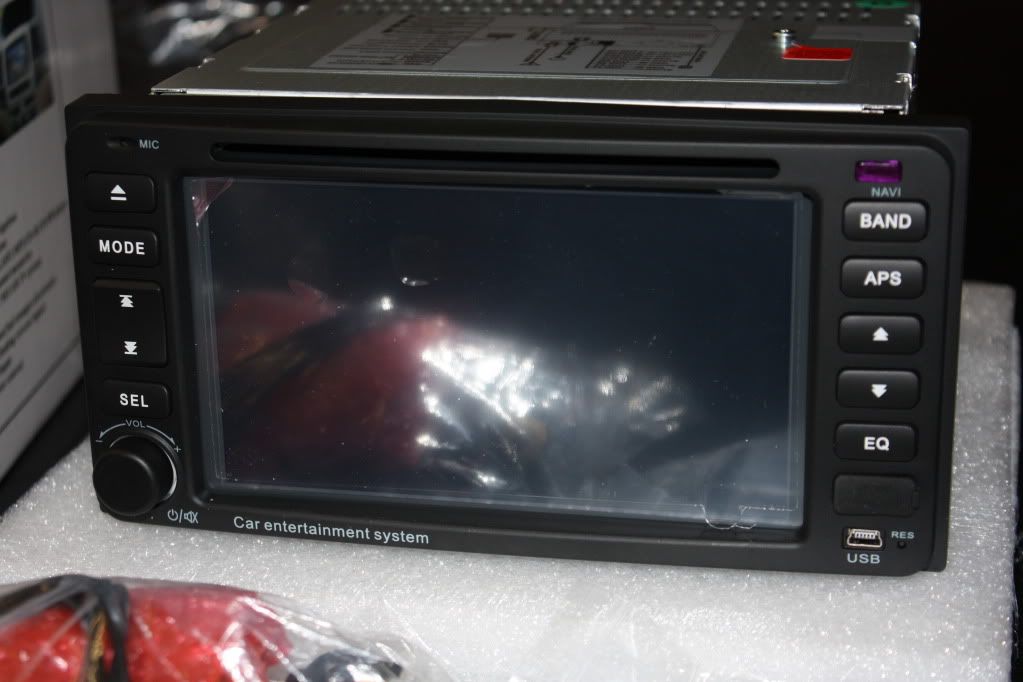
I installed my DIG OPTIONS TP09X1 Entertainment Unit tonight and thought i would write up a installation how to for others out there who might want to do the same. This was the simplest stereo install i have ever completed, cant stress enough how simple it is so give it a red hot go!
Click on the pictures below to see the full photo.
First of all you need to remove the original unit. To do this, pull all three turn dials for the heating and fan off with your fingers, they come off easily.
You will see there is one screw in the centre fan control, use a phillips head screw driver to remove.
Now you can proceed to remove the fascia around the original stereo. Get your fingers in behind the fascia from the inside of the two little compartment holders and gently pull the fascia off. Try to do this as slowly as possible to prevent the yellow clips from detaching like i found happend to me. I found the yellow plastic clips underneath the gear stick surround which also comes off easily by starting to pull from the centre console upwards with the centre console lid open. You will need a torch. Good thing they are bright yellow as it made it so much easier to find them! Well done Mr Toyota! Remember to attach the clips back to their mounts on the fascia mounting clips before reinstalling the fascia.
Once the fascia is off you will need to detach the AC button plug and the Hazard light plug. There are little tab levers on both of these and come out with ease once depressed.
After this you should be left with something looking like this.
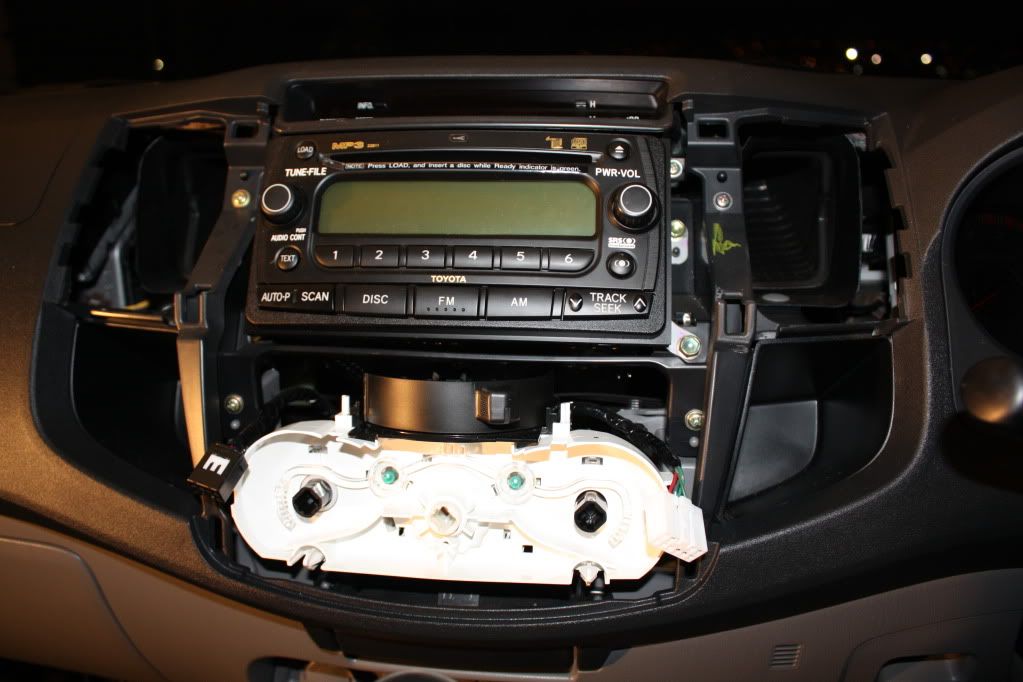
There are four 8mm screws on the left and right hand side of the original unit. You will need to use an extension on your ratchet to get to these. If you have a magentic tool handy i advise using it to collect these screws once out as they can fall into the abis also.
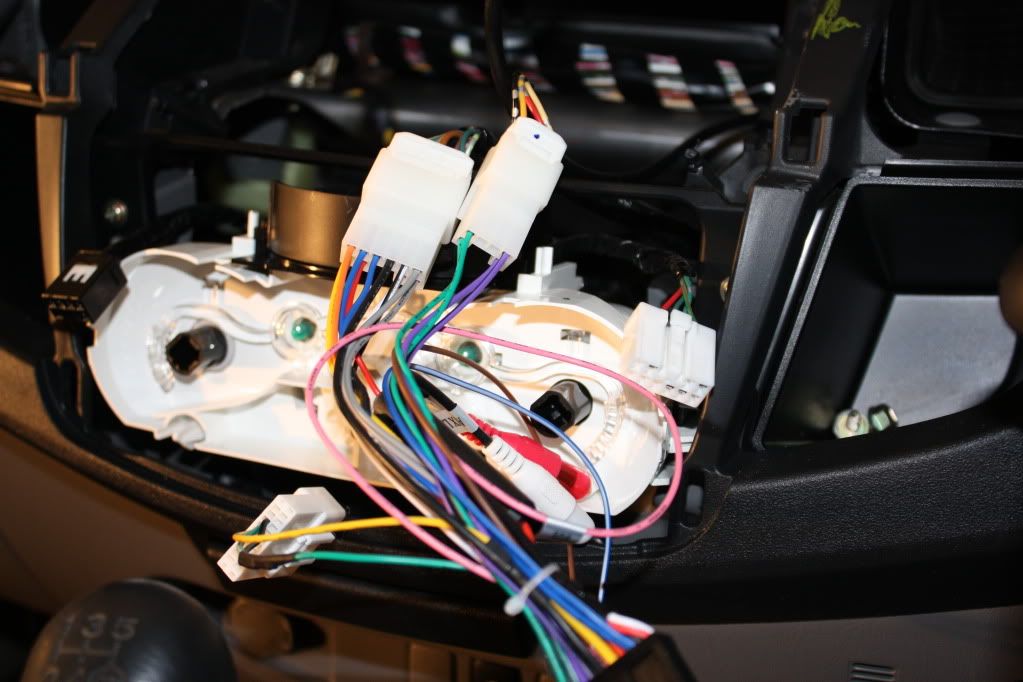
Once all the srews have been undone and removed, pull the stero out, detach the antenna, and two white plug harnesses from the rear. They look like this.
Now its time to get the TP09X1 ready!
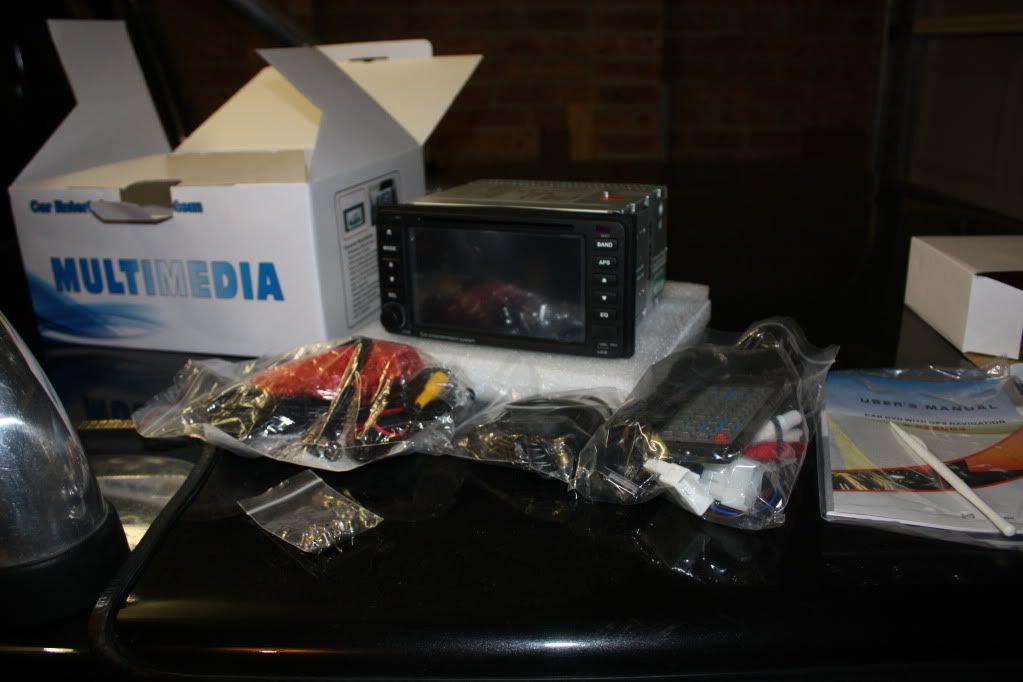
Find the TP09X1 Toyota wiring harness that came with the unit and plug it in to the factory wiring harness.
I like to test things (probably too anxious to see it working ) before commiting to a full install, so i plugged my unit straight into the wiring harness and turned it on to make sure it was all working perfect which it was! Detach the wiring harness from the back of the unit.
Once this is established you need to remove the two LEFT and RIGHT frame mountings off the original head unit. You can either use a phillips head screw driver or 8mm socket to remove the screws. I reused these screws and attached the two mounting frames onto the TP09X1. They are labelled L and R funnily enough. These frame mounting should be screwed in the same orientation as the original unit.

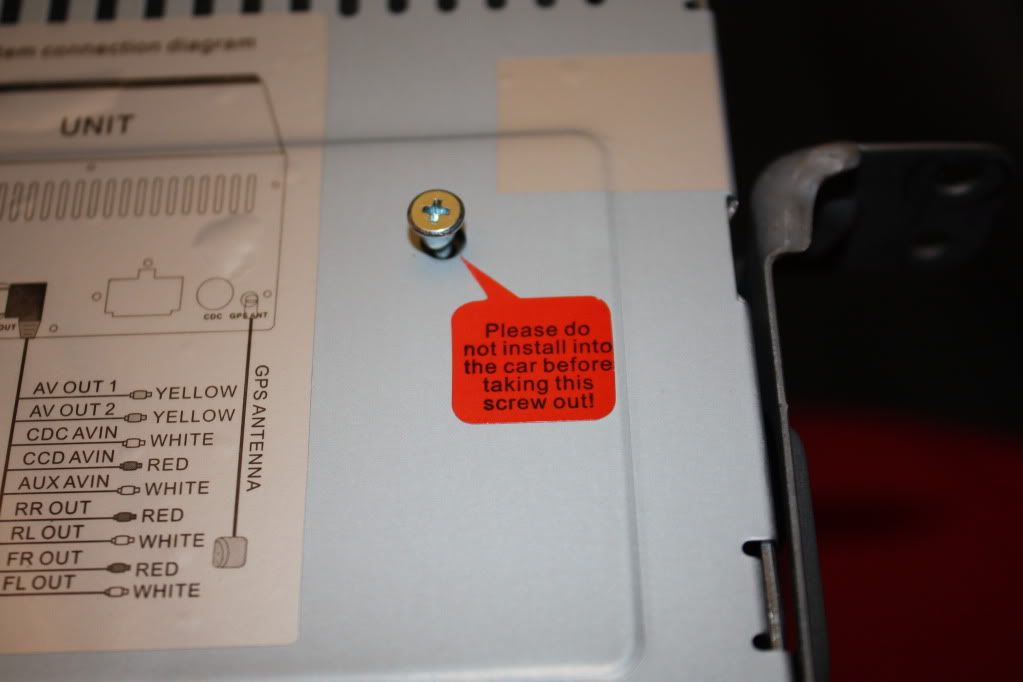
There is a tiny screw on the top of the unit with a warning that says to remove this before installation into the dash, remember to remove this, i believe this has something to do with the DVD/CD drive.
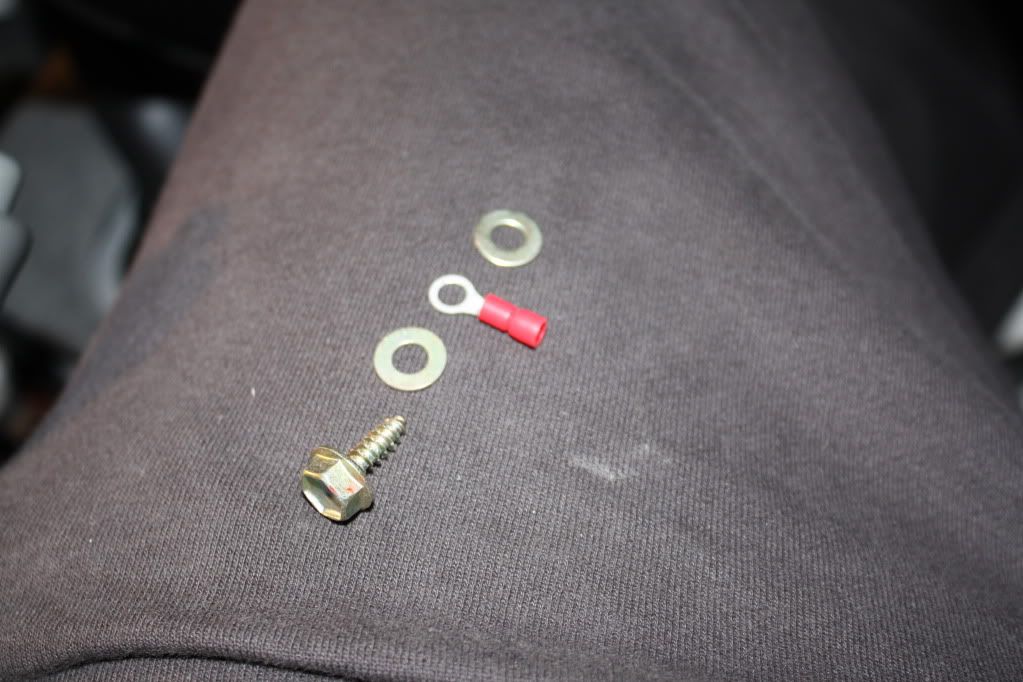
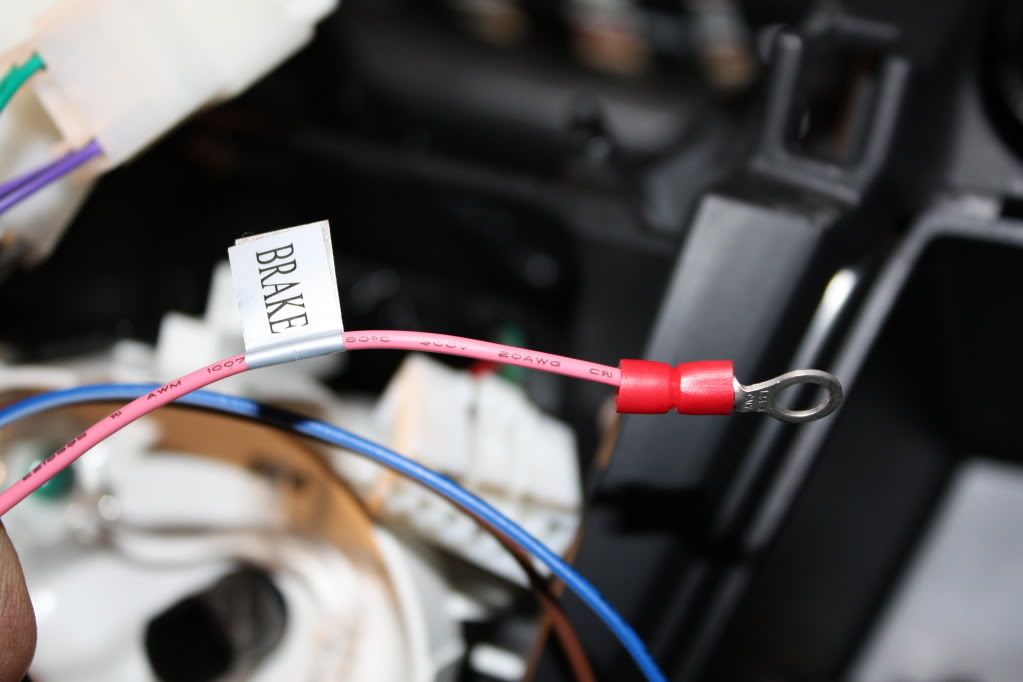
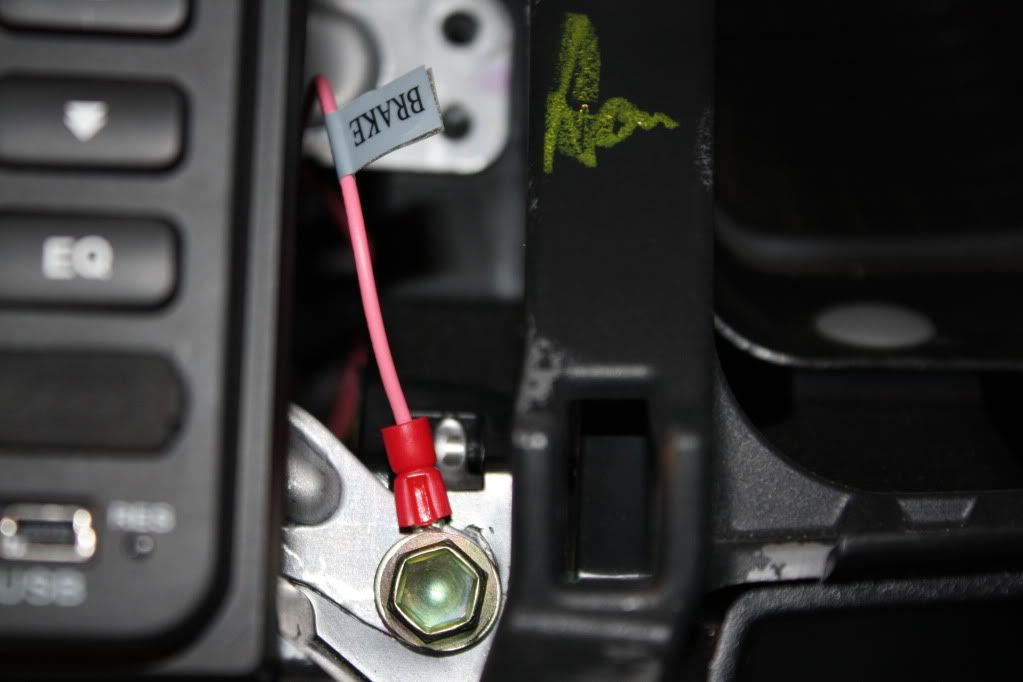
You need to ground the PINK cable labelled "BRAKE" to stop the video warning message from appearing all the time when trying to watch a DVD/TV etc. Im really not a fan of using wire connectors so i crimped the cable with a round terminal and used some washers on either side and screwed it to the metal that the bottom right hand screw attaches to. You could however just use a wire connector and splice into one of the ground cables in the back if thats your thing (i believe it is the black wire on the wiring harness).
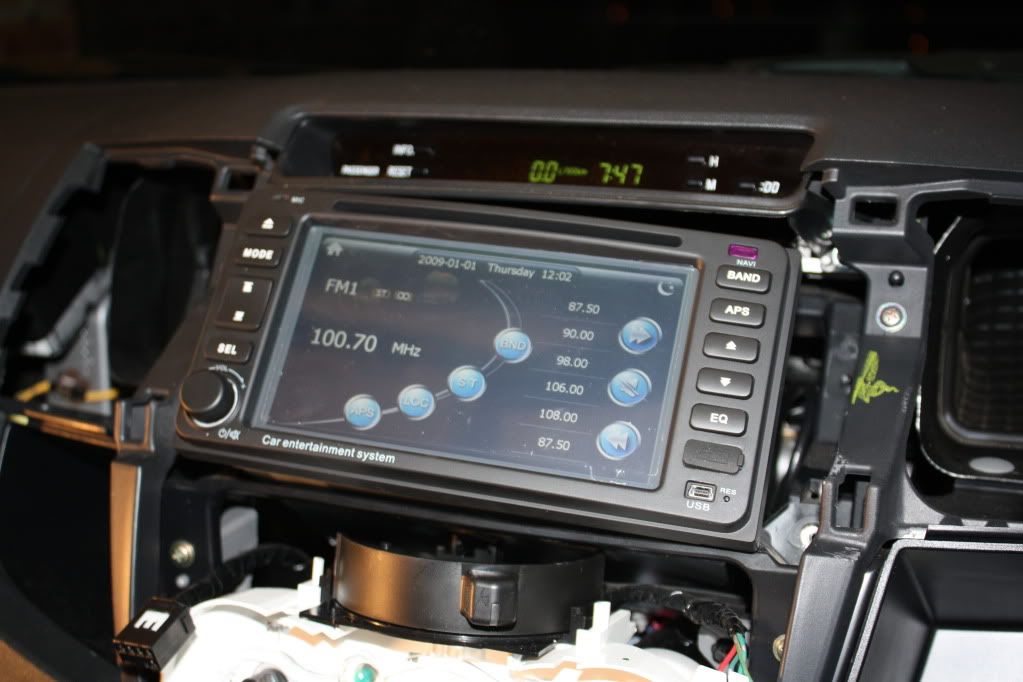
Re-attach the wiring harness, GPS antenna cable and radio antenna cable to the unit. There is quite a bit of room under the unit once in the dash so i just left my GPS antenna resting there, it seems to work fine with no issue getting a signal. If you want you may want to route it somewhere else. I also attached the IPOD cable that came with the unit and ran it over into my glove box where i normally keep my ipod.
Gently place the new unit back into the dash and do the complete reversal to removing the head unit in the first place. Again if you have a 8mm magnetic socket this will make life so much easier. If you dont have one like me, you just need to take it slow as the angle you need to put the screws back in can make the screw fall out of the socket.
Congratulations you have just installed the TP09X1 in 30 minutes!
There is more to come on this install. Part 2 will look at installing the reverse camera and wiring the unit so that video can be watched without getting the annoying warning message. Im also waiting on the digital tv antenna to arrive so this can be installed also. Stay tuned!
Click on the pictures below to see the full photo.
First of all you need to remove the original unit. To do this, pull all three turn dials for the heating and fan off with your fingers, they come off easily.
You will see there is one screw in the centre fan control, use a phillips head screw driver to remove.
Now you can proceed to remove the fascia around the original stereo. Get your fingers in behind the fascia from the inside of the two little compartment holders and gently pull the fascia off. Try to do this as slowly as possible to prevent the yellow clips from detaching like i found happend to me. I found the yellow plastic clips underneath the gear stick surround which also comes off easily by starting to pull from the centre console upwards with the centre console lid open. You will need a torch. Good thing they are bright yellow as it made it so much easier to find them! Well done Mr Toyota! Remember to attach the clips back to their mounts on the fascia mounting clips before reinstalling the fascia.
Once the fascia is off you will need to detach the AC button plug and the Hazard light plug. There are little tab levers on both of these and come out with ease once depressed.
After this you should be left with something looking like this.
There are four 8mm screws on the left and right hand side of the original unit. You will need to use an extension on your ratchet to get to these. If you have a magentic tool handy i advise using it to collect these screws once out as they can fall into the abis also.
Once all the srews have been undone and removed, pull the stero out, detach the antenna, and two white plug harnesses from the rear. They look like this.
Now its time to get the TP09X1 ready!
Find the TP09X1 Toyota wiring harness that came with the unit and plug it in to the factory wiring harness.
I like to test things (probably too anxious to see it working
Once this is established you need to remove the two LEFT and RIGHT frame mountings off the original head unit. You can either use a phillips head screw driver or 8mm socket to remove the screws. I reused these screws and attached the two mounting frames onto the TP09X1. They are labelled L and R funnily enough. These frame mounting should be screwed in the same orientation as the original unit.
There is a tiny screw on the top of the unit with a warning that says to remove this before installation into the dash, remember to remove this, i believe this has something to do with the DVD/CD drive.
You need to ground the PINK cable labelled "BRAKE" to stop the video warning message from appearing all the time when trying to watch a DVD/TV etc. Im really not a fan of using wire connectors so i crimped the cable with a round terminal and used some washers on either side and screwed it to the metal that the bottom right hand screw attaches to. You could however just use a wire connector and splice into one of the ground cables in the back if thats your thing (i believe it is the black wire on the wiring harness).
Re-attach the wiring harness, GPS antenna cable and radio antenna cable to the unit. There is quite a bit of room under the unit once in the dash so i just left my GPS antenna resting there, it seems to work fine with no issue getting a signal. If you want you may want to route it somewhere else. I also attached the IPOD cable that came with the unit and ran it over into my glove box where i normally keep my ipod.
Gently place the new unit back into the dash and do the complete reversal to removing the head unit in the first place. Again if you have a 8mm magnetic socket this will make life so much easier. If you dont have one like me, you just need to take it slow as the angle you need to put the screws back in can make the screw fall out of the socket.
Congratulations you have just installed the TP09X1 in 30 minutes!
There is more to come on this install. Part 2 will look at installing the reverse camera and wiring the unit so that video can be watched without getting the annoying warning message. Im also waiting on the digital tv antenna to arrive so this can be installed also. Stay tuned!
Last edited by johnny5x on Sun, 25 Apr 2010 3:43 +0000, edited 2 times in total.
-
johnny5x - Posts: 310
- Joined: Sun, 31 Jan 2010 7:19 +0000
- Location: Canberra ACT
Re: DIG Options GPS
![]() by johnny5x on Wed, 21 Apr 2010 6:31 +0000
by johnny5x on Wed, 21 Apr 2010 6:31 +0000
Hi All,
I have just created a DIG Option install how to thread...
viewtopic.php?f=13&t=5734
Hope you find it helpful!
Cheers
John
I have just created a DIG Option install how to thread...
viewtopic.php?f=13&t=5734
Hope you find it helpful!
Cheers
John
-
johnny5x - Posts: 310
- Joined: Sun, 31 Jan 2010 7:19 +0000
- Location: Canberra ACT
Re: DIG Options GPS
![]() by bardenboy on Wed, 21 Apr 2010 6:43 +0000
by bardenboy on Wed, 21 Apr 2010 6:43 +0000
Hi Steve
I have a full lienced OziExplore, PC & PDA copies, its a great piece of software for the cost and you even get free upgrades.
I have been running it on my old PDA and was looking forward using it on the new in dash unit
At this stage I will try and add the DIG Options software to see if that helps, but I am real keen to get it working
Dennis
- bardenboy
- Posts: 51
- Joined: Wed, 22 Oct 2008 4:51 +0000
Re: How To - DIG Options TP09X1 Unit Install
![]() by gruntre69 on Wed, 21 Apr 2010 6:53 +0000
by gruntre69 on Wed, 21 Apr 2010 6:53 +0000
Nice one mate! I've got one of these on order...... Great photos! Very helpful.
Would be nice if you add one more to the end of that post of the finished product fitting perfectly as the original one did.
Would be nice if you add one more to the end of that post of the finished product fitting perfectly as the original one did.
-
gruntre69 - Posts: 384
- Joined: Mon, 18 Jan 2010 2:25 +0000
- Location: Perth WA
Re: DIG Options GPS
![]() by gruntre69 on Wed, 21 Apr 2010 6:56 +0000
by gruntre69 on Wed, 21 Apr 2010 6:56 +0000
efini7 wrote:Hi All,
I have just created a DIG Option install how to thread...
viewtopic.php?f=13&t=5734
Hope you find it helpful!
Cheers
John
Great post efini7
Looking forward to getting mine once they have stock..... and it will be good to have some colaboration on getting Oz Explorer running properly without restarting problems with popup screens.
Questions: Do you have a 5th or 6th gen Ipod and if yes does it display track/artist/album data on screen? and does the skip forward/back track work with Ipod (including steering wheel controls)
-
gruntre69 - Posts: 384
- Joined: Mon, 18 Jan 2010 2:25 +0000
- Location: Perth WA
Re: DIG Options GPS
![]() by johnny5x on Wed, 21 Apr 2010 7:56 +0000
by johnny5x on Wed, 21 Apr 2010 7:56 +0000
Cheers guntre
I dont have steering wheel controls so cant comment on that aspect (2005 model).
I have an 8 GB ipod touch. All the unit is able to do is play, stop and skip songs. Song details dont come up on the screen. The ipod interface screen is really not that great, would be something i wish they would update cause it is pretty bland, but all the other features are great
-
johnny5x - Posts: 310
- Joined: Sun, 31 Jan 2010 7:19 +0000
- Location: Canberra ACT
Re: DIG Options GPS
![]() by gruntre69 on Wed, 21 Apr 2010 10:20 +0000
by gruntre69 on Wed, 21 Apr 2010 10:20 +0000
Yes Matt from DO said to me by phone that he couldn't say for sure about the ipod compatability. He seemed to come accross as though the unit was made for earlier Ipods (hence the charging issues with latest models) and was noncommital about modern Ipods.
He did tell me though that there are no updates available to firmware on this unit so what you see is what you get with Ipod...
He did tell me though that there are no updates available to firmware on this unit so what you see is what you get with Ipod...
-
gruntre69 - Posts: 384
- Joined: Mon, 18 Jan 2010 2:25 +0000
- Location: Perth WA
Who is online
Users browsing this forum: No registered users and 15 guests
![]()