Grunter's SR5 - Canning prep - build stage 3
Re: Grunter's SR5 - Canning prep - build stage 3
![]() by gruntre69 on Sat, 14 Apr 2012 10:34 +0000
by gruntre69 on Sat, 14 Apr 2012 10:34 +0000
-
gruntre69 - Posts: 384
- Joined: Mon, 18 Jan 2010 2:25 +0000
- Location: Perth WA
Grunter's SR5 - Canning prep - build stage 3
![]() by Qwerty on Sat, 14 Apr 2012 11:14 +0000
by Qwerty on Sat, 14 Apr 2012 11:14 +0000
Could use main roof rails for weight bearing? Though with extra cab you're probably dealing with different dynamics ?
-
Qwerty - Posts: 4281
- Joined: Tue, 16 Aug 2011 12:56 +0000
Grunter's SR5 - Canning prep - build stage 3
![]() by Qwerty on Sat, 14 Apr 2012 11:27 +0000
by Qwerty on Sat, 14 Apr 2012 11:27 +0000
-
Qwerty - Posts: 4281
- Joined: Tue, 16 Aug 2011 12:56 +0000
Re: Grunter's SR5 - Canning prep - build stage 3
![]() by gruntre69 on Sun, 15 Apr 2012 7:54 +0000
by gruntre69 on Sun, 15 Apr 2012 7:54 +0000
-
gruntre69 - Posts: 384
- Joined: Mon, 18 Jan 2010 2:25 +0000
- Location: Perth WA
-
Qwerty - Posts: 4281
- Joined: Tue, 16 Aug 2011 12:56 +0000
Re: Grunter's SR5 - Canning prep - build stage 3
![]() by packeteer on Sun, 15 Apr 2012 12:48 +0000
by packeteer on Sun, 15 Apr 2012 12:48 +0000
ie. you'll want to fix that before heading out
-

packeteer - Posts: 3468
- Joined: Wed, 27 Apr 2011 1:49 +0000
- Location: Chatswood, Sydney
Grunter's SR5 - Canning prep - build stage 3
![]() by Qwerty on Sun, 15 Apr 2012 1:11 +0000
by Qwerty on Sun, 15 Apr 2012 1:11 +0000
Rubber but still
Not perfect
-
Qwerty - Posts: 4281
- Joined: Tue, 16 Aug 2011 12:56 +0000
Re: Grunter's SR5 - Canning prep - build stage 3
![]() by gruntre69 on Sun, 15 Apr 2012 5:12 +0000
by gruntre69 on Sun, 15 Apr 2012 5:12 +0000
packeteer wrote:fyi, the tailgate dust sealing is non-existent!
ie. you'll want to fix that before heading out
Which canopy?
I've already done the crappy Toyota Tailgate, best I could....
Edit: Just looked in Packeteer's shed. Looks like no canopy....
-
gruntre69 - Posts: 384
- Joined: Mon, 18 Jan 2010 2:25 +0000
- Location: Perth WA
Re: Grunter's SR5 - Canning prep - build stage 3
![]() by gruntre69 on Sat, 21 Apr 2012 5:37 +0000
by gruntre69 on Sat, 21 Apr 2012 5:37 +0000
So here's my list of items I have on the way:
- Camburg UCA (ball joint type) and a diff drop kit (This will allow me hopefully to crank my Cal offroad Bilstiens up to the top groove and give me that bit of extra clearance for the lower fuel tank... and hopefully some caster to steer nicely)
- 150L long range tank
- Caddy canopy
- Rino welded roof rack to suit
- Rino hilift, shovel and spare wheel mounts
The last piece of the puzzle will be the rear springs which I'll wait until the front is sorted then get them matched.
-
gruntre69 - Posts: 384
- Joined: Mon, 18 Jan 2010 2:25 +0000
- Location: Perth WA
Re: Grunter's SR5 - Canning prep - build stage 3
![]() by packeteer on Sat, 21 Apr 2012 6:57 +0000
by packeteer on Sat, 21 Apr 2012 6:57 +0000
Qwerty wrote:On what canopy packeteer? Mine is perfect but the tailgate itself is the pain (Toyota tailgate.) have sealed my tailgate with some rubber but still not perfect
sorry for the late reply, I was referring to what everybody seems to have already fixed
-
packeteer - Posts: 3468
- Joined: Wed, 27 Apr 2011 1:49 +0000
- Location: Chatswood, Sydney
Re: Grunter's SR5 - Canning prep - build stage 3
![]() by Bushbound on Sun, 22 Apr 2012 10:51 +0000
by Bushbound on Sun, 22 Apr 2012 10:51 +0000
gruntre69 wrote:The last piece of the puzzle will be the rear springs which I'll wait until the front is sorted then get them matched.
I have CalOffroad suspension front and rear, just told Cal what ride height I wanted and what load I carried, he did the calculations and supplied the correct springs. I have found it to be slightly oversprung when empty and just slightly unsersprung when fully loaded, so is pretty close to the perfect all round set up for me.gruntre69 wrote:Camburg UCA (ball joint type) and a diff drop kit (This will allow me hopefully to crank my Cal offroad Bilstiens up to the top groove and give me that bit of extra clearance for the lower fuel tank... and hopefully some caster to steer nicely)
I'm interested to hear how this works as I am considering the same set up, for the same reasons.
Geoff
- Bushbound
- Posts: 462
- Joined: Tue, 01 Jun 2010 3:31 +0000
- Location: Hobart Tasmania
Re: Grunter's SR5 - Canning prep - build stage 3
![]() by darmo on Sun, 13 May 2012 8:54 +0000
by darmo on Sun, 13 May 2012 8:54 +0000
Which tigerz 11 winch did you go? Do you reckon I could install one without removing the bar off my truck?
Cheers darmo.
gruntre69 wrote:Well I think I'm going to end up spending a fair bit of my hard earned on this Hilux so I've decided to document it for 2 reasons. 1: because this is a handy place to keep track of it. And 2: and more important, I'm really glad I discovered this forum and the wealth of info on here before I started. I'll be glad to share any little discoveries I make along the way to save some of you blokes some time.
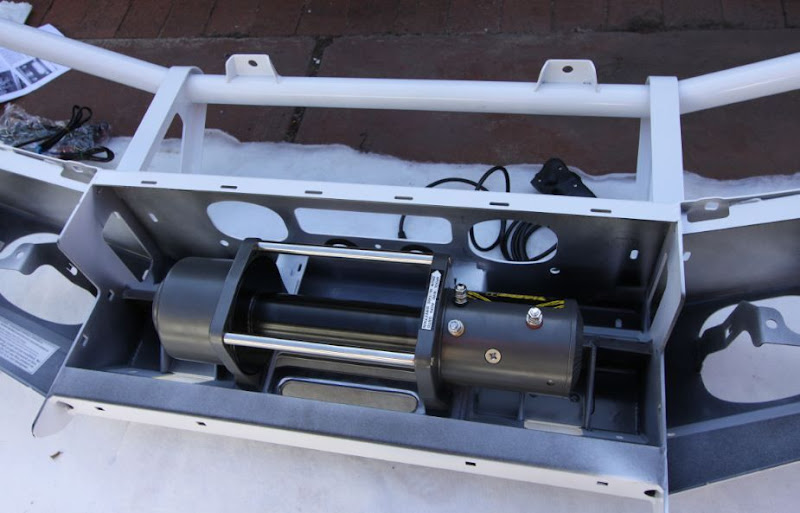
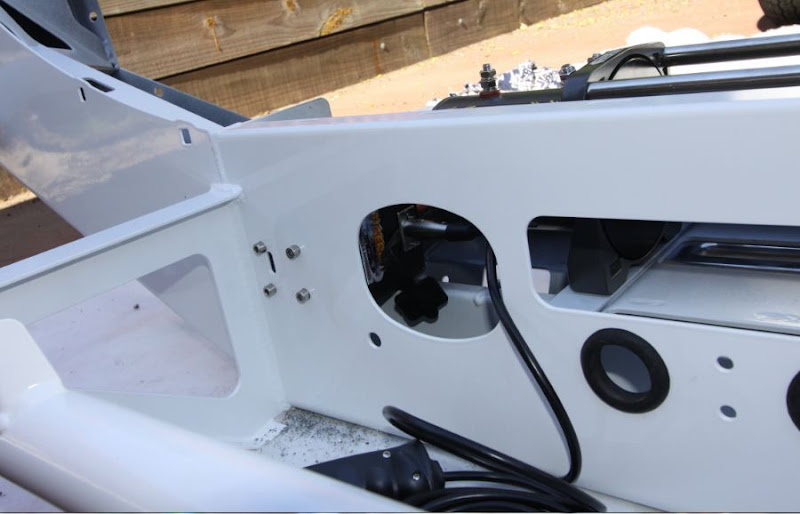
I fitted my new ARB delude bar and Tigerz11 winch a couple of weekends ago and I thought I'd get some pics up now to show how I fitted the control Box.
Everything I needed was in the winch and bar kits, right down to the relay harness for the indicators which weren't needed because my Ute has the extra relay harness for the factory tow bar already. I'll find a use for those relays later I'm sure.
ARB also supplies 3 x 800mm battery cables which weren't required because the winch also comes with cables. These will come in handy for my second battery install coming soon.
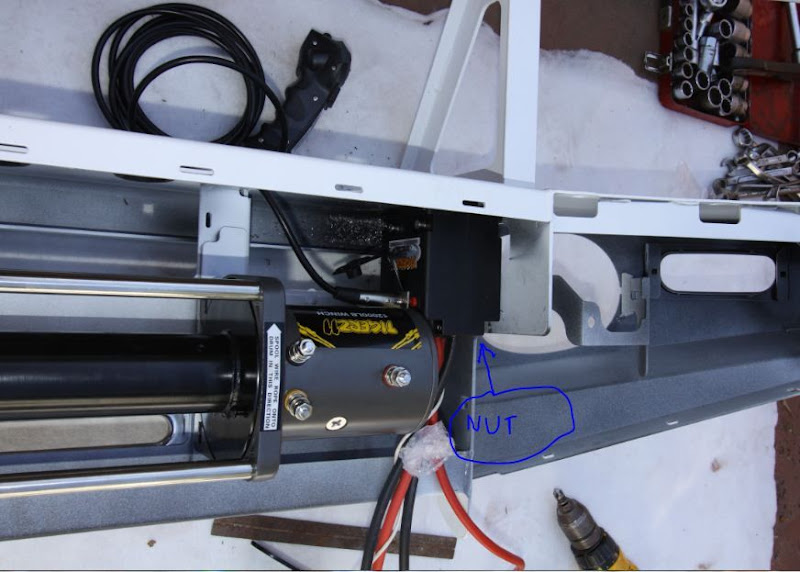
I managed to get it inside the bar out of the weather, although it was very tight with one of the captive nuts that pre-locates the bar for flexible adjustment prior to drilling and fitting the main bar mounting bolts to the crush can frame(edit) The bolt that goes here also needed to have about 10mm cut off it so it didn't protrude through the captive nut into the control box.
Mounting the control box this way also sacrifices one of the holes for fixing the polyurethane bump pads. This can easily be drilled out from the underside to clear the cap screws and stuck down with a dob of silicone. I used the cap screws supplied with the winch to screw on the control box and I had to carefully mark and drill the 4 holes in the top of the freshly painted bar. I just drilled the holes 8mm for the 6mm screws to allow for slight errors in the drill pattern. I was too lazy to make a cardboard drilling template but it worked out sweet just measuring with a rule and square. (Recommend the template).
Winch mounted
Control box (just enough space for crush can captive nut)
Top view
I ran the small Earth for the control pack back to my cab and earthed it via a switch on the right below the steering wheel. I didn't really like the idea of leaving it all powered up because the weather proofing on the solenoid box doesn't look that great to me, even though I installed it inside the bar.
It’s not quite finished yet because I want to add a stud or something in the recess for the fairlead to hook the eye of the end of the winch rope to, which will keep it up out of the way and stop it from scratching up that polished hawser and eventually damaging the rope. I will leave the hook off and will use it if I need to during a recovery, I’ll probably just use D shackles anyway.
Next will be a cover for the top of the bar where all the holes are for the ARB/Warn control mount and the drum inspection slot. My skydiving background gives me knowledge on Nylon fibres and Sunlight and UV exposure severely degrades nylon and spectra fibres(correction - Spectra is way more UV resistant than Nylon). I will make up a quickly removable cover plate for these holes which will also tidy up the appearance of the entire bar.
I also wouldn’t mind somehow figuring out a way to lock the freewheel gear lever on the winch in case someone decides they like my $250 rope more than I do.
Coming soon the install of my ARB on board Air which was given to me for my birthday along with the dig options unit my awesome chick. (Thanks Babe)
I’ve already fitted the Dig options unit but there is no need to go into that as it’s already been well covered and is very straight forward. I will show a picture of the rear view camera mount though when I finish it because I plan to drill a 25mm hole straight through the top centre of the number plate and that’s a bit different.
- darmo
- Posts: 59
- Joined: Thu, 19 Nov 2009 9:25 +0000
Re: Grunter's SR5 - Canning prep - build stage 3
![]() by gruntre69 on Mon, 14 May 2012 9:04 +0000
by gruntre69 on Mon, 14 May 2012 9:04 +0000
You will need to take the bar off..
-
gruntre69 - Posts: 384
- Joined: Mon, 18 Jan 2010 2:25 +0000
- Location: Perth WA
Re: Grunter's SR5 - Canning prep - build stage 3
![]() by gruntre69 on Tue, 22 May 2012 4:29 +0000
by gruntre69 on Tue, 22 May 2012 4:29 +0000
Fuel tank arrived and going in over the next few days....
I think I'm going to run a false floor and a centre sliding draw setup. Not the expensive draws, just some arrangement for plastic tubs to slide under the floor. Should do the trick without taking a second mortgage to pay for it!
-
gruntre69 - Posts: 384
- Joined: Mon, 18 Jan 2010 2:25 +0000
- Location: Perth WA
Re: Grunter's SR5 - Canning prep - build stage 3
![]() by packeteer on Tue, 22 May 2012 5:29 +0000
by packeteer on Tue, 22 May 2012 5:29 +0000
edit: sorry for sounding like an advertisement, but I'm really sold on Luke's drawers
-
packeteer - Posts: 3468
- Joined: Wed, 27 Apr 2011 1:49 +0000
- Location: Chatswood, Sydney
Re: Grunter's SR5 - Canning prep - build stage 3
![]() by gruntre69 on Wed, 30 May 2012 4:35 +0000
by gruntre69 on Wed, 30 May 2012 4:35 +0000
I'm pretty happy with how this tank went in and the clearance loss it very acceptable. I was thinking it would be much worse. I needed to pay a lot of attention to securing fuel lines and wiring harnesses because the old OE tank had mountings for all this incorporated and the OA tank has none. So I now have 193 liters with 2 jerries and am dead keen to finish the well fitout and go for a couple of dry runs to test the loaded finished product.....
Bring on July and the Canning!
-
gruntre69 - Posts: 384
- Joined: Mon, 18 Jan 2010 2:25 +0000
- Location: Perth WA
Re: Grunter's SR5 - Canning prep - build stage 3
![]() by Jeeves on Sat, 01 Dec 2012 10:20 +0000
by Jeeves on Sat, 01 Dec 2012 10:20 +0000
Love the build, love the avatar!!! Were did you end up getting your Camburg's from? Do you have a model number? Are they the same ones that go on the +05 tacoma's?
Tane
- Jeeves
- Posts: 7
- Joined: Fri, 26 Oct 2012 12:19 +0000
Re: Grunter's SR5 - Canning prep - build stage 3
![]() by randomrizzla on Tue, 29 Apr 2014 6:45 +0000
by randomrizzla on Tue, 29 Apr 2014 6:45 +0000
Cheers mate!
Ryley
- randomrizzla
- Posts: 9
- Joined: Mon, 30 Jul 2012 10:24 +0000
Re: Grunter's SR5 - Canning prep - build stage 3
![]() by gruntre69 on Thu, 21 Jan 2016 9:34 +0000
by gruntre69 on Thu, 21 Jan 2016 9:34 +0000
I decided before the CSR trip to install a monster rides diff lowering kit. This was install along with the MR bash plate that is needed under the lowered diff. This was the final stroke to deliver a totally reliable and capable package and the CRS trip was dead easy for this Hilux. If anything I was slightly disappointed in the CSR because it was not even slightly challenging for the vehicle.
-
gruntre69 - Posts: 384
- Joined: Mon, 18 Jan 2010 2:25 +0000
- Location: Perth WA
Who is online
Users browsing this forum: No registered users and 138 guests
![]()