Quinny's Mistress - The Bitch is Back...

Want to show off what you've done to your rig? or have a custom project to show? Post it up here!

Re: Quinny's Build

Postby Quinny34 on Sat, 18 Apr 2009 12:39 +0000

Okay.. here are the results so far...

Suspension and angles.

This is just a view of the Tough Dog Front Suspension
Image

This is a good view of the CV angle
Image

And this shows the amount of gap I have in the CV boots.
Image

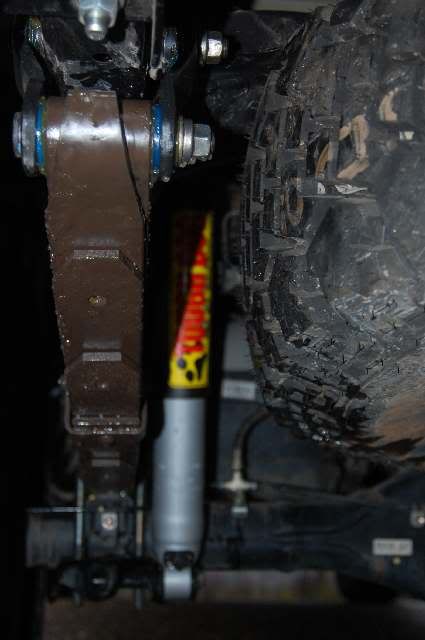
With the rears, This shows the TD rear shock and the greasable shackles,
Image

This is not the best shot but its all I could manage, you can see how the springs are seperated slightly allowing for a softer ride under normal conditions but still catering for load when the rear is full.
Image

On level ground, the measurements are
Front 760mm from rim to guard
Rear 735mm from rim to bar on the tray
Rims are 16"x8" 0 offset Dynamic

The combination of bigger tyres and suspension upgrades have made the ride far superior to my previous rig. Nothing is harsh but steering and handling are still very direct and sure footed. Brakes are working harder with the bigger rubber but that was to be expected. Hopefully I can fit the rotor upgrade kit under the rims and solve that issue.

At this stage Im thinking maybe 20mm extra at the rear axle, and if possible an extra 10mm at the front. But before I do anything I want to give it a work out around Yackandandah to get a better feel for it. it may well be fine as is.

Currently running the TD suspension settings @ 3 Front, 1 Rear unloaded.

I was certain my last Lux measured 780mm at the front but I may have been wrong... My thread no longer appears as it was under my old username... Will search for the text doco I may have saved it in...
FCCW
Application for G##C membership REVOKED
quinny23@newhilux.net
User avatar
Quinny34
Platinum Subscriber
 
Posts: 5169
Joined: Sun, 19 Aug 2007 1:00 +0000
Location: Lavington, NSW


Re: Quinny's Build

Postby Quinny34 on Sat, 18 Apr 2009 1:19 +0000

Electrical and plumbing work so far includes the ARB compressor, Skogs Miracle Diff breathers, Chiptorque chip and the rear lights.

Probably the last clean pic of the engine bay I'll get but I was really happy with the work I did even if I do say so myself.. It all looks factory. I was going to mount the compressor in the tray toolbox but the loom was made to fit the lux I reckon... if not, it does fit bloody well.
Image

Image

Image

This is the USB connection for the CT/Xede chip. Will go into more of a write up on this as I play with it later. So far Im impressed with the performance gains and the software but it's still to early to really comment.
Image

The wireing loom, if anyone else goes down the Xede path though, pay the extra $65 for the piggy back loom and cut into it and not your factory loom. I didnt know it was available at time of purchase. Also, if using the wireing clips, wire the loom so it can be joined (so male female on the main loom) and use whatever is needed on the end of the Xede to fit. This way, if you have issues you can simply unplug and correct the factory loom with no tools required.

The chip itself is right ontop of the glove box bolted in with 2 screws and nylocks.
Image

Rear lights, with resistors so its not a strobe light! Enough said.
Image
FCCW
Application for G##C membership REVOKED
quinny23@newhilux.net
User avatar
Quinny34
Platinum Subscriber
 
Posts: 5169
Joined: Sun, 19 Aug 2007 1:00 +0000
Location: Lavington, NSW

Re: Quinny's Build

Postby Quinny34 on Sat, 18 Apr 2009 1:36 +0000

Now, as you can see in these pics... it sits pretty much dead level now....

Image

With a small load, bike, lugage, fuel...
Image

One issue I need to fix with the tray is the fuel filler.
Image

Due to the angle of it I can no longer use the high flow bowsers. It also cops a shitload of dirt and crap from the wheel and with the issues of bad fuel I think it prudent to move it somehow...

I have a gap between the tray and cab I should be able to fit it into, will run some pipe around for both the fual and breather and see how I go... the guy who made the tray was very vocal about how much of a bitch it was to work around the Hilux dual babs tank...

Thats it for now... Im back of to keep fitting out the kitchen for the missus.... Will hopefully get some action shots shortly and be able to comment on the suspension when used in anger...

I'll need to catch up with Rod also as I'm just about ready to fit my carputer but would love to short track the config by "borrowing his" along with the plugins used.... Was previously going to use destinator but not fussed at this stage...
FCCW
Application for G##C membership REVOKED
quinny23@newhilux.net
User avatar
Quinny34
Platinum Subscriber
 
Posts: 5169
Joined: Sun, 19 Aug 2007 1:00 +0000
Location: Lavington, NSW

Re: Quinny's Build - Updated Pics!

Postby rodw on Sat, 18 Apr 2009 2:28 +0000

Looks great Quinny, Awesome in fact!

Don't go Destinator for your Car PC, either pay for Centrafuse or go with the free RoadRunner/RideRunner front end which is bulletproof mate. That's what I use. For street nav, shell out for Odyssey like mine. It's cheap bundled with the GPS receiver you will need. Happy to burn a CD or DVD of my setup which would be a good start for you. Send me a PM when you are ready.

There has to be a solution for your filler location surely!
User avatar
rodw
 
Posts: 3195
Joined: Tue, 19 Feb 2008 2:00 +0000
Location: Brisbane, QLD

Re: Quinny's Build - Updated Pics!

Postby Hilux Max on Sat, 18 Apr 2009 2:57 +0000

looking good mate....nice pics.
User avatar
Hilux Max
Valued Contributor
 
Posts: 12434
Joined: Sun, 07 Jan 2007 12:00 +0000

Re: Quinny's Build - Updated Pics!

Postby Bull on Sat, 18 Apr 2009 5:32 +0000

Good write up and some well thought out mods.
Makes me want mine finished.
User avatar
Bull
 
Posts: 681
Joined: Thu, 11 Dec 2008 9:54 +0000
Location: Northern Territory

Re: Quinny's Build - Updated Pics!

Postby Quinny34 on Sat, 18 Apr 2009 5:39 +0000

Thanks guys.. .means alot...
FCCW
Application for G##C membership REVOKED
quinny23@newhilux.net
User avatar
Quinny34
Platinum Subscriber
 
Posts: 5169
Joined: Sun, 19 Aug 2007 1:00 +0000
Location: Lavington, NSW

Re: Quinny's Build - Updated Pics!

Postby davis.16 on Sat, 18 Apr 2009 6:08 +0000

very tidy truck mate want to swap???? haha hope mine will be set up like yours one day. im keeping a close watch on this thread as alot of your mods are what i would do if i had cash.

Cheers Sam
Yes this is my ute...... No i won't help you move house.
User avatar
davis.16
 
Posts: 402
Joined: Sun, 21 Sep 2008 4:29 +0000
Location: Sydney

Re: Quinny's Build - Updated Pics!

Postby Brookster on Sat, 18 Apr 2009 7:33 +0000

Quinny,

Looks bloody great! Wish I could have gone to 265/70 R16s but not legal in Vic. Doesn't the hilux look 100% better with no alloy side steps?

My fuel filler is forward of my mud guard and is protected from mud etc.. Have to tilt the nozzle upside down to stop the bowser cut-off.

My suspension is less hard-core but it is much better that the standard set-up. Bit more rubber does help as well. I'll be interested to hear how the xede chip goes; particularly at low revs.

Well done!

Simon
IF A MAN TALKS IN THE FOREST AND THERE IS NO WOMAN TO HEAR HIM, IS HE STILL WRONG?
Brookster
 
Posts: 327
Joined: Sun, 13 Jul 2008 1:00 +0000
Location: Mornington Peninsula, VIC

Re: Quinny's Build - Updated Pics!

Postby dute on Sun, 19 Apr 2009 7:00 +0000

Good Pixs, good set up well done . . . . . . 8-)
FCCW

inside Dute's black hole

"Age and treachery will ALWAYS overcome youth and skill"
User avatar
dute
Moderator
 
Posts: 5102
Joined: Sun, 14 Sep 2008 10:17 +0000
Location: Melbourne Vic

Re: Quinny's Build - Updated Pics!

Postby olcoolone on Sun, 19 Apr 2009 7:44 +0000

Quinny, the only thing I would look at changing is where your rear shocker adjusters are....they are facing forward and will get damaged from stones and rocks.

Undo the bottom shocker mount and turn them 180 Deg. (adjusters facing backwards).

I know from experience how much stone damage we get on the front of the shocker.
User avatar
olcoolone
 
Posts: 675
Joined: Sun, 07 Jan 2007 12:00 +0000
Location: Modbury, SA

Re: Quinny's Build - Updated Pics!

Postby Quinny34 on Sun, 19 Apr 2009 7:58 +0000

olcoolone,

Thanks mate, will do... Seems obvious now you've pointed it out :oops:
FCCW
Application for G##C membership REVOKED
quinny23@newhilux.net
User avatar
Quinny34
Platinum Subscriber
 
Posts: 5169
Joined: Sun, 19 Aug 2007 1:00 +0000
Location: Lavington, NSW

Re: Quinny's Build - Updated Pics!

Postby rodw on Sun, 19 Apr 2009 7:58 +0000

olcolone is right mate. That is how OL installed mine. Terrible pic I know, but you can see where the adjuster should be:
Image
User avatar
rodw
 
Posts: 3195
Joined: Tue, 19 Feb 2008 2:00 +0000
Location: Brisbane, QLD

Re: Quinny's Build - Updated Pics!

Postby olcoolone on Mon, 20 Apr 2009 6:13 +0000

Thats the advantage of showing other people what you are doing, don't worry I sometimes overlook the obvious until someone points it out.
User avatar
olcoolone
 
Posts: 675
Joined: Sun, 07 Jan 2007 12:00 +0000
Location: Modbury, SA

Re: Quinny's Build - Updated Pics!

Postby cr1pp5 on Mon, 20 Apr 2009 9:25 +0000

looking good quinny
R.I.P. The Bogan Truck 14/11/2007 - 08/05/2010
User avatar
cr1pp5
 
Posts: 1440
Joined: Thu, 21 Feb 2008 2:00 +0000
Location: Yarrawalla, VIC

Re: Quinny's Build - Updated Pics!

Postby Quinny34 on Fri, 24 Apr 2009 5:51 +0000

I now have a locker...... and after initial testing it has not met expectations.....

Its blown them clean the #### out of the water :o :o :o

Initial testing on steep inclins with deep rutted out holes that would swallow a Yaris for week before emerging on the other side, where impassable without the lock, as soon as 2 wheel lifted the car was toast....

With the locker... it just did it. I mean, it just did it. I didnt seem to notice the huge amount of air beneath the wheels... it just drove on top of it...

Will hopefully be able to test more this weekend (Cant wait.... I'll be like a t kid a Xmas eve tonight waiting for the big day).. Will try and get some photos and a better review...

Whoever invented lockers should be sent a complimentary FIGJAM shirt....
FCCW
Application for G##C membership REVOKED
quinny23@newhilux.net
User avatar
Quinny34
Platinum Subscriber
 
Posts: 5169
Joined: Sun, 19 Aug 2007 1:00 +0000
Location: Lavington, NSW

Re: Quinny's Build - Updated Pics!

Postby Hilux Max on Fri, 24 Apr 2009 6:53 +0000

Image

Image

Image

I knew you'd be happy mate...it just makes driving the vehicle so much easier and less stressfull. the hilux doesnt struggle, just keeps on moving like the surface is alot flatter than what it is really like.

its awesome. :mrgreen:
User avatar
Hilux Max
Valued Contributor
 
Posts: 12434
Joined: Sun, 07 Jan 2007 12:00 +0000

Re: Quinny's Build - Updated Pics!

Postby rodw on Fri, 24 Apr 2009 8:32 +0000

Quinny,

Couldn't stop myself, must be the grey colour, but I had to read your buildup from the beginning again. It is an awesome build so far. If you get a chance, would you mind posting some pics of the clearance mods you made for your 33's.

We'll be interested to hear more about your XDE chip performance too.
User avatar
rodw
 
Posts: 3195
Joined: Tue, 19 Feb 2008 2:00 +0000
Location: Brisbane, QLD

Re: Quinny's Build - Updated Pics!

Postby Hilux Max on Fri, 24 Apr 2009 8:50 +0000

rodw wrote: If you get a chance, would you mind posting some pics of the clearance mods you made for your 33's.


Are you hinting at something in the near future Rod? ;)
User avatar
Hilux Max
Valued Contributor
 
Posts: 12434
Joined: Sun, 07 Jan 2007 12:00 +0000

Re: Quinny's Build - Updated Pics!

Postby Quinny34 on Fri, 24 Apr 2009 9:07 +0000

Roger... Will do... Was waiting for the flares before I completleted that part... in all honesty... I took an axe (only blunt object available at time) and used it to bash the bottom most corner of the Guard back... Probably went a bit further than I had to but not fussed... the flares will cover it. BTW... ended up cancelling th ARB flares and ordering utemart...

When the utemart flares arrive I'll post up some more info with pics... For the camping trip this weekend I'm gonna go get some strip flares just to keep the mud down a bit... 2 puddles last night and the drivers side is covered.... I wont be able to see out the side windows after a few klms on the omeo highway at that rate 8-)

Other than that.. the 33's are not to hard to get on...
FCCW
Application for G##C membership REVOKED
quinny23@newhilux.net
User avatar
Quinny34
Platinum Subscriber
 
Posts: 5169
Joined: Sun, 19 Aug 2007 1:00 +0000
Location: Lavington, NSW

PreviousNext

Return to Member Build Ups

Who is online

Users browsing this forum: No registered users and 10 guests