MR RUM's 2013 Extra Cab
10 posts
• Page 1 of 1
MR RUM's 2013 Extra Cab
![]() by MR RUM on Thu, 14 Apr 2016 2:49 +0000
by MR RUM on Thu, 14 Apr 2016 2:49 +0000
Post Deleted.
Last edited by MR RUM on Tue, 23 Aug 2016 1:42 +0000, edited 2 times in total.
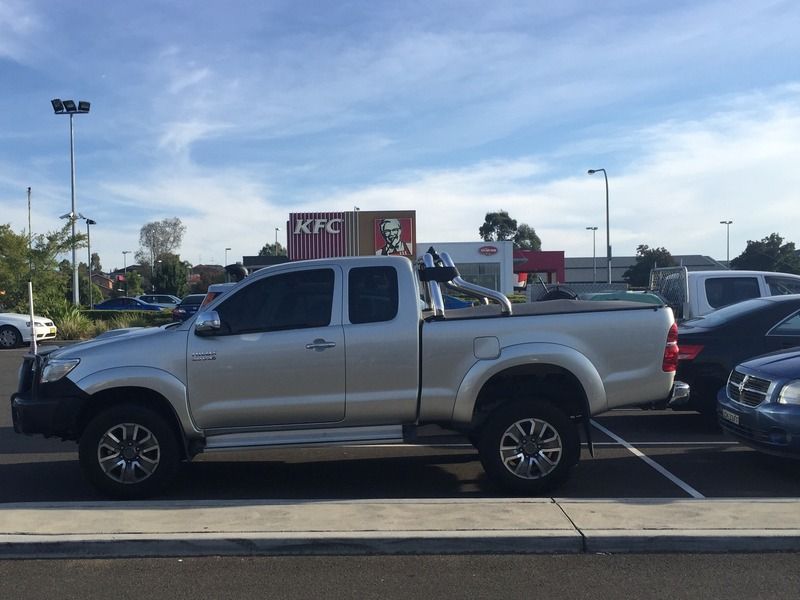
R.M.Williams isn't the only one with a longhorn.
-
MR RUM - Posts: 27
- Joined: Tue, 11 Aug 2015 6:03 +0000
- Location: Mount Annan, NSW
Re: MR RUM's 2013 Extra Cab
![]() by MR RUM on Thu, 14 Apr 2016 2:50 +0000
by MR RUM on Thu, 14 Apr 2016 2:50 +0000
We were already committed to a trip away with friends the week after we picked up the HiLux, so the first two things I did to it when I got it home was install the old GME 3400 UHF I'd pulled out of the Commodore, and then wire up a couple of Hella Rallye 4000s I had sitting on a shelf.
I decided to squeeze the face of the UHF in where the ash tray slot goes. The main unit is up under the dash above the glovebox, and an external speaker is under the dash on the drivers side, near the fuse panel.
I tried a couple of the aerials I had lying around in the garage, and I went with a four foot GME unit. At this point I hadn't decided what I wanted to do about the microphone, so I just tucked it into one of the two pockets under the aircon vents for the time being (I didn't bother uploading a photo of the installed UHF, however if you're interested, it can be seen in other photos further down the page).
As for the lights, I had two pencil and two spread beams sitting here. With only enough room for two, I opted to go with the spreads. Some mightn't agree, but I've found when it comes to vision at night, it's much more important to have a wide range, than long range.

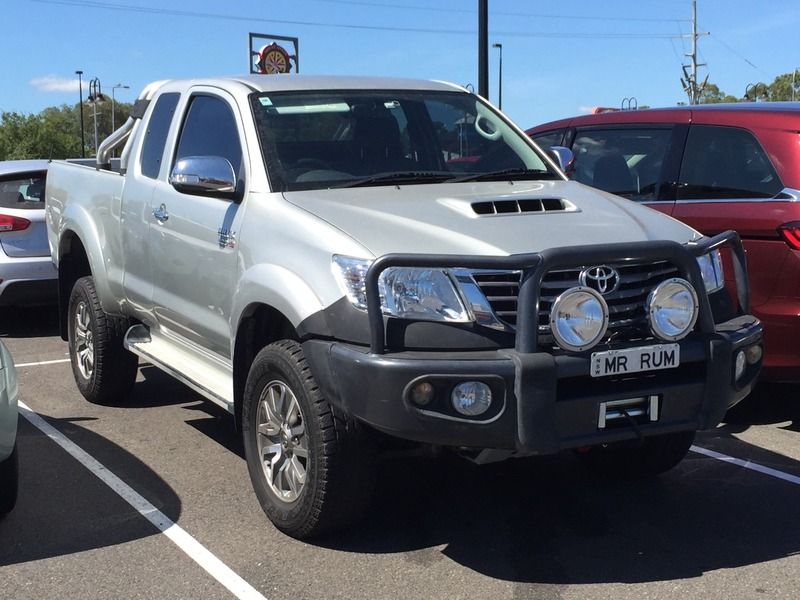
Unfortunately we're blocking most of the HiLux in this one, but it was the only photo I could find from that first weekend.
The first thing I said when I drove away from the dealership was "The ugly as f@&k bullbar has to go!", but after a few weeks, it grew on me. Unless it begins to get in the way, it'll probably be staying.
The second thing I said was "I need window tint. It feels like I'm driving around in a fish bowl." This didn't grow on me, so at the first opportunity, I had the windows tinted nice and dark. I didn't go as dark as on previous vehicles, but they're still pretty dark. To give you an idea of how dark, I used to have to wind down my windows to use the side mirrors at night. This was especially annoying when it was raining.
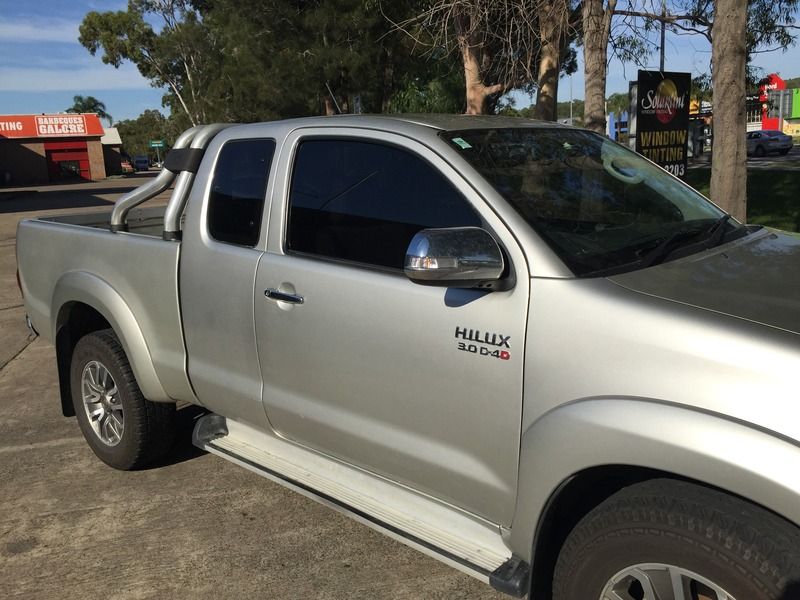
Dark, but not too dark.
As we tend to do a lot of solo driving, a winch seemed like a logical accessory to start with. After much research, I decided to order a 9000lb Superwinch, along with everything I needed to install it from Toyota.
The moment I received everything, a friend of mine informs me he could've ordered it all at trade price, potentially saving me a couple of hundred dollars. I wasn't really bothered by this, but I did get him to come with me to ARB when I placed an order for a bunch of items including a Safari snorkel, Under Vehicle Protection, and Old Man Emu suspension components to suit the sort of weight we'll carry on our extended trips. He managed to saved me over $400 this time.
Now that I had everything together, I organised an afternoon with a few mates to help me install the heavy items that I didn't fancy tackling by myself. By the end of the night, we had the suspension sorted, winch operational, and UVP on.
The springs I chose are supposed to give me an additional 30mm up front, and 45mm in the rear, while performing optimally with payloads up around 500kg. I'm yet to properly load her up, so I can't fairly comment on the handling and ride just yet.
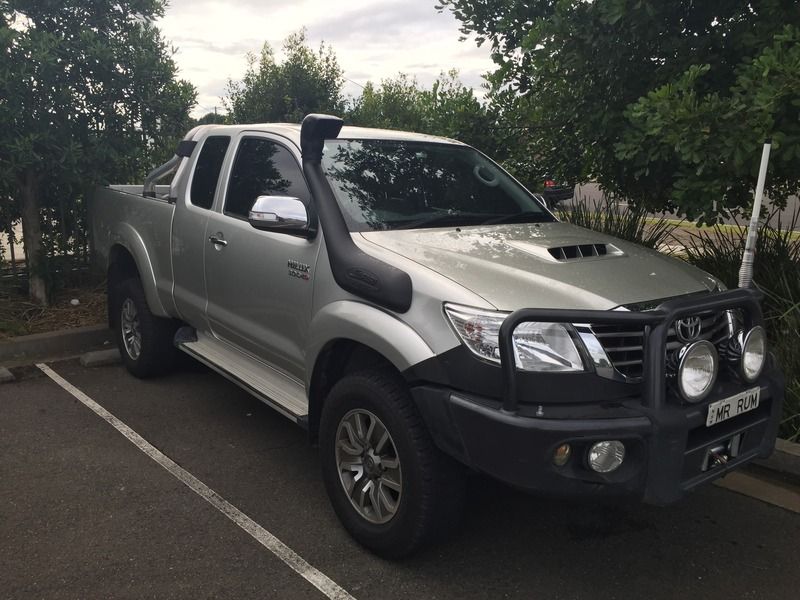
I almost needed to use the side steps to get into her the day after the lift.
I had planned on installing the snorkel myself, but after pricing the required items I didn't already own, it worked out to be almost the same as the $220 ARB wanted for installation. I decided to bight the bullet, and I booked it in.
During one of my few trips to ARB, I grabbed a shorter whip for my aerial for use around town. There's a few underground car parks around home that I just didn't fit through with the four footer on. Well I fit, but I was damaging the tip on light fittings and exit signs. At one particular location the aerial scraped the lining off the ceiling of the carpark for about twenty meters, leaving a tonne of crap all over the outside of the ute. This should put an end to that nonsense.
I managed to fix the crooked aerial with the help of a large shifter and a little elbow grease.
Externally, I don't expect much to change from here on. One day I'll no doubt crush the side steps and need to replace them with something stronger. Same goes for the rear step bar. Until then though, this will do me just fine.
The following items all went in together over a period of weeks. Hesitant to regret any decisions about where I mounted additional accessories, I waited until I had it all worked out in my head before proceeding. I kind of installed all of the components for each system one at a time, and then wired them all up on the same day.
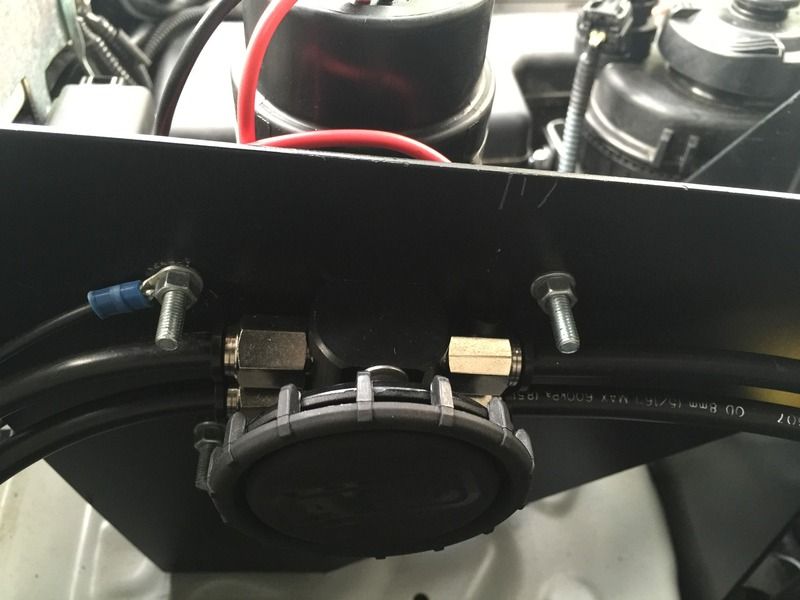
In an attempt to reduce the chances of a failure, I decided to install an oil catch can, and diesel/water separator. I went with a Provent 200 PCV separator, and a Water Watch water in fuel warning system.
The Provent 200 install was quite straightforward with the information this thread. The method I used is outlined on pages 21 & 22.
CLICK HERE FOR PROVENT 200 DISCUSSION
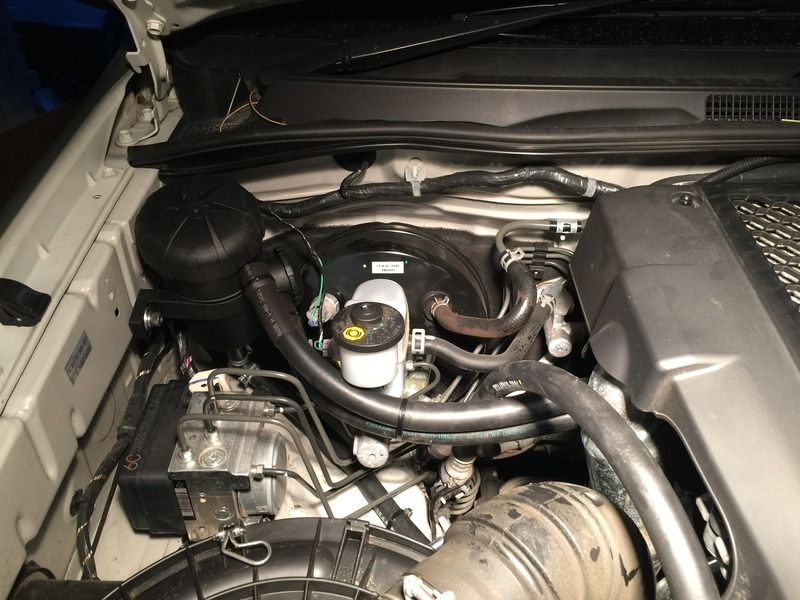
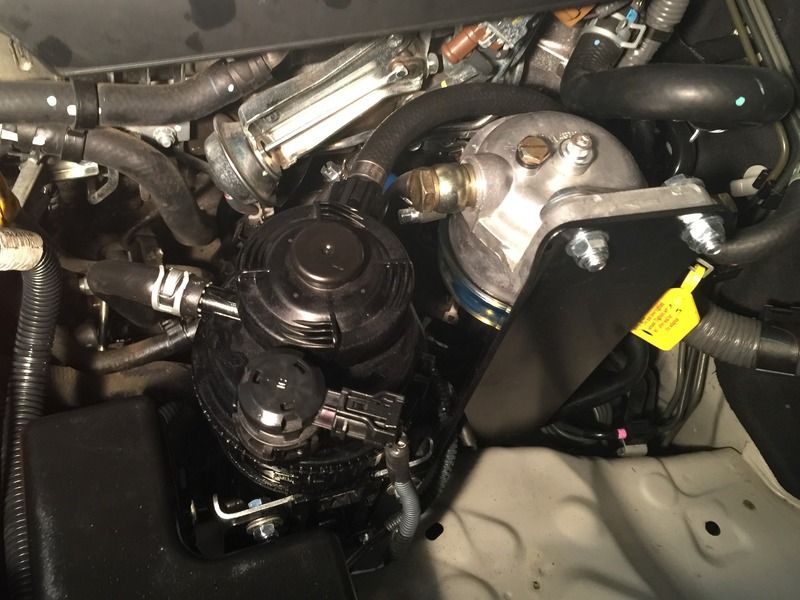
In my opinion, the finished product blends into the engine bay seamlessly.
A word of warning.
There's a valve in the Provent 200 that makes a small amount of noise as it opens and closes. It's like a little hum at around 1000-1300rpm. It's not loud, and I don't notice it any more, but it did cause me to worry for a day or so trying to work out if something was loose or rubbing.
The Water Watch system was also quite simple to install. The instructions that came in the kit were comprehensive, and easy to understand. The kit included a HiLux specific mounting bracket, and everything else required to make it work.
Apart from a few holes in the factory fuel filter bracket, this kit goes in using existing nuts and bolts.
The only trouble I had was deciding where to fit the warning light and buzzer in the cab.
At first I put the light down in the switch panel near the power window controls, with the buzzer secured in behind. As soon as I sat in the drivers seat though, I realised I would never be able to see the light down there, and then I questioned whether I'd hear the buzzer clearly from behind the dash.
After days of pondering, I came up with what seemed like the perfect solution. I put the light in the panel next to the stereo, and the buzzer through the side of the AC vent. I was too tired to be making this kind of decision when I did it though, because I did have trouble with clearance around the buzzer when I tried to put it all back together again. A couple of four letter words later, and I made the necessary alterations to put everything back together.
If I was to do this again, I would just cable tie the buzzer to something behind the dash.
For anyone that's thinking of installing a Water Watch system, I am of the opinion that you could put the buzzer anywhere in your cab and still hear it.
It. Is. LOUD!
On one hand this is awesome news if it ever goes off.
On the other hand, it gets a little annoying during its "test". It does this every time your turn the key to accessories. The light and buzzer come on for a couple of seconds, indicating that everything is operational.
This is something I haven't gotten used to, and I'm considering placing something over the end of the buzzer in an attempt to muffle it a little.
Up until this point I had considered everything to be essential, but now was was time to indulge a little.
In the past, if we wanted a hot shower, we would boil a saucepan/billy, mix it with cold water in a bucket to get the desired temperature, drop one of those cheap 12V submersible shower pumps in the bucket, and enjoy. At $20 each, we would use the pumps till the motors died, and then buy another.
The last of these failed on me in January, and ever since, I've been looking around at alternative options. I finally decided that a heat exchange system was the way to go, and chose the Glind Original kit to fit to my ute.
My reasons for choosing this type of system came down to a couple of factors.
The first being that I don't need to find room for it. True, the hoses need a home, but they are flexible and fit just about anywhere. The other options I considered took up a lot of space.
The second is that I don't need to find space for another fuel source. I read a comment somewhere that diesel is too precious on remote trips to be using for shower water. I don't really agree with this, but even if I ended up in a situation where I believed this to be the case, I could still throw a billy on the fire, and just use the system without using my engine for heating. Besides, if you warm your water when you first pull up, you are using the heat you've already gathered in your engine. A few of minutes of running the engine at idle is hardly going to make a huge difference in the grand scheme of things.
A negative I've read is that it's just one more thing to fail. This could be true, and is why I didn't just opt for the cheapest one I could find. I looked around, and bought the one I believed would survive. If it does happen to leak for some reason, it would only take a moment to plumb the engine back up to bypass the heat exchanger. For this reason, it hasn't got me worried in the slightest. Only time will tell for sure though, and I'll be sure to pass on any bad experiences if I have them.
Don't get me wrong, I'm not trying to claim that a heat exchange shower is the best thing around, or that they would suit everyone, just that it suits me.
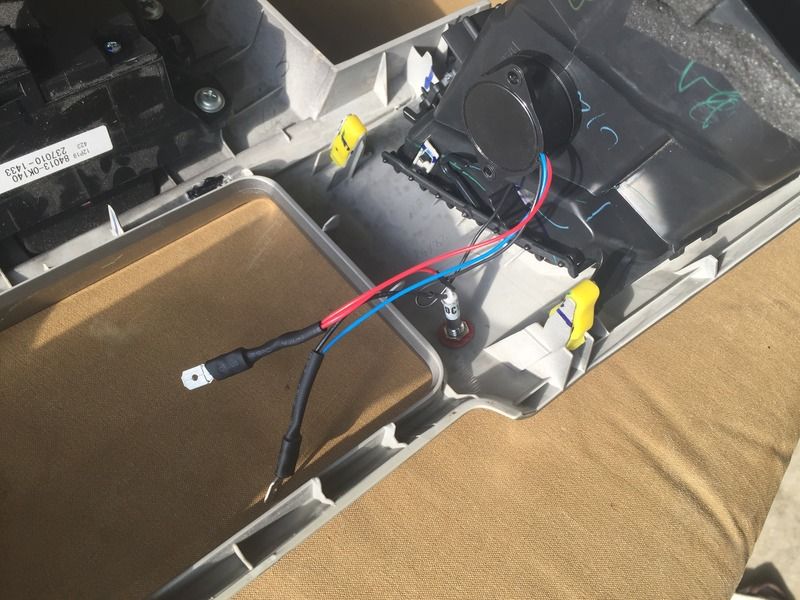
Installation was very straightforward once I worked out where I wanted the pump and heat exchange to go.
A fair bit of time was spent crawling over and under the engine bay, followed by a visit to a local steel supplier to grab an offcut of 2mm sheet, and then I got to fabricating.
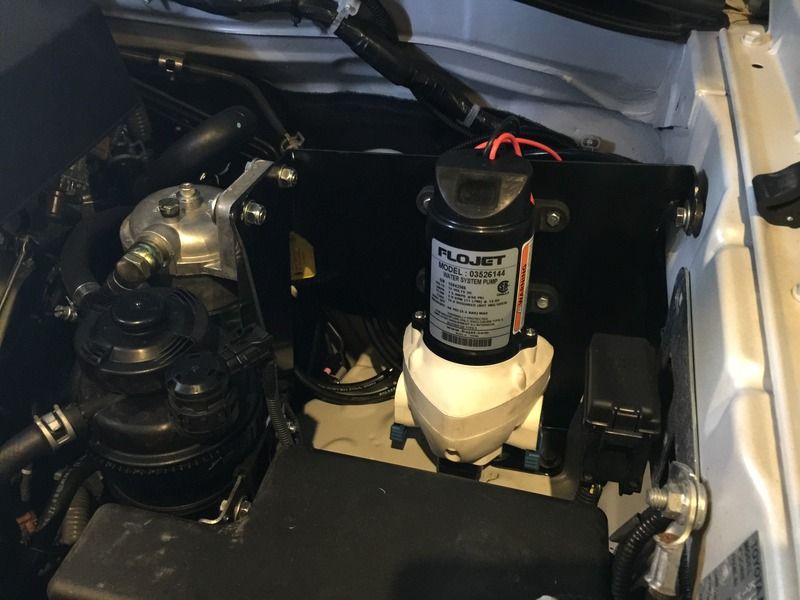
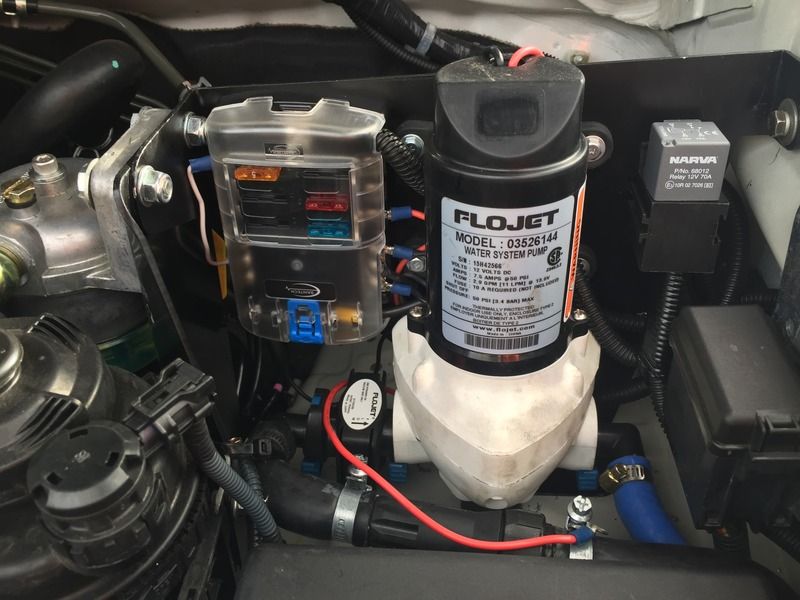
Thanks to the Water Watch's mounting bracket, I was able to come up with a bracket for the FloJet water pump that required no holes to be drilled in the engine bay. I pissed off my neighbours a little when I didn't realise it was almost 10PM and I was still using my grinder. So a quick apology later and I got on to painting.
I'm pretty pleased with how this turned out.
Back when we bolted on the UVP, I was concerned by the remaining gap between the bullbar and the first of the bash plates. It seemed a little to inviting to things like stones, sticks, and spinifex seeds for my liking.
The offending gap.
I wanted a little more protection, so I made a stone guard that would double as my heat exchanger mount. As I have no easy means to make bends in large sheet, I cut everything to size, then popped back into the joint I bought the steel from, where they made the required bends for me. A bit of paint to finish, and it was ready for installation.
It's mounted using existing bolts.
I was a little concerned that the restricted airflow this may cause would result in higher engine temps, but so far nothing seems to have changed.
Since installing my stone guard, I've noticed that the ARB bars don't have any such gap, and though the TJM versions have vent holes, they have way less openings above the winch than I do. I may need to alter my design to incorporate more flow, but for now I'll just keep an eye on things.
With both the pump and heat exchange installed, I plumbed everything up and am happy with how easy it all works.
All ready to be hooked up to a power source.
The heat exchange mounted in behind behind the winch.
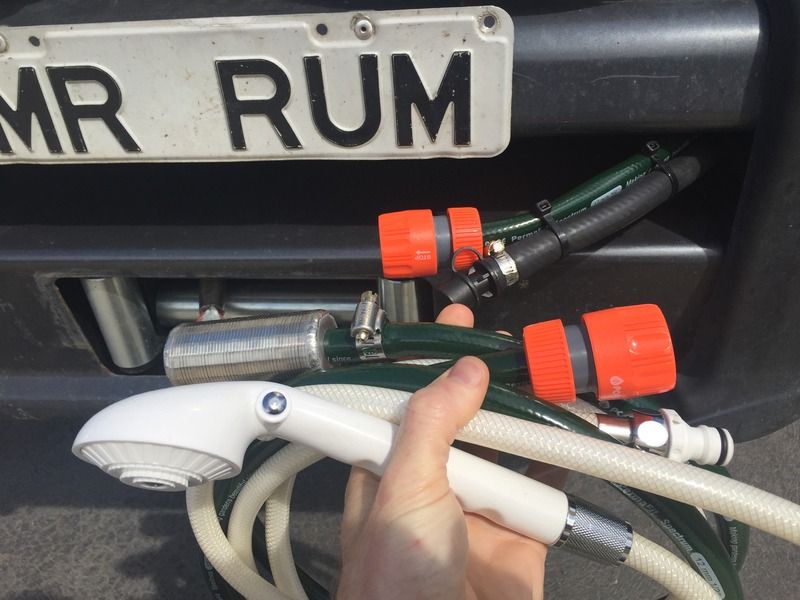
The inlet and outlet hoses are just tucked in behind the bullbar, and have standard garden hose fittings attached.
Next on the list was to extend the factory diff, gearbox, and transfer case breathers. I had bought an ARB kit back when I ordered all the other goodies, and thought that four breathers would have everything covered, but then I learnt of the ADD breather. The easiest way to overcome this oversight was to run the front diff, gearbox, transfer case, and ADD breathers to the ARB kit, and the rear diff to a separate filter behind the tail light assembly. After I'd fitted everything of course, I then learnt of the other location for a breather on the transfer case. As I didn't have the parts on hand, I've left that job for another day. I intend to just join it to the existing transfer case breather via a T-connector. I can't see the small volume of them both combined causing any sort of problem.
I attached the ARB filter to the back of my shower pump bracket, and cable tied the rear one to a small hole I drilled as high as I could manage, and hooked everything up.
Another satisfying moment.
Front diff, gearbox, transfer case, and A.D.D. breathers in engine bay.
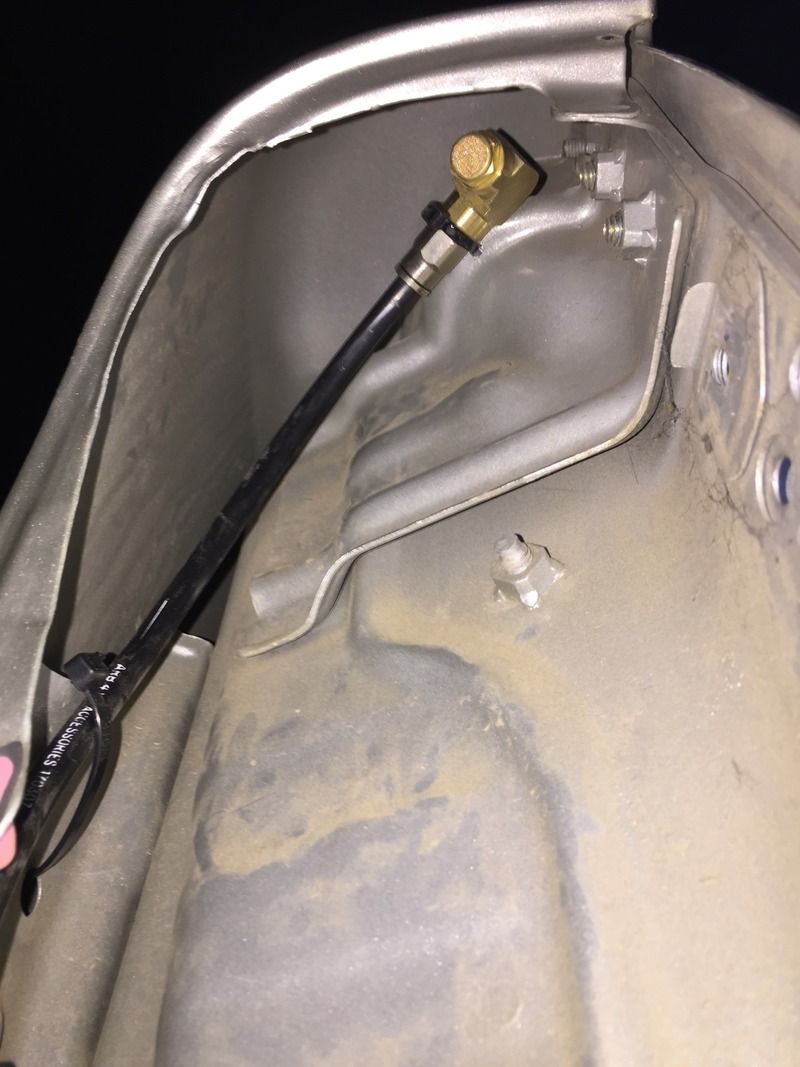
Rear diff breather above left tail light assembly.
After the water pump and breathers were attached to my bracket, there was still enough room to mount a relay and fuse block to power my growing list of accessories.
Luckily there isn't any more that needs to be installed under the bonnet now, because I'm pretty much out of usable space at this point.
If I had've thought to put the fuse box there earlier, I would've put the pump a little further across. I was just lucky there was enough space left to make it fit.
While hunting around for a couple of extra spare wheels, I came across a full set of the same TRD rims my HiLux came with on Gumtree. The ad was posted by a wheel shop from somewhere over near Rockdale, so I didn't know how solid they were on their price. I made them an offer, and to my surprise they accepted. One of the wheels has a bit of nasty gutter rash, but otherwise I'm stoked. I'll grab a couple of tyres for them when I get around to it, and that'll one less thing to worry about.
Not bad for $500.
The choice to install a long range fuel tank was an easy one. Depending on the make and model I chose, it could save me having to carry up to four jerry cans. I looked into, and contacted, all the manufacturers I could find, and after considering everything, went with a 145L tank from Long Range Automotive. I had to order it a bit in advance due to there already being a few on back order. They didn't recommend attempting the installation without a hoist, so I booked myself in to have it fitted by Artarmon Automotive once everything was ready.
It only took them half a day to fit, and so far I'm really happy with it.
All the manufacturers claim that their tanks don't change your ground clearance, but I have a feeling they are just saying that they don't hang lower than the bottom of your diff. My tank does hang slightly lower than the side old one, but I don't see this causing me any issues with the type of driving I expect to be doing.
Before.
After.
Although this was taken with no weight on board, it shows that even if the tank does hang lower, it's still plenty higher than the UVP will ever be.
Around the same time I ordered the LRA tank, I also purchased a sat phone with a car kit. The car kit was too cheap to pass up, but I had no idea how I was going to go about installing it. The phone cradle is rather bulky, and there was also the mic, speaker, module, and antennae to contend with. I started with the antennae, as it seemed like the easiest decision to make. After again having to test my fabrication skills, I managed to devise a way to mount it to the bracket that joins the two sports bars. I took the bars off and drilled holes for the wiring to pass through. While I had everything apart, I ran a bit of polish over the aluminium, which came up much better than I thought it would.
Right before I bolted the bars back to the ute, I tied a small weight to the end of some fishing line. I dropped the weight through the top hole where the antennae would end up, and with a bit of shaking, I managed to get it to fall out the bottom hole. I secured both ends of the fishing line, and left it ready to pull the wiring through when I got around to it. As I was too busy to finish the job at the time, I drove around with it like this for over a week.
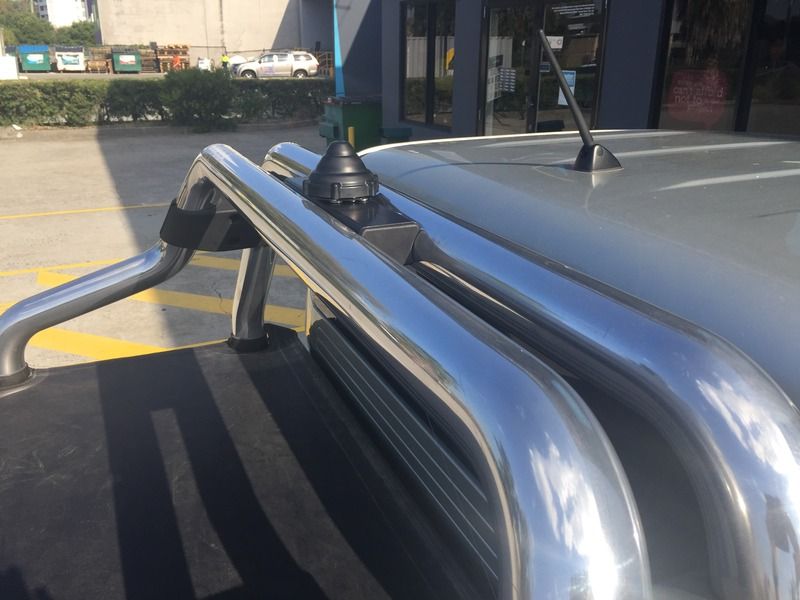
The addition of this aerial brings my overall height up to 1.95m.
I thought I knew what I was doing with the phone cradle, but I was never 100% convinced. After seeing a photo somewhere, of something totally unrelated, I had a brainwave!
Out came my ever shrinking steel offcut again. I made some measurements, and was soon cutting and bending. After convincing myself it wouldn't be in the way of the airbag, I gave everything a couple of coats of paint, and bolted it into place.
It's possibly a little over engineered, but at least I can be certain that no amount of corrugations will ever shake it loose.
Initially it stuck out a bit too far, but a quick trim before it was painted had everything sorted.
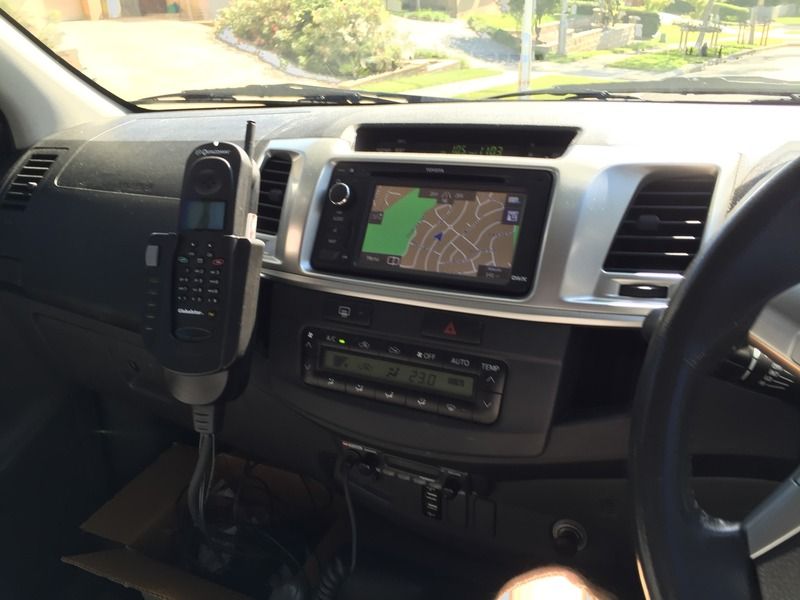
As bulky as it all is, it doesn't look too out of place now it's mounted.
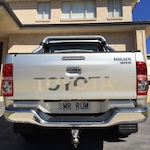
I stated earlier that the transition from my lowered SS ute to the HiLux was easy. Well I lied a little. The fact that entire vehicles can hide behind the HiLux's tailgate has taken some getting used to. This isn't a problem for future me to worry about though, because I invested in a Carbon Car Systems reverse camera, and it has completely transformed the ease of navigating tight parking spaces. I really wish I had of done it sooner.
My first visit to the shops with my reverse camera fitted.
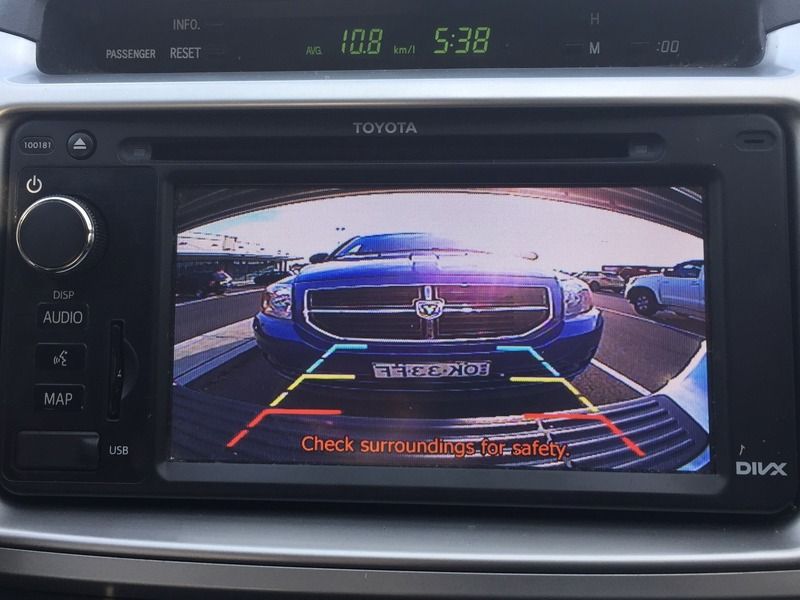
The view from inside.
You can read the installation instructions online if you think you might be interested. It is without doubt the easiest install I've done so far.
CLICK HERE TO VIEW REVERSE CAMERA INSTALLATION INSTRUCTIONS
I suggest if you do buy one of these kits though, before you do anything else, pull the two screws out of the mounting bracket and put some Loctite on them. I lost one of them almost instantly due to it vibrating out, and it was a size screw that I didn't have many of. In fact, of all the bolts and screws that I have hoarded over the years (I basically never throw them out), I only had one the right size and thread. After an hour of searching through the garage with no luck, I ended up finding one upstairs amongst my computer spares.
While running the wires for the reverse camera, I thought I should also hook up the rest of the sat phone car kit. This was all too easy now that all the hard work had already been completed, and the fishing line made pulling the wires through to the antennae an absolute breeze. The speaker went under the dash near the one for the UHF, and there was just enough cord on the microphone to put it up next to the sunnies holder in the roof. I screwed the module to the floor under the drivers seat, plugged everything in, and the job was finally done.
If I'm absolutely certain I won't change my mind, I don't have a problem drilling holes in my dash. So with my mind finally made up, I mounted the UHF mic holder below the sat phone cradle.
Another find thanks to this forum was the dual USB charge point from Solid Kit. I originally ordered and installed one with blue LEDs, but I found them absolutely annoying after dark. So I reordered a set without the LEDs and now I'm super happy with them.
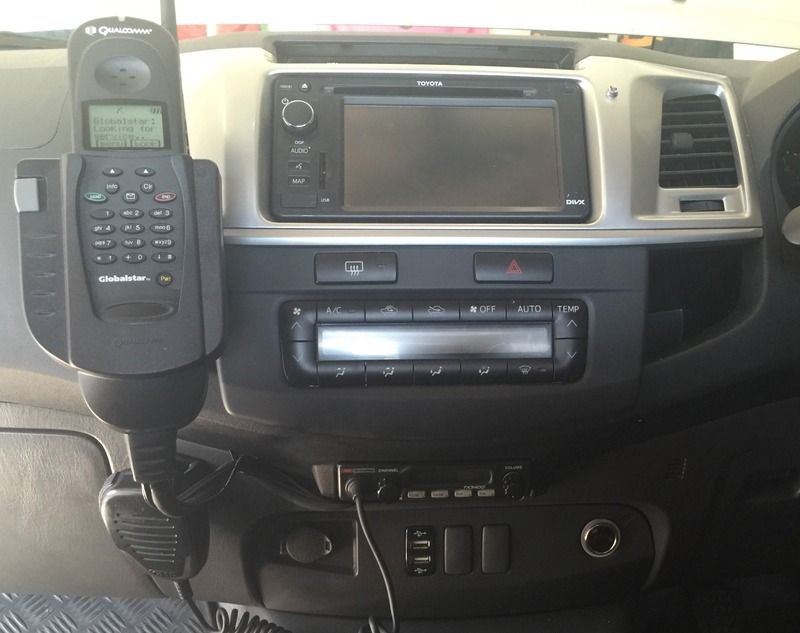
Sat phone, UHF mic, and USB ports done!
While on the Solid Kit site, I also bought myself a dual battery volt meter.
You might be wondering why I'd do such a thing. I mean, I filled the space most of you put your auxiliary battery with a water pump and diff breathers right?
With the LRA tank on the passengers side, and the winch up front, I didn't really want to put another heavy item up front, or on that side of the vehicle. Plus I couldn't see a 120Ah battery even fitting.
I thought of having a custom battery bracket made to go under the tub behind the drivers side rear wheel, but this idea has been scrapped for the time being. For now at least, the battery has been installed in the tub, bolted down in front of the drivers side wheel arch. This means I've lost some space I'd like to get back if possible, but it'll do for now.
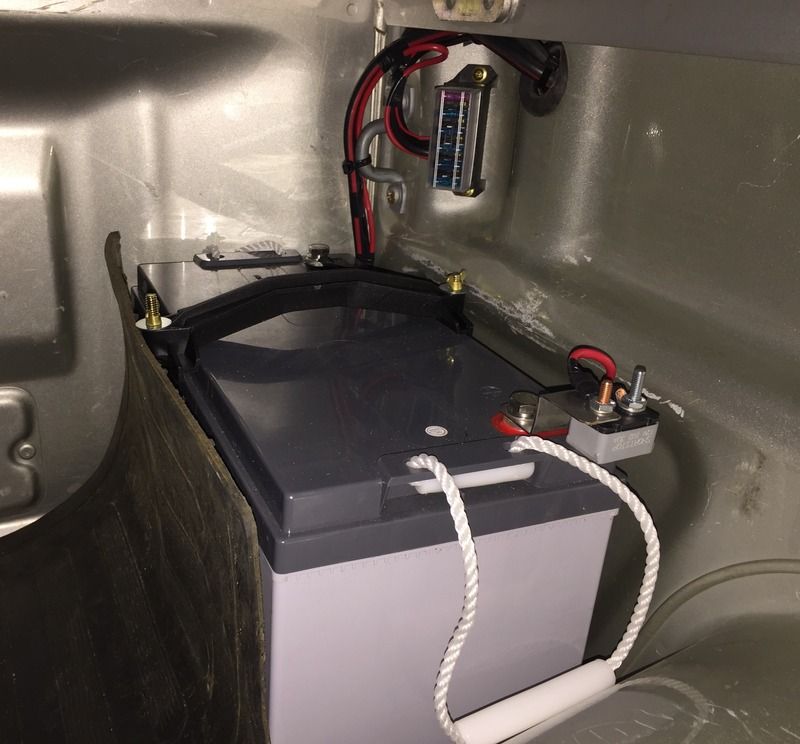
I'll probably make a protective enclosure to cover the auxiliary battery. I just haven't worked out how I want to do it yet.
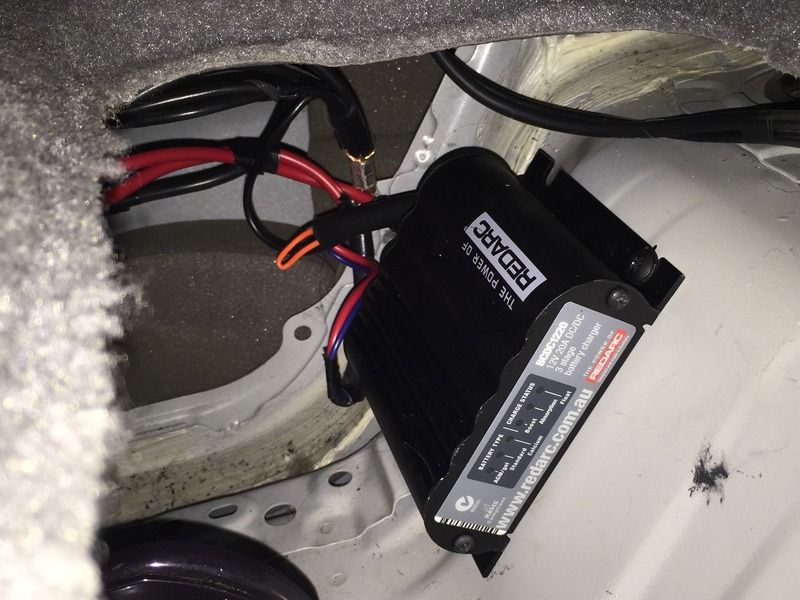
The Redarc BCDC charger is fixed under the rear seat on the drivers side.
I wired the dual volt meters to come on with the ignition, or at the flick of a switch. I intend to swap the switch for a push button later on, but either works.
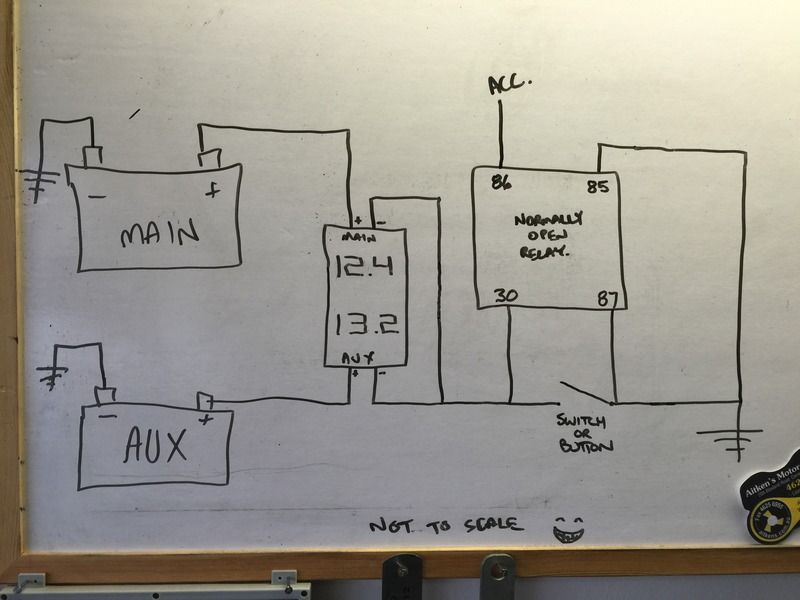
Wiring diagram of how I installed the dual volt meter.
The main reason for such a large auxiliary battery is to power the fridges. We usually only travel with one 32L Engel, but for this next trip we'll be packing a second to use as a freezer. Not willing to trust a regular cigarette socket on the corrugations, I grabbed a couple of the screw type Engel sockets to put in the back of the cab.
Unfortunately, I had another one of those too tired moments when I decided where to put them. This led to a few different solution being tested, the last of which working well enough for me to go ahead with.
After my silly mistake with the buzzer earlier, I made many measurements to be sure there was plenty of clearance for everything. Problem was, I failed to make sure I could get the panels on and off with them in place. It wasn't the end of the world though, as they still ended up out of sight, and functional, which is what I was aiming for.
Now I just needed to run the cables, and plug in the fridges.
Despite my screw up, the final product is as discrete as I'd hoped.
After reading around this forum I'm fully aware that trays are the more popular option, but I tend to prefer a tub. I can totally understand that there are circumstances where trays would be a much better choice, but for now, I'll be sticking with what I'm used to.
I purchased some tub lighting while at a recent camping show, that should make rummaging around in the back a little easier at night. I also grabbed the optional remote control unit that gives you the ability to control both power, and the built in dimmer from a distance. I had a similar set up to this in my last ute, and found it very handy.
Installation wasn't as straightforward as I would've liked though. The length of wire between each light cluster didn't really work with the available spaces under the lip of the tub, so I cut the wires and grafted in extensions where needed. It was a very time consuming job, but the end result made it absolutely worth it in my opinion.
The whole lot only cost me a little over $100, which represents great value in my opinion.
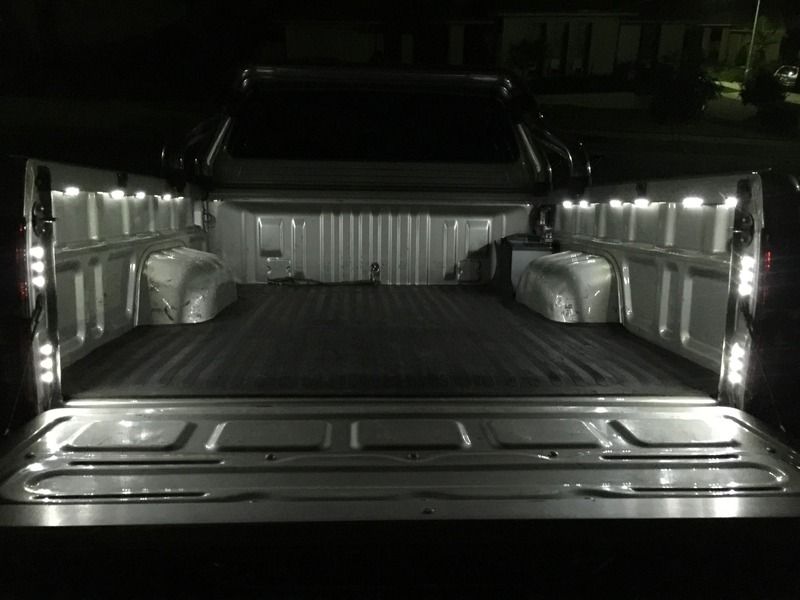
Dimmed to their lowest level.
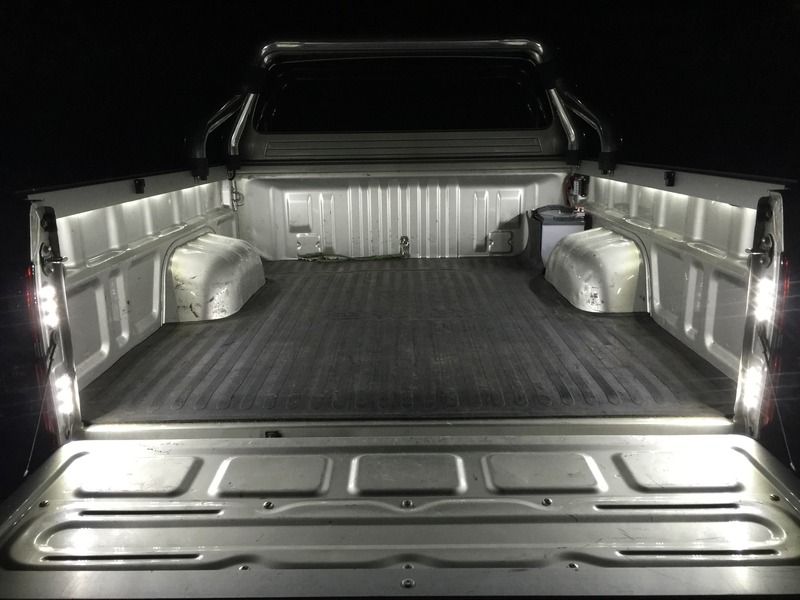
Turned up all the way.
Here's what they look like in action...
The only item left on my to-do list at this point was the L2 A.D.D. mod. I grabbed a relay and switch I had left over from a previous project, and I had the job done in no time at all. This should mean no more complaining about the painfully high gear ratio of reverse while backing the boat and caravan. Woo bloody hoo!
Below are a couple of pictures outlining what's involved.
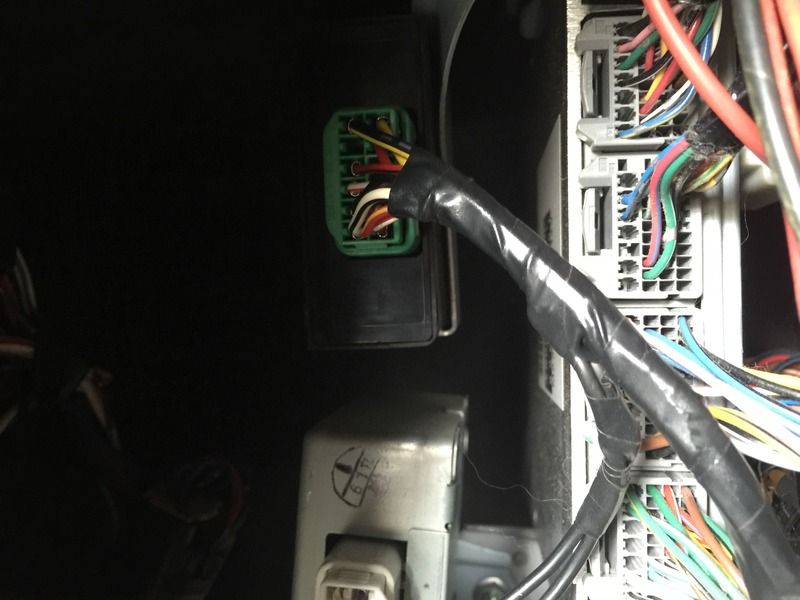
This is what you should see when you remove the glovebox. You're looking for the green plug to the left.
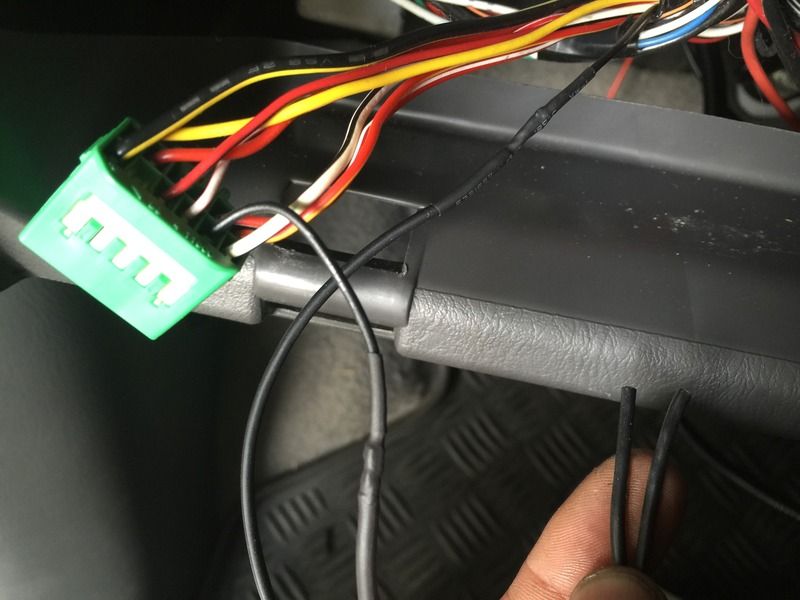
Cut the thin black wire and extend both sections as much as you need. Connect these to your switch/relay and you're done.

This is how I wired it.
Note:The relay was only used so my switch would glow red when the A.D.D. is disabled.
Obviously this is just a basic overview. If you need/want to know more, there's plenty of detailed discussion about it in this thread.
CLICK HERE FOR ALL THE INFO ON THE A.D.D. MODIFICATION
Wow, I think that's it.
I don't know how many of you bothered reading this far, but to those that have, thank you. It took me quite a while to get all this together using just my phone, and I'd hate for it have been for nothing.
Cheers, Pete.
I decided to squeeze the face of the UHF in where the ash tray slot goes. The main unit is up under the dash above the glovebox, and an external speaker is under the dash on the drivers side, near the fuse panel.
I tried a couple of the aerials I had lying around in the garage, and I went with a four foot GME unit. At this point I hadn't decided what I wanted to do about the microphone, so I just tucked it into one of the two pockets under the aircon vents for the time being (I didn't bother uploading a photo of the installed UHF, however if you're interested, it can be seen in other photos further down the page).
As for the lights, I had two pencil and two spread beams sitting here. With only enough room for two, I opted to go with the spreads. Some mightn't agree, but I've found when it comes to vision at night, it's much more important to have a wide range, than long range.
Unfortunately we're blocking most of the HiLux in this one, but it was the only photo I could find from that first weekend.
The first thing I said when I drove away from the dealership was "The ugly as f@&k bullbar has to go!", but after a few weeks, it grew on me. Unless it begins to get in the way, it'll probably be staying.
The second thing I said was "I need window tint. It feels like I'm driving around in a fish bowl." This didn't grow on me, so at the first opportunity, I had the windows tinted nice and dark. I didn't go as dark as on previous vehicles, but they're still pretty dark. To give you an idea of how dark, I used to have to wind down my windows to use the side mirrors at night. This was especially annoying when it was raining.
Dark, but not too dark.
As we tend to do a lot of solo driving, a winch seemed like a logical accessory to start with. After much research, I decided to order a 9000lb Superwinch, along with everything I needed to install it from Toyota.
The moment I received everything, a friend of mine informs me he could've ordered it all at trade price, potentially saving me a couple of hundred dollars. I wasn't really bothered by this, but I did get him to come with me to ARB when I placed an order for a bunch of items including a Safari snorkel, Under Vehicle Protection, and Old Man Emu suspension components to suit the sort of weight we'll carry on our extended trips. He managed to saved me over $400 this time.
Now that I had everything together, I organised an afternoon with a few mates to help me install the heavy items that I didn't fancy tackling by myself. By the end of the night, we had the suspension sorted, winch operational, and UVP on.
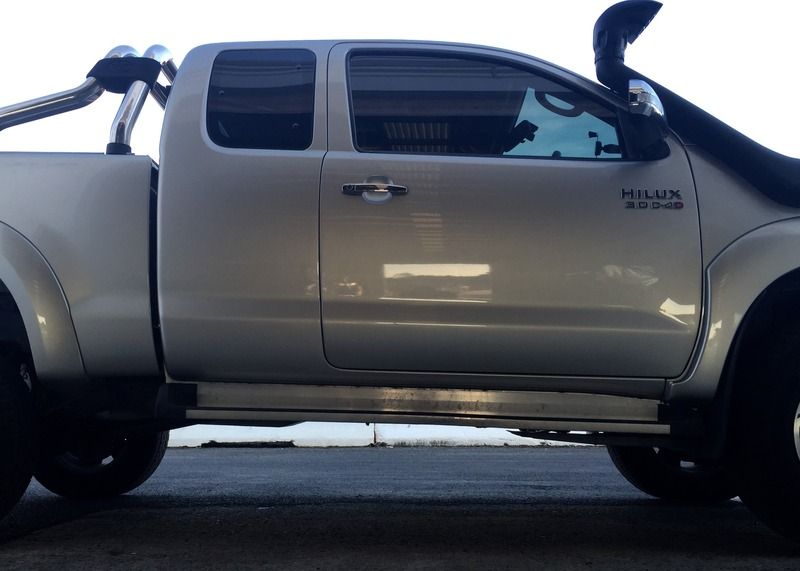
The springs I chose are supposed to give me an additional 30mm up front, and 45mm in the rear, while performing optimally with payloads up around 500kg. I'm yet to properly load her up, so I can't fairly comment on the handling and ride just yet.
I almost needed to use the side steps to get into her the day after the lift.
I had planned on installing the snorkel myself, but after pricing the required items I didn't already own, it worked out to be almost the same as the $220 ARB wanted for installation. I decided to bight the bullet, and I booked it in.
During one of my few trips to ARB, I grabbed a shorter whip for my aerial for use around town. There's a few underground car parks around home that I just didn't fit through with the four footer on. Well I fit, but I was damaging the tip on light fittings and exit signs. At one particular location the aerial scraped the lining off the ceiling of the carpark for about twenty meters, leaving a tonne of crap all over the outside of the ute. This should put an end to that nonsense.
I managed to fix the crooked aerial with the help of a large shifter and a little elbow grease.
Externally, I don't expect much to change from here on. One day I'll no doubt crush the side steps and need to replace them with something stronger. Same goes for the rear step bar. Until then though, this will do me just fine.
The following items all went in together over a period of weeks. Hesitant to regret any decisions about where I mounted additional accessories, I waited until I had it all worked out in my head before proceeding. I kind of installed all of the components for each system one at a time, and then wired them all up on the same day.
In an attempt to reduce the chances of a failure, I decided to install an oil catch can, and diesel/water separator. I went with a Provent 200 PCV separator, and a Water Watch water in fuel warning system.
The Provent 200 install was quite straightforward with the information this thread. The method I used is outlined on pages 21 & 22.
CLICK HERE FOR PROVENT 200 DISCUSSION
In my opinion, the finished product blends into the engine bay seamlessly.
A word of warning.
There's a valve in the Provent 200 that makes a small amount of noise as it opens and closes. It's like a little hum at around 1000-1300rpm. It's not loud, and I don't notice it any more, but it did cause me to worry for a day or so trying to work out if something was loose or rubbing.
The Water Watch system was also quite simple to install. The instructions that came in the kit were comprehensive, and easy to understand. The kit included a HiLux specific mounting bracket, and everything else required to make it work.
Apart from a few holes in the factory fuel filter bracket, this kit goes in using existing nuts and bolts.
The only trouble I had was deciding where to fit the warning light and buzzer in the cab.
At first I put the light down in the switch panel near the power window controls, with the buzzer secured in behind. As soon as I sat in the drivers seat though, I realised I would never be able to see the light down there, and then I questioned whether I'd hear the buzzer clearly from behind the dash.
After days of pondering, I came up with what seemed like the perfect solution. I put the light in the panel next to the stereo, and the buzzer through the side of the AC vent. I was too tired to be making this kind of decision when I did it though, because I did have trouble with clearance around the buzzer when I tried to put it all back together again. A couple of four letter words later, and I made the necessary alterations to put everything back together.
If I was to do this again, I would just cable tie the buzzer to something behind the dash.
For anyone that's thinking of installing a Water Watch system, I am of the opinion that you could put the buzzer anywhere in your cab and still hear it.
It. Is. LOUD!
On one hand this is awesome news if it ever goes off.
On the other hand, it gets a little annoying during its "test". It does this every time your turn the key to accessories. The light and buzzer come on for a couple of seconds, indicating that everything is operational.
This is something I haven't gotten used to, and I'm considering placing something over the end of the buzzer in an attempt to muffle it a little.
Up until this point I had considered everything to be essential, but now was was time to indulge a little.
In the past, if we wanted a hot shower, we would boil a saucepan/billy, mix it with cold water in a bucket to get the desired temperature, drop one of those cheap 12V submersible shower pumps in the bucket, and enjoy. At $20 each, we would use the pumps till the motors died, and then buy another.
The last of these failed on me in January, and ever since, I've been looking around at alternative options. I finally decided that a heat exchange system was the way to go, and chose the Glind Original kit to fit to my ute.
My reasons for choosing this type of system came down to a couple of factors.
The first being that I don't need to find room for it. True, the hoses need a home, but they are flexible and fit just about anywhere. The other options I considered took up a lot of space.
The second is that I don't need to find space for another fuel source. I read a comment somewhere that diesel is too precious on remote trips to be using for shower water. I don't really agree with this, but even if I ended up in a situation where I believed this to be the case, I could still throw a billy on the fire, and just use the system without using my engine for heating. Besides, if you warm your water when you first pull up, you are using the heat you've already gathered in your engine. A few of minutes of running the engine at idle is hardly going to make a huge difference in the grand scheme of things.
A negative I've read is that it's just one more thing to fail. This could be true, and is why I didn't just opt for the cheapest one I could find. I looked around, and bought the one I believed would survive. If it does happen to leak for some reason, it would only take a moment to plumb the engine back up to bypass the heat exchanger. For this reason, it hasn't got me worried in the slightest. Only time will tell for sure though, and I'll be sure to pass on any bad experiences if I have them.
Don't get me wrong, I'm not trying to claim that a heat exchange shower is the best thing around, or that they would suit everyone, just that it suits me.
Installation was very straightforward once I worked out where I wanted the pump and heat exchange to go.
A fair bit of time was spent crawling over and under the engine bay, followed by a visit to a local steel supplier to grab an offcut of 2mm sheet, and then I got to fabricating.
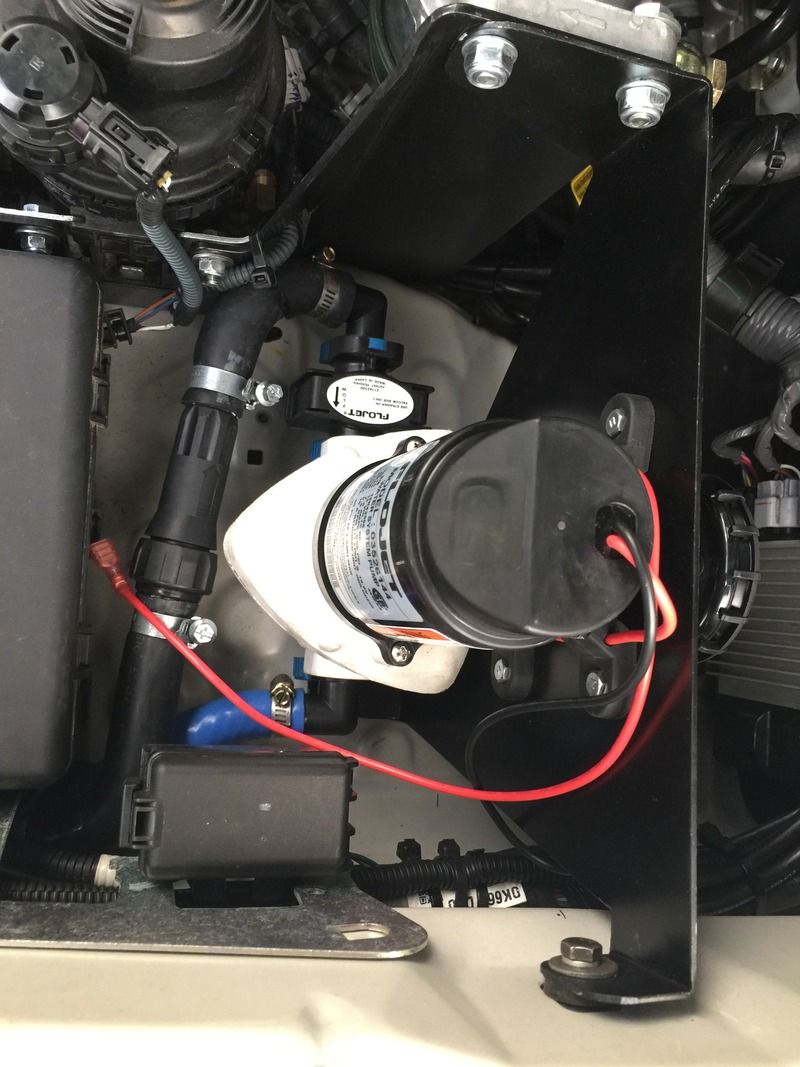
Thanks to the Water Watch's mounting bracket, I was able to come up with a bracket for the FloJet water pump that required no holes to be drilled in the engine bay. I pissed off my neighbours a little when I didn't realise it was almost 10PM and I was still using my grinder. So a quick apology later and I got on to painting.
I'm pretty pleased with how this turned out.
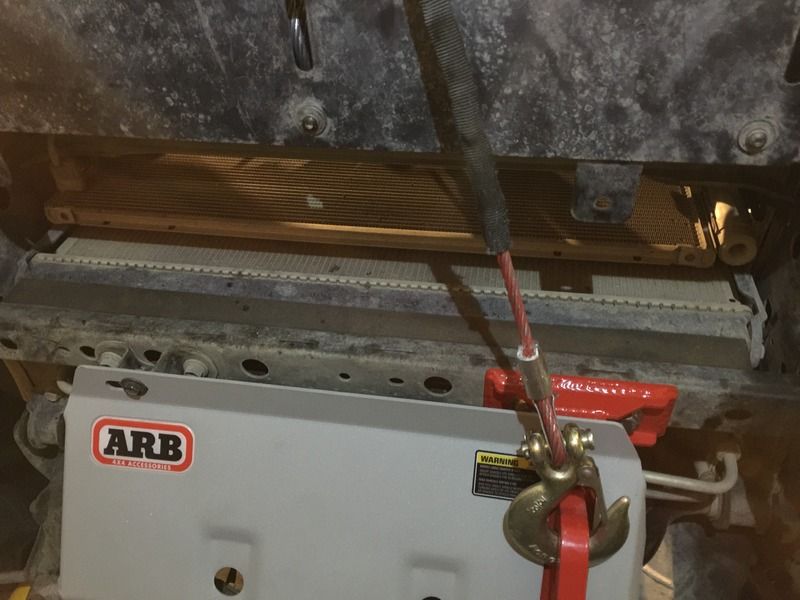
Back when we bolted on the UVP, I was concerned by the remaining gap between the bullbar and the first of the bash plates. It seemed a little to inviting to things like stones, sticks, and spinifex seeds for my liking.
The offending gap.
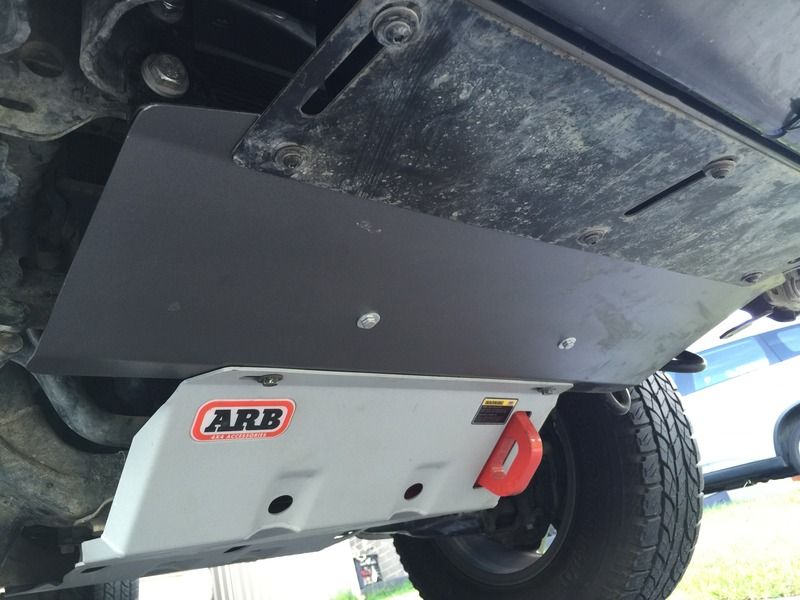
I wanted a little more protection, so I made a stone guard that would double as my heat exchanger mount. As I have no easy means to make bends in large sheet, I cut everything to size, then popped back into the joint I bought the steel from, where they made the required bends for me. A bit of paint to finish, and it was ready for installation.
It's mounted using existing bolts.
I was a little concerned that the restricted airflow this may cause would result in higher engine temps, but so far nothing seems to have changed.
Since installing my stone guard, I've noticed that the ARB bars don't have any such gap, and though the TJM versions have vent holes, they have way less openings above the winch than I do. I may need to alter my design to incorporate more flow, but for now I'll just keep an eye on things.
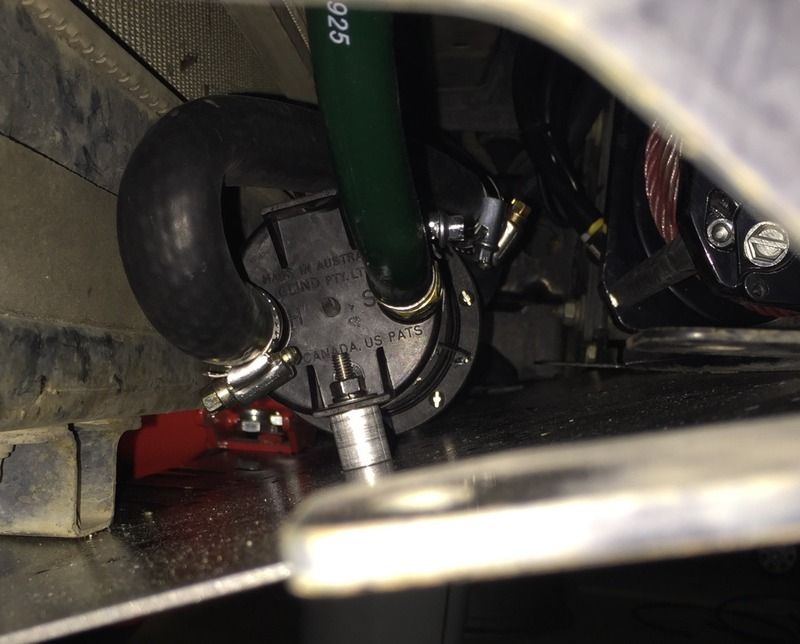
With both the pump and heat exchange installed, I plumbed everything up and am happy with how easy it all works.
All ready to be hooked up to a power source.
The heat exchange mounted in behind behind the winch.
The inlet and outlet hoses are just tucked in behind the bullbar, and have standard garden hose fittings attached.
Next on the list was to extend the factory diff, gearbox, and transfer case breathers. I had bought an ARB kit back when I ordered all the other goodies, and thought that four breathers would have everything covered, but then I learnt of the ADD breather. The easiest way to overcome this oversight was to run the front diff, gearbox, transfer case, and ADD breathers to the ARB kit, and the rear diff to a separate filter behind the tail light assembly. After I'd fitted everything of course, I then learnt of the other location for a breather on the transfer case. As I didn't have the parts on hand, I've left that job for another day. I intend to just join it to the existing transfer case breather via a T-connector. I can't see the small volume of them both combined causing any sort of problem.
I attached the ARB filter to the back of my shower pump bracket, and cable tied the rear one to a small hole I drilled as high as I could manage, and hooked everything up.
Another satisfying moment.
Front diff, gearbox, transfer case, and A.D.D. breathers in engine bay.
Rear diff breather above left tail light assembly.
After the water pump and breathers were attached to my bracket, there was still enough room to mount a relay and fuse block to power my growing list of accessories.
Luckily there isn't any more that needs to be installed under the bonnet now, because I'm pretty much out of usable space at this point.
If I had've thought to put the fuse box there earlier, I would've put the pump a little further across. I was just lucky there was enough space left to make it fit.
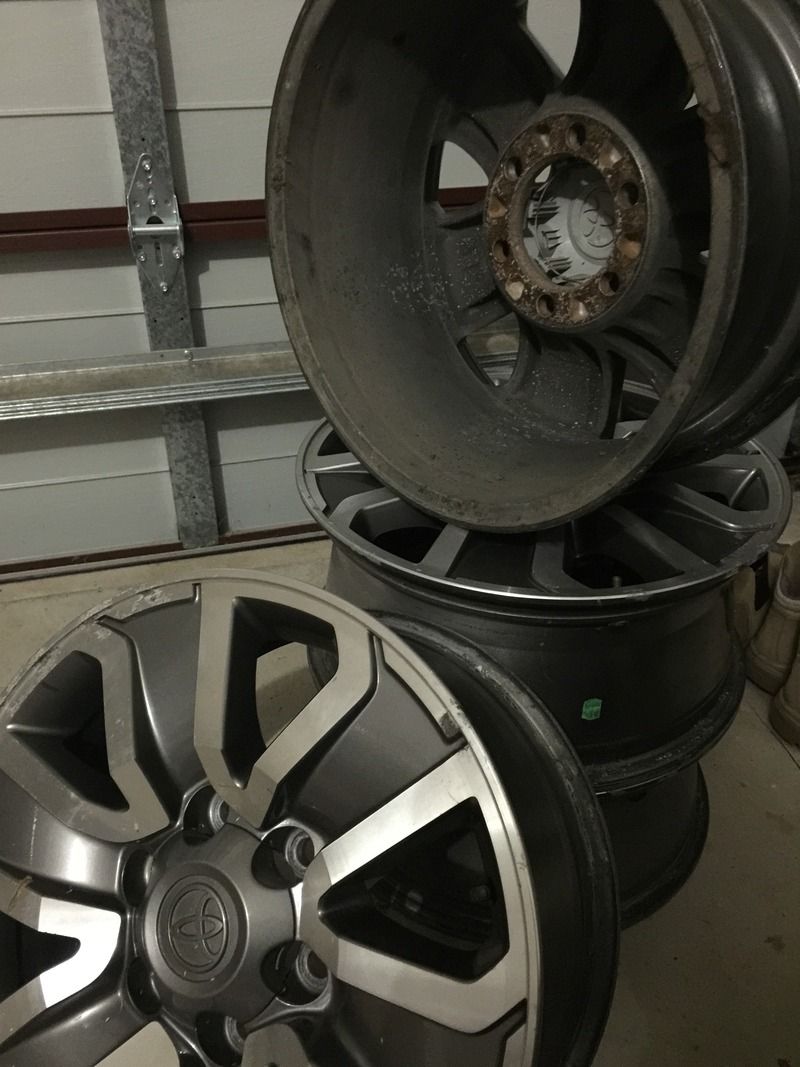
While hunting around for a couple of extra spare wheels, I came across a full set of the same TRD rims my HiLux came with on Gumtree. The ad was posted by a wheel shop from somewhere over near Rockdale, so I didn't know how solid they were on their price. I made them an offer, and to my surprise they accepted. One of the wheels has a bit of nasty gutter rash, but otherwise I'm stoked. I'll grab a couple of tyres for them when I get around to it, and that'll one less thing to worry about.
Not bad for $500.
The choice to install a long range fuel tank was an easy one. Depending on the make and model I chose, it could save me having to carry up to four jerry cans. I looked into, and contacted, all the manufacturers I could find, and after considering everything, went with a 145L tank from Long Range Automotive. I had to order it a bit in advance due to there already being a few on back order. They didn't recommend attempting the installation without a hoist, so I booked myself in to have it fitted by Artarmon Automotive once everything was ready.
It only took them half a day to fit, and so far I'm really happy with it.
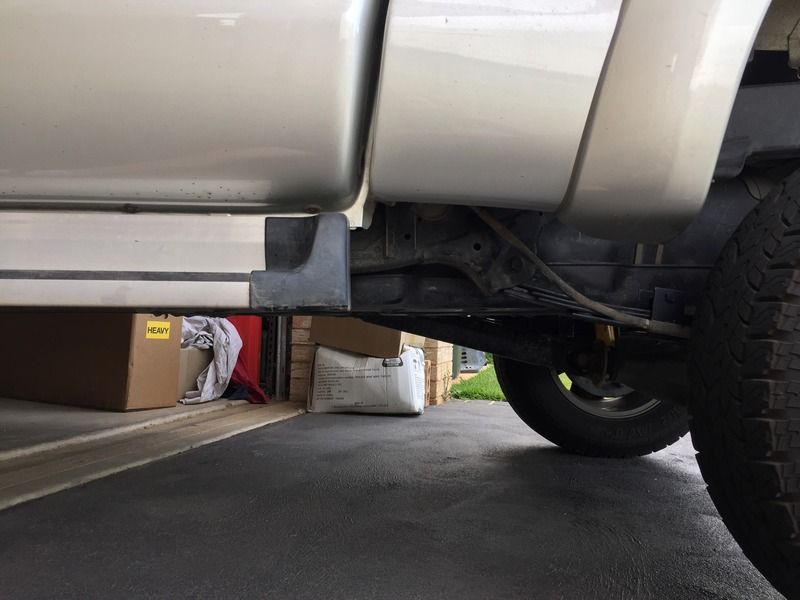
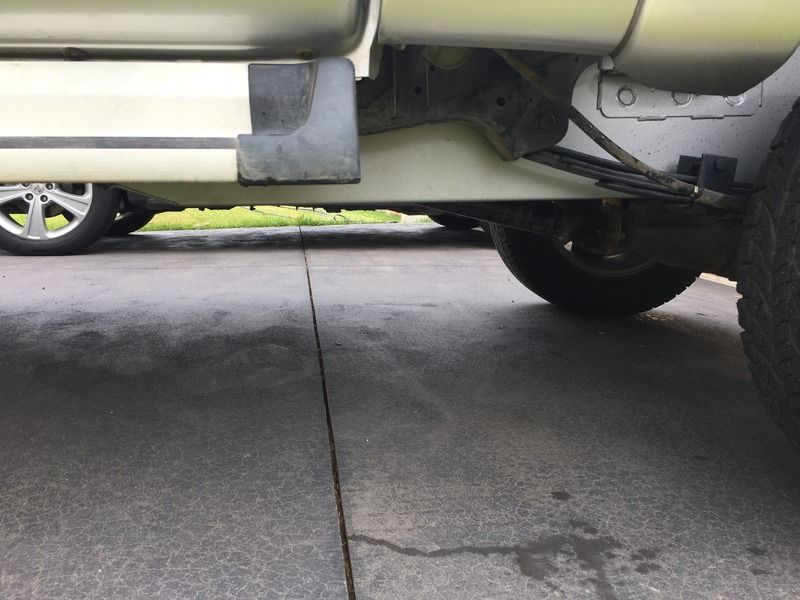
All the manufacturers claim that their tanks don't change your ground clearance, but I have a feeling they are just saying that they don't hang lower than the bottom of your diff. My tank does hang slightly lower than the side old one, but I don't see this causing me any issues with the type of driving I expect to be doing.
Before.
After.
Although this was taken with no weight on board, it shows that even if the tank does hang lower, it's still plenty higher than the UVP will ever be.
Around the same time I ordered the LRA tank, I also purchased a sat phone with a car kit. The car kit was too cheap to pass up, but I had no idea how I was going to go about installing it. The phone cradle is rather bulky, and there was also the mic, speaker, module, and antennae to contend with. I started with the antennae, as it seemed like the easiest decision to make. After again having to test my fabrication skills, I managed to devise a way to mount it to the bracket that joins the two sports bars. I took the bars off and drilled holes for the wiring to pass through. While I had everything apart, I ran a bit of polish over the aluminium, which came up much better than I thought it would.
Right before I bolted the bars back to the ute, I tied a small weight to the end of some fishing line. I dropped the weight through the top hole where the antennae would end up, and with a bit of shaking, I managed to get it to fall out the bottom hole. I secured both ends of the fishing line, and left it ready to pull the wiring through when I got around to it. As I was too busy to finish the job at the time, I drove around with it like this for over a week.
The addition of this aerial brings my overall height up to 1.95m.
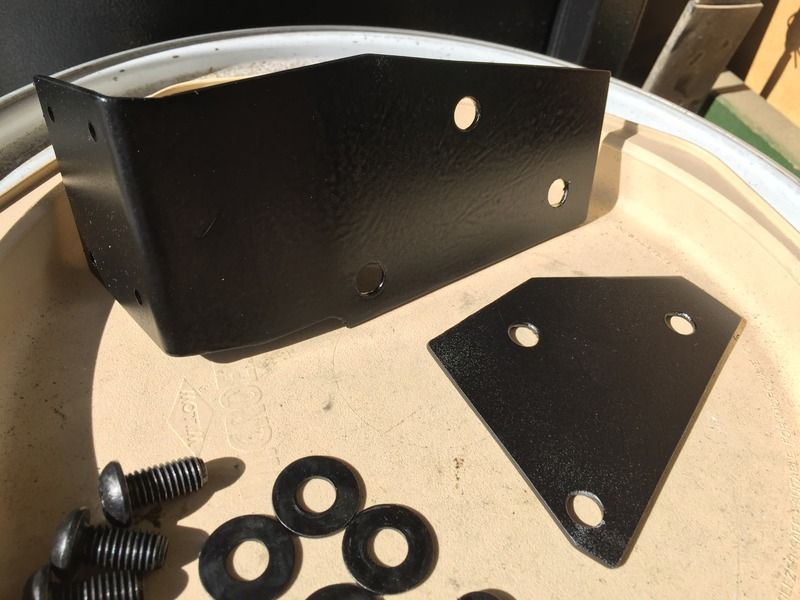
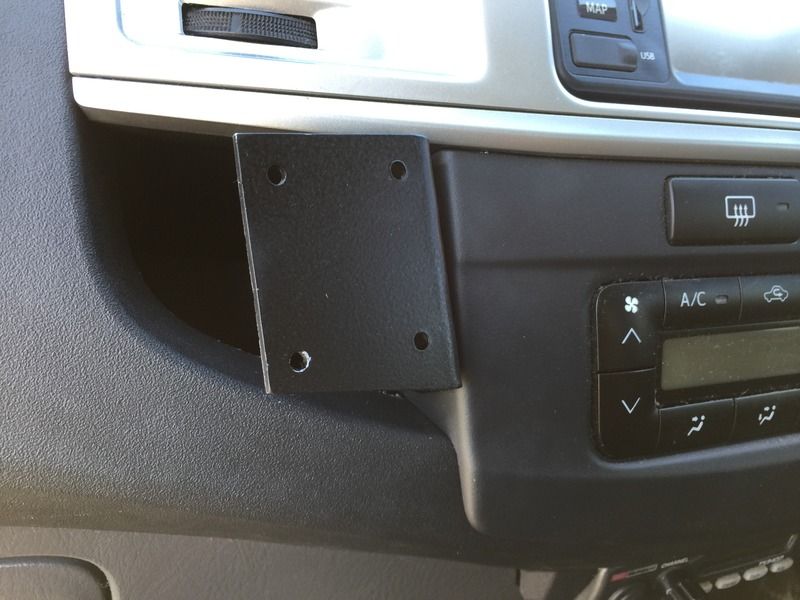
I thought I knew what I was doing with the phone cradle, but I was never 100% convinced. After seeing a photo somewhere, of something totally unrelated, I had a brainwave!
Out came my ever shrinking steel offcut again. I made some measurements, and was soon cutting and bending. After convincing myself it wouldn't be in the way of the airbag, I gave everything a couple of coats of paint, and bolted it into place.
It's possibly a little over engineered, but at least I can be certain that no amount of corrugations will ever shake it loose.
Initially it stuck out a bit too far, but a quick trim before it was painted had everything sorted.
As bulky as it all is, it doesn't look too out of place now it's mounted.
I stated earlier that the transition from my lowered SS ute to the HiLux was easy. Well I lied a little. The fact that entire vehicles can hide behind the HiLux's tailgate has taken some getting used to. This isn't a problem for future me to worry about though, because I invested in a Carbon Car Systems reverse camera, and it has completely transformed the ease of navigating tight parking spaces. I really wish I had of done it sooner.
My first visit to the shops with my reverse camera fitted.
The view from inside.
You can read the installation instructions online if you think you might be interested. It is without doubt the easiest install I've done so far.
CLICK HERE TO VIEW REVERSE CAMERA INSTALLATION INSTRUCTIONS
I suggest if you do buy one of these kits though, before you do anything else, pull the two screws out of the mounting bracket and put some Loctite on them. I lost one of them almost instantly due to it vibrating out, and it was a size screw that I didn't have many of. In fact, of all the bolts and screws that I have hoarded over the years (I basically never throw them out), I only had one the right size and thread. After an hour of searching through the garage with no luck, I ended up finding one upstairs amongst my computer spares.
While running the wires for the reverse camera, I thought I should also hook up the rest of the sat phone car kit. This was all too easy now that all the hard work had already been completed, and the fishing line made pulling the wires through to the antennae an absolute breeze. The speaker went under the dash near the one for the UHF, and there was just enough cord on the microphone to put it up next to the sunnies holder in the roof. I screwed the module to the floor under the drivers seat, plugged everything in, and the job was finally done.
If I'm absolutely certain I won't change my mind, I don't have a problem drilling holes in my dash. So with my mind finally made up, I mounted the UHF mic holder below the sat phone cradle.
Another find thanks to this forum was the dual USB charge point from Solid Kit. I originally ordered and installed one with blue LEDs, but I found them absolutely annoying after dark. So I reordered a set without the LEDs and now I'm super happy with them.
Sat phone, UHF mic, and USB ports done!
While on the Solid Kit site, I also bought myself a dual battery volt meter.
You might be wondering why I'd do such a thing. I mean, I filled the space most of you put your auxiliary battery with a water pump and diff breathers right?
With the LRA tank on the passengers side, and the winch up front, I didn't really want to put another heavy item up front, or on that side of the vehicle. Plus I couldn't see a 120Ah battery even fitting.
I thought of having a custom battery bracket made to go under the tub behind the drivers side rear wheel, but this idea has been scrapped for the time being. For now at least, the battery has been installed in the tub, bolted down in front of the drivers side wheel arch. This means I've lost some space I'd like to get back if possible, but it'll do for now.
I'll probably make a protective enclosure to cover the auxiliary battery. I just haven't worked out how I want to do it yet.
The Redarc BCDC charger is fixed under the rear seat on the drivers side.
I wired the dual volt meters to come on with the ignition, or at the flick of a switch. I intend to swap the switch for a push button later on, but either works.
Wiring diagram of how I installed the dual volt meter.
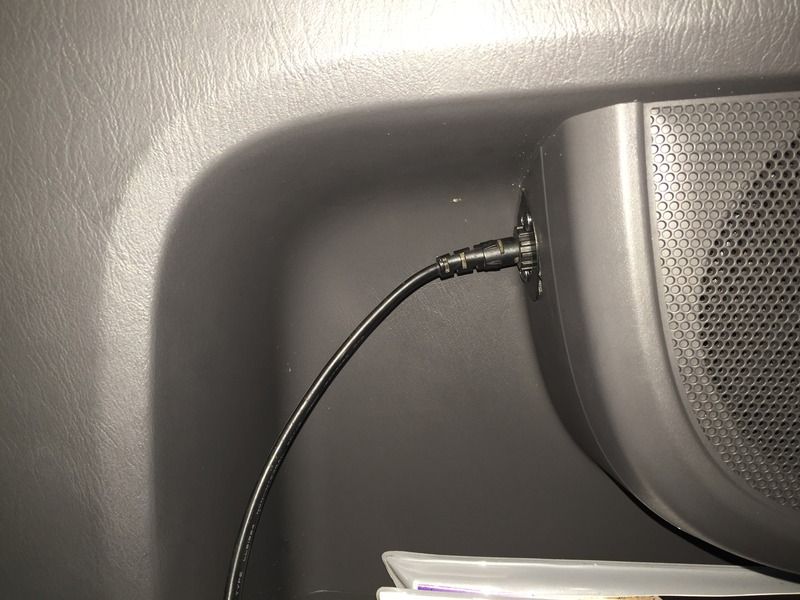
The main reason for such a large auxiliary battery is to power the fridges. We usually only travel with one 32L Engel, but for this next trip we'll be packing a second to use as a freezer. Not willing to trust a regular cigarette socket on the corrugations, I grabbed a couple of the screw type Engel sockets to put in the back of the cab.
Unfortunately, I had another one of those too tired moments when I decided where to put them. This led to a few different solution being tested, the last of which working well enough for me to go ahead with.
After my silly mistake with the buzzer earlier, I made many measurements to be sure there was plenty of clearance for everything. Problem was, I failed to make sure I could get the panels on and off with them in place. It wasn't the end of the world though, as they still ended up out of sight, and functional, which is what I was aiming for.
Now I just needed to run the cables, and plug in the fridges.
Despite my screw up, the final product is as discrete as I'd hoped.
After reading around this forum I'm fully aware that trays are the more popular option, but I tend to prefer a tub. I can totally understand that there are circumstances where trays would be a much better choice, but for now, I'll be sticking with what I'm used to.
I purchased some tub lighting while at a recent camping show, that should make rummaging around in the back a little easier at night. I also grabbed the optional remote control unit that gives you the ability to control both power, and the built in dimmer from a distance. I had a similar set up to this in my last ute, and found it very handy.
Installation wasn't as straightforward as I would've liked though. The length of wire between each light cluster didn't really work with the available spaces under the lip of the tub, so I cut the wires and grafted in extensions where needed. It was a very time consuming job, but the end result made it absolutely worth it in my opinion.
The whole lot only cost me a little over $100, which represents great value in my opinion.
Dimmed to their lowest level.
Turned up all the way.
Here's what they look like in action...
The only item left on my to-do list at this point was the L2 A.D.D. mod. I grabbed a relay and switch I had left over from a previous project, and I had the job done in no time at all. This should mean no more complaining about the painfully high gear ratio of reverse while backing the boat and caravan. Woo bloody hoo!
Below are a couple of pictures outlining what's involved.
This is what you should see when you remove the glovebox. You're looking for the green plug to the left.
Cut the thin black wire and extend both sections as much as you need. Connect these to your switch/relay and you're done.
This is how I wired it.
Note:The relay was only used so my switch would glow red when the A.D.D. is disabled.
Obviously this is just a basic overview. If you need/want to know more, there's plenty of detailed discussion about it in this thread.
CLICK HERE FOR ALL THE INFO ON THE A.D.D. MODIFICATION
Wow, I think that's it.
I don't know how many of you bothered reading this far, but to those that have, thank you. It took me quite a while to get all this together using just my phone, and I'd hate for it have been for nothing.
Cheers, Pete.
Last edited by MR RUM on Tue, 23 Aug 2016 1:43 +0000, edited 3 times in total.
R.M.Williams isn't the only one with a longhorn.
-
MR RUM - Posts: 27
- Joined: Tue, 11 Aug 2015 6:03 +0000
- Location: Mount Annan, NSW
Re: MR RUM's 2013 Extra Cab
![]() by TOYZX on Thu, 14 Apr 2016 5:28 +0000
by TOYZX on Thu, 14 Apr 2016 5:28 +0000
Nice work man!
Sent from my SM-N920I using Tapatalk
Sent from my SM-N920I using Tapatalk
-

TOYZX - Moderator
- Posts: 2919
- Joined: Wed, 08 May 2013 7:58 +0000
Re: MR RUM's 2013 Extra Cab
![]() by nicebike on Thu, 14 Apr 2016 6:32 +0000
by nicebike on Thu, 14 Apr 2016 6:32 +0000
Tidy and thorough. Some good examples of "measure twice and cut once"  Well done.
Did I miss any mention of what cable size you used to link up your second battery ? What size did you use ?
And yes, big job to get all that posted using a phone - busy fingers
Did I miss any mention of what cable size you used to link up your second battery ? What size did you use ?
And yes, big job to get all that posted using a phone - busy fingers
- nicebike
- Posts: 736
- Joined: Thu, 27 Feb 2014 7:28 +0000
Re: MR RUM's 2013 Extra Cab
![]() by Mrmal on Thu, 14 Apr 2016 8:10 +0000
by Mrmal on Thu, 14 Apr 2016 8:10 +0000
Great looking ute! Handy tip - with extra cabs - if you put on the dual cab steps on, it provides a small amount of protection to the front of the rear wheel arches and gives you a hand leg up into the tub......also closes that gap.
We used dual cab steps on Mik's single cab works a treat!
Mal
We used dual cab steps on Mik's single cab works a treat!
Mal
- Mrmal
- Posts: 194
- Joined: Tue, 16 Jul 2013 11:26 +0000
Re: MR RUM's 2013 Extra Cab
![]() by MR RUM on Thu, 14 Apr 2016 12:15 +0000
by MR RUM on Thu, 14 Apr 2016 12:15 +0000
Thanks for the kind words guys.
No you didn't miss anything. The truth is, I have a relative that's an auto electrician. He installed the auxilary battery and ran all the related wiring while I slept. I had him order everything for me to save a few dollars, and when I went to pick everything up, he put it in for me. Being a shift worker and having two jobs makes it hard to find the time to do everything, so when he offered to help, I jumped at the chance.
I'll certainly look into this. There's been times when I've wanted the step to go back that little bit more. I hadn't even thought of using a dual cab step. Thanks.
nicebike wrote:Did I miss any mention of what cable size you used to link up your second battery ? What size did you use ?
No you didn't miss anything. The truth is, I have a relative that's an auto electrician. He installed the auxilary battery and ran all the related wiring while I slept. I had him order everything for me to save a few dollars, and when I went to pick everything up, he put it in for me. Being a shift worker and having two jobs makes it hard to find the time to do everything, so when he offered to help, I jumped at the chance.
Mrmal wrote:Handy tip - with extra cabs - if you put on the dual cab steps on, it provides a small amount of protection to the front of the rear wheel arches and gives you a hand leg up into the tub......also closes that gap.
I'll certainly look into this. There's been times when I've wanted the step to go back that little bit more. I hadn't even thought of using a dual cab step. Thanks.
R.M.Williams isn't the only one with a longhorn.
-
MR RUM - Posts: 27
- Joined: Tue, 11 Aug 2015 6:03 +0000
- Location: Mount Annan, NSW
Re: MR RUM's 2013 Extra Cab
![]() by rds_929 on Thu, 14 Apr 2016 3:30 +0000
by rds_929 on Thu, 14 Apr 2016 3:30 +0000
looking nice man coming along well
- rds_929
- Posts: 402
- Joined: Mon, 01 Jun 2015 6:26 +0000
- Location: melbourne , victoria
Re: MR RUM's 2013 Extra Cab
![]() by Mrmal on Fri, 15 Apr 2016 2:50 +0000
by Mrmal on Fri, 15 Apr 2016 2:50 +0000


- Mrmal
- Posts: 194
- Joined: Tue, 16 Jul 2013 11:26 +0000
Re: MR RUM's 2013 Extra Cab
![]() by rusty 351 on Fri, 15 Apr 2016 5:13 +0000
by rusty 351 on Fri, 15 Apr 2016 5:13 +0000
Awesome write up mate,
Its looking good!!
Its looking good!!
- rusty 351
- Posts: 96
- Joined: Sat, 25 Jul 2015 6:27 +0000
- Location: central coast
Re: MR RUM's 2013 Extra Cab
![]() by nicebike on Fri, 15 Apr 2016 5:36 +0000
by nicebike on Fri, 15 Apr 2016 5:36 +0000
Cool idea with the dual cab steps, Mrmal. Make's you wonder why anyone bothers with the shorter ones on anything with a tub. 
- nicebike
- Posts: 736
- Joined: Thu, 27 Feb 2014 7:28 +0000
10 posts
• Page 1 of 1
Who is online
Users browsing this forum: No registered users and 125 guests
![]()