Rockets New Build - Power Up
Re: Rockets New Build - Power Up
![]() by oggy on Sun, 20 Dec 2015 5:03 +0000
by oggy on Sun, 20 Dec 2015 5:03 +0000
Thats unusal  I would have thought that being a Datsun the gear box would have broken long before the bolt snapped
Occupational health and safety officers..Stop messin with Darwin's theory of natural selection... Stupid hippies.
Oggy's build viewtopic.php?f=41&t=19033
Oggy's build viewtopic.php?f=41&t=19033
-

oggy - Moderator
- Posts: 3123
- Joined: Thu, 24 May 2012 6:47 +0000
Re: Rockets New Build - Power Up
![]() by snakesoup on Sun, 20 Dec 2015 6:28 +0000
by snakesoup on Sun, 20 Dec 2015 6:28 +0000
maybe a bit of heat will help on the next attempt
- snakesoup
- Posts: 101
- Joined: Wed, 04 Nov 2015 5:45 +0000
- Location: Melbourne
Re: Rockets New Build - Power Up
![]() by Rocket55 on Sun, 20 Dec 2015 6:56 +0000
by Rocket55 on Sun, 20 Dec 2015 6:56 +0000
oggy wrote:Thats unusal
We can always rely on Oggy for words of wisdom.
Cheers Rod
__________________________________________________________________________________________
Bitumen ...... another waste of public funds
__________________________________________________________________________________________
Bitumen ...... another waste of public funds
-

Rocket55 - Moderator
- Posts: 7816
- Joined: Wed, 16 Mar 2011 8:07 +0000
- Location: Sutherland NSW
Re: Rockets New Build - Power Up
![]() by Rocket55 on Sun, 20 Dec 2015 6:59 +0000
by Rocket55 on Sun, 20 Dec 2015 6:59 +0000
snakesoup wrote:maybe a bit of heat will help on the next attempt
I'll give it a go and see what happens. Worst than can happen is I break the easy out off. At least that gives me something to weld to for my first welding effort. I'd prefer not to learn in this situation though.
Cheers Rod
__________________________________________________________________________________________
Bitumen ...... another waste of public funds
__________________________________________________________________________________________
Bitumen ...... another waste of public funds
-
Rocket55 - Moderator
- Posts: 7816
- Joined: Wed, 16 Mar 2011 8:07 +0000
- Location: Sutherland NSW
Re: Rockets New Build - Power Up
![]() by oggy on Sun, 20 Dec 2015 9:27 +0000
by oggy on Sun, 20 Dec 2015 9:27 +0000
Yeah...what could possibly go wrongRocket55 wrote:snakesoup wrote:maybe a bit of heat will help on the next attempt
I'll give it a go and see what happens. Worst than can happen is I break the easy out off. At least that gives me something to weld to for my first welding effort. I'd prefer not to learn in this situation though.
Occupational health and safety officers..Stop messin with Darwin's theory of natural selection... Stupid hippies.
Oggy's build viewtopic.php?f=41&t=19033
Oggy's build viewtopic.php?f=41&t=19033
-
oggy - Moderator
- Posts: 3123
- Joined: Thu, 24 May 2012 6:47 +0000
Re: Rockets New Build - Power Up
![]() by Rocket55 on Sun, 20 Dec 2015 11:11 +0000
by Rocket55 on Sun, 20 Dec 2015 11:11 +0000
oggy wrote:Yeah...what could possibly go wrongRocket55 wrote:snakesoup wrote:maybe a bit of heat will help on the next attempt
I'll give it a go and see what happens. Worst than can happen is I break the easy out off. At least that gives me something to weld to for my first welding effort. I'd prefer not to learn in this situation though.

Nothing mate, it's a Datsun
Cheers Rod
__________________________________________________________________________________________
Bitumen ...... another waste of public funds
__________________________________________________________________________________________
Bitumen ...... another waste of public funds
-
Rocket55 - Moderator
- Posts: 7816
- Joined: Wed, 16 Mar 2011 8:07 +0000
- Location: Sutherland NSW
Re: Rockets New Build - Power Up
![]() by pisso01 on Sun, 20 Dec 2015 12:20 +0000
by pisso01 on Sun, 20 Dec 2015 12:20 +0000
Just dont weld the stud to the gearbox housing.
My touring Lux - viewtopic.php?f=41&t=7795 - Nearly finished
-

pisso01 - Moderator
- Posts: 2193
- Joined: Sun, 24 Oct 2010 7:08 +0000
- Location: Orange, NSW.
Re: Rockets New Build - Power Up
![]() by Rocket55 on Sun, 20 Dec 2015 1:02 +0000
by Rocket55 on Sun, 20 Dec 2015 1:02 +0000
Cheers Rod
__________________________________________________________________________________________
Bitumen ...... another waste of public funds
__________________________________________________________________________________________
Bitumen ...... another waste of public funds
-
Rocket55 - Moderator
- Posts: 7816
- Joined: Wed, 16 Mar 2011 8:07 +0000
- Location: Sutherland NSW
Re: Rockets New Build - Power Up
![]() by Glenn k on Sun, 20 Dec 2015 2:27 +0000
by Glenn k on Sun, 20 Dec 2015 2:27 +0000
Rocket55 wrote:snakesoup wrote:maybe a bit of heat will help on the next attempt
I'll give it a go and see what happens. Worst than can happen is I break the easy out off. At least that gives me something to weld to for my first welding effort. I'd prefer not to learn in this situation though.
Make sure you disconnect the battery, or is there no need to??? I think we might need to revive an old thread
due to recent financial difficulties, the light at the end of the tunnel has been shut off until further notice !
-

Glenn k - Posts: 2006
- Joined: Wed, 21 Mar 2007 1:00 +0000
- Location: southern sydney, NSW
Re: Rockets New Build - Power Up
![]() by Rocket55 on Sun, 20 Dec 2015 2:32 +0000
by Rocket55 on Sun, 20 Dec 2015 2:32 +0000
Glenn k wrote:Rocket55 wrote:snakesoup wrote:maybe a bit of heat will help on the next attempt
I'll give it a go and see what happens. Worst than can happen is I break the easy out off. At least that gives me something to weld to for my first welding effort. I'd prefer not to learn in this situation though.
Make sure you disconnect the battery, or is there no need to??? I think we might need to revive an old thread
If I had an ECU I'd disconnect that, but old school Datto power here
Cheers Rod
__________________________________________________________________________________________
Bitumen ...... another waste of public funds
__________________________________________________________________________________________
Bitumen ...... another waste of public funds
-
Rocket55 - Moderator
- Posts: 7816
- Joined: Wed, 16 Mar 2011 8:07 +0000
- Location: Sutherland NSW
Re: Rockets New Build - Power Up
![]() by Rocket55 on Mon, 21 Dec 2015 12:14 +0000
by Rocket55 on Mon, 21 Dec 2015 12:14 +0000
Bit of mixed success tonight. I ran the drill through it a couple more times, give it a couple of big whacks and applied some heat, attacked it with an easy out and no love. Was probably a bit timid with it as I sure as hell didn't want to snap the easy out off in there. So I gave up on that and just kept on dilling, eventually as the drill was biting through it would grab and then start to screw it in further. No no. I got my little punch out and wrestled with it but it wouldn't come out, Although I was able to fold it up a bit with the punch and then drill those bit out. In the end I folded it all up towards the top of the hole then shoved the drill in there and it all came out. Unconventional maybe, but hey it's out.
In doing this I also kinda drilled away some of the existing thread, so time for an upsize, ran a bigger drill through it and cleaned it up.
Then ran a 12mm tap through it.
Mounted the passengers side mount, remembering to put the exhaust bracket in, then on with the cross member and job done!!
In doing this I also kinda drilled away some of the existing thread, so time for an upsize, ran a bigger drill through it and cleaned it up.
Then ran a 12mm tap through it.
Mounted the passengers side mount, remembering to put the exhaust bracket in, then on with the cross member and job done!!
Cheers Rod
__________________________________________________________________________________________
Bitumen ...... another waste of public funds
__________________________________________________________________________________________
Bitumen ...... another waste of public funds
-
Rocket55 - Moderator
- Posts: 7816
- Joined: Wed, 16 Mar 2011 8:07 +0000
- Location: Sutherland NSW
Re: Rockets New Build - Power Up
![]() by pisso01 on Mon, 21 Dec 2015 4:06 +0000
by pisso01 on Mon, 21 Dec 2015 4:06 +0000
Bitch of a job that should have been easy.
My touring Lux - viewtopic.php?f=41&t=7795 - Nearly finished
-
pisso01 - Moderator
- Posts: 2193
- Joined: Sun, 24 Oct 2010 7:08 +0000
- Location: Orange, NSW.
Re: Rockets New Build - Power Up
![]() by Rocket55 on Mon, 21 Dec 2015 6:03 +0000
by Rocket55 on Mon, 21 Dec 2015 6:03 +0000
Your telling me!! Engine mounts today, hopefully better luck there.
Cheers Rod
__________________________________________________________________________________________
Bitumen ...... another waste of public funds
__________________________________________________________________________________________
Bitumen ...... another waste of public funds
-
Rocket55 - Moderator
- Posts: 7816
- Joined: Wed, 16 Mar 2011 8:07 +0000
- Location: Sutherland NSW
Re: Rockets New Build - Power Up
![]() by Mrmal on Mon, 21 Dec 2015 3:07 +0000
by Mrmal on Mon, 21 Dec 2015 3:07 +0000
Four words for you mate:
Left Hand Drill Bit
They are brilliant - use smaller and build to the bigger ones - the heat and friction instead of winding the bolt in it winds out......... just need a fool proof system for keeping them separate from the normal bits! Spent many a minute trying to figure out why a bit wont cut.......
- Mrmal
- Posts: 194
- Joined: Tue, 16 Jul 2013 11:26 +0000
Re: Rockets New Build - Power Up
![]() by Rocket55 on Mon, 21 Dec 2015 5:59 +0000
by Rocket55 on Mon, 21 Dec 2015 5:59 +0000
Ah yes, at about midnight last night when it started to screw further in I was thinking how great would it be to have a set of left hand drills about now, might add them to the list next time I'm out.
Cheers Rod
__________________________________________________________________________________________
Bitumen ...... another waste of public funds
__________________________________________________________________________________________
Bitumen ...... another waste of public funds
-
Rocket55 - Moderator
- Posts: 7816
- Joined: Wed, 16 Mar 2011 8:07 +0000
- Location: Sutherland NSW
Re: Rockets New Build - Power Up
![]() by Rocket55 on Mon, 21 Dec 2015 6:26 +0000
by Rocket55 on Mon, 21 Dec 2015 6:26 +0000
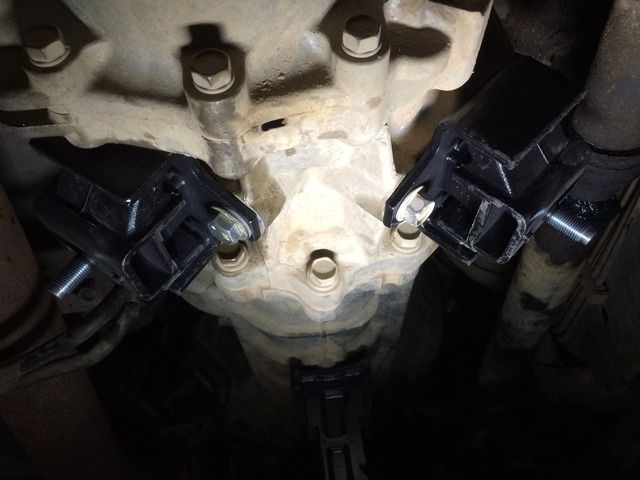
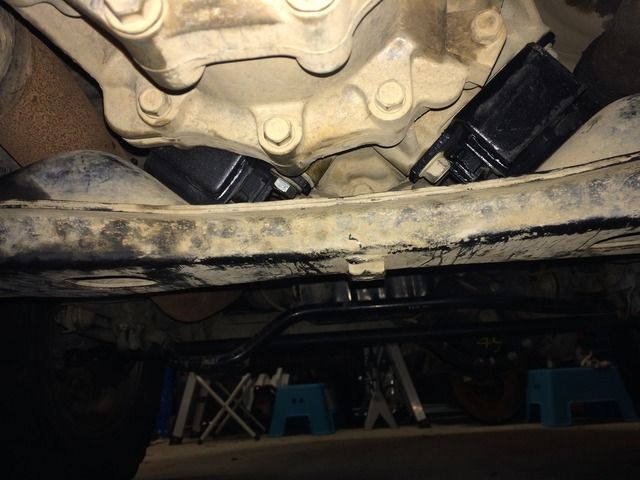
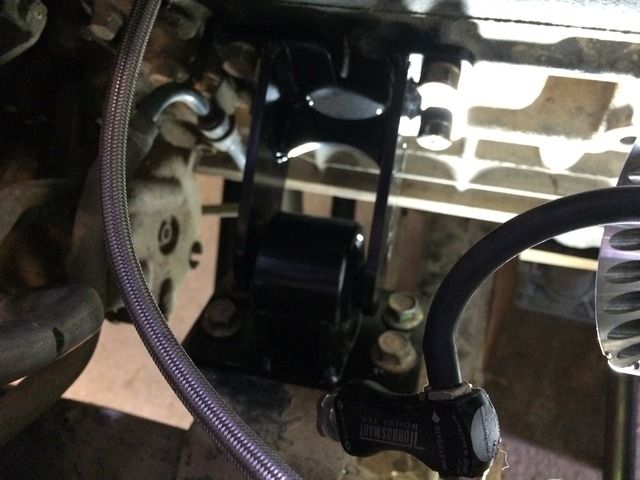
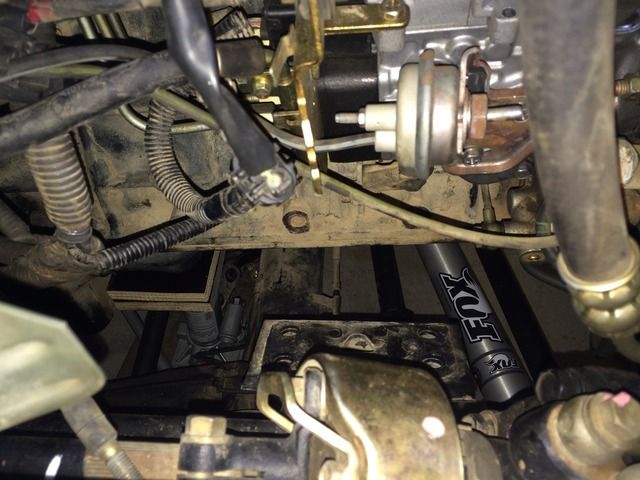
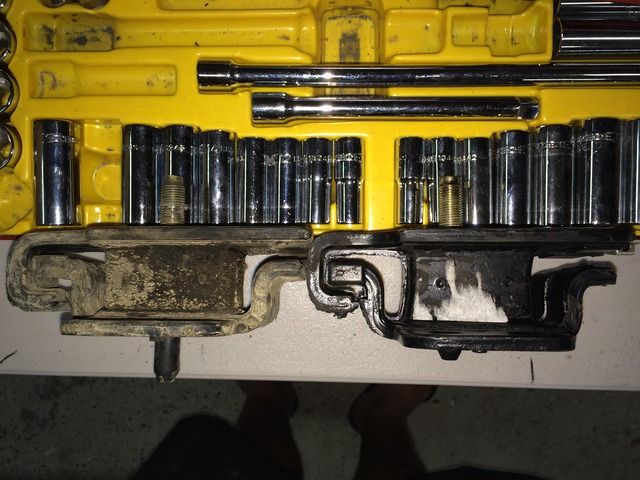
After successfully changing the gearbox mounts (after a small mishap) it was time to change the engine mounts. The gearbox mounts are pretty easy and straight forward, piece of cake actually, these engine mounts are a different beast and a job if I had to do it again I probably wouldn't.
First up, off with the intercooler and intake pipework between the airbox and the turbo. Out with both batteries, now you can see and touch the mounts. Then I undid the top nut on the mount and wound it off to the top of the thread, then set about cracking all the other bolts (passenger side first) seeing as though the Superior mount is going in this side I undid the engine bracket bolts as well as this gets replaced. Upon removing the little heat shield I found it was cracked nearly all the way through and probably wasn't that far from falling off, so in the bin it went, one less thing to put back on.
I didt the same on the drivers side as well, only left the engine braket bolts alone.
Next was to lift the engine, it went up easily untill the top of the fan hit the fan shoud, at this point it still needed to go another 10-15mm to clear the top of the threaded bolt in the top of the mounts, clearly this was not going to happen.
So I continued to remove the passenger side mount and engine bracket all together. All the bolts are hugely tight and access is limited so it's a time consuming exercise. Some from above and some from below.
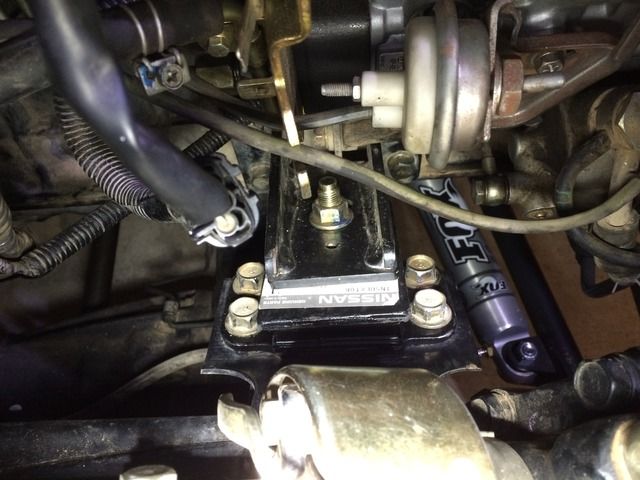
Now to mount the Superior mount, just put it in loose, adjust the engine height a bit to line the centre bolt up then just nipped everything up.
Now for the drivers side. No way was i able to manipulate the mount out, so I bit the bullet and removed the engine bracket also.
Then set about installing the new genuine mount and the engine bracket again.
Do everything up on both sides super tight, let the engine down and clean up. Radiator goes in tomorrow so I left the batteries and intercooler out till then.
For the record, a new mount is 51mm thick to the outside of the plates, the old passenger side mount measured 48mm and the drivers side 47mm. I did notice I coud relatively easily squash/tilt the old drivers side mount by hand and bring the plates together. (I could also do this with the new one....) The old drivers side mount showed plenty of evidence where it had been compressed with nice shinny smooth marks on the inside of the plates.
First up, off with the intercooler and intake pipework between the airbox and the turbo. Out with both batteries, now you can see and touch the mounts. Then I undid the top nut on the mount and wound it off to the top of the thread, then set about cracking all the other bolts (passenger side first) seeing as though the Superior mount is going in this side I undid the engine bracket bolts as well as this gets replaced. Upon removing the little heat shield I found it was cracked nearly all the way through and probably wasn't that far from falling off, so in the bin it went, one less thing to put back on.
I didt the same on the drivers side as well, only left the engine braket bolts alone.
Next was to lift the engine, it went up easily untill the top of the fan hit the fan shoud, at this point it still needed to go another 10-15mm to clear the top of the threaded bolt in the top of the mounts, clearly this was not going to happen.
So I continued to remove the passenger side mount and engine bracket all together. All the bolts are hugely tight and access is limited so it's a time consuming exercise. Some from above and some from below.
Now to mount the Superior mount, just put it in loose, adjust the engine height a bit to line the centre bolt up then just nipped everything up.
Now for the drivers side. No way was i able to manipulate the mount out, so I bit the bullet and removed the engine bracket also.
Then set about installing the new genuine mount and the engine bracket again.
Do everything up on both sides super tight, let the engine down and clean up. Radiator goes in tomorrow so I left the batteries and intercooler out till then.
For the record, a new mount is 51mm thick to the outside of the plates, the old passenger side mount measured 48mm and the drivers side 47mm. I did notice I coud relatively easily squash/tilt the old drivers side mount by hand and bring the plates together. (I could also do this with the new one....) The old drivers side mount showed plenty of evidence where it had been compressed with nice shinny smooth marks on the inside of the plates.
Cheers Rod
__________________________________________________________________________________________
Bitumen ...... another waste of public funds
__________________________________________________________________________________________
Bitumen ...... another waste of public funds
-
Rocket55 - Moderator
- Posts: 7816
- Joined: Wed, 16 Mar 2011 8:07 +0000
- Location: Sutherland NSW
Re: Rockets New Build - Power Up
![]() by Rocket55 on Tue, 22 Dec 2015 7:22 +0000
by Rocket55 on Tue, 22 Dec 2015 7:22 +0000
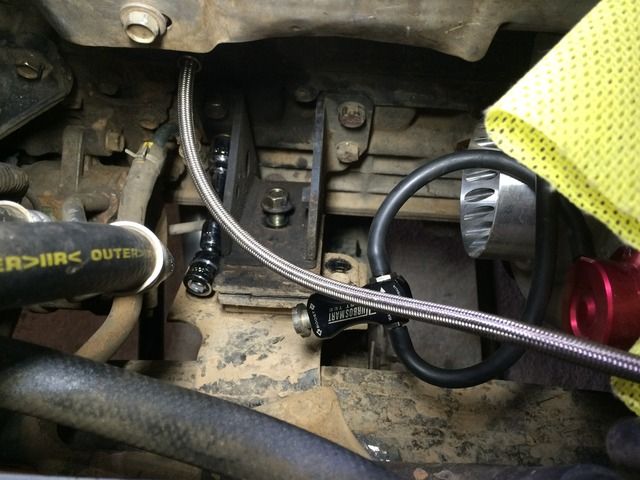
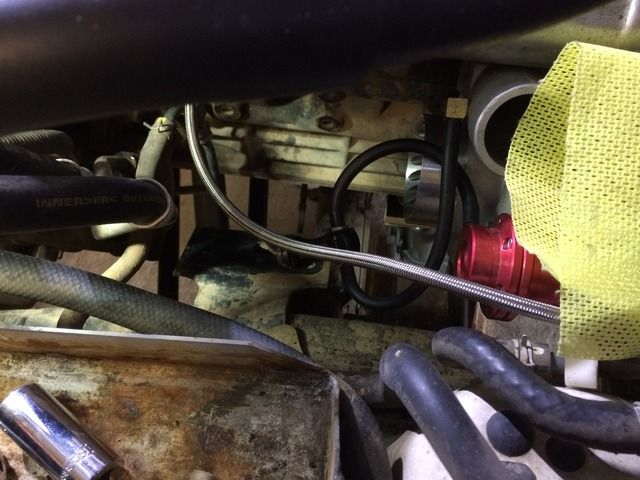
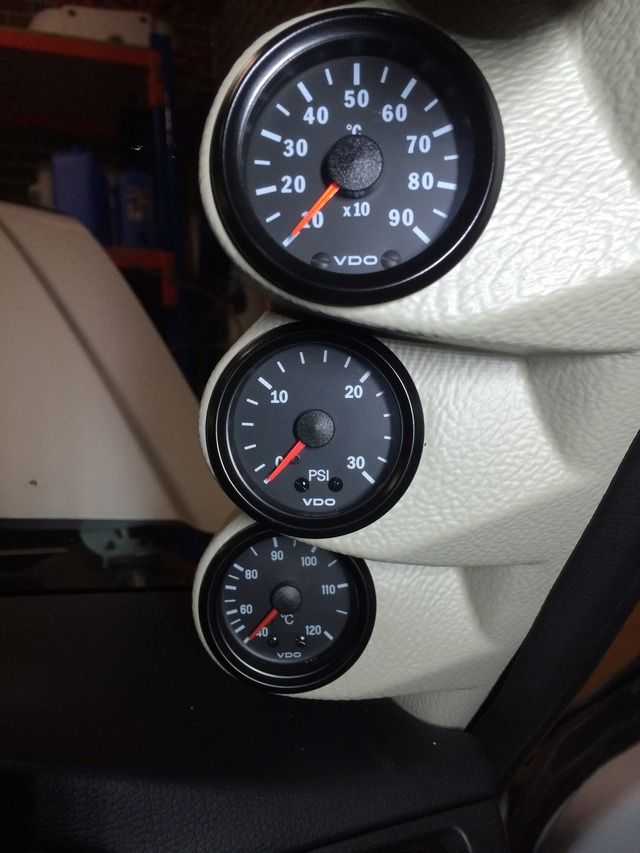
First job this morning was to install the temp VDO temp gauge, it's a full sweep gauge with a 4m capilary tube. Install was pretty straight forward, went through the fire wall on the passenger side then up along the guard and over to the thermostat housing.
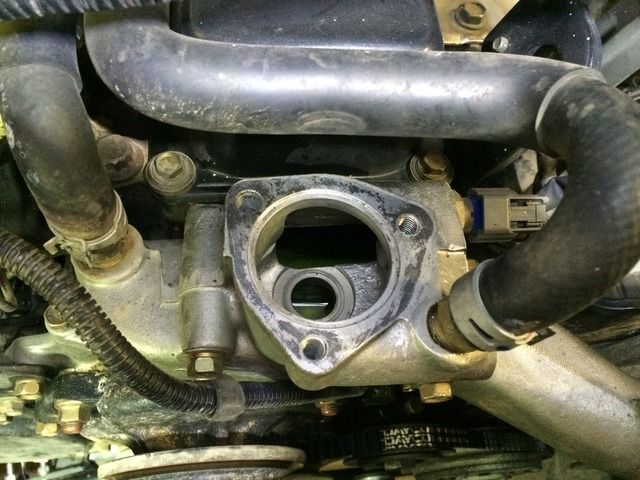
Next up was to remove the 12x1.5 plug in the thermostat housing and tap it out to 1/4 NPT, just used a bit of grease on the end of the tap and the fluid to help flush it out.
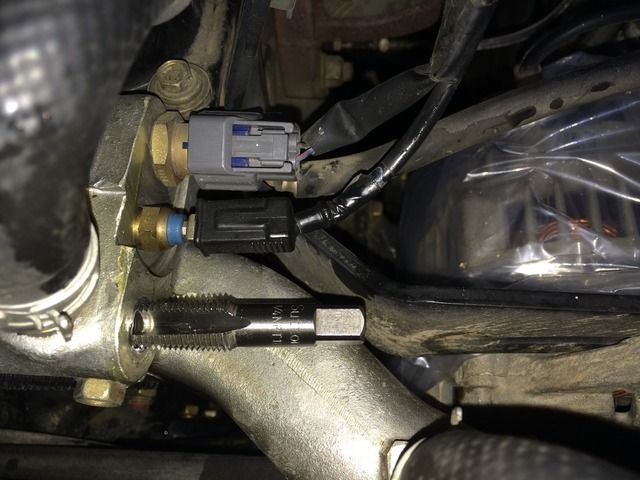
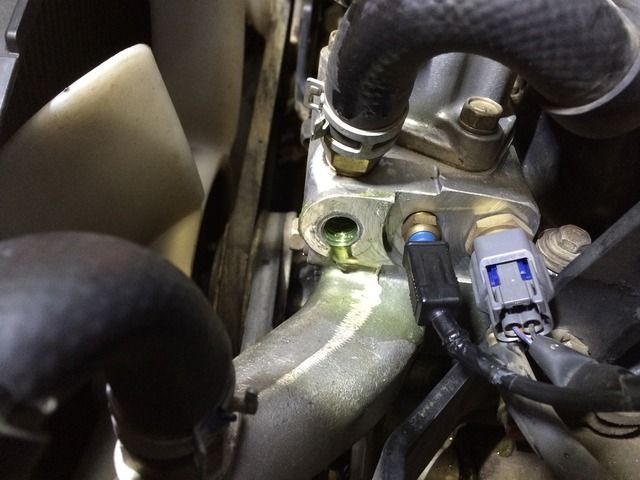
I'm finding that the 1/4 NPT adaptor that came with the gauge doesn't screw in very far, but at the same time I wasn't really using a spanner, so I'll give it a crack later and see how it goes. The adaptor is pretty thin walled so i'm not sure how much stick I can give it.
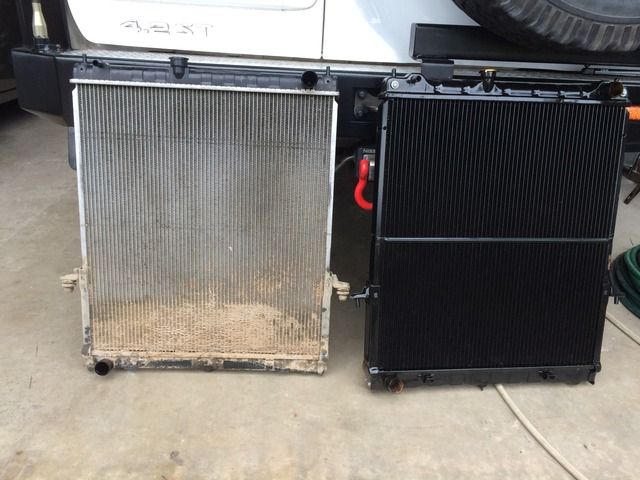
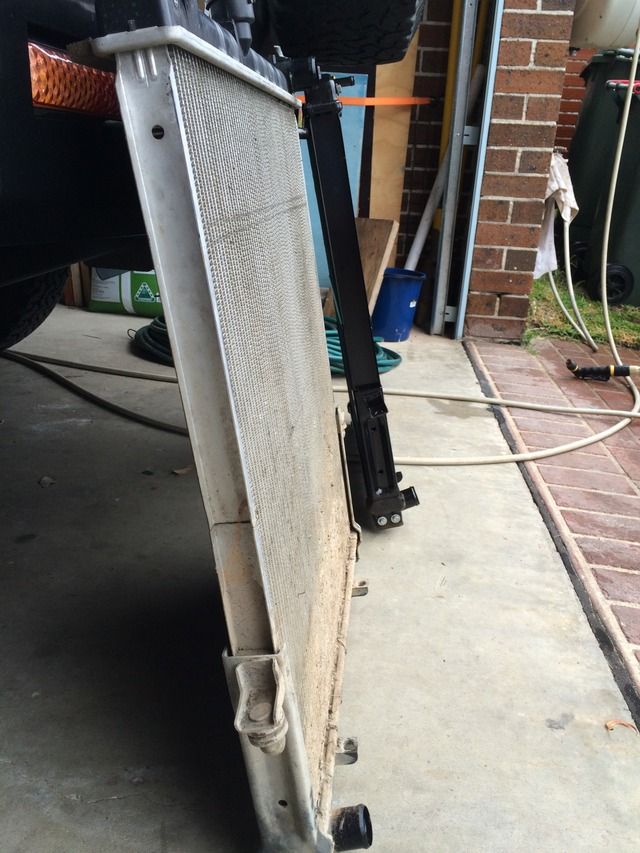
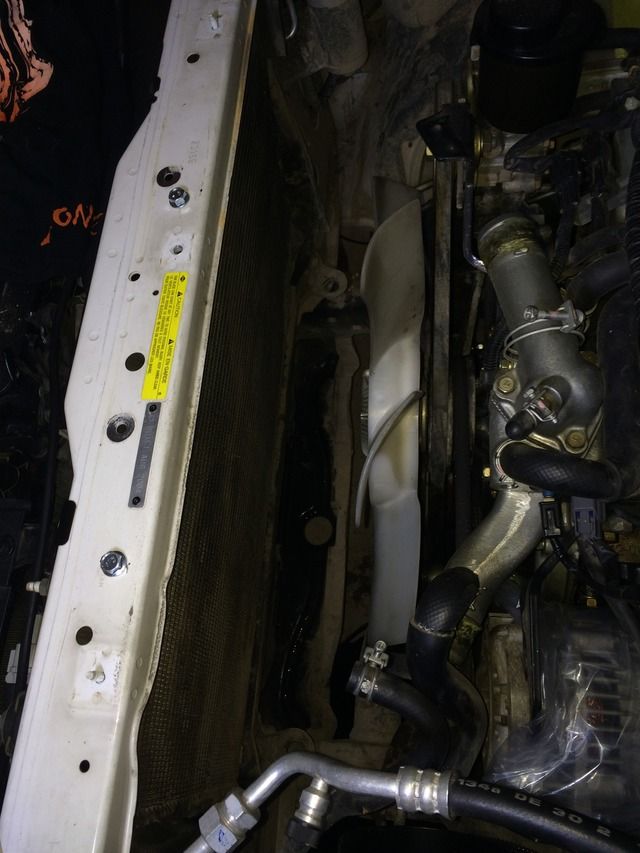
Next up was to get the radiator out, pretty easy really. Drain it, remove the hoses, unclip the bottom half of the shroud and lift it out. It had a bit of mud in the bottom but not very much at all really. Sitting next to the new one (Rapid Cool 3 core)
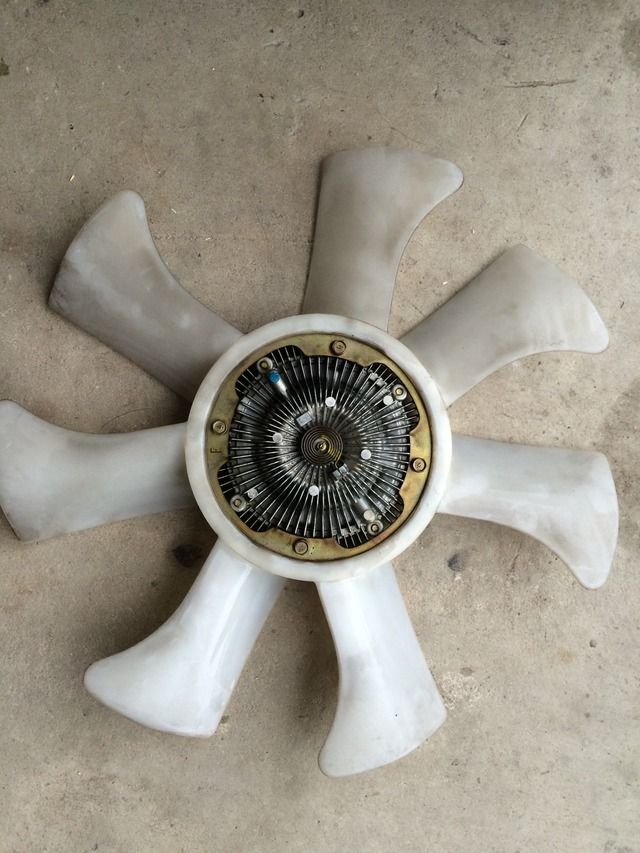
Next up was out with the fan and hub assembly.
Removed all the belts to take up to the shop, get them measured and get some new ones.
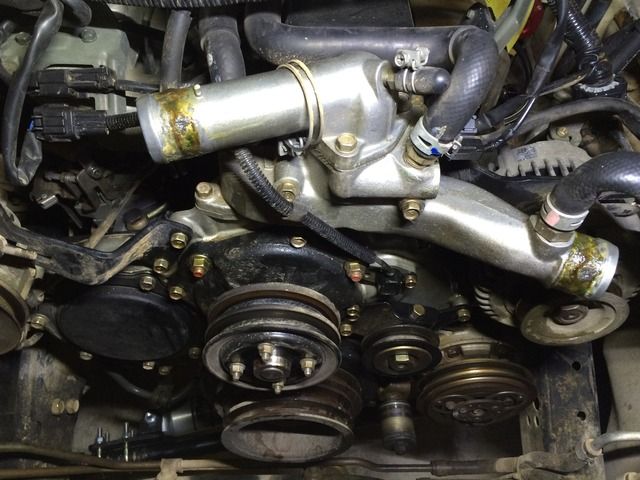
Drained the oil as well. So in the morning, I'll get some coolant, belts and a 1/4 NPT plug just in case the temp gauge thermocoupling lets go. Fill it with oil, belts on, new fan and fan hub assembly install (if it arrives....), radiator in, intercooler on, batteries in and crank it up. Looking forward to that.
Next up was to remove the 12x1.5 plug in the thermostat housing and tap it out to 1/4 NPT, just used a bit of grease on the end of the tap and the fluid to help flush it out.
I'm finding that the 1/4 NPT adaptor that came with the gauge doesn't screw in very far, but at the same time I wasn't really using a spanner, so I'll give it a crack later and see how it goes. The adaptor is pretty thin walled so i'm not sure how much stick I can give it.
Next up was to get the radiator out, pretty easy really. Drain it, remove the hoses, unclip the bottom half of the shroud and lift it out. It had a bit of mud in the bottom but not very much at all really. Sitting next to the new one (Rapid Cool 3 core)
Next up was out with the fan and hub assembly.
Removed all the belts to take up to the shop, get them measured and get some new ones.
Drained the oil as well. So in the morning, I'll get some coolant, belts and a 1/4 NPT plug just in case the temp gauge thermocoupling lets go. Fill it with oil, belts on, new fan and fan hub assembly install (if it arrives....), radiator in, intercooler on, batteries in and crank it up. Looking forward to that.
Cheers Rod
__________________________________________________________________________________________
Bitumen ...... another waste of public funds
__________________________________________________________________________________________
Bitumen ...... another waste of public funds
-
Rocket55 - Moderator
- Posts: 7816
- Joined: Wed, 16 Mar 2011 8:07 +0000
- Location: Sutherland NSW
Re: Rockets New Build - Power Up
![]() by Rocket55 on Wed, 23 Dec 2015 9:32 +0000
by Rocket55 on Wed, 23 Dec 2015 9:32 +0000
Not much happened today, getting parts, waiting for parts. Managed to complete the oil change and change the fuel filter, sort out my thermocoupling issue, also put a new thermostat in. The long bolt came out OK, they've got never sieze on them now so should be right in the future.
Put the A/C belt on, but I think old mate who measured the Alternator belt was on drugs when he did it and it doesn't fit, so something else to swap tomorrow... on the bright side the power steer belt fits. Put the starting battery back in also. Feels good again to be actually put stuff back on as opposed to taking it off.
Also noticed today 3 things under the car today.
1) When old mate changed the clutch he relocated my wiring lume for the trailer power and plugs he successfully let it lay on the exhaust and melt through, there's bare wires showing, no fuses have dropped so it must be earth wires. Something else to fix.
2) There's a pin hole in the exhaust pipe flange that bolts onto the dump pipe, and
3) I think with the new mounts it's moved the engine slightly and the exhaust goes very very close to the chassis and is actually touching one of those little metal brackets that holds the plastic inserts to support the steel transmission breather lines. For now I'll just remove the bracket, they're only steel breathers.
I think I'll combine issue 2 and 3 together and go to an exhaust joint to get the hole welded up and see if they can pursuade the pipe over 10mm or so, while it's there get the muffler chopped out and replaced with a little hotdog/resonator just to give it a bit more note.
Cheers Rod
__________________________________________________________________________________________
Bitumen ...... another waste of public funds
__________________________________________________________________________________________
Bitumen ...... another waste of public funds
-
Rocket55 - Moderator
- Posts: 7816
- Joined: Wed, 16 Mar 2011 8:07 +0000
- Location: Sutherland NSW
Re: Rockets New Build - Power Up
![]() by DeadlyBeast on Wed, 23 Dec 2015 10:49 +0000
by DeadlyBeast on Wed, 23 Dec 2015 10:49 +0000
Nice work Rod. You've been busy.
Looks like you will know where to look should any thing break down out on the tracks.
Looks like you will know where to look should any thing break down out on the tracks.
- DeadlyBeast
- Moderator
- Posts: 1914
- Joined: Sat, 26 May 2012 7:42 +0000
- Location: Top End
Re: Rockets New Build - Power Up
![]() by 07luxyTD on Thu, 24 Dec 2015 6:37 +0000
by 07luxyTD on Thu, 24 Dec 2015 6:37 +0000
Loving the build and thought put into it. What's left to do?
Be careful with 1/4 NPT fitting as its tapered and to much elbow torque may cause the housing to crack.
Be careful with 1/4 NPT fitting as its tapered and to much elbow torque may cause the housing to crack.
"Lucky you weren't cut off by my stihl"
My build thread viewtopic.php?f=41&t=13794
My Landcruiser Build http://www.newlandcruiser.net/phpbb/vie ... 90&start=0
My build thread viewtopic.php?f=41&t=13794
My Landcruiser Build http://www.newlandcruiser.net/phpbb/vie ... 90&start=0
-

07luxyTD - Posts: 2826
- Joined: Wed, 22 Feb 2012 5:15 +0000
- Location: Quorrobolong, NSW
Who is online
Users browsing this forum: No registered users and 116 guests
![]()