Ben's '12 SR5 build
Hi All,
When I first bought my Hilux I didn’t expect to be spending so many weekends tinkering with it, when I wasn’t out camping or fishing.
So...I thought it was about time to start a build thread.
A bit of history...
I bought my Hilux just over a year ago and put a little over 400km on the stock H/T’s before getting them swapped for Cooper ST Maxx 265/70R17. After another 2000km with the tyres rubbing on the mud guards if I turned more than 10°, I added a 2” lift
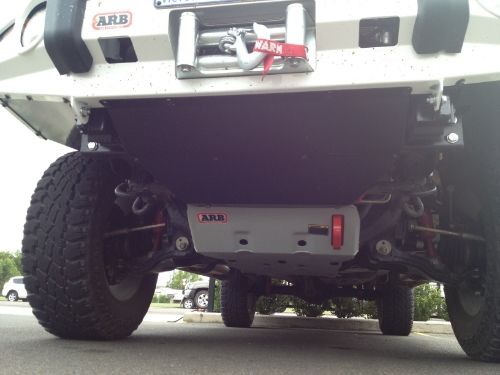
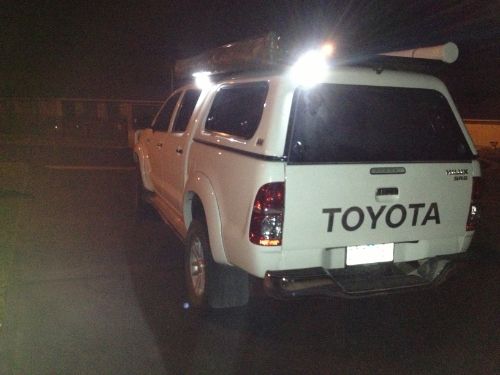
Then came the typical visit to ARB thinking it could do with a bullbar, I walked out with an order for a deluxe winch bar, driving lights, warn winch, canopy, roof rack, snorkel, under body guards, recovery point, UHF and foxwing... I wasn’t surprised they decided to throw in a recovery kit to add to the collection.
Then the long wait for the canopy and bullbar. The canopy came in 4 weeks and was installed along with everything else but the bar, winch, lights and guards. Another 4 weeks went by and the ARB dealer realised they forgot to put the bullbar order in with the factory . 3 weeks later the bar was on.
In the time I was waiting for the bullbar I’d manage to dent my bumper while attempting a 3-point turn hitting the esky... beer was fine and the car came out worse off than the esky. A couple of weeks later, while driving in some long grass, the front end found a wombat hole... after an inventive recovery the Hilux came off second best again, with the front bumper hanging off. Luckily with the front wheel jammed in the hole so well there was no damage to anything but the bumper.
I put together a quick solution for rear recovery points using 6mm steel plate the standard chrome bar and the chassis towbar mounting points, until I can get a rear bar.
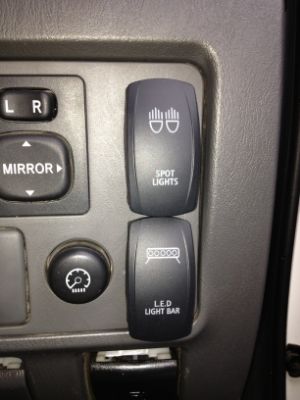
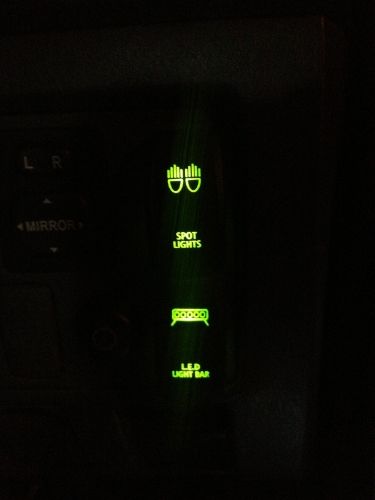
I was given a 20” light bar off some mates after they drank a bottle of my Blue Label when I wasn’t home, then mounted it across the bullbar aerial mounts using some trimmed 40mm angle. I wired then spotties and lightbar up separately to green LED carling switches near the driver door... looks very neat and gets rid of the cheap crappy button switch.
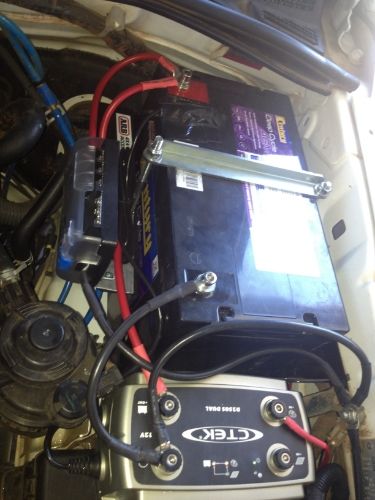
More recently I put in a dual battery system using a Century 100Ah AGM, ARB tray and Ctek D250s. Added a Baintech fuse block to each battery to clean up the terminals. I’m still thinking of moving the Ctek behind the glove box to keep it in the cool.
While playing around with power I ran some 8 gauge to the tub for some accessories. Put a couple of Narva 5W LED camping lights on the side and back of my tray rack and wired the rear one up to the reverse lights with a diode. Added a 1m LED strip light to the rear canopy window and wired it all through a temporary switch panel in the tub. Until I get some drawers $$$$.
Forgot to mention, also added some diff breathers from Mitch, and a reversing camera mounted on the rack.
When I find time, I will be mounting my 300w inverter under the passenger seat and compressor under the rear seat.
So far I’ve come to ‘NewHilux’ for advice before touching anything on the ute, which has paid off in spades and saved me drilling a few holes in panels and the tub.
(Photos to come)
Cheers,
Ben
When I first bought my Hilux I didn’t expect to be spending so many weekends tinkering with it, when I wasn’t out camping or fishing.
So...I thought it was about time to start a build thread.
A bit of history...
I bought my Hilux just over a year ago and put a little over 400km on the stock H/T’s before getting them swapped for Cooper ST Maxx 265/70R17. After another 2000km with the tyres rubbing on the mud guards if I turned more than 10°, I added a 2” lift
Then came the typical visit to ARB thinking it could do with a bullbar, I walked out with an order for a deluxe winch bar, driving lights, warn winch, canopy, roof rack, snorkel, under body guards, recovery point, UHF and foxwing... I wasn’t surprised they decided to throw in a recovery kit to add to the collection.
Then the long wait for the canopy and bullbar. The canopy came in 4 weeks and was installed along with everything else but the bar, winch, lights and guards. Another 4 weeks went by and the ARB dealer realised they forgot to put the bullbar order in with the factory
In the time I was waiting for the bullbar I’d manage to dent my bumper while attempting a 3-point turn hitting the esky... beer was fine and the car came out worse off than the esky. A couple of weeks later, while driving in some long grass, the front end found a wombat hole... after an inventive recovery the Hilux came off second best again, with the front bumper hanging off. Luckily with the front wheel jammed in the hole so well there was no damage to anything but the bumper.
I put together a quick solution for rear recovery points using 6mm steel plate the standard chrome bar and the chassis towbar mounting points, until I can get a rear bar.
I was given a 20” light bar off some mates after they drank a bottle of my Blue Label when I wasn’t home, then mounted it across the bullbar aerial mounts using some trimmed 40mm angle. I wired then spotties and lightbar up separately to green LED carling switches near the driver door... looks very neat and gets rid of the cheap crappy button switch.
More recently I put in a dual battery system using a Century 100Ah AGM, ARB tray and Ctek D250s. Added a Baintech fuse block to each battery to clean up the terminals. I’m still thinking of moving the Ctek behind the glove box to keep it in the cool.
While playing around with power I ran some 8 gauge to the tub for some accessories. Put a couple of Narva 5W LED camping lights on the side and back of my tray rack and wired the rear one up to the reverse lights with a diode. Added a 1m LED strip light to the rear canopy window and wired it all through a temporary switch panel in the tub. Until I get some drawers $$$$.
Forgot to mention, also added some diff breathers from Mitch, and a reversing camera mounted on the rack.
When I find time, I will be mounting my 300w inverter under the passenger seat and compressor under the rear seat.
So far I’ve come to ‘NewHilux’ for advice before touching anything on the ute, which has paid off in spades and saved me drilling a few holes in panels and the tub.
(Photos to come)
Cheers,
Ben