Well, finally got word that the ARB rear step towbar, I ordered in late February is actually being shipped and have it booked in to be fitted on Thursday.
This weekend I am fitting some ARB tiedown tracks so I can secure a load.
Will try and remember to post oms pics later in the week.
Rod
Rod's Rig - Round 2
![]() by rodw on Mon, 26 May 2008 1:49 +0000
by rodw on Mon, 26 May 2008 1:49 +0000
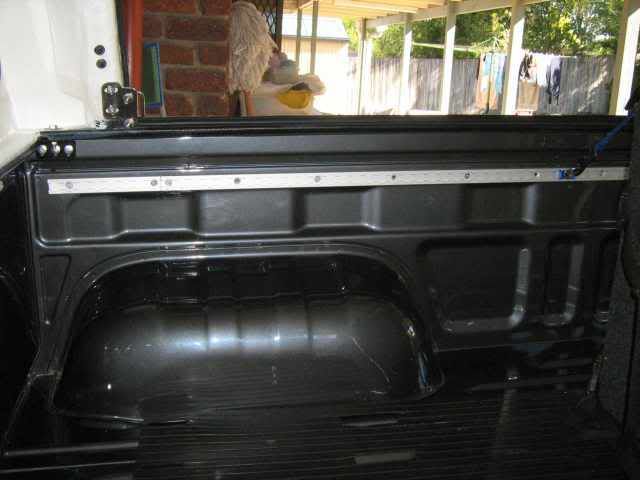
After having a couple of washing machines in the back over the weekend with nowhere to tie then down under the canopy, I decided to install some tiedown tracks from ARB that have clip in rings that you can position anywhere along the track. Bugger of a job to fit as the Rear mud guard liners had to be removed so I could get in under the tub. Here is what they look like:
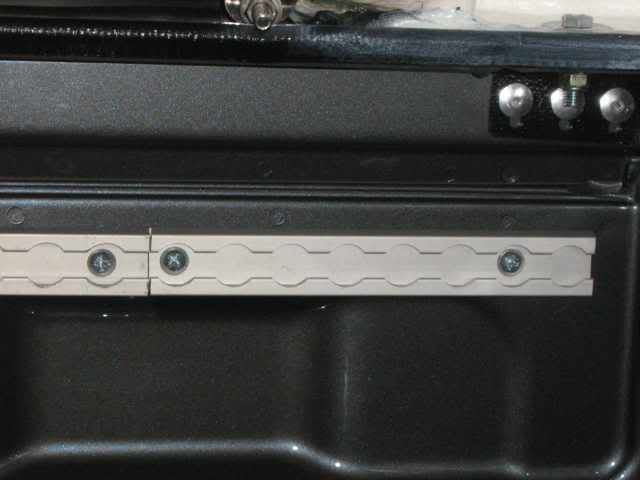
I bought 3 x 1200mm long tracks at $41 each and cut one of them up so I could run tracks the full length of the tub. Here is the extra bit I added:
The rings are $9 per pair. Here is a close up of them in use:
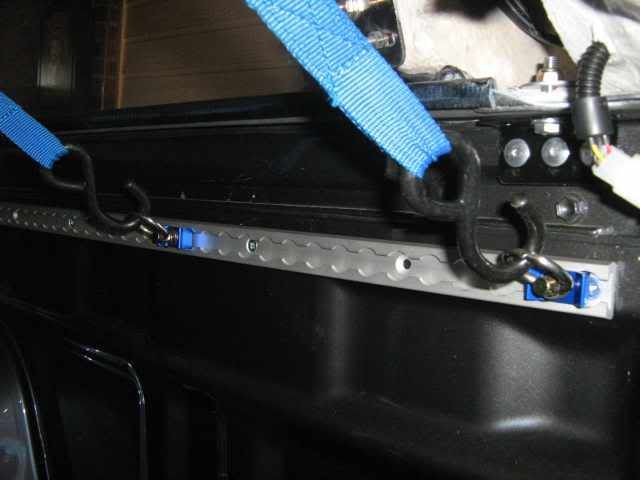
It is really easy to slip the rings on and off and the tracks are rated for 1800 kg. I am very impresssed with the completed result.
I was considering installing a drawer unit in my rig, but have found the ute back to be very handy so might not do that at all. I think I'll try just strapping down my existing storage rack in the back of the ute, but I'll need to make a base for it to lift it up so the fridge slide clears the tailgate. I will post some pics when I am happy with the modifications.
Rod
I bought 3 x 1200mm long tracks at $41 each and cut one of them up so I could run tracks the full length of the tub. Here is the extra bit I added:
The rings are $9 per pair. Here is a close up of them in use:
It is really easy to slip the rings on and off and the tracks are rated for 1800 kg. I am very impresssed with the completed result.
I was considering installing a drawer unit in my rig, but have found the ute back to be very handy so might not do that at all. I think I'll try just strapping down my existing storage rack in the back of the ute, but I'll need to make a base for it to lift it up so the fridge slide clears the tailgate. I will post some pics when I am happy with the modifications.
Rod
-
rodw - Posts: 3195
- Joined: Tue, 19 Feb 2008 2:00 +0000
- Location: Brisbane, QLD
![]() by Hilux Max on Mon, 26 May 2008 6:38 +0000
by Hilux Max on Mon, 26 May 2008 6:38 +0000
I like the looks of the Rod. Do you think you could have screwed those rails in with a self tapper screw to save you having to up under the guard liner?
The Punisher 2.0 N80 Build - http://www.newhilux.net/phpbb/viewtopic.php?f=119&t=26631
The Punisher 1.0 N70 Build - http://www.newhilux.net/phpbb/viewtopic.php?f=41&t=747&hilit=Punisher
The Punisher 1.0 N70 Build - http://www.newhilux.net/phpbb/viewtopic.php?f=41&t=747&hilit=Punisher
-

Hilux Max - Valued Contributor
- Posts: 12434
- Joined: Sun, 07 Jan 2007 12:00 +0000
![]() by david allan on Mon, 26 May 2008 6:41 +0000
by david allan on Mon, 26 May 2008 6:41 +0000
Rod the hooks are a great idea.
I installed some on the floor of the tray, one on each side
I installed some on the floor of the tray, one on each side
-

david allan - Posts: 657
- Joined: Thu, 27 Sep 2007 1:00 +0000
- Location: melbourne, VIC
![]() by rodw on Mon, 26 May 2008 7:08 +0000
by rodw on Mon, 26 May 2008 7:08 +0000
Mmaaxx, No, it would not be very strong. The screws are actually 6mm bolts with nyloc nuts and they go through 50mm washers at the back to spread the load. You could get some on without removing the guards. They also sell a 45mm length with 2 bolts and one position.
That's why I bought the extra bit of track. I never wanted to pull the stuff off again because I wanted a tiedown where there was not a track later on. I had to cut most of the bolts down about 15mm to stop them denting the outside skin of the tub. The installation was pretty easy with an offsider, just pulling off the flares and the inner guards sucked. They went back on easy!
David, I thought about the floor mounting, certainly a lot easier but thought I still might end up with a drawer unit one day. They certainly would not get in the road on the floor of the tub as they only stick out about 8mm or so. I might add some there one day if I find I need to secure a low load and don't add drawers.
Hey Mmaaxx, I just rememebred, I got a good look at the fuel filler while it was all off thinking of body lifts, but unless you got a longer metal filler made up, and only extended the rubber hoses, you should not need to take the guard off.
Rod
-
rodw - Posts: 3195
- Joined: Tue, 19 Feb 2008 2:00 +0000
- Location: Brisbane, QLD
![]() by rodw on Mon, 26 May 2008 7:20 +0000
by rodw on Mon, 26 May 2008 7:20 +0000
Forgot to mention that the reason I dod not go with floor mounted tracks is that this storage rack is almost the full width of the tub and therefore the floor mounted tracks wouldn't tie it down.
I think the tied downs will hold it down nicely once I modify the base of the rack somehow.Might be next weekend.
Rod
I think the tied downs will hold it down nicely once I modify the base of the rack somehow.Might be next weekend.
Rod
-
rodw - Posts: 3195
- Joined: Tue, 19 Feb 2008 2:00 +0000
- Location: Brisbane, QLD
![]() by rodw on Fri, 30 May 2008 5:53 +0000
by rodw on Fri, 30 May 2008 5:53 +0000
Finally, Got my ARB Towbar fitted yesterday at On Track 4WD in Moss St, Slacks Ck. Yes that's right, the one I ordered in the last week of Feb actually turned up! I like it a lot and will post some pics in the next day or so.
Why did I not go to ARB to get the thing fitted? Long story really, but Brett's offsider Brad at OnTrack is a mad Suzuki nut and he took a set of 16" Suzuki Rims off my hands which knocked $200 off the price.
They had a lot of trouble fitting it because the chassis rails were 6mm wider than the tow bar. Finally manged to talk to the head mechanic at ARB and he told them that the Hilux chassis rail dimemsions can vary up to 20mm. According to ARB, the trick is to squeeze the rails together with a high lift jack until you can get the towbar on!
I also called in at Opposite Lock who fitted my bullbar and they tell me that Ironman have some plates for the underneath of my bullbar due in the country mid next month. Not sure of the price at this stage, but they have a set on order for me.
Rod
-
rodw - Posts: 3195
- Joined: Tue, 19 Feb 2008 2:00 +0000
- Location: Brisbane, QLD
![]() by Hilux Max on Sat, 31 May 2008 1:42 +0000
by Hilux Max on Sat, 31 May 2008 1:42 +0000
good stuff mate, pics pics pics 
The Punisher 2.0 N80 Build - http://www.newhilux.net/phpbb/viewtopic.php?f=119&t=26631
The Punisher 1.0 N70 Build - http://www.newhilux.net/phpbb/viewtopic.php?f=41&t=747&hilit=Punisher
The Punisher 1.0 N70 Build - http://www.newhilux.net/phpbb/viewtopic.php?f=41&t=747&hilit=Punisher
-
Hilux Max - Valued Contributor
- Posts: 12434
- Joined: Sun, 07 Jan 2007 12:00 +0000
![]() by rodw on Sat, 31 May 2008 5:31 +0000
by rodw on Sat, 31 May 2008 5:31 +0000
I never asked him about them. I was planning on getting sliders from Brooksy at Custom 4x4 fabrications who is at Greenbank, just down the road from me. His Disco featured on a recent 4WD monthly magazine. Spoke to him som eitme agos and said between $500-$800 depending on the design. He makes them to order. I got his number somewhere..
Might need a month or so to recover first, as I am just shy of $10k of extras on my truck ATM.
Rod
Might need a month or so to recover first, as I am just shy of $10k of extras on my truck ATM.
Rod
-
rodw - Posts: 3195
- Joined: Tue, 19 Feb 2008 2:00 +0000
- Location: Brisbane, QLD
![]() by rodw on Mon, 09 Jun 2008 10:11 +0000
by rodw on Mon, 09 Jun 2008 10:11 +0000
Well, wet to the caravan and camping show today and found a good deal on a CB radio so came home with a GME TX3440 and antenna much to the disgust of the Icom Rep. Spent a bit of time in the afternoon and got all the hardware installed. and will finish it off tomorrow.
Decided to take some pics with my Nikon D40 digital SLR that i picked up during the wwek off Ebay.
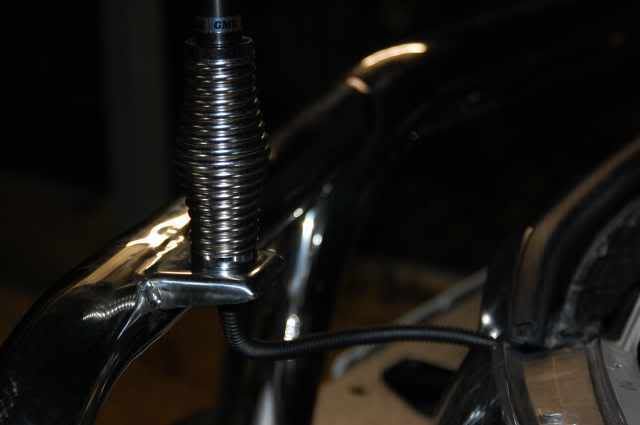
First, I mounted the antenna on the Ironman bull bar, you can see by the time I fgto around to taking photos, it was getting late..
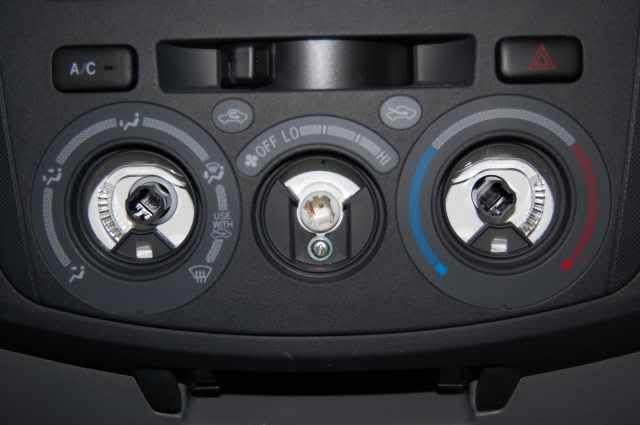
Then I took the radio out. Pulled off the 3 Air con knobs, and removed the screw behind the centre one:
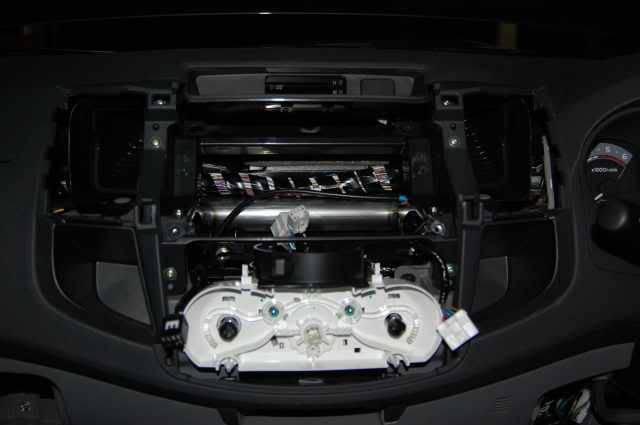
You need to unclip the two swithes from the front panel and you can get to the four 10mm bolts that hold the Radio in and remove it:
Then I cut an old flouro light housing I had lying around and mucked about to make a microphone mount Here is what I ended up with:
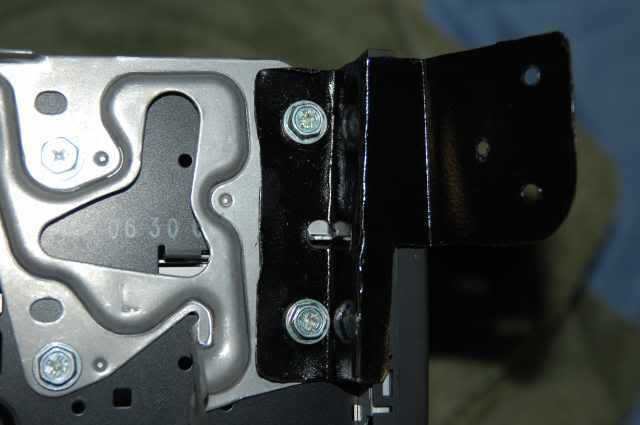
Note I bolted this onto the exisiting bracket bolts and had to drill a clearance hole for a metal locatng tag.
(And I splashed a bit of paint on it too!)
The GME radio has a 2 part plastic mike mount, and I ended up drilling a couple of more holes in it to hold it onto the bracket (after I drilled an unnecessary hole:
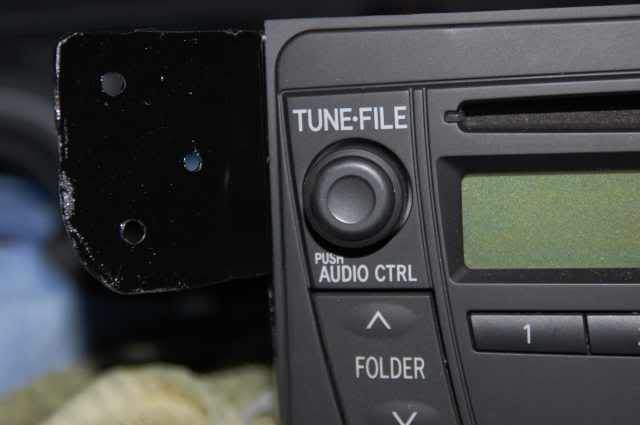
So this is what the finished mount looked like:
And the finished article looks pretty good from the drivers seat:
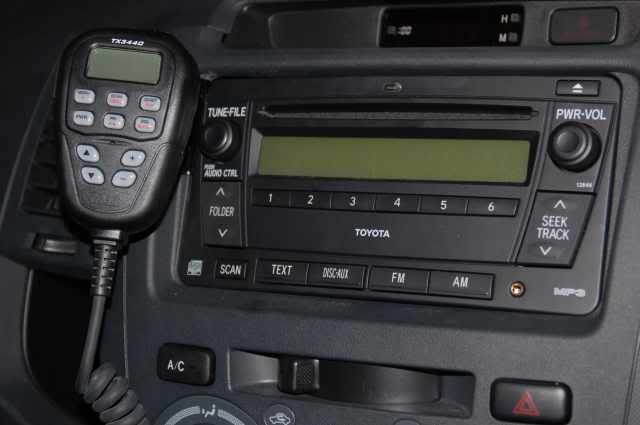
More to follow....
Decided to take some pics with my Nikon D40 digital SLR that i picked up during the wwek off Ebay.
First, I mounted the antenna on the Ironman bull bar, you can see by the time I fgto around to taking photos, it was getting late..
Then I took the radio out. Pulled off the 3 Air con knobs, and removed the screw behind the centre one:
You need to unclip the two swithes from the front panel and you can get to the four 10mm bolts that hold the Radio in and remove it:
Then I cut an old flouro light housing I had lying around and mucked about to make a microphone mount Here is what I ended up with:
Note I bolted this onto the exisiting bracket bolts and had to drill a clearance hole for a metal locatng tag.
(And I splashed a bit of paint on it too!)
The GME radio has a 2 part plastic mike mount, and I ended up drilling a couple of more holes in it to hold it onto the bracket (after I drilled an unnecessary hole:
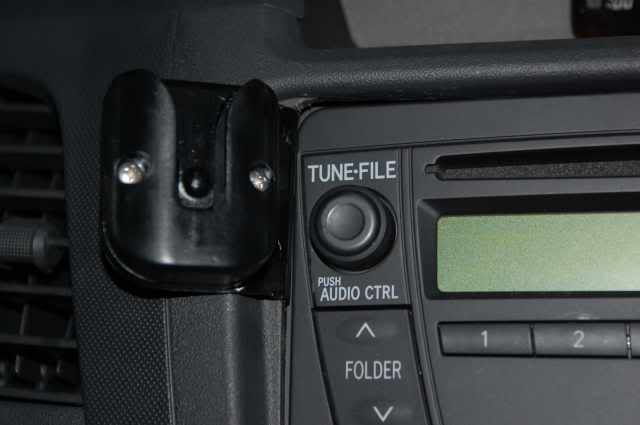
So this is what the finished mount looked like:
And the finished article looks pretty good from the drivers seat:
More to follow....
-
rodw - Posts: 3195
- Joined: Tue, 19 Feb 2008 2:00 +0000
- Location: Brisbane, QLD
![]() by rodw on Mon, 09 Jun 2008 10:25 +0000
by rodw on Mon, 09 Jun 2008 10:25 +0000
So now, I had to work out where to put the radio itself. After a lot of mucking about, I decided it would fit behind the glovebox just under the computer quite nicely if I made a bracket.
I cut up a bit of scap steel to make a simple angle iron bracket:
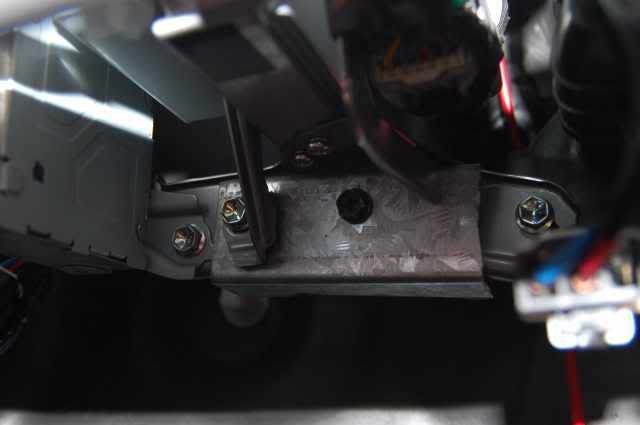
I drilled one hole through the bracket and removed a 10mm bolt that holds a brace for the CPU bracket on the LHS. Drilled another hole though the bracket and used a self tapping bolt (the black one) to mount it to the car.
YOu can see the bracket is a bit rough, but who cares when it is under the dash!
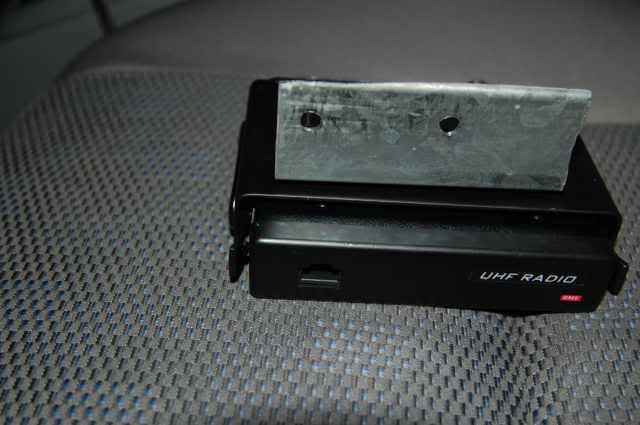
So then I bolted it all together:
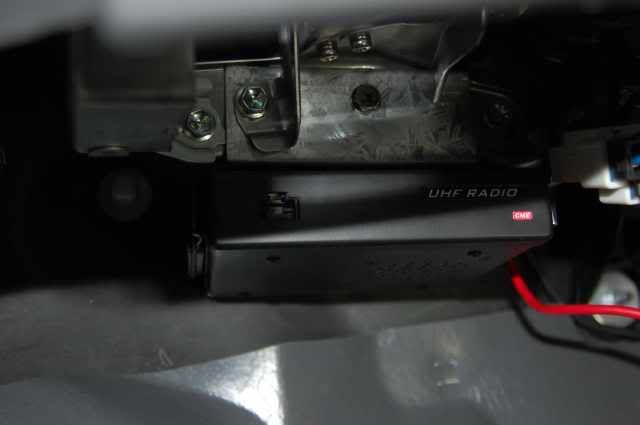
You can see the red wire I ran a fair while ago when I added Aux power to the cab. Bit of an overkill, the last CB (bloody old one!) drew about 4-5 amps, this one only draws 1.5 amp and has a 2 amp fuse!
The GME mount allows the radio to slide in and clip into position. The speaker is facing down and high enough for it to be out of the road of the passenger's feet. See how it goes, can add an external speaker later if I need to!
Well that is as far as I got tonight. Tomorrow I will get wire in the antenna and power and put it all back together.. Should be a good job!
I cut up a bit of scap steel to make a simple angle iron bracket:
I drilled one hole through the bracket and removed a 10mm bolt that holds a brace for the CPU bracket on the LHS. Drilled another hole though the bracket and used a self tapping bolt (the black one) to mount it to the car.
YOu can see the bracket is a bit rough, but who cares when it is under the dash!
So then I bolted it all together:
You can see the red wire I ran a fair while ago when I added Aux power to the cab. Bit of an overkill, the last CB (bloody old one!) drew about 4-5 amps, this one only draws 1.5 amp and has a 2 amp fuse!
The GME mount allows the radio to slide in and clip into position. The speaker is facing down and high enough for it to be out of the road of the passenger's feet. See how it goes, can add an external speaker later if I need to!
Well that is as far as I got tonight. Tomorrow I will get wire in the antenna and power and put it all back together.. Should be a good job!
-
rodw - Posts: 3195
- Joined: Tue, 19 Feb 2008 2:00 +0000
- Location: Brisbane, QLD

![]() by hiluxdan on Mon, 09 Jun 2008 12:02 +0000
by hiluxdan on Mon, 09 Jun 2008 12:02 +0000
Nice work rod,
I put mine behind the glove box too but fitted it vertically right over on the side.
Didn't like the idea of going under the seat in case we take on any water in a crossing!
Dan
I put mine behind the glove box too but fitted it vertically right over on the side.
Didn't like the idea of going under the seat in case we take on any water in a crossing!
Dan
-
hiluxdan - Posts: 263
- Joined: Wed, 26 Sep 2007 1:00 +0000
- Location: Gold Coast, QLD
![]() by rodw on Mon, 09 Jun 2008 7:15 +0000
by rodw on Mon, 09 Jun 2008 7:15 +0000
Thanks 9w6vk
hiluxdan, I got as far as pulling off some trims to take the seat out but did not like the idea for water ingress at all. I considered the side mounting option you used, then remembered I had some material floating around that would let me make the bracket. It is easy to get to for servicing and the speaker is unobstructed.
for Info, Icom will have a similar unit to toe GME TX3440 on the market in mid July and had a prototype on dislpay at the camping & carvan show. The mike is a fair bit larger, so i decided not to wait. In any case, it is a 5 watt only unit, not a 25 watt unit locked to 5 watts like their other UHF radio that those in the know can reprogram to transmit UHF at 25 watts!
Rod
-
rodw - Posts: 3195
- Joined: Tue, 19 Feb 2008 2:00 +0000
- Location: Brisbane, QLD
![]() by rodw on Mon, 09 Jun 2008 8:17 +0000
by rodw on Mon, 09 Jun 2008 8:17 +0000
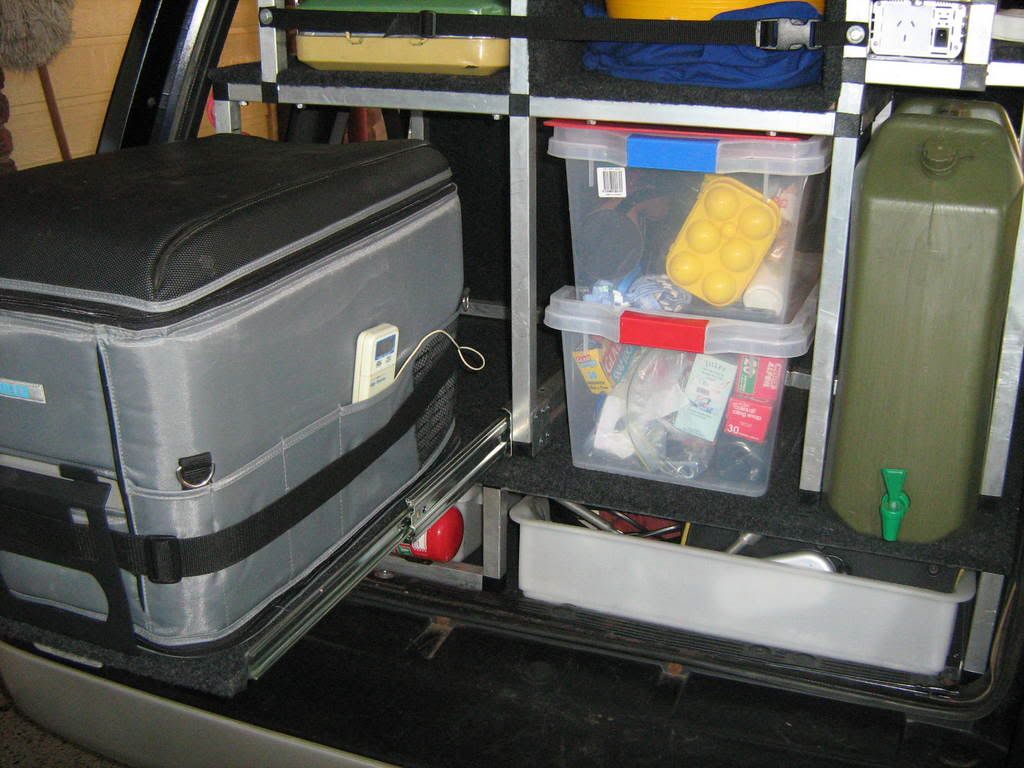
I made up a storage rack for my vitara and I have decided to keep using it in the Hilux with a couple of minor modifications. This is what it looks like:
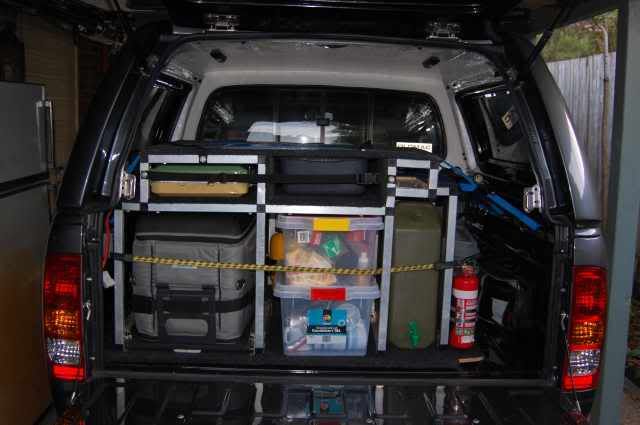
Note the Anderson Plug hanging on the left just below the ockie strap and the hole in the top right corner:
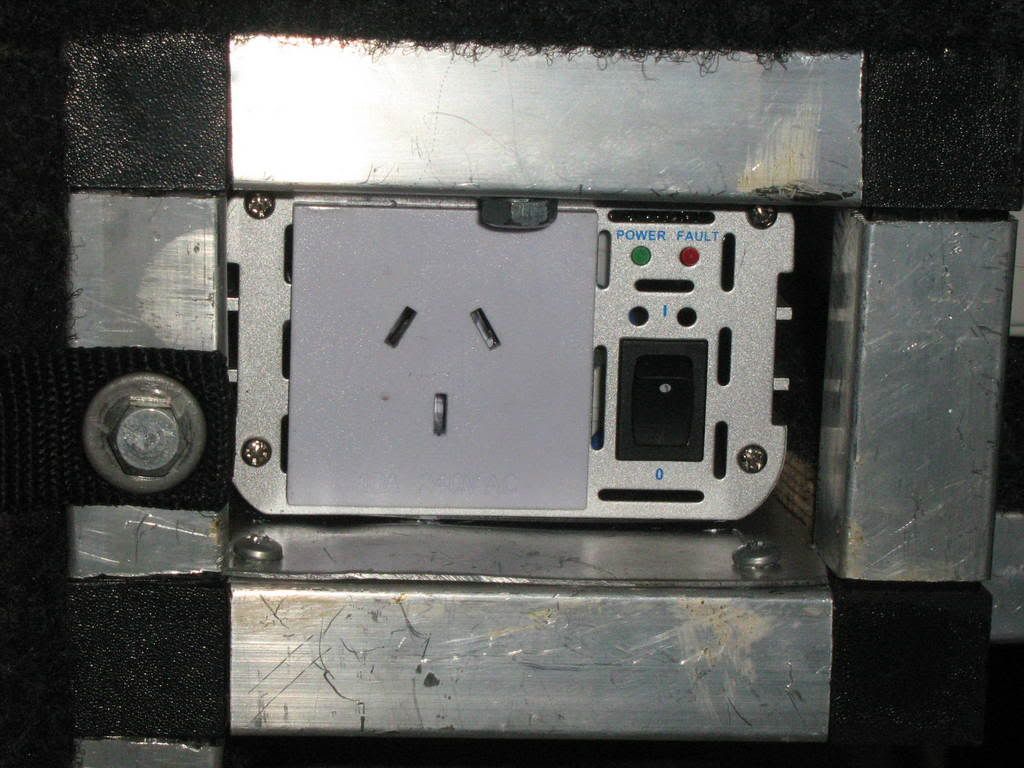
This used to hold a Jaycar inverter that I will put back in once I get power to a matching Anderson Plug in the tub.
You can see the power wires in the back of the hole for the inverter.
I have still got the rack mounted on the false floor that came out of the Vitara. I don't intend to bolt the rack in at this stage unless I really have to but am just using tiedowns. Been there a week or so nad has not moved:

You can't see it in this pic, but there is enough room for another water jerry can behind the inverter sidways across the back. I am thinking of adding a small 12v pressure pump on the base board behind the fire extinguisher here:
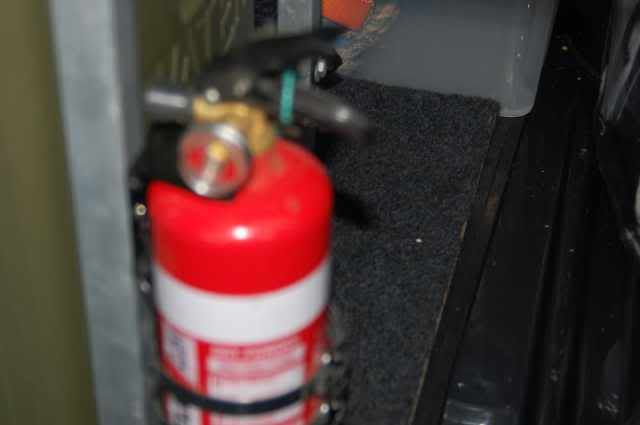
So I will hook the pump into both of the jerry cans and will have 40 litres of running water. I will probably mount a tap up beside the inverter.
I will add a 35 amp fuse to the inverter up behind it and becasue the pressure pump will be wired in up behind the inverter too, I'll and an in line fuse at the appropraite size for it as well.
Hope this might help hiluxdan to get his head around wiring.
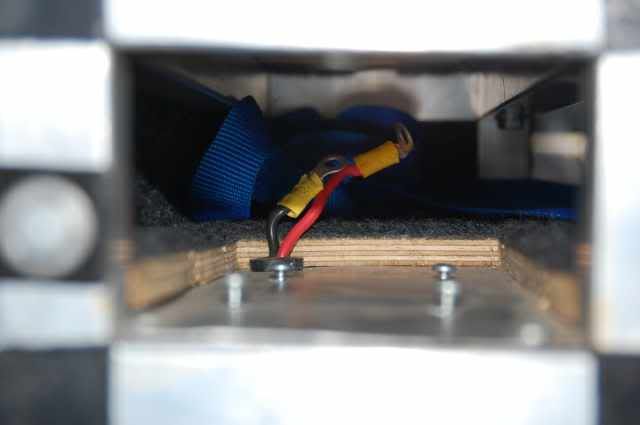
Note the Anderson Plug hanging on the left just below the ockie strap and the hole in the top right corner:
This used to hold a Jaycar inverter that I will put back in once I get power to a matching Anderson Plug in the tub.
You can see the power wires in the back of the hole for the inverter.
I have still got the rack mounted on the false floor that came out of the Vitara. I don't intend to bolt the rack in at this stage unless I really have to but am just using tiedowns. Been there a week or so nad has not moved:
You can't see it in this pic, but there is enough room for another water jerry can behind the inverter sidways across the back. I am thinking of adding a small 12v pressure pump on the base board behind the fire extinguisher here:
So I will hook the pump into both of the jerry cans and will have 40 litres of running water. I will probably mount a tap up beside the inverter.
I will add a 35 amp fuse to the inverter up behind it and becasue the pressure pump will be wired in up behind the inverter too, I'll and an in line fuse at the appropraite size for it as well.
Hope this might help hiluxdan to get his head around wiring.
-
rodw - Posts: 3195
- Joined: Tue, 19 Feb 2008 2:00 +0000
- Location: Brisbane, QLD
![]() by rodw on Thu, 12 Jun 2008 4:57 +0000
by rodw on Thu, 12 Jun 2008 4:57 +0000
Thought it was about time I posted a current photo of the rig.
Here is the ARB towbar I waited for patiently for 3 months:
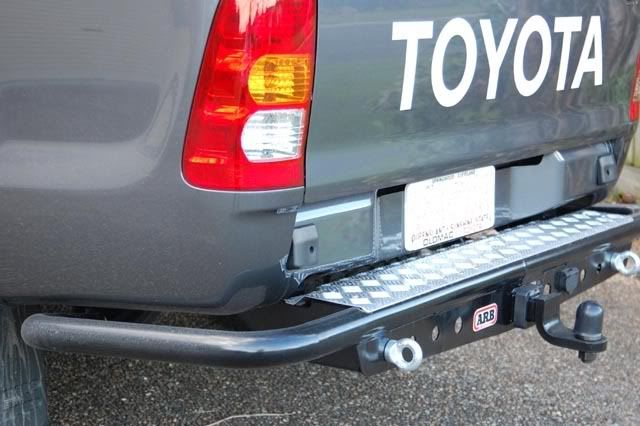
Nice to actually have a rear bumper given the SR does not inherit one from the factory.
Bit hard to see, but this one is how it stands now with the CB and Reat bar:
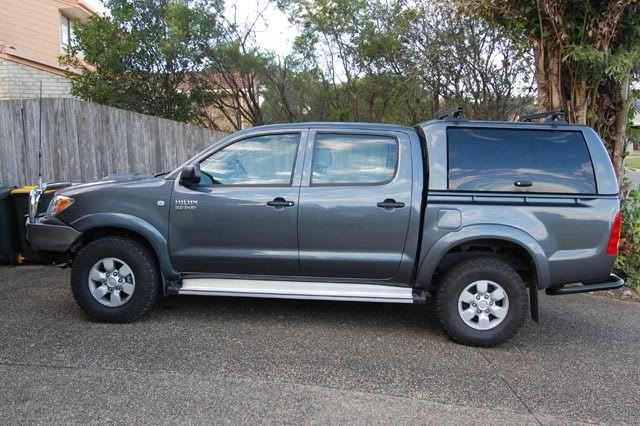
All that is left to go on the outside is the sliders (maybe the Outers group buy posted elsewhere on this forum) and a lift...
Rod
Here is the ARB towbar I waited for patiently for 3 months:
Nice to actually have a rear bumper given the SR does not inherit one from the factory.
Bit hard to see, but this one is how it stands now with the CB and Reat bar:
All that is left to go on the outside is the sliders (maybe the Outers group buy posted elsewhere on this forum) and a lift...
Rod
-
rodw - Posts: 3195
- Joined: Tue, 19 Feb 2008 2:00 +0000
- Location: Brisbane, QLD
![]() by rodw on Thu, 12 Jun 2008 5:12 +0000
by rodw on Thu, 12 Jun 2008 5:12 +0000
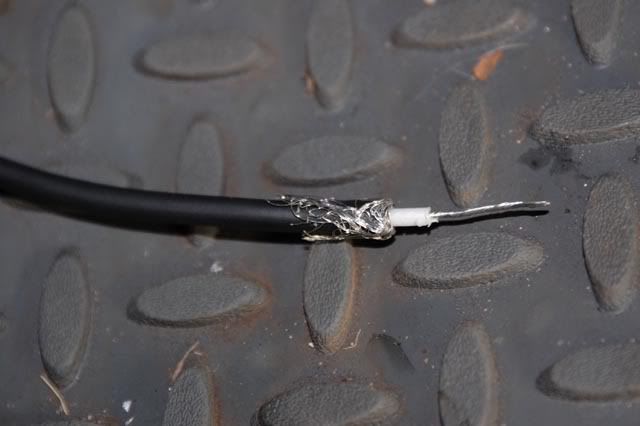
I also noted that some guys were wondering how to install the Coax cable fitting. I just used the one supplied with the GME antenna that came with my set.
First, trim the caox and fold the braided shield back over the outside cover:
Then, Screw the fitting on over the coax until you get a snug fit.
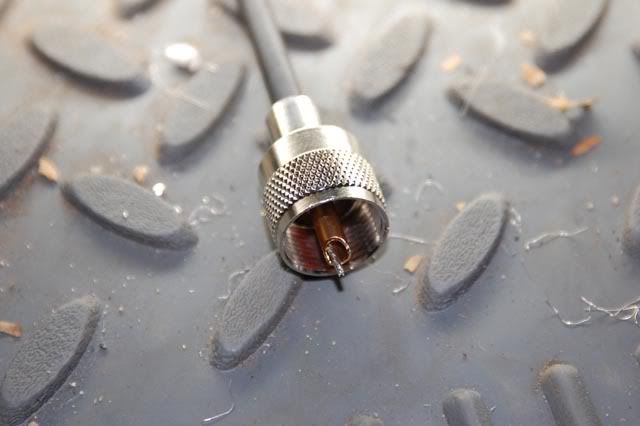
ONce you get this far, solder the internal lead onto the tip of the socket and trim off any excess wire and you are done.
If you have a multimeter or continuity tester, check that there is no circuit between the inside pin and the outer shell. You can also check that you have continuity from the antenna back to the tip and from the spring or mount back to the shell of the coax plug.
If you ever need to take the cable out of the cab again, just cut it off near the plug, heat up the point, suck the solder out and unscrew the fitting again. I did this a couple of times on my last car to remove the grill. This time, I slid the coax between the grill and the light so won't be an issue.
Rod
First, trim the caox and fold the braided shield back over the outside cover:
Then, Screw the fitting on over the coax until you get a snug fit.
ONce you get this far, solder the internal lead onto the tip of the socket and trim off any excess wire and you are done.
If you have a multimeter or continuity tester, check that there is no circuit between the inside pin and the outer shell. You can also check that you have continuity from the antenna back to the tip and from the spring or mount back to the shell of the coax plug.
If you ever need to take the cable out of the cab again, just cut it off near the plug, heat up the point, suck the solder out and unscrew the fitting again. I did this a couple of times on my last car to remove the grill. This time, I slid the coax between the grill and the light so won't be an issue.
Rod
-
rodw - Posts: 3195
- Joined: Tue, 19 Feb 2008 2:00 +0000
- Location: Brisbane, QLD
![]() by david allan on Thu, 12 Jun 2008 5:23 +0000
by david allan on Thu, 12 Jun 2008 5:23 +0000
Rod
did you have to take of your factory tow bar to install the ARB one.
How much heavier is the SRB one compared to the toyota tow bar
did you have to take of your factory tow bar to install the ARB one.
How much heavier is the SRB one compared to the toyota tow bar
-
david allan - Posts: 657
- Joined: Thu, 27 Sep 2007 1:00 +0000
- Location: melbourne, VIC
Who is online
Users browsing this forum: No registered users and 29 guests
![]()