Rod's Rig - Round 2

Want to show off what you've done to your rig? or have a custom project to show? Post it up here!

Re: Rod's new Rig

Postby Hilux Max on Sat, 22 Nov 2008 5:25 +0000

Rod,

good going mate,

may I ask, how much was the tranny cooler kit by itself?

Your rig, with all the electronics on board is starting to look abit like the Mitsubishi Starion from the Canonball Run Movie :lol: :lol: :lol:
User avatar
Hilux Max
Valued Contributor
 
Posts: 12434
Joined: Sun, 07 Jan 2007 12:00 +0000


Re: Rod's new Rig

Postby premier on Sat, 22 Nov 2008 9:26 +0000

Max....I had a trans cooler fitted to mine, all up including fitting was $320. I think to cooler itself was $165ish for the kit
2011 SR Extracab, ROH trojen wheels, Cooper tyres
User avatar
premier
 
Posts: 228
Joined: Sat, 17 May 2008 1:00 +0000
Location: , SA

Re: Rod's new Rig

Postby rodw on Sat, 22 Nov 2008 9:48 +0000

Looks like from the invoice it was $139 for the cooler and $130 for fitting.
User avatar
rodw
 
Posts: 3195
Joined: Tue, 19 Feb 2008 2:00 +0000
Location: Brisbane, QLD

Re: Rod's new Rig

Postby rodw on Sat, 22 Nov 2008 7:28 +0000

In amongst stripping wet carpet out of a Pulsar that got flooded in our recent storms up here in the Sunshine state, I got a bit more work done on my rig today.

By the way, if you have filthy carpets and seats, just get a few cans of the spray on Super Cheap degreaser, soak everything with it and hit it with the Gerni. Stick it in the sun to dry. Might take a couple of days to dry, but it comes up like new! A wrecker tolde this trick and he reckons a detailer told him.

First off, I installed that smart looking switch I scored for free in the dash for the bitumen melting LIghtforce 240 spotlights :

Image

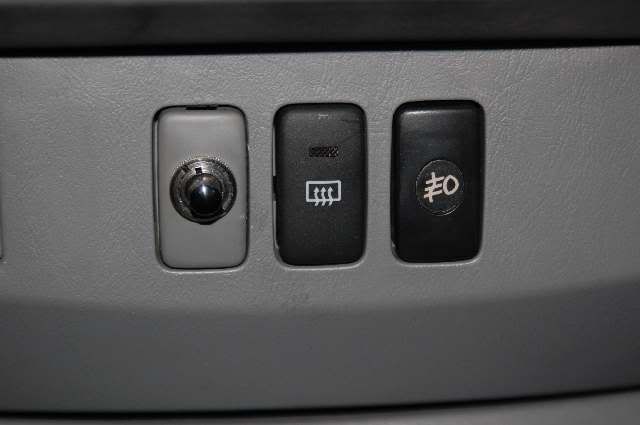
WIred the light on the switch into the light on the cigarette lighter, so the symbol lights up when the dash lights are turned on. I put it down in the centre becasue I will have put a pull switch for the compressor over on the Right hand side where the Dash dimmer would be if I had an SR5 and that leaves 2 slots for lockers down the track side by side.

Did a quick search on this forum and found olcologne's spotlight relay wiring thread viewtopic.php?f=11&t=1056&p=10927&hilit=spotlight+wiring#p10927 which made life really easy.

I decided not to buy a wiring loom to go with these spotties on account of wanting to use heavy wiring so there was no voltage loss. Anyway, you don't need me to show you how to wire spotties in, but becasue I like to solder every join and shrinkwrap connectors etc to avoid shorts, it took a while... Anyway, I followed Richard's instructions and it worked fist time. Only change I made was to wire in the switch between the Red and Yellow wire and pin 85 on the relay to make her legal. On acount of it being a hot day and the beer fridge being right beside my rig while I was doing this, I decided against taking the rig for a test drive after sundown! It seems to me that the passenger (left) side is the best to tackle for this as it is so close to the battery. I removed the battery and mounted the relay on the guard beside the battery, so the wiring was a short as I could make it. Used a 20 amp blade fuse inan in line holder between it and the battery terminal. Used the existing earth bolt on the inner guard to earth the spotties.

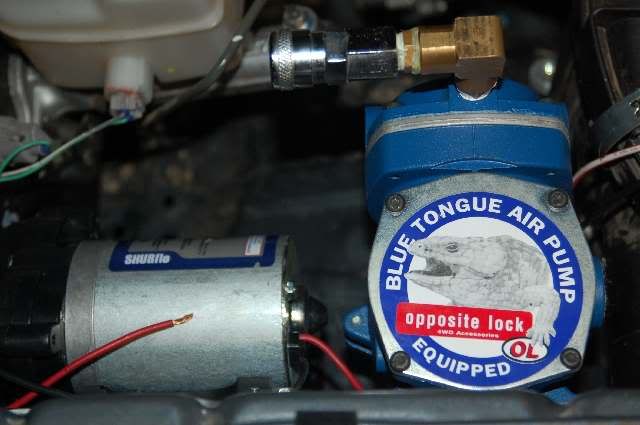
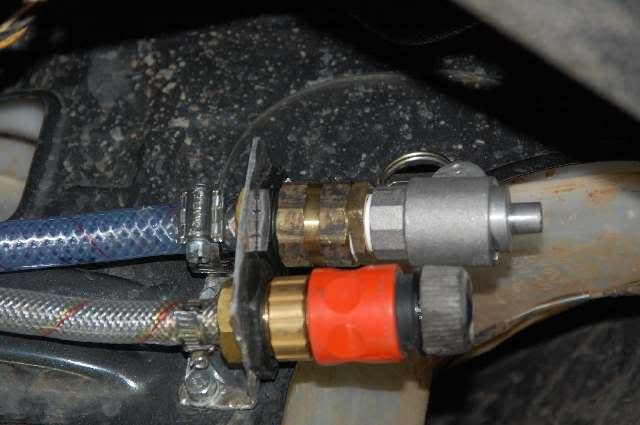
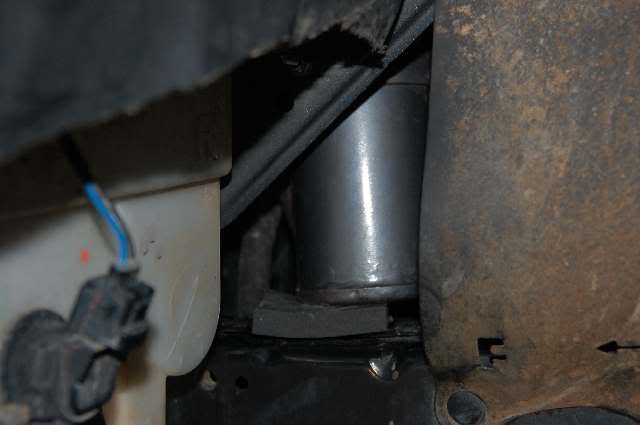
Anyway, while I was at it, I tackled mounting the Helton heat exchanger. This was pretty easy. It fits nicely below the factory battery tray, but don't drill a hole through the washer bottle. (I drilled the hole from the washer bottle side). There is a handy heater hose that runs from beside where the top radiator hose joins the engine down to just below the fuel filter, so I removed this and used the 16mm radiator hose and new hose clamps supplied to run down from the engine to the heat exchanger and then another bit from the exchanger to the heater line pipe below the fuel filter. As an afterthought, I decided to jam in a bit of self adhesive 12mm x 50m rubber strip on to the bottom of the heat exchanger at the last minute so it sits on the chasiss rail without rubbing a hole in something. I have not got the pressure pump in place yet, but gave her a bit of a test using a temporary setup and a cold engine and I think it will be fine. Here are acouple of pics. The first is looking down bside the battery to the top of the heat exchanger:
Image

The blurry red bit is a ball valve Helton provided to regulate the coolant water flow and you can see the 2 heater pipes going down to the exchanger and you can see one of the water connectors in sharp focus.

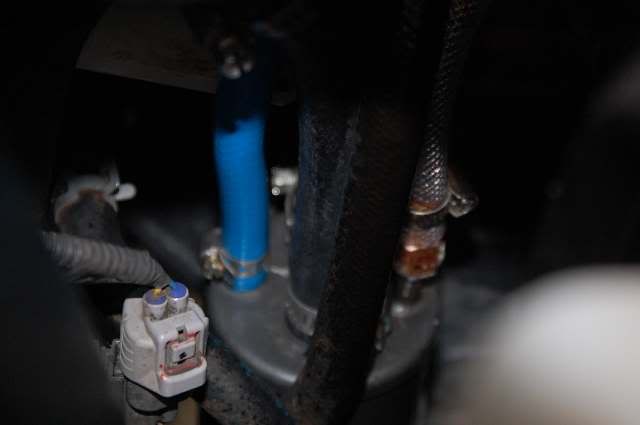
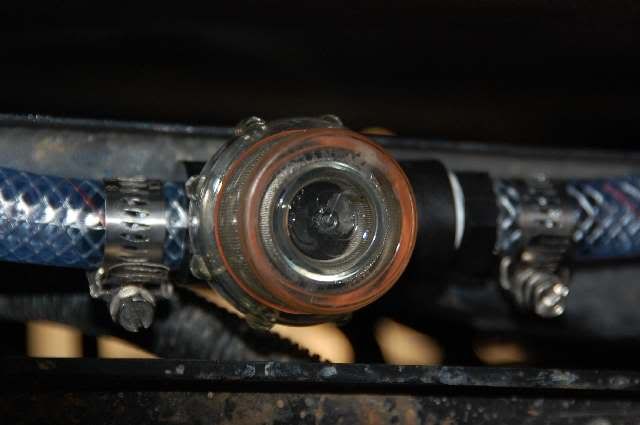
The second is insde the wheel arch and you can see the body of the exchanger, the wiper washer bottle bottle and the mounting bolt in the shadows on the top left. You can see the mounting clamp wrapping around the body of the heat exchanger. With my bull bar, this is all exposed, but in your truck, it might be hard to see all this, just watch that washer bottle!

Image

So the next job is to fit the pressure pump and the compressor over on the right hand side where the SR5 ABS brake controller is. Plenty of room there, so I think at this stage, I will mount both of them vertically on the guard which will make everything easy to service. To do this, I think I will bolt a fairly large flat plate onto the guard and mount the pump and comperessor on the plate. Should be much easier to do this than the spotties as I will use a positive earthed relay setup andhave already got alittle bit of the wiring done. The 4 fuse distributon block will go over with them and I will use 2 fuses for each item (1 for the circuit and one will be the low current relay switching circuit.
User avatar
rodw
 
Posts: 3195
Joined: Tue, 19 Feb 2008 2:00 +0000
Location: Brisbane, QLD

Re: Rod's new Rig

Postby rodw on Sun, 23 Nov 2008 6:31 +0000

Well, got the compressor and pump fitted under the bonnet today, but still have the wiring to do. Here is what I ended up with:

Image

This is on the right hand side just in front of the brake cylinder which is the blurry white bit in the top left hand corner. The outer guard is the grey bit along the bottom of the pic.

I had a bit of 2.0 mm Aluminium Checkerplate lying around. It might have been easier if it was a bit bigger, but I mounted the compressor vertically and the pump horizontally on the plate. At the top, I used the larger of the two threaded holes on the side of the guard and a couple of self drilling roofing screws ('cos I was too lazy to take the mudguard liner out and use bolts through the guard) at the bottom, I had some 25mm angle iron lying around and welded up a bracket that is bolted to the top of the mudguard using the two threaded holes and secured to the aluminium plate using 3 little bolts. Put some 3mm rubber between the guard and the aluminium plate and also between the Blue Tongue compressor and the plate as suggested by Opposite Lock (They said they used Bike tube). Used a bit of locktite on all of the bolts.

Bought the compressor bare, but had a few air hose fittiings lying around and have a 10m air hose in the shed, so set the compressor up so I can use it once I get power connected.

I was very happy with the mounting plate, it does not move and the compressor is solid as a rock. The water pump is mounted on some very flexible rubber feet, so it swings around a bit but it is designed to do this. Camec told me when I bought it that it could be mounted on any angle, but if you set it up vertically to put the pump at the bottom so if it leaked, it did not kill the pump motor.

The pump will be pretty easy to plumb in and hopefully, I will be able to put an in line filter ino the inlet somewhere. I bought one with the pump, but I need to go back to Camec now the pump and heat exchanger are fitted to work out exactly what bits I need,

I am also hoping to fit a 9 litre air tank for the compressor here:

Image

If you look up from below behind the rear wheel on a dual cab, there is plenty of room just above the ARB side rail on the tow bar between the outside guard and the tub. a 9 litre air tank should fit in this space, but I got to work out what bits to get for this yet. Will be looking for some advice from the forum, but will raise a separate thread ...
User avatar
rodw
 
Posts: 3195
Joined: Tue, 19 Feb 2008 2:00 +0000
Location: Brisbane, QLD

Re: Rod's new Rig

Postby rodw on Mon, 01 Dec 2008 8:06 +0000

Well got the hot water system in nad here is a pic of the Helton Heat exchanger tucked down below the battery tray and hiding behind a power steering hose beside the radiator.

Image

The blue hose is the inlet from the pressure pump (came with the Helton Kit), You can see the braided outlet hose which takes the hot water to the shower. The black hose with the hose clamp is a heater hose coming down from the radiator and is the hot radiator inlet. The cooler outlet going back to the heater is hidden out of sight in this pic.

Here are the outlet and inlet I mounted on the left hand side tucked up under the guard. The bracket is a piece of 2mm ally checkerplate that was lying aorund. There was one threaded screw hole on the vehicle and I used that and a couple of rofing screws to fix it in position. The brass fittings are held in place with a slice I cut off a poly pipe coupling fitting. This allowed me to poke the brass hoes pipe fittings and tighten up my improvised mounting collars.

Image

I started with a couple of garden hose fittings fitted on a bracket on the inner guard but found that the suction line leaked and the pump wold not prime, so I had to replace it with a cam lock fitting complete with an alluminium cap to keep the dust out. I modified a garden hose fitting by fitting a bit of rubber under the collar to act as a dust cap.

Shurflo also make a nice little bowl filter to put on the inlet side of the pressure pump which cost me about $15 and I think this would be a good idea to include it somewhere. Here you can see it running along the bottom of the radiator. This pic is looking straight up from below the radiator so it is very easy to service.

Image

So anyway after a couple of weekends mucking around with this stuff, I am looking forward to getting out in the country air to try out my handiwork.
User avatar
rodw
 
Posts: 3195
Joined: Tue, 19 Feb 2008 2:00 +0000
Location: Brisbane, QLD

Re: Rod's new Rig

Postby rodw on Sat, 03 Jan 2009 4:15 +0000

Max got me motivated to get the K&N front recovery points mounted seeing he has been mucking about with his towbar. They came off when the bulbar went on because some angle iron which formed part of the bulbar mount was in the road. Here is what was there before the bull bar went on.

Image

Seeing as they cost me $240, it seemed a shame to leave them in the shed, so I finally decided to do something about it. . The Ironman Bar has some 4mm thick angle iron that bolts on to the silver bolt at the back in the picture above, some of it had to go. I had showed these hooks to Brooksy when I visited him a few months ago and he thought that modifying the mount would have no impact on the integrity of the bull bar mounting system or air bag operation. He’s a qualified engineer, so that was good enough for me.

Image

I got into it with my 4” angle grinder and cut of a fair bit of the top angle so the K&N mounting point could be fitted. The problem is that the bull bar angle iron will hold the recovery point 4mm away from the chassis rail, so I needed a spacer. The K&N recovery point is made from 75mm flat iron so I decided to head off to Metalcorp Steel to get some 75mm x 4mm flat iron. Bugger! They are closed for Christmas until 5th Jan and I'll be back at work then. Anyway, I had to drive past Bunnings to get home, so I had a poke around in there and found a plate to join rafters together which was 75mm wide x 4mm thick! I was in business and a lot cheaper at $6.00 each than buying a full length flat from Metalcorp. So after a bit of stuffing around, I had cut out a cardboard template for the spacer.

Image

You can see it matches the K&N mounting plate. The hole is for the smaller bolt.

Image

So now to transfer the cardboard pattern to the plates I got from Bunnings and the next pic shows an original plate I bought and a finished spacer.

Image

You can see the hardware had a few extra holes in it, but they will be hidden from view once installed. Pretty easy really, Drilled a hole at the end of the slot and an extra one for the small bolt, then cut it out with my 4” angle grinder. Once they were dressed up, I added a lick of paint to the spacers and to the under body area I cut away.

Image

So with the spacers made and the angle cut away, it was simply a matter of bolting the recovery points back on with the plate behind it. If you have a look at the bottom spacer in the photo above, it is oriented with the recovery point below. The cutout on the top left is for the yellow tab on the top of the chassis rail, the small bolt goes through the middle hole at the top left of the spacer, the body mount fits through the slot and the bottom bolt holds on the K&N mount and the bull bar. While there is only one bolt through the spacer, the top edge of the cutout on the right of the spacer sits on top of the Bull bar mount so it can’t go anywhere. So anyway, here is the finished product below:

Image
User avatar
rodw
 
Posts: 3195
Joined: Tue, 19 Feb 2008 2:00 +0000
Location: Brisbane, QLD

Re: Rod's new Rig

Postby Hilux Max on Sat, 03 Jan 2009 6:12 +0000

Great stuff Rod....Glad I can be the reason for inspiring you to play with your rig...at the end of the day, it was worth it wasnt it? :lol:

Lets just hope now you dont need to use that recovery hook huh? :lol: :roll:
User avatar
Hilux Max
Valued Contributor
 
Posts: 12434
Joined: Sun, 07 Jan 2007 12:00 +0000

Re: Rod's new Rig

Postby rodw on Sat, 03 Jan 2009 6:36 +0000

Hopefully, just like the winch Max, only use it to pull other people out. :lol:
User avatar
rodw
 
Posts: 3195
Joined: Tue, 19 Feb 2008 2:00 +0000
Location: Brisbane, QLD

Re: Rod's new Rig

Postby rodw on Sun, 04 Jan 2009 6:44 +0000

Well I'm blaming Mmaax again but I decided to try my hand at making up a transfer case guard to ad da bit mor under body armour to my truck. I started another thread here about the fabrication

viewtopic.php?f=8&t=2947

It is not finished yet, But I have got this far:

From the left
Image

From the right

Image

From the front

Image

And from the rear with the rear plate still to be made:

Image

I reckon I have picked up an extra 10mm or so of clearance from this mod and hope to finish it off by the weekend. I hvae included a lot more detail about how I made this in the separate thread above.
User avatar
rodw
 
Posts: 3195
Joined: Tue, 19 Feb 2008 2:00 +0000
Location: Brisbane, QLD

Re: Rod's new Rig

Postby Hilux Max on Sun, 04 Jan 2009 7:11 +0000

Keep em coming Rod.....LOL :lol:

Next thing you know, you'll be blaming me for SAS'ing her too..... :lol: :D

good stuff, Ill be tackling this very soon too.
User avatar
Hilux Max
Valued Contributor
 
Posts: 12434
Joined: Sun, 07 Jan 2007 12:00 +0000

Re: Rod's new Rig

Postby davis.16 on Mon, 05 Jan 2009 6:50 +0000

hey mate i read about the cheap dual battery system you had in your old car the $95 one. i was at supercheap today and saw a $95 but it has a manual isolator. next to it was a $150 one thats auto isolator... would that be better. and in the way of a battery is gel cell the way to go in this case???

Cheers Sam (davis.16)
Yes this is my ute...... No i won't help you move house.
User avatar
davis.16
 
Posts: 402
Joined: Sun, 21 Sep 2008 4:29 +0000
Location: Sydney

Re: Rod's new Rig

Postby rodw on Mon, 05 Jan 2009 7:06 +0000

Sam,

Here is a pic of the Supercheap regulator I had in my old car if that helps.

Image

For $150, you could get a better one from Battery World or find a Redarc which are highly regarded and look very similar to the supercheap job
Image
User avatar
rodw
 
Posts: 3195
Joined: Tue, 19 Feb 2008 2:00 +0000
Location: Brisbane, QLD

Re: Rod's new Rig

Postby Lately Lux on Tue, 06 Jan 2009 6:28 +0000

The REDARC are a good unit, I use one for my setup. I have a mate who had one in his Patrol until he went for a full electronic control system, but has put the REDARC in his Navara now. His is about 7 years old and has seen some HEAVY duty 4WDing and hasn't missed a beat.

Brett
User avatar
Lately Lux
 
Posts: 223
Joined: Thu, 25 Oct 2007 1:00 +0000
Location: Bonogin, QLD

Re: Rod's new Rig

Postby rodw on Fri, 09 Jan 2009 6:14 +0000

Thought I'd better post some pics of the finished T/case protector
Image

Image

Image

Image

but the full details are on the thread quoted a couple of posts ago here
viewtopic.php?f=8&t=2947
User avatar
rodw
 
Posts: 3195
Joined: Tue, 19 Feb 2008 2:00 +0000
Location: Brisbane, QLD

Re: Rod's new Rig

Postby rodw on Wed, 11 Feb 2009 8:26 +0000

It's been a while since I updated this thread. So many things to do and no time to do them. Been a bit distracted by a hectic weekend social schedule and the fact that I bought my Son a first car which has had a bit of a todo list on it. I probably won't have much to show until March, but I have three immediate projects on the go.
    1. Still working on the transfer case protection utilising a bolt on crossmember. Its been sitting on the bench untouched for a couple of weeks now.
    2. Bought a radio dash fascia yesterday from a wrecker and am working on a custom install of my Car PC monitor into it. I will be cutting up the monitor case and glueing it into the fascia somehow. Probably glue the UHF mike mounting bracket straight onto this fascia as well. I will be trying for a finish that looks factory when I do this.
    3. My mate Scotty measured up for my stainless steel water tank last night at our monthly Twin Rivers 4WD club meeting. Onall4 from this forum came along for our meeting for a look, it's about time we had another Hilux in our club. I think I have talked him into joining
Pretty certain I will make my own sliders which will be the next job after these seeing as my welding has come on a bit. After that, I will focus on the rear storage and I am still puzzling over the design. I don't usually have so many things on the go, I like to tick them off one at a time, but it has just happened that way.
User avatar
rodw
 
Posts: 3195
Joined: Tue, 19 Feb 2008 2:00 +0000
Location: Brisbane, QLD

Re: Rod's new Rig

Postby Hilux Max on Wed, 11 Feb 2009 9:40 +0000

dont worry mate, you'll get there.

and dont be put off by those comment on the "Bunnings Backyard" Fabrications we are doing....they're just jealous....LOL :D

am looking forward to your sliders.
User avatar
Hilux Max
Valued Contributor
 
Posts: 12434
Joined: Sun, 07 Jan 2007 12:00 +0000

Re: Rod's new Rig

Postby davis.16 on Wed, 11 Feb 2009 1:07 +0000

Make sure you put up pics of your rock sliders once complete im interested in making some too.

Cheers Sam
Yes this is my ute...... No i won't help you move house.
User avatar
davis.16
 
Posts: 402
Joined: Sun, 21 Sep 2008 4:29 +0000
Location: Sydney

Re: Rod's new Rig

Postby ROLLUX on Wed, 11 Feb 2009 5:51 +0000

hey mate what did the radio surround cost you at the wreckers?
ROLLUX
 
Posts: 109
Joined: Fri, 18 Apr 2008 1:00 +0000
Location: mount isa, QLD

Re: Rod's new Rig

Postby rodw on Wed, 11 Feb 2009 7:56 +0000

Rollux, I paid $55 ad GDM on Beaudesert Road but they only had one Hiilux.

Image

Anyway, I decided to make a start on this tonight.

I removed the aluminium plate from the face of the Xenarc monitor and hacked the buttons off the case of the screen and added the 6" extended ribbon cable from RaidGear on eBay.

Image

Cutting off the buttons did not remove any of the screw holes that holds the case or anything together.

The touch screen sits recessed into the front cover and while 2/3 of it is now gone from the bottom side, the glass cannot fall out as it is such a tight fit and it is held on one corner still.

The idea is to end up with something that looks like this:

Image

There will not be too much that needs to be filled in to make this look neat, so hopefully I will get away with a neat finish. The light sensor will be hidden behind the dash unless I can make a window for it. I found that this did not work well as the monitor flickered a lot if the dash was passing in and out of shadow,so I hd always kept the auto brightness turned off.

I am planning on using something like Dynatron that they talk about on mp3car.com, but probably an equivalent 3M product as I can get their stuff easilly and I can't find Dynatron down under. I will probably end up gluing everything straight onto the fascia so I have a one piece item. I also will probably mould in a CB Radio microphone mount into the fascia as well while I am at it. I will see how I go.

Have got so little time over the next month, but hopefully, I will get some of this done.
User avatar
rodw
 
Posts: 3195
Joined: Tue, 19 Feb 2008 2:00 +0000
Location: Brisbane, QLD

PreviousNext

Return to Member Build Ups

Who is online

Users browsing this forum: No registered users and 34 guests