Skog,
Thanks for the wrap. The Caddy got a few comments while I was away. It did impress people! Still happy with it. Had some rain and there is a few drops getting in around the hinge on the rear hatch which has a rubber washer seal under the hinge. It has a plastic cap over the bolt holding it on otherwise I'd give it a tighten. Not much dust got in after 100 km or so of dirt an I have not finished off my tailgate seal yet, so that won't be a problem!
Alby,
I think the shadecloth migt have some pros and cons. We had to pack up wet after rain and the tent was soaked. It was good to be able to roll it up on a clean surface. The tarp was filthy becasue of dirt and mud in the awning and I had to wash it off with a hose, but when you fold it up, the tent does not land on that bit, so it stayed clean.
Put the tent up at home and put it away when dry tonight was no drama to clean it up, just wiped down the plastic skirts on the side panels.
I agree, Cubelock is a great product, but to do something like what I did, you need everything that is going to fit on hand before you make it up. But if I started from scratch with the Caddy canopy, it would be a breeze as there would be so much room compared with a Vitara! Get yourself some 1/4" Tee Nuts to hold the ply on. Countersink each hole through one layer of the ply before fitting the Tee nut with a 3/4" wood drill bit and the carpet will glue over the top of the Tee nut and nobody will know it is there. You have a nice metal thread in the Ply to bolt through the Cubleock to hold the shelves on.
And no, never caught a single fish!
Rod
Rod's Rig - Round 2
![]() by patl on Tue, 08 Jul 2008 9:43 +0000
by patl on Tue, 08 Jul 2008 9:43 +0000
Rod,
We called into Cania on the way back from Awoonga November last year.
Caught that many bass that in the end we wouldnt even take the motor out of gear. Got about 20-30 each day.
Top lure was pale green/white spinner bait.
Nice camping spot and the king parrots where very tame.
Patrick
We called into Cania on the way back from Awoonga November last year.
Caught that many bass that in the end we wouldnt even take the motor out of gear. Got about 20-30 each day.
Top lure was pale green/white spinner bait.
Nice camping spot and the king parrots where very tame.
Patrick
Patrick
-

patl - Posts: 207
- Joined: Mon, 28 Jan 2008 2:00 +0000
- Location: Mackay, Qld
![]() by rodw on Wed, 23 Jul 2008 7:28 +0000
by rodw on Wed, 23 Jul 2008 7:28 +0000
Been a while since I posted much here, but thought I'd provide an early update on one project I have wanted to have a go at for a while. Seeing I have a laptop with a buggered screen and keyboard, I have decided to build a carputer. The lap top will go under the seat and the screen in the console. If I can get a USB FM Radio working, I'll remove the factory radio and put an amp behind the rear seat. I think I can live without an AM radio, Any Music CD's can be played (or Ripped) onto the PC and I can even watch video files or DVDs as well.
So far, got most of the software working, but I have got a lot of work left to do to get Ozie Explorer up and running. I am planning on running Oddessy Turn by Turn navigation which is available from Twigg online. They say it will embed into the Road Runner Front End software!
Anyway, here is what the external touch screen will look like once I get up and running. It will be a fair while before I get it into the car. I have managed to get a customised Skin for OziExplorer, need to make some buttons to activate a few features...
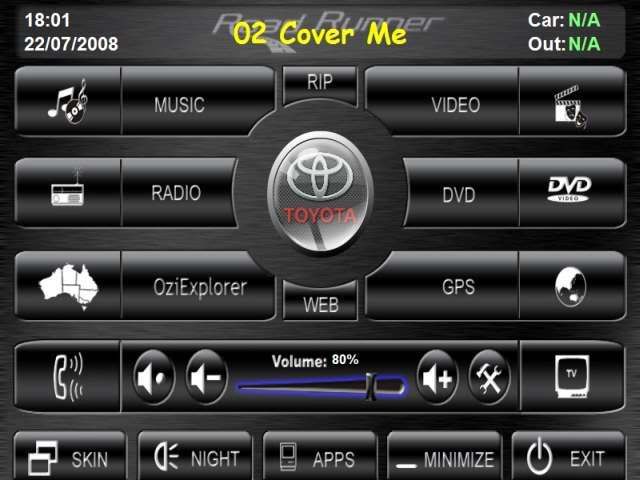
And here is what Ozzie looks like embedded into the skin.
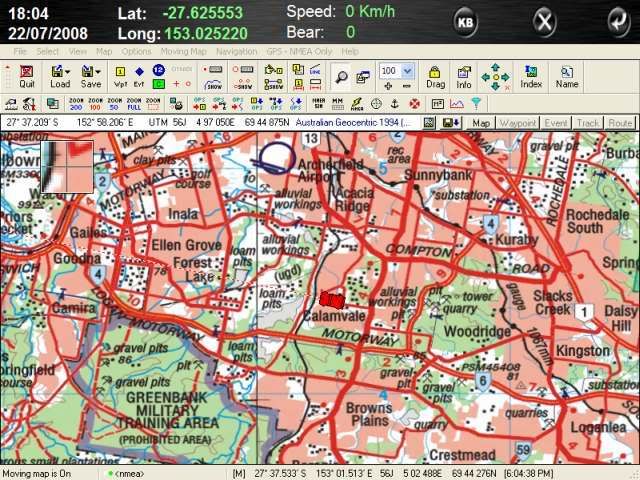
I even managed to split the GPS input into three so there is one for Ozie, one for RoadRunner (for the display of Lat, Long, Speed and Bearing at the top of the screen.
This is not an easy project, but the back of it is broken now...
Cheers, Rod
So far, got most of the software working, but I have got a lot of work left to do to get Ozie Explorer up and running. I am planning on running Oddessy Turn by Turn navigation which is available from Twigg online. They say it will embed into the Road Runner Front End software!
Anyway, here is what the external touch screen will look like once I get up and running. It will be a fair while before I get it into the car. I have managed to get a customised Skin for OziExplorer, need to make some buttons to activate a few features...
And here is what Ozzie looks like embedded into the skin.
I even managed to split the GPS input into three so there is one for Ozie, one for RoadRunner (for the display of Lat, Long, Speed and Bearing at the top of the screen.
This is not an easy project, but the back of it is broken now...
Cheers, Rod
-
rodw - Posts: 3195
- Joined: Tue, 19 Feb 2008 2:00 +0000
- Location: Brisbane, QLD
![]() by Parr on Wed, 23 Jul 2008 8:51 +0000
by Parr on Wed, 23 Jul 2008 8:51 +0000
rod
there is was an thread on new triton not so long ago. one of the guys was using a dell computer under the seat. the only thing i would be worried about would be he HD packing it up on ruff roads ill see if i can track down the thread 4 you
http://www.newtriton.net/forum/viewtopic.php?id=1100
might hav to sign up to view this 1
SAS'ed & 4-linked lux
http://www.newhilux.net/phpbb/viewtopic.php?f=41&t=6337
Thanks:
Buds Customs http://www.facebook.com/budscustoms
Monster Rides http://www.monsterrides.com.au/
Taipan XP http://www.taipanxp.com.au/
http://www.newhilux.net/phpbb/viewtopic.php?f=41&t=6337
Thanks:
Buds Customs http://www.facebook.com/budscustoms
Monster Rides http://www.monsterrides.com.au/
Taipan XP http://www.taipanxp.com.au/
-

Parr - Posts: 1155
- Joined: Tue, 15 Apr 2008 1:00 +0000
- Location: hervey bay, QLD
![]() by Quinny34 on Wed, 23 Jul 2008 10:20 +0000
by Quinny34 on Wed, 23 Jul 2008 10:20 +0000
hdd's are cheap... or you can get a reasonably sized solid state drive (No moving parts - like a big usb key) reasonably cheap.
I'm using destinator as the shell but I am still waiting for finance to release funds for the screen... Screen will go into the roof console...
I'm using destinator as the shell but I am still waiting for finance to release funds for the screen... Screen will go into the roof console...
-

Quinny34 - Platinum Subscriber
- Posts: 5169
- Joined: Sun, 19 Aug 2007 1:00 +0000
- Location: Lavington, NSW
![]() by rodw on Wed, 23 Jul 2008 11:26 +0000
by rodw on Wed, 23 Jul 2008 11:26 +0000
Well, have made a little more progress as I found this site:
[URL]http://members.iinet.net.au/~jfernandes/?In_Vehicle_Systems:Skinbedder:OziExplorer_Skin[/URL]
Which let me do this:

Still got a couple of issues with this, but it makes a huge improvement. Can't switch back and forth between the application anfd the front end.
Yes I know about the HDD issue but I got 3 yrs of hard use out of my laptop and the HDD survived, I put a new drive in it to start this off. They are pretty cheap. If I did not have the buggered laptop, I might have gone the whole hog and used a CF card to boot off. If on a long trip, I'd probably carry a spare Ghosted drive ready to go. 5 min job to slip it in!
Quinny, what screen are you going to get? and where from? I have not got one yet for the same reasons!
Tossing up to get a screen from Jaycar for $500 for one with warranty or shell out smae money and import a Xenarc with no warranty. Either way, not much difference as if I open the case to put it in the dash, the warranty is buggered..
[URL]http://members.iinet.net.au/~jfernandes/?In_Vehicle_Systems:Skinbedder:OziExplorer_Skin[/URL]
Which let me do this:
Still got a couple of issues with this, but it makes a huge improvement. Can't switch back and forth between the application anfd the front end.
Yes I know about the HDD issue but I got 3 yrs of hard use out of my laptop and the HDD survived, I put a new drive in it to start this off. They are pretty cheap. If I did not have the buggered laptop, I might have gone the whole hog and used a CF card to boot off. If on a long trip, I'd probably carry a spare Ghosted drive ready to go. 5 min job to slip it in!
Quinny, what screen are you going to get? and where from? I have not got one yet for the same reasons!
Tossing up to get a screen from Jaycar for $500 for one with warranty or shell out smae money and import a Xenarc with no warranty. Either way, not much difference as if I open the case to put it in the dash, the warranty is buggered..
-
rodw - Posts: 3195
- Joined: Tue, 19 Feb 2008 2:00 +0000
- Location: Brisbane, QLD
Re: Rod's new Rig
![]() by rodw on Sun, 07 Sep 2008 7:18 +0000
by rodw on Sun, 07 Sep 2008 7:18 +0000
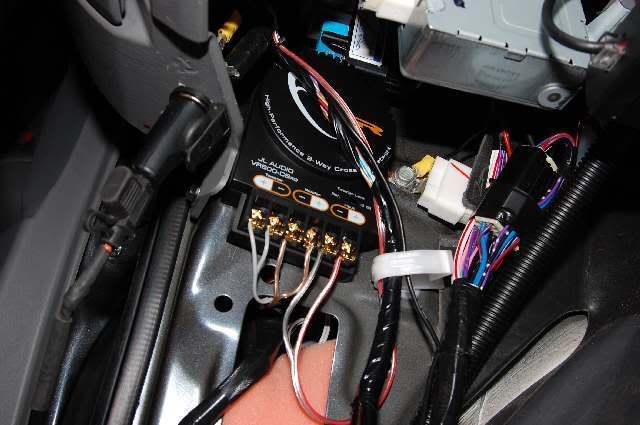
Well, in preparation for the Car PC, I put in my Amp today. A while ago I bought a JL 2 channel Amp and JL split speakers to match. Cost me about $600 including a wiring kit, but that was with a discount of about $300 or so, so it is pretty good gear. The reason why I stuck with the 2 channel amp is that I want to put in a car PC and my sound card will only have two channels. The Guy at JB said I would not hear rear speakers so why bother? So I went along with his advice. The current install is a bit temporary as the factory headunit will go once I get the PC and a touch screen in the car.
Don't underestimate how big a job this is, Spent all yesterday afternon and this morning on this project. I used a line out converter to reduce the speaker outputs on the factory head unit to line inputs. To do this, the first thing I had to do was to work out the wiring to the head unit and I posted it here:
viewtopic.php?f=11&t=2436
The first job I tackled was installing the speakers. I won't go into the detail as it's been covered before, but I bought the speaker adapters from the US. I think I may have ordered the wrong ones as I got the 6.5" adapters and had some trouble mounting my 6" speakers so I had to drill some new holes in the speaker surround which was pretty scary butchering a $379 pair of speakers! But it turned out all good. I followed the instructions that came with the spacers and used some Sikaflex to glue them to the door before riveting them in.
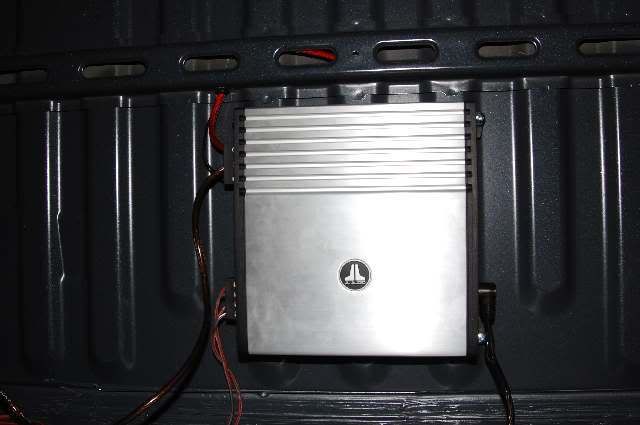
I decided to mount the tweeters in the door and the Amp behind the back seat. People like JB did not like these locations (mainly because it is more work I think). The said they usually mounted the amp under the seat and surface mounted the tweeters on the dash. Anyway, you be the judge from these pics what would look nicer:


The instruction book for the speakers said to use a 45mm Hole saw so before I did ths job I went looking and only had a choice of a 44mm or 46mm so I bought a 44mm one. I got it home and it was huge. It would have required using the second bezel around it that came with the speakers that looked a bit poxy. I ended up buying a 38mm hole saw and the fit was perfect! (so be warned, check the manual against the hardware before drilling a hole in your car before you buy a hole saw).
I left the factory speaker wiring in place in case I needed it again and spliced into the wires behind the dash. I spliced into the speaker wires (pins 1,2,3 & 4 in the link above) and I also picked up the Accessory power line (pin 7) to use as the Amp turn on line. I used a Stanley knife to pare off about 8mm of insulation from each wire, trying to stagger them, to reduce the chance of a short. Then I wrapped the new wires onto the bare sections and soldered them on and wrapped them in insulation tape (sorry, no pics).
To mount the speakers, I had to install the speaker crossovers. The manual said not to put them in the door because they don't like water, so after I removed the factory speakers, I pushed a length of wire down through the convoluted rubber conduit that goes from the car to the door. You have to massage the conduit and work the wire into the door. Then I pulled two sets of speaker wires from the door back into the car. There is just enough room near where the speaker wires come out inside the car behind the kick panels to mount the cross overs. Keep them as high as you can otherwise you won't be able to replace the kick panels (I found out the hard way!)
This is the passanger (left) side under the glove box. You can see my Aux power socket with the Flouro light plugged in. It always seems to be late when I finish these jobs and get to the photos!
I ran the speaker wires from the factory headunit down to below the console where I mounted the speaker to line-in adapter.
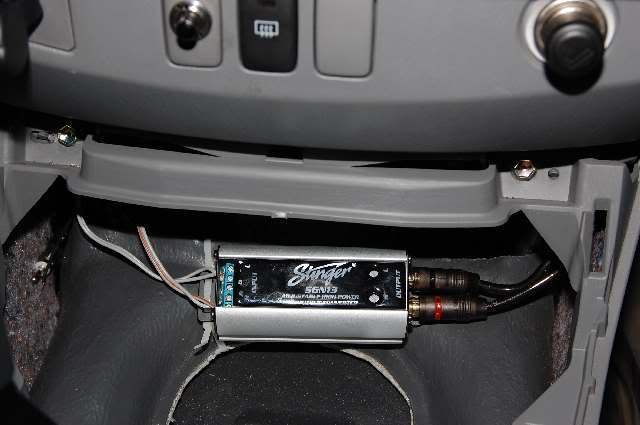
The top of the console was pretty easy to remove. Mine is an auto so all I did was unscrew the T/case lever knob, pull off the plate around the handbrake, grabbed the console near the handbrake and gave a big reef upwards and it all popped off.
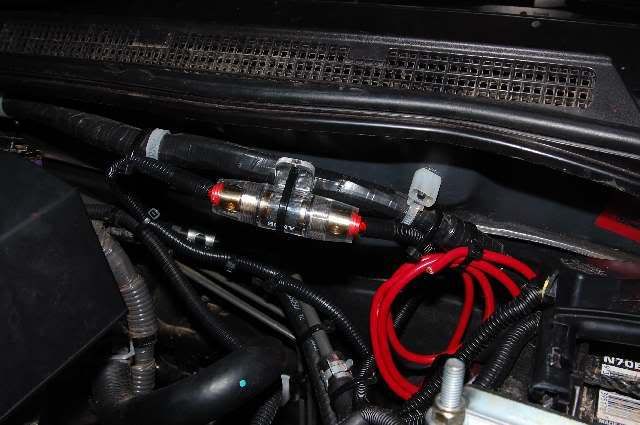
I picked up some power from the second battery and ran it up to the fuse supplied with the wiring kit. Decided not to screw it onto the firewall, and just cable tied it to the wiring harness. I noted the amp needed a 20 amp fuse and the kit supplied a 60 amp one. I bought a 20 amp fuse but was not impressed to find they sell the fuses in sets of 5!
So anyway, with the fiddly stuff done, I ran the power wire under the sill panels along the left hand side of the car. While I was at it, I ran another power lead for the Car PC (which will run off an Opus Power supply). I also ran the Amp turnon wire along this side. I ran the left speaker wire and the lineout from under the console across to the Drivers (right) side and back along under the sill panels to the back of the car. That way, I won't get interferance as the power is nowhere near the audio signals.
Removing the rear seat was much easier than everyone said it would be, I just needed a helper to remove the seat from the car. You just need to undo the two bolts that secure the hinge on each side of the car and unhook the rear of the seat from the slide. Hope it goes on easy!
I mounted the amp centred and rested it on a small box the right height until I had screwed it off. I ran the power wires up and along the reinforcing channel. Ther was a gap to get the wires into the channel, but I drilled an exit hole. I used my trusty piece of wire to pull the power wire and the amp turn on wire.
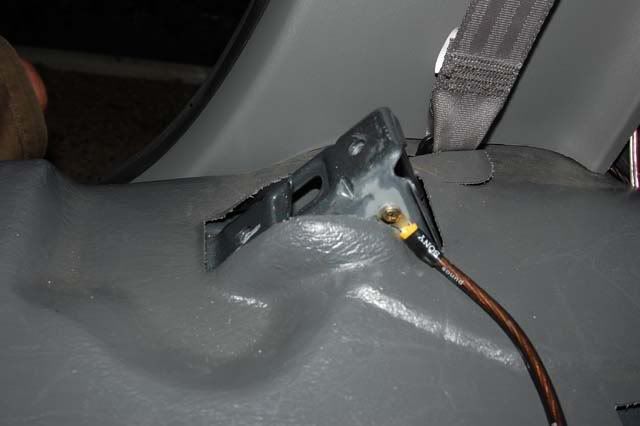
I screwed the earth wire to the seat hinge mount after rubbing the paint with some wet & dry down to bare metal (I'll spray a bit of paint around later).
So anyway, was pretty pleased with the job so far, turned it on and Nothing! Not impressed. Got an Ipod and plugged it direct into the amp and it worked. I was confident the wiring was good, so I had a look at the line adapter. I removed one pair of speaker wires from it and patched in one of the original factory speakers. I had sound! The lineout adapter was a dud!. Not impressed. Back to JB who are 30 minutes away, they said that they did not have anybody to test it on a Sunday. They agreed to provide a credit if I bought another adaptter, so that was what I did. Took it home, slipped it in and it fired up straight away!
So now to calibrate the amp according to the instructon manual. It said to remove the speaker wires and connect a volt meter to one pair of speaker wires. It said to play a 1000 Hz tone (which I found on the internet and burnt to a CD) at 3/4 volume. It said to adjust the input sensitivity on the amp (and I also played with the line out adapter adjustemnt as well) until the voltmeter read 13.4 volts. that's what I did and it was perfect! Maybe other amps will have different voltages, I don't know.
Once I put the car back together, I invited my 16 year old son who is a very keen bass guitarist to check it out. He threw some tracks at it that at half volume was shaking the front door trims like you would not believe with no distortion. Top gear this JL stuff I think! Very pleased with my handiwork. Can't wait to get the PC in the car so I am not worrying about changing CD's.
So anyway, I will have no rear seat this week, but at least I have the music!
Don't underestimate how big a job this is, Spent all yesterday afternon and this morning on this project. I used a line out converter to reduce the speaker outputs on the factory head unit to line inputs. To do this, the first thing I had to do was to work out the wiring to the head unit and I posted it here:
viewtopic.php?f=11&t=2436
The first job I tackled was installing the speakers. I won't go into the detail as it's been covered before, but I bought the speaker adapters from the US. I think I may have ordered the wrong ones as I got the 6.5" adapters and had some trouble mounting my 6" speakers so I had to drill some new holes in the speaker surround which was pretty scary butchering a $379 pair of speakers! But it turned out all good. I followed the instructions that came with the spacers and used some Sikaflex to glue them to the door before riveting them in.
I decided to mount the tweeters in the door and the Amp behind the back seat. People like JB did not like these locations (mainly because it is more work I think). The said they usually mounted the amp under the seat and surface mounted the tweeters on the dash. Anyway, you be the judge from these pics what would look nicer:
The instruction book for the speakers said to use a 45mm Hole saw so before I did ths job I went looking and only had a choice of a 44mm or 46mm so I bought a 44mm one. I got it home and it was huge. It would have required using the second bezel around it that came with the speakers that looked a bit poxy. I ended up buying a 38mm hole saw and the fit was perfect! (so be warned, check the manual against the hardware before drilling a hole in your car before you buy a hole saw).
I left the factory speaker wiring in place in case I needed it again and spliced into the wires behind the dash. I spliced into the speaker wires (pins 1,2,3 & 4 in the link above) and I also picked up the Accessory power line (pin 7) to use as the Amp turn on line. I used a Stanley knife to pare off about 8mm of insulation from each wire, trying to stagger them, to reduce the chance of a short. Then I wrapped the new wires onto the bare sections and soldered them on and wrapped them in insulation tape (sorry, no pics).
To mount the speakers, I had to install the speaker crossovers. The manual said not to put them in the door because they don't like water, so after I removed the factory speakers, I pushed a length of wire down through the convoluted rubber conduit that goes from the car to the door. You have to massage the conduit and work the wire into the door. Then I pulled two sets of speaker wires from the door back into the car. There is just enough room near where the speaker wires come out inside the car behind the kick panels to mount the cross overs. Keep them as high as you can otherwise you won't be able to replace the kick panels (I found out the hard way!)
This is the passanger (left) side under the glove box. You can see my Aux power socket with the Flouro light plugged in. It always seems to be late when I finish these jobs and get to the photos!
I ran the speaker wires from the factory headunit down to below the console where I mounted the speaker to line-in adapter.
The top of the console was pretty easy to remove. Mine is an auto so all I did was unscrew the T/case lever knob, pull off the plate around the handbrake, grabbed the console near the handbrake and gave a big reef upwards and it all popped off.
I picked up some power from the second battery and ran it up to the fuse supplied with the wiring kit. Decided not to screw it onto the firewall, and just cable tied it to the wiring harness. I noted the amp needed a 20 amp fuse and the kit supplied a 60 amp one. I bought a 20 amp fuse but was not impressed to find they sell the fuses in sets of 5!
So anyway, with the fiddly stuff done, I ran the power wire under the sill panels along the left hand side of the car. While I was at it, I ran another power lead for the Car PC (which will run off an Opus Power supply). I also ran the Amp turnon wire along this side. I ran the left speaker wire and the lineout from under the console across to the Drivers (right) side and back along under the sill panels to the back of the car. That way, I won't get interferance as the power is nowhere near the audio signals.
Removing the rear seat was much easier than everyone said it would be, I just needed a helper to remove the seat from the car. You just need to undo the two bolts that secure the hinge on each side of the car and unhook the rear of the seat from the slide. Hope it goes on easy!
I mounted the amp centred and rested it on a small box the right height until I had screwed it off. I ran the power wires up and along the reinforcing channel. Ther was a gap to get the wires into the channel, but I drilled an exit hole. I used my trusty piece of wire to pull the power wire and the amp turn on wire.
I screwed the earth wire to the seat hinge mount after rubbing the paint with some wet & dry down to bare metal (I'll spray a bit of paint around later).
So anyway, was pretty pleased with the job so far, turned it on and Nothing! Not impressed. Got an Ipod and plugged it direct into the amp and it worked. I was confident the wiring was good, so I had a look at the line adapter. I removed one pair of speaker wires from it and patched in one of the original factory speakers. I had sound! The lineout adapter was a dud!. Not impressed. Back to JB who are 30 minutes away, they said that they did not have anybody to test it on a Sunday. They agreed to provide a credit if I bought another adaptter, so that was what I did. Took it home, slipped it in and it fired up straight away!
So now to calibrate the amp according to the instructon manual. It said to remove the speaker wires and connect a volt meter to one pair of speaker wires. It said to play a 1000 Hz tone (which I found on the internet and burnt to a CD) at 3/4 volume. It said to adjust the input sensitivity on the amp (and I also played with the line out adapter adjustemnt as well) until the voltmeter read 13.4 volts. that's what I did and it was perfect! Maybe other amps will have different voltages, I don't know.
Once I put the car back together, I invited my 16 year old son who is a very keen bass guitarist to check it out. He threw some tracks at it that at half volume was shaking the front door trims like you would not believe with no distortion. Top gear this JL stuff I think! Very pleased with my handiwork. Can't wait to get the PC in the car so I am not worrying about changing CD's.
So anyway, I will have no rear seat this week, but at least I have the music!
-
rodw - Posts: 3195
- Joined: Tue, 19 Feb 2008 2:00 +0000
- Location: Brisbane, QLD
Re: Rod's new Rig
![]() by premier on Sun, 07 Sep 2008 7:50 +0000
by premier on Sun, 07 Sep 2008 7:50 +0000
Hey Rod, great job
how much room is there behind the seat? How thick is your amp......thinking of doing this myself
how much room is there behind the seat? How thick is your amp......thinking of doing this myself
2011 SR Extracab, ROH trojen wheels, Cooper tyres
-

premier - Posts: 228
- Joined: Sat, 17 May 2008 1:00 +0000
- Location: , SA
Re: Rod's new Rig
![]() by rodw on Sun, 07 Sep 2008 8:04 +0000
by rodw on Sun, 07 Sep 2008 8:04 +0000
Mate, I am sure any amp will fit. I have an enclosure I will be fitting that is near double the depth of the amp I have which will be a tight fit. Look for an amp with a solid state design, no fans to go wrong in dusty conditions. It would be a lot easier under the seat, but I wanted it higher out of the water... and that space behind the seat is wasted.
Now ask me again after I attempt to put the rear seat back in! I have not tested it for fit after the install, but could slide it up behind the seat before I started.
Now ask me again after I attempt to put the rear seat back in! I have not tested it for fit after the install, but could slide it up behind the seat before I started.
-
rodw - Posts: 3195
- Joined: Tue, 19 Feb 2008 2:00 +0000
- Location: Brisbane, QLD
Re:
![]() by Quinny34 on Sun, 07 Sep 2008 9:29 +0000
by Quinny34 on Sun, 07 Sep 2008 9:29 +0000
rodw wrote:
Quinny, what screen are you going to get? and where from? I have not got one yet for the same reasons!
Sorry for the deley... still awaiting the finance area to release funds myself... looking to go 2 x 8" screens (Widescreen). May go for a 7 depending on price... looking to have 1 touch screen up front and the other at the back. Both in a roof console...
FYI.. Logitech have a really small BT keyboard with a touch pad or scroll wheel for about $150 - $200.... A mate at work has one for his system... (The joy of being single...
-
Quinny34 - Platinum Subscriber
- Posts: 5169
- Joined: Sun, 19 Aug 2007 1:00 +0000
- Location: Lavington, NSW
Re: Rod's new Rig
![]() by rodw on Mon, 08 Sep 2008 4:35 +0000
by rodw on Mon, 08 Sep 2008 4:35 +0000
Quinny,
I have seen that Logitech BT keyboard and it is very cool, I might get one.
I went with a 7" Xenarc 706sta which has an external controller box and is automotive grade with a 5 wire touch screen. I have also bought a LCD frame from here http://www.bybyte.com/ . While it is built for a lilliput (which are not bright enough and are not reliable). If I take the monitor out of it's case, It will fit in the frame perfectly, so I hope to relocate the monitor buttons down the side on one of the ltitle fill ins that convert the dash hole to a Dual DIN. See how I go. The Xenarc has two video inputs as well as the VGA, (using one for the reversing camera).
-
rodw - Posts: 3195
- Joined: Tue, 19 Feb 2008 2:00 +0000
- Location: Brisbane, QLD
Re: Rod's new Rig
![]() by rodw on Sun, 14 Sep 2008 7:24 +0000
by rodw on Sun, 14 Sep 2008 7:24 +0000
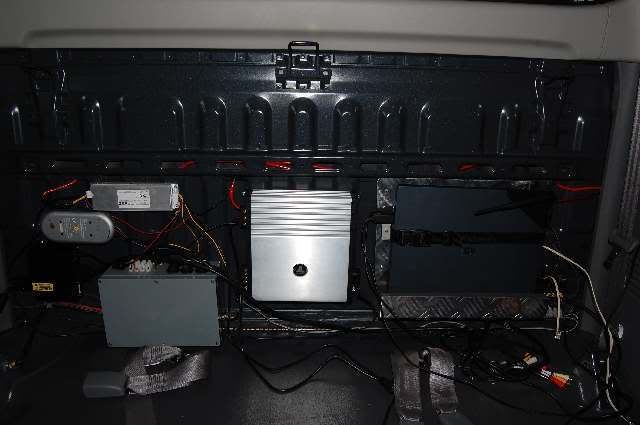
Ok, I have got most of the hardware in now and the back of my rig looks like this now!
I hope the rear seat fits back in!
I took a while to work out where to mount everything so I can service it all without pulling stuff off and becasue of all of the ridges on the car panel. Here are some close up pics. First the left hand side of the vehicle (we are facing backwards when we look at this):

You can see I fashioned a bracket for the laptop out of some aluminium sheeting and it has some soft rubber to hold it in. I might need another vertical strap to stop it bouncing up and down. There is a ghetto relay based shutdown/startup circuit at the bottom right of the laptop which did work out of the car, but is not now. Have not got time to sort that out. I thought the Opus should be able to turn the laptop on. The white wires are phone wires from the startup/shut down controller up to the laptop modem phone line in connector. I hacked the laptop power switch and ran the switch out to these connectors. Because the startup controler is not working, the second wire is just running to a momentary switch to turn it on.
You can see that I have wireless LAN onboard and the antenna on the laptop is only temporary. It goes down to a PCMICA long range Wireless card with an exteranl pigtail. I have also got an N connector Pigtail for this card so I can run to an external antenna eventually.
Here is the right hand side:

You can see the Opus at the top, it is set for 12v and the old laptop brick below it steps up to 19v for the laptop.
In the bottom left is the controller for the Xenarc 706TSA. I have a longer monitor interconnect cable on the way, currently, the monitor makes it to the armrest. Most of the cables you can still see lying around are fromt he Xenarc.
Still got a bit of sorting out to do and a lot more hardware to go. The amp is still connected to the factory head unit for now...
Cheers!
I hope the rear seat fits back in!
I took a while to work out where to mount everything so I can service it all without pulling stuff off and becasue of all of the ridges on the car panel. Here are some close up pics. First the left hand side of the vehicle (we are facing backwards when we look at this):
You can see I fashioned a bracket for the laptop out of some aluminium sheeting and it has some soft rubber to hold it in. I might need another vertical strap to stop it bouncing up and down. There is a ghetto relay based shutdown/startup circuit at the bottom right of the laptop which did work out of the car, but is not now. Have not got time to sort that out. I thought the Opus should be able to turn the laptop on. The white wires are phone wires from the startup/shut down controller up to the laptop modem phone line in connector. I hacked the laptop power switch and ran the switch out to these connectors. Because the startup controler is not working, the second wire is just running to a momentary switch to turn it on.
You can see that I have wireless LAN onboard and the antenna on the laptop is only temporary. It goes down to a PCMICA long range Wireless card with an exteranl pigtail. I have also got an N connector Pigtail for this card so I can run to an external antenna eventually.
Here is the right hand side:
You can see the Opus at the top, it is set for 12v and the old laptop brick below it steps up to 19v for the laptop.
In the bottom left is the controller for the Xenarc 706TSA. I have a longer monitor interconnect cable on the way, currently, the monitor makes it to the armrest. Most of the cables you can still see lying around are fromt he Xenarc.
Still got a bit of sorting out to do and a lot more hardware to go. The amp is still connected to the factory head unit for now...
Cheers!
-
rodw - Posts: 3195
- Joined: Tue, 19 Feb 2008 2:00 +0000
- Location: Brisbane, QLD
Re: Rod's new Rig
![]() by rodw on Sun, 14 Sep 2008 12:24 +0000
by rodw on Sun, 14 Sep 2008 12:24 +0000
Sorry Rollux,
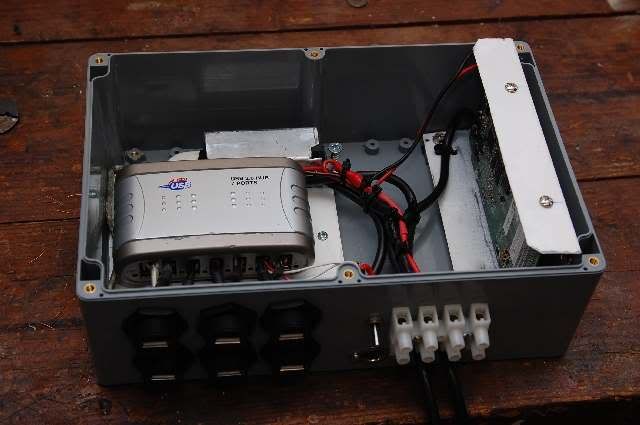
This is what is inside:
And here is a closeup of the connections:
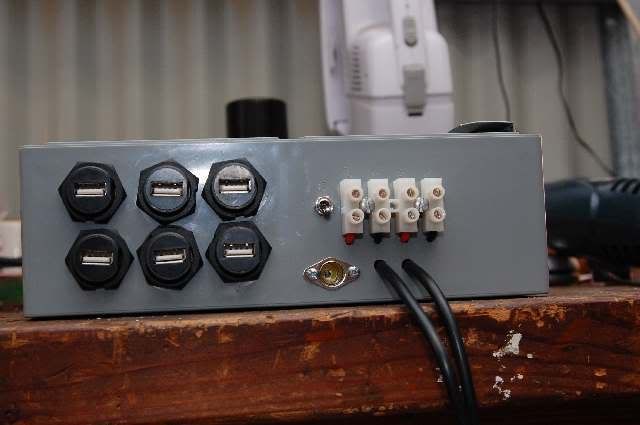
Inside is a 7 port Jaycar USB hub, one port stays internal to drive the Silab USB FM Radio which I have soldered a bit of coax on and put a Car Radio socket on the outside of the case (The radio is shielded in some 25mm square aluminium to prevent any interferance). There is also a USB HDD tucked in there... The switch is to turn one of the USB ports onto standby power to keep the GPS receiver hot all of the time. The standby power is the reason why I have 4 power connectors (one pair to power the hub and HDD, the other pair to add standby power.
I have used screw in, IP67 harsh environment USB connectors so nothing will fall out.
This is what is inside:
And here is a closeup of the connections:
Inside is a 7 port Jaycar USB hub, one port stays internal to drive the Silab USB FM Radio which I have soldered a bit of coax on and put a Car Radio socket on the outside of the case (The radio is shielded in some 25mm square aluminium to prevent any interferance). There is also a USB HDD tucked in there... The switch is to turn one of the USB ports onto standby power to keep the GPS receiver hot all of the time. The standby power is the reason why I have 4 power connectors (one pair to power the hub and HDD, the other pair to add standby power.
I have used screw in, IP67 harsh environment USB connectors so nothing will fall out.
-
rodw - Posts: 3195
- Joined: Tue, 19 Feb 2008 2:00 +0000
- Location: Brisbane, QLD
Re: Rod's new Rig
![]() by ROLLUX on Sun, 14 Sep 2008 5:15 +0000
by ROLLUX on Sun, 14 Sep 2008 5:15 +0000
hey mate thought about putting the switch for standby power on the dash so u dont have to go behind the seat all the time?
- ROLLUX
- Posts: 109
- Joined: Fri, 18 Apr 2008 1:00 +0000
- Location: mount isa, QLD
Re: Rod's new Rig
![]() by rodw on Sun, 14 Sep 2008 6:39 +0000
by rodw on Sun, 14 Sep 2008 6:39 +0000
Give us a break mate  while I am at it, I might also try and relocate the touch screen from the floor near the back seat into the dash
Still to come:
Power button
Still to come:
Power button
-
rodw - Posts: 3195
- Joined: Tue, 19 Feb 2008 2:00 +0000
- Location: Brisbane, QLD
Re: Rod's new Rig
![]() by ROLLUX on Mon, 15 Sep 2008 3:53 +0000
by ROLLUX on Mon, 15 Sep 2008 3:53 +0000
hehe it was only a suddgestion 
have you heard of deutch connectors we use them at work there water and dust proof i can send some ur way if u like but u would have to get a crimping tool for the pins and sockets
cheers
shane
have you heard of deutch connectors we use them at work there water and dust proof i can send some ur way if u like but u would have to get a crimping tool for the pins and sockets
cheers
shane
- ROLLUX
- Posts: 109
- Joined: Fri, 18 Apr 2008 1:00 +0000
- Location: mount isa, QLD
Re: Rod's new Rig
![]() by rodw on Mon, 15 Sep 2008 4:47 +0000
by rodw on Mon, 15 Sep 2008 4:47 +0000
No, have not heard of the deutch connectors, can you post a link? I'd be interested in looking at them, but will probably have this all soldered up in a day or so Well maybe in a month or so at current rate of progress.. 
-
rodw - Posts: 3195
- Joined: Tue, 19 Feb 2008 2:00 +0000
- Location: Brisbane, QLD
Re: Rod's new Rig
![]() by ROLLUX on Mon, 15 Sep 2008 7:49 +0000
by ROLLUX on Mon, 15 Sep 2008 7:49 +0000
http://www.deutschipd.com/Products/products.html
this is the company that actualy makes them. but caterpillar use there connectors for everything on there machines there for the company i work for (hastings deering) sells them off the shelf.
this is the company that actualy makes them. but caterpillar use there connectors for everything on there machines there for the company i work for (hastings deering) sells them off the shelf.
- ROLLUX
- Posts: 109
- Joined: Fri, 18 Apr 2008 1:00 +0000
- Location: mount isa, QLD
Who is online
Users browsing this forum: No registered users and 54 guests
![]()