Page 3 of 4

Re: Grunter's SR5 - Lift installed

PostPosted: Mon, 19 Jul 2010 12:51 +0000
by gruntre69
Max you are worth your weight in Cuban Cigars!
Thanks mate!

Order placed now...... Bring it on.....

Now I'll be able to stem the relentless assault on my bank account for a while!

Re: Grunter's SR5 - Lift installed

PostPosted: Tue, 15 Mar 2011 3:33 +0000
by gruntre69
No posts for a while but I've done heaps and will get some more photos up soon.

CB is in, no screws in Dash or any visible locations, just a small piece of timber bracing under the glove box. Wired to sub-fuse of Aux battery bus.
Image
Image

Re: Grunter's SR5 - Lift installed

PostPosted: Tue, 15 Mar 2011 5:02 +0000
by johnny5x
That clip for mounting the mic? how much? where from?

Re: Grunter's SR5 - Lift installed

PostPosted: Tue, 15 Mar 2011 5:11 +0000
by gruntre69

Re: Grunter's SR5 - Lift installed: Photos finally

PostPosted: Tue, 15 Mar 2011 7:24 +0000
by gruntre69
OK I haven't put the postings up as the work happened but here's the photo's and story of the progress. See my shed for details of parts used:
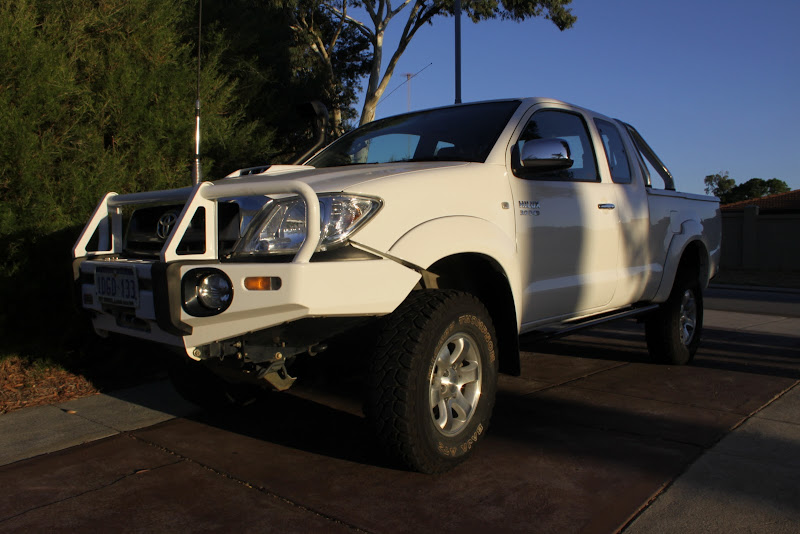
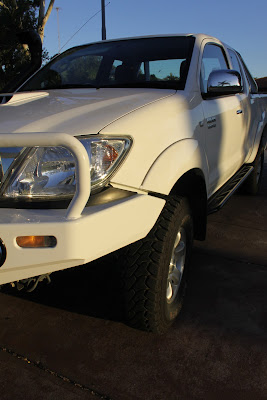
Wheels and tyres are on and I’m pretty happy with them although wheel balance was a challenge with the 3” lift. Very close to needing an adjustable UCA or offset UCA bushes.
Image
Image

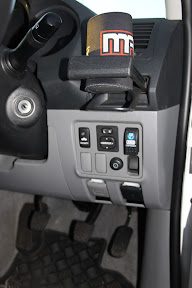
Dig_options GPS unit is in, has been replaced once under warranty but all is good now. You can see I pulled the GPS antenna up through the screen vent and mounted it on top of the dash. I came up with a unique location for the reversing camera by drilling a hole through the number plate and mounting panel.
Image
Image

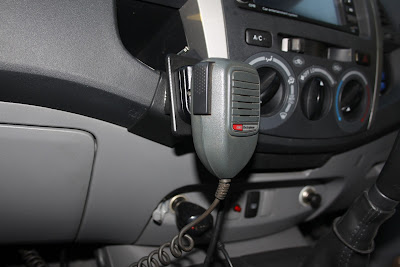
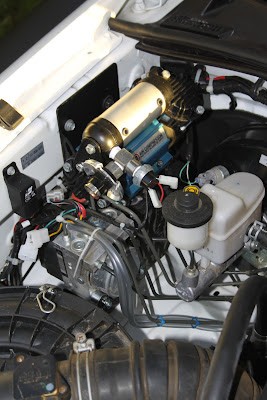
Dual battery system is in, with Redarc isolator and with an LED monitor/button which enables soliniod override for jump starting and possibly winching. I’ve also rewired the power feed to the Dig_options unit to run from Aux battery along with the 2 accessory outlets on the dash.
Image
Image

ARB on board air is in, switch is on driver side switch panel along with the winch earthing/kill switch. Still room for 2 x locker switches if I can ever spend that much on my lux.
Image
Image

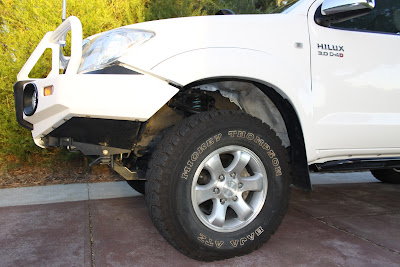
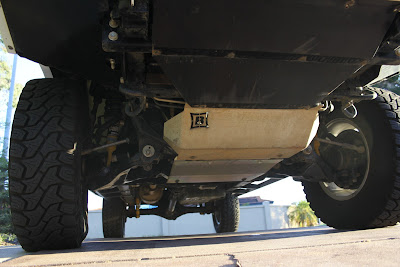
Buds customs have joined the party with protection equipment all round, including Front under body guard, engine skid plate and rock sliders.
Image
Image
Image

I got the Diesel fuel warning buzzer in on the weekend which was a dead easy job. I also got my diff breathers in and just have to drill my holes into the airbox to terminate them to finish that job, I’ll add photos for that when done.
I’ll get around to installing my low range 2x4 switch in the next few days. That’s it for now……

Re: Grunter's SR5 - Lift installed: photos up

PostPosted: Wed, 27 Apr 2011 7:08 +0000
by LJV13B
Hiya Grunter how's it going, Im loving your build buddy! I have a white SR5 too and am keen on the same white bullbar, Im just curious if you get any/much reflection from the headlights off it?

Cheers,
LJV

Re: Grunter's SR5 - Lift installed: photos up

PostPosted: Wed, 27 Apr 2011 7:40 +0000
by shanno
Lookin good champ!

Re: Grunter's SR5 - Lift installed: photos up

PostPosted: Wed, 27 Apr 2011 7:46 +0000
by helmut79
Looking good mate, nicely setup rig

Re: Grunter's SR5 - Lift installed: photos up

PostPosted: Wed, 27 Apr 2011 8:07 +0000
by gruntre69
Thanks for the encouraging posts lads! Just got back from a nice 5 days away in the lux, she is performing admirably and I'm very happy with her. I'm actually contemplating changing over to a Canopy.... I have a trailer for the dirt bike and can easily hitch that up when going riding. The canopy will give heaps better loading capacity and rofrack options as well.

LJV13B wrote:Hiya Grunter how's it going, Im loving your build buddy! I have a white SR5 too and am keen on the same white bullbar, Im just curious if you get any/much reflection from the headlights off it?

Cheers,
LJV

I initially thought I might have to black it out but I've done plenty of night miles in it and frankly the bar reflection isn't a problem for me. I'd say go for it!

Re: Grunter's SR5 - Lift installed: photos up

PostPosted: Thu, 28 Apr 2011 3:21 +0000
by LJV13B
Thanks Grunter:) Yeah I like the white bar, I used to have a black one on my old solid axle hilux and Im wondering how the paint will fare after some bush bashing. I just am worried the white bar may look pretty scrappy once it gets all scratched up and perhaps a little rusty. Hmmm decisions....

I trailride too which is why I own a ute, if I had a trailer I'd go the canopy as they're pretty darn good for a fridge and draws. Would make everything really easy and tidy.

Re: Grunter's SR5 - Lift installed: photos up

PostPosted: Thu, 28 Apr 2011 5:09 +0000
by gruntre69
Yes the bush bashing is a bit of a problem for the white, I did some a few weeks back and took a fair few bits of paint off. It won't rust because they paint the white over the top of the powder coat but the black powder coat now shows through..... Shrubs won't really touch the powder coating but it does take the whit 2 pack off.....

Re: Grunter's SR5 - Lift installed: photos up

PostPosted: Thu, 28 Apr 2011 6:09 +0000
by KTM525EXC
looking very schmick mate, excelent installs of all your mods, very tidy. :D

cheers Troy

Re: Grunter's SR5 - Lift installed: photos up

PostPosted: Thu, 28 Apr 2011 10:13 +0000
by gruntre69
Thanks Troy, long range tank and at least one locker and I'm much happier..... and poorer....

PS: yours is an awesome rig too mate!

Re: Grunter's SR5 - Lift installed: photos up

PostPosted: Tue, 03 Apr 2012 8:22 +0000
by gruntre69
OK, I've ordered the outback accessories 153l long range tank and am about to press the button on a Razorback canopy. I'm preping for the canning stock route for August.

I want to get some more caster back into my front end and there is an option to fit offset bushes ($290 delivered) into my UCAs of bite the bullet and order some camburg UCA from the states. I can get the UCA for US$379 and can get them here on my own Fedex account for probably around AU$90. http://www.wheelersoffroad.com/05upcamburgcotaco.htm
Not sure weather it's really worth the extra $200 is worth it or not..... If anybody wants to join in and we get 3 sets and split the freight it would be more attractive.......

Anybody who has a Razerback and wants to share comments and experiences, please do.

I'm also needing rear springs as the standard springs and blocks just aren't going to cut it. I'm thinking of running with Ultimate suspension for these and getting Brendon to tailor a set for my needs. I'd love to go the Sax ones but they are double the price and I cannot justify that....

Re: Grunter's SR5 - Canning prep - build stage 3

PostPosted: Tue, 03 Apr 2012 9:53 +0000
by Bushbound
gruntre69 wrote:I also got my diff breathers in and just have to drill my holes into the airbox to terminate them to finish that job,

Mate, are you going to terminate your diff breathers into the airfilter air box ?? If you are then this is a BAD idea because your doff breathers need to be at atmospheric pressure and the inside of your air box will have a varying pressure depending on the speed of the vehicle and engine revs. As you have a snorkel, there will be a positive pressure at highway speed, pressurizising the diffs and helping the oil get under the seal lip but at slow speed and high engine revs you will have a negative pressure in the airbox and diffs - this will help suck water and dust into your diffs. The pressure variant will be small and you will need a manometer to measure it but it will definately not help your diff breathers work.

Nice build and well done.
Geoff

Re: Grunter's SR5 - Canning prep - build stage 3

PostPosted: Tue, 03 Apr 2012 11:16 +0000
by gruntre69
Hey Geoff,

It is a good point mate and I had deffinately considered it. I have actually though that the pressure would be insignificant but I have sat on this for a while. My feeling is that the size of the duct and the snorkel inlet would not actually create enough pressure either way to have much effect against the oil seals in at the axles and drive shafts.

I wasn't realy going to go down the road of a nanometer even though this would be perfect to measure it. At the moment the tubes are terminated up on top of the wheel arch and this is probably good enough as I don't intend turning my $70K lux into a submarine any time soon.... 8-)

Thanks for the input mate!

Re: Grunter's SR5 - Canning prep - build stage 3

PostPosted: Wed, 04 Apr 2012 7:01 +0000
by Bushbound
Grunter, the other thing to consider if you terminate your diff breathers into the air box is that you stand the chance to make yourself a venturi pump that MAY suck the oil out of the diff - unlikely but possible.
To make the seals work best on your diffs, you want them at atmospheric pressure so terminating them on top of the guard is where I have mine and seems a good spot.
What sort of breathers did you use ?? I see some people use the white pneumatic mufflers but they do not breathe once they are wet (try them) so I used sintered bronze breathers and checked them when wet to ensure they still breathe.
You must also run the hose from your diffs so that it always runs uphill, if there is a dip in the hose it will eventually fill up with moisture - oil or water - and block the breather from working, wont need much to completely bock it. I blow mine out with compressed air a couple of times per year.
gruntre69 wrote:I don't intend turning my $70K lux into a submarine any time soon
Neither did I but I managed to slip into a big deep hole the first trip to the bush in my Hilux, so be prepared.

Have you fitted your LR fuel tank yet ?? I fitted the same tank earlier this year and love the range it gives me but a bit unhappy about how low it sits and managed to bash the front of it in on its first run to the bush. I had a bit of a drama with the breather leaking fuel when full as my driveway is quite steep + I didn't like the open hose as supplied, so I made a breather with sintered bronze insert that mounts up on the head board of the tray - perfect.
Geoff

Re: Grunter's SR5 - Canning prep - build stage 3

PostPosted: Wed, 04 Apr 2012 7:32 +0000
by packeteer
loving the build. I'm planning on a similar setup

Re: Grunter's SR5 - Canning prep - build stage 3

PostPosted: Sat, 14 Apr 2012 8:35 +0000
by gruntre69
Ok it's decision time on the canopy. I had my heart set on the razorback but I have discovered another Thailand produced unit called Caddy.

Caddy
Fibreglass
100KG roof rack rating with HD rail incorporated (no poxy extra frame)
Large tilt out windows standard
No vinyl hood lining to tear
lined with 12mm foam and light carpet
built in light
Solid stainless hinges and fittings
Slam shut type rotary automotive type latches
No central locking
$850 less than Razorback
Image

Razorback
Also 100KG roof rating
Vinly hood lining which takes up lots of space and will easily tear
central locking
No tilt out window for extracab model
Slam shut type rotary automotive type latches
Steel
Very nice looking
$850 more than Caddy
Rear window demister
Image

I'm now edging towards the Caddy one but am yet to see it in person. The guy tells me that they are working on the central locking kit which will be a retrofit item. I don't think I want the lock $850 badly....

I also like the lift up side windows. I'm going to look at the Caddy next week and get something ordered.
What you you lads think?

Grunter's SR5 - Canning prep - build stage 3

PostPosted: Sat, 14 Apr 2012 10:28 +0000
by Qwerty
Considered a Flexiglass flexisport ? Wa based ... Love mine.