Page 12 of 14

Re: Rocket's Lux - Vibration Fixed

PostPosted: Mon, 12 Aug 2013 5:54 +0000
by Rocket55
Hi Gaza, these are pretty easy and straight forward to do, the hardest part is soldering the wire to the LED strip :?

I placed the door switch just behind the headlight next to the rubber bonnet stop

Image

I used these tek screws to screw the aluminium strip into place, I didn't used the rubber washer.

Image

and they came out like this

Image

Make sure you screw into the bracing of the bonnet. You can see the plastic clips that hold the insulation in place, just stick to that line in between them. when you press on the insulation it will be supported really well where the bracing is, press next to the bracing and the insulation will feel a bit loose and unsecured by comparison. I think trying to feed cable ties in/out of the insulation will be a PITA.

Re: Rocket's Lux - Vibration Fixed

PostPosted: Mon, 12 Aug 2013 6:34 +0000
by GazaShaggy
Ok thanks for the quick reply I'll hopefully get around to it not next weekend as I'm drving down to Rainbow via the Wyperfield so hopfully the following weekend.

Re: Rocket's Lux - Vibration Fixed

PostPosted: Fri, 06 Sep 2013 4:54 +0000
by dc3rar
What was the actual issue with tail shaft as I have the very same issue?

Re: Rocket's Lux - Vibration Fixed

PostPosted: Fri, 06 Sep 2013 10:51 +0000
by Rocket55
Yeah, as I said the uni joint was buggered. Replaced both uni's on the front shaft and all good.

Re: Rocket's Lux - Vibration Fixed

PostPosted: Fri, 06 Sep 2013 10:56 +0000
by Quinny34
Rocket55 wrote:Yeah, as I said the uni joint was buggered. Replaced both uni's on the front shaft and all good.


That was one of Kylie's proposed modifications for ride comfort wasn't it?

Re: Rocket's Lux - Vibration Fixed

PostPosted: Fri, 06 Sep 2013 3:05 +0000
by Rocket55
:lol: :lol: he rang me about 5 times asking for my buggered uni's, something about endless vibrations through the seat......

Re: Rocket's Lux - Vibration Fixed

PostPosted: Fri, 06 Sep 2013 4:06 +0000
by MADDOG
Rocket55 wrote:Yeah, as I said the uni joint was buggered. Replaced both uni's on the front shaft and all good.

I prefer the real head turner approach and wait until the uni joints totally give way and the shaft drops out on the highway while I'm towing my trailer up a hill. Everyone loves sparks and loud noises. :roll: :? :D

Re: Rocket's Lux - Vibration Fixed

PostPosted: Fri, 06 Sep 2013 4:32 +0000
by Rocket55
Whilst impressive at the time, I hate walking back along the road picking up parts, been there done that with a brake caliper that came loose and the parted the rim neatly in half...... That was on a V8 dunnydoor. I supose shouldn't have expected anything less ;)

Re: Rocket's Lux - Vibration Fixed

PostPosted: Thu, 19 Sep 2013 5:52 +0000
by Thomo55
Hey rocket, I like all your little tricks and have been doing some similar things but have just hit a snag running some wires around the cab... How do you remove the door sill kick panels?? :shock: feel really stupid but don't want to break it by just pulling!!!
Help appreciated :D

Re: Rocket's Lux - Vibration Fixed

PostPosted: Thu, 19 Sep 2013 7:57 +0000
by 10 luxxxx
Just pull it up mate it's just clipped on start and one end and work your way along.

Re: Rocket's Lux - Vibration Fixed

PostPosted: Mon, 28 Oct 2013 1:56 +0000
by robert.campbell5
Nice build mate. Just read through it all. I've pinched your wiring diagram for your reverse lights. I've put a 6" LED bar on the back of mine but just have it hooked up to an on/off switch. I was happy with it at first but it quickly became annoying when I had to change into 1st and flick the switch before taking off.

Re: Rocket's Lux - Vibration Fixed

PostPosted: Mon, 28 Oct 2013 3:29 +0000
by Rocket55
:lol: :lol: thanks Robert, I'm pretty happy with it. I hate having to remember to turn things on and off which is why I have automated as much as possible. You know what they say "lazyness is only lazyness when it's well carried out!" ;)

Re: Rocket's Lux - Reversing Lights

PostPosted: Mon, 11 Nov 2013 7:28 +0000
by Fedorgnp
Rocket55 wrote:Got board on Sat arvo and needed a bit of therapy, so I decided to install the 2 LED reversing/work lights I picked up from Glen at 4wd supplies off this forum. I used 2 of the 20W lights, so my expectations were high. 8-) I wanted the lights up high and switched so they come on automatically when reverse is selected, but can also be turned on manually as work lights if required, and just for kicks, turned off all together. After a bit of searching and thinking my plan was set.

Parts required:
- on/off/on switch
- standard relay
- lights of choice
- 3mm twin wire
- split conduit
- various terminals
- 10A fuse
- rubber gromet
- 25mm RHS

Pick up power from 2nd battery and run to switch, rip stero head unit out and pick up reverse camera switching wire and run to switch, come back from switch to relay. Run power to relay from 2nd battery, run output from relay under car along left hand side chassis rail, cross over to drivers side on rear cross member under the tub. Remove drivers side tail light assembly. Drill hole from tub into tail light assembly cavity and install rubber gromet (note: passenger side tail light cavity already full). Run wire up around rear window frame. Cut 25mm aluminium RHS to required length. Drill holes through RHS and top of canpoy and install lights. Drill holes for light cable to enter canopy. Connect lights to power supply inside canopy. Turn them on and admire.
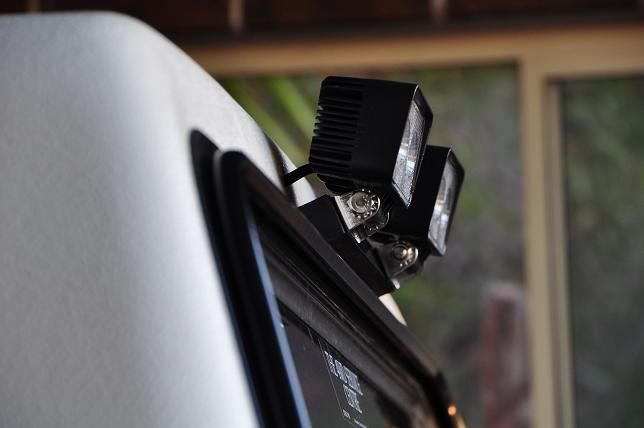
Image

Image

Image

The control pic.
Image

Let there be light :D
Image

Distances are:
- Palm trees 12m
- Gutter at bottom of driveway 17m
- White Hilux next door 25m
- Wheelie bins across the road 27m
- fence across the road 33m

The spread of light is amazing, not huge pentrating power for max distance but seriously there is just light everywhere, very happy with the result :D

Here is the wiring diagram I used, works a treat and really easy to do.
Image

While I was at it, I noticed a couple of times when changing tyres over to my awsome 33's (sorry, but they are truely wicked) that when getting the spare out from under the tub, I found it really difficult to see what I was doing and could never find that little bloody round thing to undo. In the day time I got too much glare from the sun and under the car was too dark, and in the night time, well it was just plain dark. So I put a little LED under there so I could see. Ran the wires in the same split conduit as the reversing lights, kill 2 birds with the 1 stone. Just put a simple toggle switch up front, too easy. Now I can see plain as day.
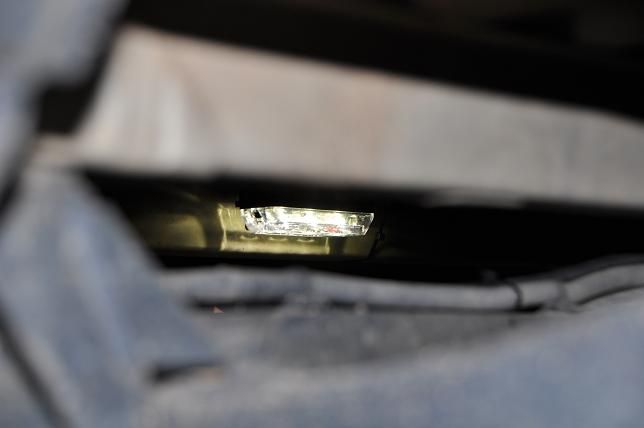
Image

Easy to see now :D
Image

While I was on a roll, a little while ago I put some DVD headrests in for the kids on the longer trips and I powered these up from the 2nd battery. I did this so they can watch movies or play games without the need to run the accessories on the car, problem is the headrests are all touch button and have covers on them, so an inadvertand adjustment of the headrest could turn them on, and under a cover and not running through the accessories could see these things turned on for days/weeks at a time, can't be good for them, so I ran a simple master switch to the power supply in the form of a basic toggle switch. Now simply power them up when needed, no chance of accedently turning them on.

This now meant I had to find space for 3 new switches. It was getting late by now, so I grabbed a piece of aluminium angle cut it to length installed the 3 switches and mounted it under the switch panel on the drivers side as a temporary measure. It turned out Ok, might leave it there I think. Not sure whether to paint it black or Hilux grey though?

Image

PS: There is just the right number of pedals in this shot :lol:

Image

Overall a good afternoons work.


Great write up. Makes my job easier as i am just about to do it now,

Re: Rocket's Lux - Just Cruis'in

PostPosted: Fri, 13 Dec 2013 10:21 +0000
by Rocket55
Small update to my lux.

I had Bailey Diesel Group (BDG) install a new set of injectors and fuel lines today. All I can say is WOW, what an improvement, quieter, smoother, faster, more responsive and a creamier exhaust note, no cold injector rattle and no more smoke due to leaky seals. Very happy and satisfied camper!! 8-) 8-) 8-)

Re: Rocket's Lux - New BDG Injectors

PostPosted: Fri, 13 Dec 2013 12:15 +0000
by Stu.wrf450
Rocket55 wrote:Small update to my lux.

I had Bailey Diesel Group (BDG) install a new set of injectors and fuel lines today. All I can say is WOW, what an improvement, quieter, smoother, faster, more responsive and a creamier exhaust note, no cold injector rattle and no more smoke due to leaky seals. Very happy and satisfied camper!! 8-) 8-) 8-)


I thought that would of been a big update? Good to see it has improved your truck and your happy just in time for the weekend.

Re: Rocket's Lux - New BDG Injectors

PostPosted: Fri, 13 Dec 2013 1:56 +0000
by pisso01
8-) 8-) 8-) 8-)

Re: Rocket's Lux - New BDG Injectors

PostPosted: Fri, 13 Dec 2013 1:57 +0000
by Skog07
Must go like a Rocket now, Rocket! :lol:

Re: Rocket's Lux - New BDG Injectors

PostPosted: Fri, 13 Dec 2013 2:47 +0000
by Rocket55
It's all in the Sprint Booster Skog :lol: :lol: :lol:

Re: Rocket's Lux - New BDG Injectors

PostPosted: Fri, 13 Dec 2013 2:53 +0000
by Alby
:lol: :lol: :lol: :lol: :lol:

Nice work Rod, you got alot of K's out of the original injectors, mine didn't last that long

Re: Rocket's Lux - SOLD

PostPosted: Thu, 19 Dec 2013 6:10 +0000
by Rocket55
Well all good, no great things must come to an end, it's with a heavy heart that I have to post that I just sold my Hilux :( :( :( and watched it drive out my driveway for the last time.

Image

Unfortunately my Hilux is getting turned into landscaping of my back yard :? Although I am confident the guy who bought it will continue to love it and enjoy it for what it was built for :D

I'm really going to miss this car, of all the flash cars I've had over the years, I think I will miss this one the most. :( :(