STEINBAUER INSTALL INSTRUCTIONS.
I knocked this out last night for a fella on here and decided to post it. Feel free to add anything you see fit.
FIRSTLY DISCONNECT BATTERY.

.
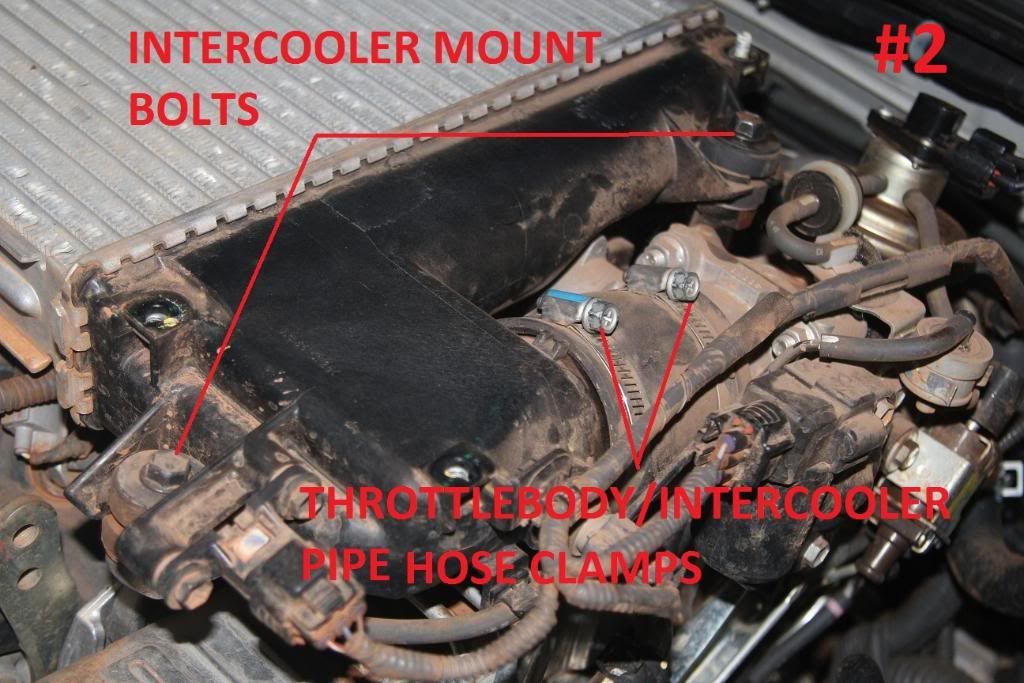
1 AND 2. UNDO THE INTERCOOLER MOUNTS AND ALSO THE THROTTLE BODY PIPE HOSE CLAMPS, JUST LOOSEN DONT REMOVE THE CLAMPS SO YOU CAN SWIVEL THE INTERCOOLER UP AS SEEN IN PIC 4
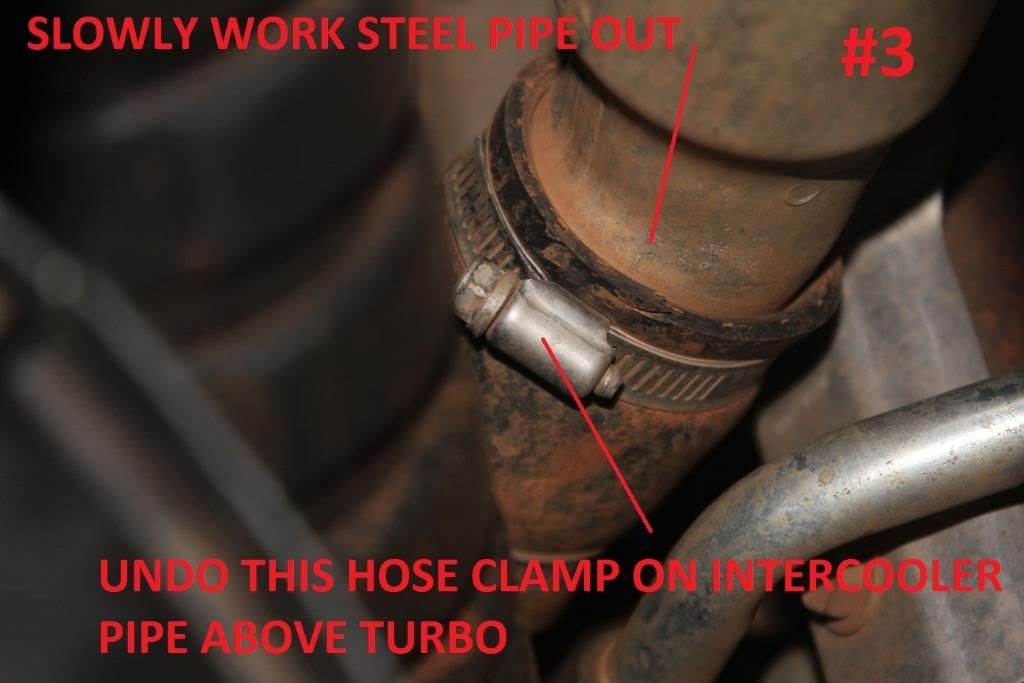
3. UNDO THE HOSE CLAMP AND SLIDE IT DOWN THE RUBBER HOSE. BE CAREFUL NOT TO DROP DIRT AND STUFF DOWN THE PIPE, I WASHED MY ENGINE WITH A HOSE THE NIGHT BEFORE TO WASH OFF LOOSE DUST AND MUD. OR ALTERNATIVELY AN AIR GUN. WORK THE STEEL INTERCOOLER PIPE OUT OF THE RUBBER PIPE A BIT OF FORCE IS NEEDED.
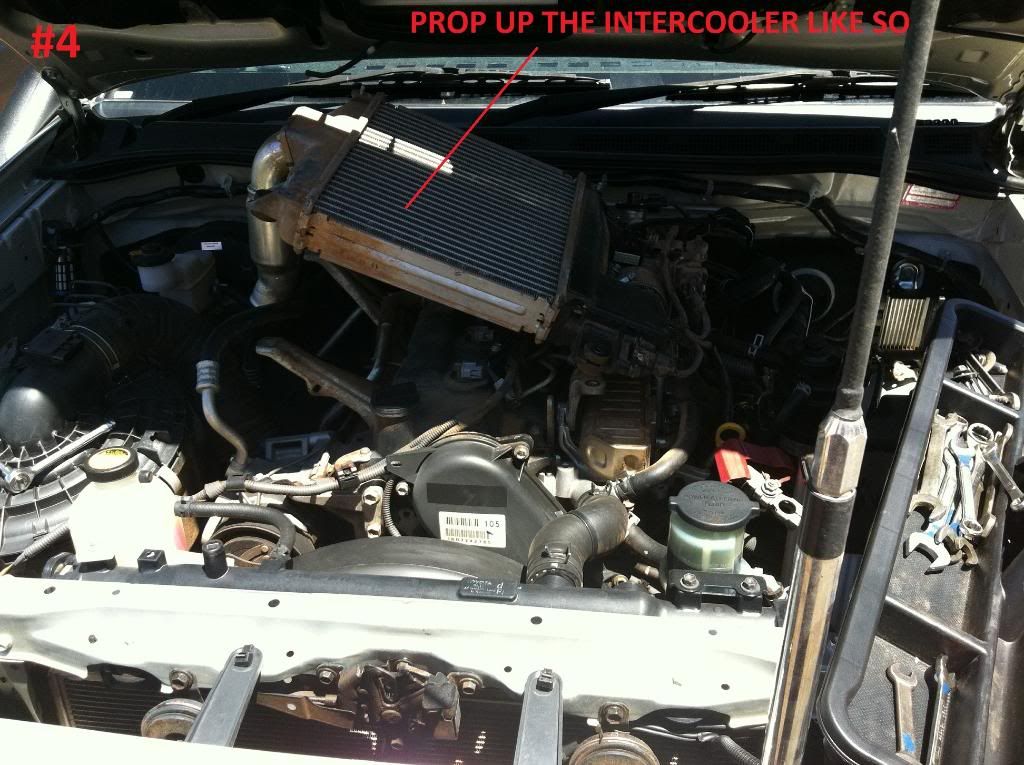
4. PROP THE INTERCOOLER UP OR WIRE IT TO THE UNDERSIDE OF THE BONNET
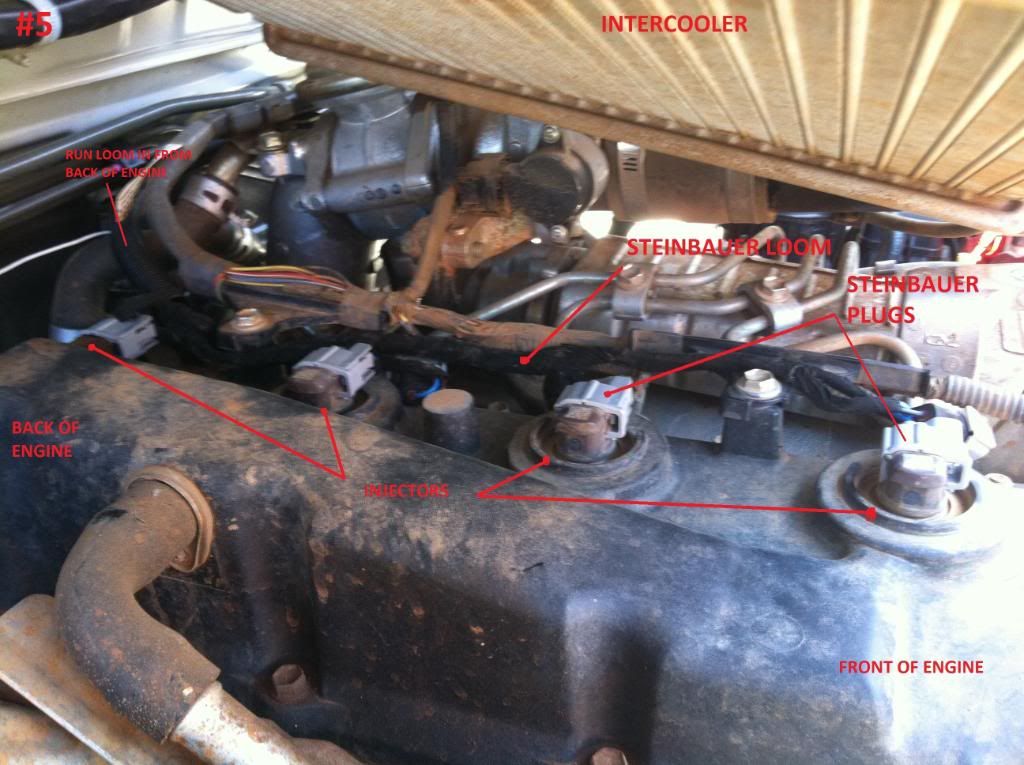
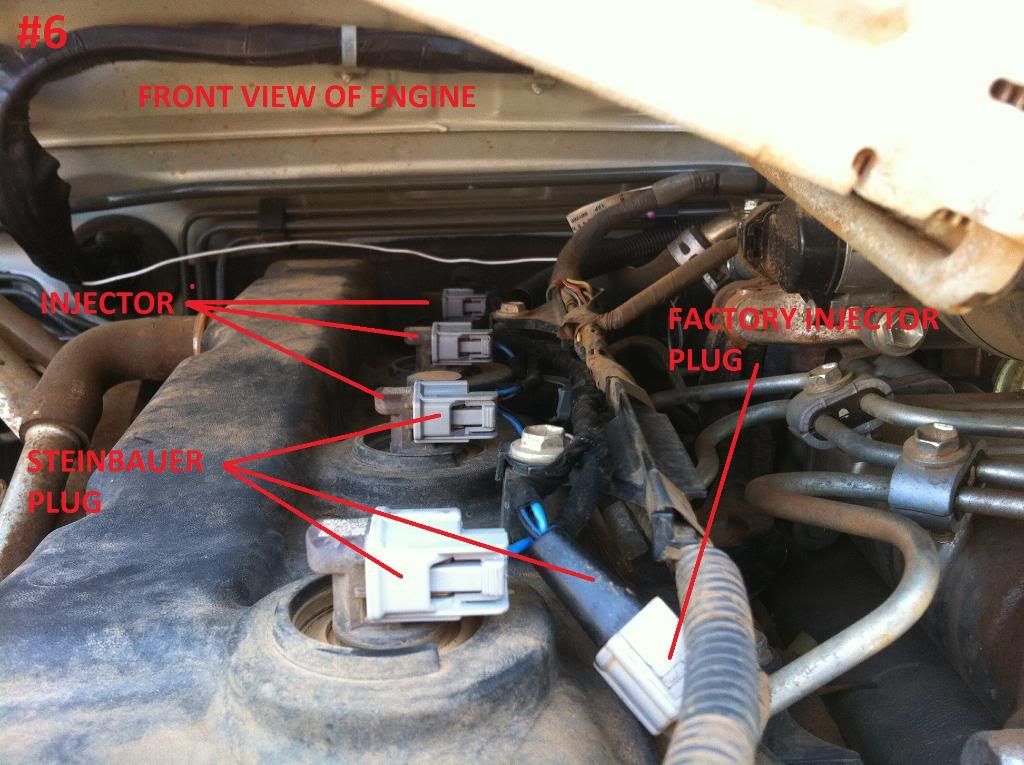
5 AND 6. RUN THE STEINBAUER INJECTOR LOOM FROM BACK TO FRONT OF THE ENGINE, CAREFULLY UNPLUG THE INJECTORS AND PLUG THE STEINBAUER LOOM IN BETWEEN THE INJECTOR AND FACTORY INJECTOR PLUG. START WITH THE VERY END OF THE STEINBAUER INJECTOR LOOM AND PLUG IT INTO THE INJECTOR CLOSEST TO FRONT OF ENGINE.
JUST MAKE SURE YOU ATTACH THEM IN SEQUENCE. ZIP TIE THE LOOM TO THE FACTORY LOOM AND ENSURE ITS NEAT AND NOT GOING TO HIT THE INTERCOOLER WHEN RE-ATTACHED. RE-INSTALL THE INTERCOOLER AND DO UP ALL 3 HOSE CLAMPS FIRMLY BUT DONT CRUSH THE PLASTIC THROTTLE BODY.

7. RUN THE STEINBAUER WHITE REFERENCE WIRE THROUGH THE FIREWALL BUNG, ITS A REAL BASTARD TO DO SO I'LL LEAVE THAT TO YOU TO FIGURE OUT. (TIP. ITS EASIER WITHOUT THE INTERCOOLER PLASTIC COVER ON (BLACK))
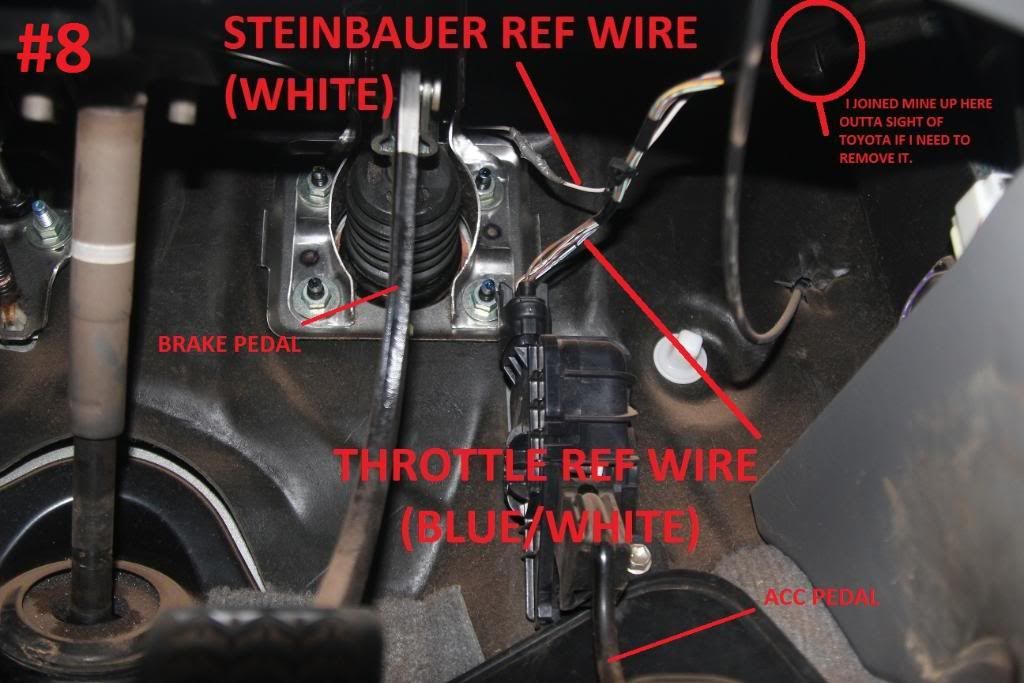
8. RUN THE STEINBAUER WHITE WIRE DOWN TO THE PEDAL, TIDY UP WIRING AS YOU GO. SOLDER OR SPLICE IT INTO THE PEDAL REFERENCE WIRE (BLUE/WHITE)
9. ATTACH THE RED 12V POWER WIRE TO BATTERY AND BLACK TO EARTH. LEAVE THE GREY AS ITS SWITCH WIRE.
10. MOUNT THE STEINBAUER MODULE TO GUARD WITH HEAVY DUTY DOUBLE SIDED TAPE. CHECK ALL INTERCOOLER BOLTS AND HOSE CLAMPS. RE MOUNT INTERCOOLER COVER. CHECK AND SECURE ALL WIRING WITH ZIP TIES OR WHATEVER. CONNECT BATTERY AGAIN AND START.
MAKE SURE YOU HAVE NO WARNING LIGHTS AND TAKE HER FOR A TEST DRIVE. YOU MAY FIND THE HILUX BLOWS SOME SOOT IF YOU GUN IT HARD. THIS IS NORMAL AND CAN BE BACKED OFF BUT THIS REQUIRES PULLING BACK OFF STEINBAUER MODULE AND ADJUSTING POTENTIOMETER.
FYI THATS MY GUN SECONDARY FILTER INSTALL I DID, MADE THE BRACKET OUT OF VC COMMODORE WAGON TANK STRAPS! HAHAHAHA
FIRSTLY DISCONNECT BATTERY.
.
1 AND 2. UNDO THE INTERCOOLER MOUNTS AND ALSO THE THROTTLE BODY PIPE HOSE CLAMPS, JUST LOOSEN DONT REMOVE THE CLAMPS SO YOU CAN SWIVEL THE INTERCOOLER UP AS SEEN IN PIC 4
3. UNDO THE HOSE CLAMP AND SLIDE IT DOWN THE RUBBER HOSE. BE CAREFUL NOT TO DROP DIRT AND STUFF DOWN THE PIPE, I WASHED MY ENGINE WITH A HOSE THE NIGHT BEFORE TO WASH OFF LOOSE DUST AND MUD. OR ALTERNATIVELY AN AIR GUN. WORK THE STEEL INTERCOOLER PIPE OUT OF THE RUBBER PIPE A BIT OF FORCE IS NEEDED.
4. PROP THE INTERCOOLER UP OR WIRE IT TO THE UNDERSIDE OF THE BONNET
5 AND 6. RUN THE STEINBAUER INJECTOR LOOM FROM BACK TO FRONT OF THE ENGINE, CAREFULLY UNPLUG THE INJECTORS AND PLUG THE STEINBAUER LOOM IN BETWEEN THE INJECTOR AND FACTORY INJECTOR PLUG. START WITH THE VERY END OF THE STEINBAUER INJECTOR LOOM AND PLUG IT INTO THE INJECTOR CLOSEST TO FRONT OF ENGINE.
JUST MAKE SURE YOU ATTACH THEM IN SEQUENCE. ZIP TIE THE LOOM TO THE FACTORY LOOM AND ENSURE ITS NEAT AND NOT GOING TO HIT THE INTERCOOLER WHEN RE-ATTACHED. RE-INSTALL THE INTERCOOLER AND DO UP ALL 3 HOSE CLAMPS FIRMLY BUT DONT CRUSH THE PLASTIC THROTTLE BODY.
7. RUN THE STEINBAUER WHITE REFERENCE WIRE THROUGH THE FIREWALL BUNG, ITS A REAL BASTARD TO DO SO I'LL LEAVE THAT TO YOU TO FIGURE OUT. (TIP. ITS EASIER WITHOUT THE INTERCOOLER PLASTIC COVER ON (BLACK))
8. RUN THE STEINBAUER WHITE WIRE DOWN TO THE PEDAL, TIDY UP WIRING AS YOU GO. SOLDER OR SPLICE IT INTO THE PEDAL REFERENCE WIRE (BLUE/WHITE)
9. ATTACH THE RED 12V POWER WIRE TO BATTERY AND BLACK TO EARTH. LEAVE THE GREY AS ITS SWITCH WIRE.
10. MOUNT THE STEINBAUER MODULE TO GUARD WITH HEAVY DUTY DOUBLE SIDED TAPE. CHECK ALL INTERCOOLER BOLTS AND HOSE CLAMPS. RE MOUNT INTERCOOLER COVER. CHECK AND SECURE ALL WIRING WITH ZIP TIES OR WHATEVER. CONNECT BATTERY AGAIN AND START.
MAKE SURE YOU HAVE NO WARNING LIGHTS AND TAKE HER FOR A TEST DRIVE. YOU MAY FIND THE HILUX BLOWS SOME SOOT IF YOU GUN IT HARD. THIS IS NORMAL AND CAN BE BACKED OFF BUT THIS REQUIRES PULLING BACK OFF STEINBAUER MODULE AND ADJUSTING POTENTIOMETER.
FYI THATS MY GUN SECONDARY FILTER INSTALL I DID, MADE THE BRACKET OUT OF VC COMMODORE WAGON TANK STRAPS! HAHAHAHA


