That dual antenns set up looks good. Does it have good reseption on the move?
Rich.
How To - DIG Options TP09X1 Unit Install Part 2 Camera Done!
Re: How To - DIG Options TP09X1 Unit Install Part 2 Camera Done!
![]() by Rich on Sat, 14 Aug 2010 10:01 +0000
by Rich on Sat, 14 Aug 2010 10:01 +0000
-

Rich - Posts: 986
- Joined: Sun, 07 Jan 2007 12:00 +0000
- Location: Gold Coast
Re: How To - DIG Options TP09X1 Unit Install Part 2 Camera Done!
![]() by johnny5x on Sat, 14 Aug 2010 8:23 +0000
by johnny5x on Sat, 14 Aug 2010 8:23 +0000
Rich wrote:That dual antenns set up looks good. Does it have good reseption on the move?
Rich.
Hey Rich,
In Canberra, not so great, elsewhere it may be better?
-

johnny5x - Posts: 310
- Joined: Sun, 31 Jan 2010 7:19 +0000
- Location: Canberra ACT
Re: How To - DIG Options TP09X1 Unit Install Part 2 Camera Done!
![]() by ormz on Sun, 22 Aug 2010 7:55 +0000
by ormz on Sun, 22 Aug 2010 7:55 +0000
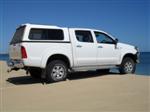
Just finished installing one of these in a friends Hilux. Great system, TV works well, no HD Channels though.. not sure if it is a HD tuner box or not? or if there are some settings i have to change??
Reverse camera was mounted just above the number plate to the RHS of the hole that you use to lower the spare wheel.
I connected the positive and negative camera wire to the reverse light wiring loom underneath the rear right hand side tail light. Took a while to find the right wires, the following info would have been helpful at the time and it may help others in future if they choose to do the install this way.
Positive Camera Wire connected to the Red with White Striped wire on the car
Negative Camera Wire connected to the White with Black Striped wire on the car
The car is a 2010 SR5. All in all was a neat clean install, looks stock and functions well.. just need to find the time now to change the menu & icon's around and install igo8 & Ozi explorer. The default menu's in my opinion are pretty dull and boring and make it look like a 'cheap' imported unit.
Would recommend this product to other people looking for an all in one TV, DVD, Navigation, Reverse Cam etc.. package. Took approx 4 1/2 hours for the complete install.
- ormz
- Posts: 4
- Joined: Sun, 07 Mar 2010 10:52 +0000
Re: How To - DIG Options TP09X1 Unit Install Part 2 Camera Done!
![]() by cory on Sun, 22 Aug 2010 8:52 +0000
by cory on Sun, 22 Aug 2010 8:52 +0000
Thanx for the info on wiring up the reverse camera ormz. I'm getting one in a month
Cheers....... Cory
-

cory - Posts: 60
- Joined: Sat, 29 May 2010 4:30 +0000
- Location: South Eastern Suburbs, Victoria
Re: How To - DIG Options TP09X1 Unit Install Part 2 Camera Done!
![]() by ormz on Sun, 22 Aug 2010 10:14 +0000
by ormz on Sun, 22 Aug 2010 10:14 +0000
no problem Cory, if you get stuck, feel free to pm me I may be able to be of assitance... good luck with the install!
P.S Thanks to previous posters aswell for photo's and comments, helped me alot with the installation.
P.S Thanks to previous posters aswell for photo's and comments, helped me alot with the installation.
- ormz
- Posts: 4
- Joined: Sun, 07 Mar 2010 10:52 +0000
Re: How To - DIG Options TP09X1 Unit Install Part 2 Camera Done!
![]() by Rich on Mon, 23 Aug 2010 1:54 +0000
by Rich on Mon, 23 Aug 2010 1:54 +0000
I Installed my A-Sure unit on the weekend. Physically, it looks the same as Steve9R's. Maybe Steve you have the earlier DIG options unit that use to be imported by them from A-sure...?
Mine is a recently released model has the integrated digital tuner. I can't seem to get reception for channel 10 and 7 here in Townsville, but all the other digital SD stations work ok. Funny how it picks up the HD channels, but won't display them....it must only be an SD tuner....
All the functions work fine and I am inpressed with it so far. I put all my music on a Micro SD card and just use that.
I got IGO version 8.3.2 I think, but the maps don't seem to display the streets very well, or maybe I just need to read the instructions and learn how to use it properly.
Now I need to Ozi explorer working, I don't know where to start. Before I bother steve again, is there a write up on here somewhere on getting Ozi explorer working from scratch (including the menu icon)?
Rich.
-
Rich - Posts: 986
- Joined: Sun, 07 Jan 2007 12:00 +0000
- Location: Gold Coast
Re: How To - DIG Options TP09X1 Unit Install Part 2 Camera Done!
![]() by asmo on Mon, 23 Aug 2010 7:59 +0000
by asmo on Mon, 23 Aug 2010 7:59 +0000
Hey Rich
Good work,
Trust me it never ends if you like to play...
To get Ozi have a read of the last few post pages
ozi website windows CE part of the website , downloads, then get the ARM version as a free download.
get it on your home PC then transfer it all to the CD card
put it in the unit and point the unit to the .exe file ( the same as the IGO you did )
The custon screen will require the program .. i got it from Matt at Dig options as this is the unit i have ..
-
asmo - Posts: 180
- Joined: Thu, 04 Feb 2010 11:36 +0000
- Location: South West WA
Re: How To - DIG Options TP09X1 Unit Install Part 2 Camera Done!
![]() by Rich on Tue, 24 Aug 2010 2:29 +0000
by Rich on Tue, 24 Aug 2010 2:29 +0000
I never had to do that for my IGO, or maybe that is why the maps seem to have only the main roads and no streets.
As you can tell, I have a lot to learn about this unit...I wish it had decent instructions!!!
As you can tell, I have a lot to learn about this unit...I wish it had decent instructions!!!
-
Rich - Posts: 986
- Joined: Sun, 07 Jan 2007 12:00 +0000
- Location: Gold Coast
Re: How To - DIG Options TP09X1 Unit Install Part 2 Camera Done!
![]() by Steve9R on Tue, 24 Aug 2010 3:20 +0000
by Steve9R on Tue, 24 Aug 2010 3:20 +0000
congrats on FINALLY buying one Rich! .. you've been talking about doing this for YEARS ! 
yeah 8.3.4 of iGO is the latest build.. i run R17 maps and 2009 basemap on mine.. no problems..
OZI is still the way to go for topo mapping.. as mentioned above, read back a few pages for the menus etc and maps etc etc etc..
see how you go and let us know if you have any problems..
Steve
yeah 8.3.4 of iGO is the latest build.. i run R17 maps and 2009 basemap on mine.. no problems..
OZI is still the way to go for topo mapping.. as mentioned above, read back a few pages for the menus etc and maps etc etc etc..
see how you go and let us know if you have any problems..
Steve
-

Steve9R - Valued Contributor
- Posts: 5248
- Joined: Wed, 11 Apr 2007 1:00 +0000
- Location: Melbourne, VIC
Re: How To - DIG Options TP09X1 Unit Install Part 2 Camera Done!
![]() by ormz on Tue, 24 Aug 2010 4:55 +0000
by ormz on Tue, 24 Aug 2010 4:55 +0000
Just wondering if anyone can help.. i've just opened the SD Card on my computer.
The only folder i can see is PolNav6 and one file named EncFiltLog.menc
Is there meant to be a Desktop folder or do i have to create one to start editing the icons and backgrounds etc.. as mentioned by Luxative on Pg. 23..
The only folder i can see is PolNav6 and one file named EncFiltLog.menc
Is there meant to be a Desktop folder or do i have to create one to start editing the icons and backgrounds etc.. as mentioned by Luxative on Pg. 23..
- ormz
- Posts: 4
- Joined: Sun, 07 Mar 2010 10:52 +0000
Re: How To - DIG Options TP09X1 Unit Install Part 2 Camera Done!
![]() by OFFTRAK on Tue, 24 Aug 2010 5:41 +0000
by OFFTRAK on Tue, 24 Aug 2010 5:41 +0000
Ormz, you'll need to create the Desktop folder.
If you download (if it still works) the files I uploaded to RapidShare (link in my post on Pg.23) it will show you the directory structure, along with the majority of the files you require for the actual menu. Back Up your MiniSD Card before copying anything onto it, just in case something goes wrong.
If you download (if it still works) the files I uploaded to RapidShare (link in my post on Pg.23) it will show you the directory structure, along with the majority of the files you require for the actual menu. Back Up your MiniSD Card before copying anything onto it, just in case something goes wrong.
-

OFFTRAK - Posts: 493
- Joined: Sun, 04 Jul 2010 7:01 +0000
- Location: Kalgoorlie, WA
Re: How To - DIG Options TP09X1 Unit Install Part 2 Camera Done!
![]() by Rich on Wed, 25 Aug 2010 9:45 +0000
by Rich on Wed, 25 Aug 2010 9:45 +0000
Hi Steve, Yeah I know. Now it's done!
I think I have IGO 8.3.2, so I am not sure how old that version is compared to 8.3.4. Anyone know?
Re Oziexplorer - I will read back and give it a go and see if I can do it.
Thanks guys,
Rich.
I think I have IGO 8.3.2, so I am not sure how old that version is compared to 8.3.4. Anyone know?
Re Oziexplorer - I will read back and give it a go and see if I can do it.
Thanks guys,
Rich.
-
Rich - Posts: 986
- Joined: Sun, 07 Jan 2007 12:00 +0000
- Location: Gold Coast
Re: How To - DIG Options TP09X1 Unit Install Part 2 Camera Done!
![]() by Rich on Wed, 25 Aug 2010 11:25 +0000
by Rich on Wed, 25 Aug 2010 11:25 +0000
I just read back over the last few pages about getting OZI explorer up and running and I only have one thing to say:
Holy Crap !@
Holy Crap !@
-
Rich - Posts: 986
- Joined: Sun, 07 Jan 2007 12:00 +0000
- Location: Gold Coast
Re: How To - DIG Options TP09X1 Unit Install Part 2 Camera Done!
![]() by OFFTRAK on Wed, 25 Aug 2010 1:32 +0000
by OFFTRAK on Wed, 25 Aug 2010 1:32 +0000
I was totally overwhelmed by it all not so long ago, Rich. It does get a bit easier once you start having a go. 
-
OFFTRAK - Posts: 493
- Joined: Sun, 04 Jul 2010 7:01 +0000
- Location: Kalgoorlie, WA
Re: How To - DIG Options TP09X1 Unit Install Part 2 Camera D
![]() by Rich on Wed, 01 Sep 2010 10:08 +0000
by Rich on Wed, 01 Sep 2010 10:08 +0000
Well, A pleasent surprise to start this job and find that Ozi was already installed for me (demo version).
Can anyone tell me how to find out what version of maps IGO is using (R16 or R17 whatever?), I think R17 is the latest version, correct?
I just want to check to see what I have got.
Rich.
Can anyone tell me how to find out what version of maps IGO is using (R16 or R17 whatever?), I think R17 is the latest version, correct?
I just want to check to see what I have got.
Rich.
-
Rich - Posts: 986
- Joined: Sun, 07 Jan 2007 12:00 +0000
- Location: Gold Coast
Re: How To - DIG Options TP09X1 Unit Install Part 2 Camera D
![]() by clae81 on Mon, 06 Sep 2010 3:51 +0000
by clae81 on Mon, 06 Sep 2010 3:51 +0000
Luxative wrote:Cool, thanks Al.
Firstly, as Al mentions, Back Up everything on your SDCard to your computer! Just in case, as you will be messing with files that may stop a navigation program from working correctly.
Here is a link to mine. http://rapidshare.com/files/410579716/NewHilux.rar.html
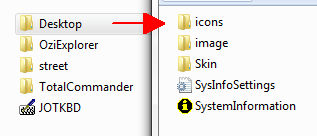
It contains my slightly modified version of Noodle's menu, the .bmp files, Total Commander and JotKbd (onscreen keyboard). If you wish to set it up like mine, you'll need to download OziExplorerCE (Direct Link) and extract it to the OziExplorer directory on the SDCard, as well as copying your 'street' directory over if you're using PolNav like I do. iGO8 users should be able to set up easily by changing the Command for the On Road Navigation to suit eg. Command = \StorageCard\iGO8\iGO8.exe .
A picture showing the directories that should be on your SDCard, with the Desktop sub-directory shown. The button icons you'll modify are in the icons directory.
Below is the actual menu file that controls the locations of the buttons and what they do when you press them. It is located at \Desktop\Skin\Main.ini
- Code: Select all
; ---------------------- Leave this part ------------------------------
GLOBALSETTINGS
ShowMessage = 0
QuitOnDoubleClick = no
X = 0
Y = 0
Width = 800
Height = 480
Arrange = No
BackgroundBitmap = ..\icons\background.bmp
StartUpAnimation = NoAnimation
ShutDownAnimation = NoAnimation
Accelerated = yes
TopMost = no
; ----------------------------------------------------------------------

; ------- This is the On Road Navigation Button ------------------------
; Mine is set up to run PolNav which is named street.exe in the street directory
BITMAPBUTTON
x = 60
y = 80
Command = \StorageCard\street\street.exe
BitmapNormal = ..\Icons\Street Logo 1.bmp
BitmapPushed = ..\Icons\Street Logo 1 over.bmp

; ------- This is the Off Road Navigation Button -----------------------
; DOwnload OziExplorer from the below link
; http://www.oziexplorer3.com/ozice/downloads/v2a/wince_core_runtime_arm.zip
; Extract it to a directory called OziExplorer on your SDCard
BITMAPBUTTON
x = 500
y = 65
Command = \StorageCard\OziExplorer\OziExplorerCE.exe
BitmapNormal = ..\Icons\Desert Logo 1.bmp
BitmapPushed = ..\Icons\Desert Logo 1 over.bmp

; ------- This is the Home Button on the bottom left of the screen -----
BITMAPBUTTON
x = 20
y = 395
BitmapNormal = ..\Icons\Home Button.bmp
BitmapPushed = ..\Icons\Home Button.bmp
QuitOnExecute = yes

; ------- This is the Windows button and gives you access to the WindowsCE Desktop
; Please be careful what files you modify here.
BITMAPBUTTON
x = 129
y = 395
BitmapNormal = ..\Icons\win.bmp
BitmapPushed = ..\Icons\win.bmp
Command = \explorer.exe

; ------- Total Commander (Disk) Button
; Once again, please be careful what you modify using this program. Back Up, Back Up!
; You'll need a keyboard to type filenames, so once you start TC double click JOTKBD. Instant keyboard
BITMAPBUTTON
x = 229
y = 395
BitmapNormal = ..\Icons\TC.bmp
BitmapPushed = ..\Icons\TC.bmp
Command = \StorageCard\TotalCommander\cecmd.exe
Once all the files are modified how you wish and you've copied it all onto your SDCard, whack it in your Dig_Options unit (writing side down and don't force it). After powering the unit on, change the Navigation Options so it points to the SystemInformation.exe file in the Desktop directory. Now your awesome new menu should be up and running, when you click on the navigation button on the main menu. We'll just cross our fingers here, but of course it will be working perfectly!
And here's what it looks like... This is with the buttons pressed.
Please note. I don't own the rights to any of the files or pictures, so many thanks to the people who have created them.
Good Luck.
Cheers
Randal

Hey, once you enter the windowsCE screen how do you exit out of it to get back to the menu screen. I cant get out of it unless i do a hard reset of the system. (ie evey time i press the navi button after iv been into the windows screen the windows screen pops up) Hope i make sence.
Clae.
-

clae81 - Posts: 40
- Joined: Sun, 28 Oct 2007 1:00 +0000
- Location: Alexandra Hills, QLD
Re: How To - DIG Options TP09X1 Unit Install Part 2 Camera D
![]() by OFFTRAK on Mon, 06 Sep 2010 6:11 +0000
by OFFTRAK on Mon, 06 Sep 2010 6:11 +0000
G'day Clae
If you can open Windows Explorer, go into the 'Desktop' folder and double click on SystemInformation.exe.
I haven't got my ute here to confirm this, but I'm pretty sure that's all I do.
If you can open Windows Explorer, go into the 'Desktop' folder and double click on SystemInformation.exe.
I haven't got my ute here to confirm this, but I'm pretty sure that's all I do.
-
OFFTRAK - Posts: 493
- Joined: Sun, 04 Jul 2010 7:01 +0000
- Location: Kalgoorlie, WA
Re: How To - DIG Options TP09X1 Unit Install Part 2 Camera D
![]() by Rich on Sat, 11 Sep 2010 8:51 +0000
by Rich on Sat, 11 Sep 2010 8:51 +0000
I am trying to back up my micro SD card and the IGO will not copy and paste, if there some trick to backing up the SD card?
Rich.
Rich.
-
Rich - Posts: 986
- Joined: Sun, 07 Jan 2007 12:00 +0000
- Location: Gold Coast
Re: How To - DIG Options TP09X1 Unit Install Part 2 Camera D
![]() by Steve9R on Sat, 11 Sep 2010 12:40 +0000
by Steve9R on Sat, 11 Sep 2010 12:40 +0000
Rich wrote:I am trying to back up my micro SD card and the IGO will not copy and paste, if there some trick to backing up the SD card?
Rich.
not really.. you should be able to access it as a normal drive and copy / paste delete etc to it..
Steve
-
Steve9R - Valued Contributor
- Posts: 5248
- Joined: Wed, 11 Apr 2007 1:00 +0000
- Location: Melbourne, VIC
Re: How To - DIG Options TP09X1 Unit Install Part 2 Camera D
![]() by Rich on Sun, 12 Sep 2010 7:11 +0000
by Rich on Sun, 12 Sep 2010 7:11 +0000
Mine will not do that.
Ozi and another folder called 2577 will, but iGO8 will not copy across.
Rich.
Ozi and another folder called 2577 will, but iGO8 will not copy across.
Rich.
-
Rich - Posts: 986
- Joined: Sun, 07 Jan 2007 12:00 +0000
- Location: Gold Coast
Who is online
Users browsing this forum: No registered users and 17 guests
![]()