How To - DIG Options TP09X1 Unit Install Part 2 Camera Done!

Re: How To - DIG Options TP09X1 Unit Install Part 2 Camera Done!

Postby gruntre69 on Thu, 29 Jul 2010 10:46 +0000

Well I got IGO 8.3 up and running with current AU maps including terrain and 3D buildings, traffic cameras etc. It is really good and blows away the Polnav. :!: I left the polnav on just in case and because it loads faster. I have designed a new nav screen so the you can choose between IGO, Polnav and OZI. I'm happy to share the files for this screen, If anybody wants a copy PM me.

I've also discovered that the upgrade I was sent from Mat at DO makes the core CE system a chinese version and that would be why OZI throws up chinese characters. Does anybody know if it's possible to switch the language of the Op system? I know it's not possible on full blow windows like Vista and 7 etc.

This is the last hiccup I have........
Cheers

Grunter
http://gatorz.com.au/
If it's in the way...... use it for traction!
My build thread
User avatar
gruntre69
 
Posts: 384
Joined: Mon, 18 Jan 2010 2:25 +0000
Location: Perth WA


Re: How To - DIG Options TP09X1 Unit Install Part 2 Camera Done!

Postby Steve9R on Thu, 29 Jul 2010 11:56 +0000

best to shoot him a quick email and ask him for the patch..

Steve
User avatar
Steve9R
Valued Contributor
 
Posts: 5248
Joined: Wed, 11 Apr 2007 1:00 +0000
Location: Melbourne, VIC

Re: How To - DIG Options TP09X1 Unit Install Part 2 Camera Done!

Postby harvester on Sun, 01 Aug 2010 7:20 +0000

Luxative wrote:Just writing to thank everyone for their input on this thread, as well as the Prado Point one... It has helped me a great deal with installing my new TP09X1 with reverse camera (being the hardest part of the whole thing).

I played with the screen that Matt from DIG Options sends out with the units. Let me know what you think. :-)

What it looks like normally...
Image
And when you press the buttons...
Image

Love this unit! I was considering taking the route that Rod and Quinny took with a CarPC, but this system does everything I want. I do have the radio reception issues that have been reported, but that doesn't bother me much as I usually use a USB stick with music stored. Bluetooth works great with my HTC HD2. PolNav works well, but I'm still sorting out the OziExplorer side of things.

Cheers
Randal


Awesome mate that looks great. I am planning on getting one of these units in the near future so am getting everything sorted before it arrives, can I get a copy of that menu off you? Am I correct in assuming you put it onto your memory card and on the unit go into Options> Navipath and select the menu?

I was planning on using iGo8 and Oziexplorer for CE, are there any specific instructions to get it installed and working properly? I have kind of pieced it together form all of the posts but not sure if there is a full tutorial anywhere.

Cheers!
harvester
 
Posts: 8
Joined: Tue, 27 Jul 2010 1:09 +0000

Re: How To - DIG Options TP09X1 Unit Install Part 2 Camera Done!

Postby OFFTRAK on Sun, 01 Aug 2010 1:32 +0000

G'day Harvester

If you get one of the Dig_Options TP09X1s then the menu should already be installed on the MicroSD card. From there you will just modify it to suit the programs you wish to run. As the menu was specifically written for the Dig_Options unit, I'm not sure if it can be shared publicly. Maybe Noodle can advise if we can make our modified versions available on the forum?

Either way, happy to help you where possible. The pictures are in .bmp format, so you can change them to whatever you like with Microsoft Paint, PhotoShop etc.

Cheers
Randal
User avatar
OFFTRAK
 
Posts: 493
Joined: Sun, 04 Jul 2010 7:01 +0000
Location: Kalgoorlie, WA

Re: How To - DIG Options TP09X1 Unit Install Part 2 Camera Done!

Postby harvester on Sun, 01 Aug 2010 2:21 +0000

Ahh righto mate thanks for that, makes it nice and easy! Just need to get hold of Matt so I can see about price and ordering one. Have emailed him so just waiting for a reply.
harvester
 
Posts: 8
Joined: Tue, 27 Jul 2010 1:09 +0000

Re: How To - DIG Options TP09X1 Unit Install Part 2 Camera Done!

Postby noodle on Mon, 02 Aug 2010 8:00 +0000

Luxative wrote:G'day Harvester

If you get one of the Dig_Options TP09X1s then the menu should already be installed on the MicroSD card. From there you will just modify it to suit the programs you wish to run. As the menu was specifically written for the Dig_Options unit, I'm not sure if it can be shared publicly. Maybe Noodle can advise if we can make our modified versions available on the forum?

Either way, happy to help you where possible. The pictures are in .bmp format, so you can change them to whatever you like with Microsoft Paint, PhotoShop etc.

Cheers
Randal


Yeah mate, I don't care if you modify the program...I really like the one that Luxative made up :D
The only bonus from using the supplied program is the screen is setup for it, and the icons are approx the right size.

I'd save a copy of it first, that way if you do make a mess of it (I made heaps :lol: ) then the base is there to start again.

cheers

Al
Al
07 D4D D/Cab Manual

"The early bird may get the worm, but the second mouse gets the cheese."
User avatar
noodle
 
Posts: 563
Joined: Tue, 23 Dec 2008 7:49 +0000
Location: Serpentine, WA

Re: How To - DIG Options TP09X1 Unit Install Part 2 Camera Done!

Postby OFFTRAK on Mon, 02 Aug 2010 11:39 +0000

Cool, thanks Al. :)

Firstly, as Al mentions, Back Up everything on your SDCard to your computer! Just in case, as you will be messing with files that may stop a navigation program from working correctly.

Here is a link to mine. http://rapidshare.com/files/410579716/NewHilux.rar.html

It contains my slightly modified version of Noodle's menu, the .bmp files, Total Commander and JotKbd (onscreen keyboard). If you wish to set it up like mine, you'll need to download OziExplorerCE (Direct Link) and extract it to the OziExplorer directory on the SDCard, as well as copying your 'street' directory over if you're using PolNav like I do. iGO8 users should be able to set up easily by changing the Command for the On Road Navigation to suit eg. Command = \StorageCard\iGO8\iGO8.exe .

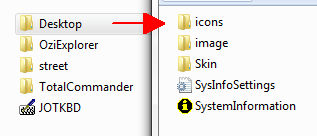
A picture showing the directories that should be on your SDCard, with the Desktop sub-directory shown. The button icons you'll modify are in the icons directory.

Image

Below is the actual menu file that controls the locations of the buttons and what they do when you press them. It is located at \Desktop\Skin\Main.ini

Code: Select all
; ---------------------- Leave this part ------------------------------
GLOBALSETTINGS
ShowMessage = 0
QuitOnDoubleClick = no
X = 0
Y = 0
Width = 800
Height = 480
Arrange = No
BackgroundBitmap = ..\icons\background.bmp
StartUpAnimation = NoAnimation
ShutDownAnimation = NoAnimation
Accelerated = yes
TopMost = no
; ----------------------------------------------------------------------

; ------- This is the On Road Navigation Button ------------------------
; Mine is set up to run PolNav which is named street.exe in the street directory
BITMAPBUTTON
x = 60
y = 80
Command = \StorageCard\street\street.exe
BitmapNormal = ..\Icons\Street Logo 1.bmp
BitmapPushed = ..\Icons\Street Logo 1 over.bmp

; ------- This is the Off Road Navigation Button -----------------------
; DOwnload OziExplorer from the below link
; http://www.oziexplorer3.com/ozice/downloads/v2a/wince_core_runtime_arm.zip
; Extract it to a directory called OziExplorer on your SDCard
BITMAPBUTTON
x = 500
y = 65
Command = \StorageCard\OziExplorer\OziExplorerCE.exe
BitmapNormal = ..\Icons\Desert Logo 1.bmp
BitmapPushed = ..\Icons\Desert Logo 1 over.bmp

; ------- This is the Home Button on the bottom left of the screen -----
BITMAPBUTTON
x = 20
y = 395
BitmapNormal = ..\Icons\Home Button.bmp
BitmapPushed = ..\Icons\Home Button.bmp
QuitOnExecute = yes

; ------- This is the Windows button and gives you access to the WindowsCE Desktop
; Please be careful what files you modify here.
BITMAPBUTTON
x = 129
y = 395
BitmapNormal = ..\Icons\win.bmp
BitmapPushed = ..\Icons\win.bmp
Command = \explorer.exe

; ------- Total Commander (Disk) Button
; Once again, please be careful what you modify using this program. Back Up, Back Up!
; You'll need a keyboard to type filenames, so once you start TC double click JOTKBD. Instant keyboard
BITMAPBUTTON
x = 229
y = 395
BitmapNormal = ..\Icons\TC.bmp
BitmapPushed = ..\Icons\TC.bmp
Command = \StorageCard\TotalCommander\cecmd.exe


Once all the files are modified how you wish and you've copied it all onto your SDCard, whack it in your Dig_Options unit (writing side down and don't force it). After powering the unit on, change the Navigation Options so it points to the SystemInformation.exe file in the Desktop directory. Now your awesome new menu should be up and running, when you click on the navigation button on the main menu. We'll just cross our fingers here, but of course it will be working perfectly!

And here's what it looks like... This is with the buttons pressed.

Image

Please note. I don't own the rights to any of the files or pictures, so many thanks to the people who have created them.

Good Luck.

Cheers
Randal
User avatar
OFFTRAK
 
Posts: 493
Joined: Sun, 04 Jul 2010 7:01 +0000
Location: Kalgoorlie, WA

Re: How To - DIG Options TP09X1 Unit Install Part 2 Camera Done!

Postby hayzie on Wed, 04 Aug 2010 9:51 +0000

Just brought one of these head units. Can't wait to hoot it up this weekend.
hayzie
 
Posts: 24
Joined: Wed, 28 Jul 2010 12:21 +0000

Re: How To - DIG Options TP09X1 Unit Install Part 2 Camera Done!

Postby darmo on Thu, 05 Aug 2010 1:03 +0000

Hi Guys,
Just went to the oziexplorer web site and had a look around. So what are the chance of using the GPS in an iphone while driving? Has anyone tried this?

I might email oziexplorer and see what there view is on this too.

Just thought I'd through it out there.

Cheers, Darmo
darmo
 
Posts: 59
Joined: Thu, 19 Nov 2009 9:25 +0000

Re: How To - DIG Options TP09X1 Unit Install Part 2 Camera Done!

Postby gruntre69 on Thu, 05 Aug 2010 3:31 +0000

I have a working version of IGO8.3 on my HTC smartphone (TytnII)
Cheers

Grunter
http://gatorz.com.au/
If it's in the way...... use it for traction!
My build thread
User avatar
gruntre69
 
Posts: 384
Joined: Mon, 18 Jan 2010 2:25 +0000
Location: Perth WA

Re: How To - DIG Options TP09X1 Unit Install Part 2 Camera Done!

Postby Steve9R on Fri, 06 Aug 2010 6:57 +0000

gruntre69 wrote:I have a working version of IGO8.3 on my HTC smartphone (TytnII)


ditto..
User avatar
Steve9R
Valued Contributor
 
Posts: 5248
Joined: Wed, 11 Apr 2007 1:00 +0000
Location: Melbourne, VIC

Re: How To - DIG Options TP09X1 Unit Install Part 2 Camera Done!

Postby harvester on Sun, 08 Aug 2010 12:42 +0000

Luxative wrote:Cool, thanks Al. :)


Good Luck.

Cheers
Randal


Thanks very much mate, that is a great help! Cant wait to set it up, thanks again.
harvester
 
Posts: 8
Joined: Tue, 27 Jul 2010 1:09 +0000

Re: How To - DIG Options TP09X1 Unit Install Part 2 Camera Done!

Postby johnny5x on Sun, 08 Aug 2010 6:50 +0000

I used IGO8 on my weekend 4wd trip and i must recommend it. It knew about a lot of fire trails that was quite surprising
User avatar
johnny5x
 
Posts: 310
Joined: Sun, 31 Jan 2010 7:19 +0000
Location: Canberra ACT

Re: How To - DIG Options TP09X1 Unit Install Part 2 Camera Done!

Postby hayzie on Mon, 09 Aug 2010 7:08 +0000

Hey guys

I brought one of these beauties last week and installed it no problem :D :D :D
from what i read through out this thread is that you can put OziExplorer on it so you can view your trip (what you've done how much to go/ way points ect...) but how do i do this?

Do i have to install windows CE? boot CD??
Then install OziExplore?

just a short answer will be heaps. ill figure out the reset. :?

cheers
hayzie
hayzie
 
Posts: 24
Joined: Wed, 28 Jul 2010 12:21 +0000

Re: How To - DIG Options TP09X1 Unit Install Part 2 Camera Done!

Postby asmo on Mon, 09 Aug 2010 7:59 +0000

Hey Hayzie

No you dont need to install windows its already there...
Just download and install Ozi from their website. (The easy bit) the ARM version for windows CE ( have a look on the website ) Trial is free.... $40 to licence

Then you need some maps or you will be looking at a blank screen
Prices on website or the net does offer free bies if you look hard ,.,
I got my maps of a friend with the CD of Raster Maps
Cheers Asmo
User avatar
asmo
 
Posts: 180
Joined: Thu, 04 Feb 2010 11:36 +0000
Location: South West WA

Re: How To - DIG Options TP09X1 Unit Install Part 2 Camera Done!

Postby hayzie on Tue, 10 Aug 2010 8:38 +0000

Thanks asmo

When I get a minute to scratch myself I'll be giving it a crack.

Hayzie.
hayzie
 
Posts: 24
Joined: Wed, 28 Jul 2010 12:21 +0000

Re: How To - DIG Options TP09X1 Unit Install Part 2 Camera Done!

Postby Rich on Fri, 13 Aug 2010 7:47 +0000

Sorry to revise an old thread (but I must admit it is a good one!)

Has anyone had any luck with permanently mounting or installing a TV antenna?

If so, where did you get it from etc...

Rich.
User avatar
Rich
 
Posts: 986
Joined: Sun, 07 Jan 2007 12:00 +0000
Location: Gold Coast

Re: How To - DIG Options TP09X1 Unit Install Part 2 Camera Done!

Postby Steve9R on Fri, 13 Aug 2010 8:03 +0000

yeah honestly.. ive got the Digital TV.. ive used it once.. when i first installed it.. thats it.. ive got the aerial wrapped up on the passenger side so you can stick it on the roof if you want to.. but we never have..

Steve
User avatar
Steve9R
Valued Contributor
 
Posts: 5248
Joined: Wed, 11 Apr 2007 1:00 +0000
Location: Melbourne, VIC

Re: How To - DIG Options TP09X1 Unit Install Part 2 Camera Done!

Postby OFFTRAK on Fri, 13 Aug 2010 12:57 +0000

Rich, speak to efini7.
Here is the link to the very tidy install he did on his antennas
User avatar
OFFTRAK
 
Posts: 493
Joined: Sun, 04 Jul 2010 7:01 +0000
Location: Kalgoorlie, WA

Re: How To - DIG Options TP09X1 Unit Install Part 2 Camera Done!

Postby johnny5x on Fri, 13 Aug 2010 7:22 +0000

Steve9R wrote:yeah honestly.. ive got the Digital TV.. ive used it once.. when i first installed it.. thats it.. ive got the aerial wrapped up on the passenger side so you can stick it on the roof if you want to.. but we never have..

Steve


Hey steve, ive never seen the magnetic antenna you are talking about, but is it possible you could attach the magnet side to the A pillar metal frame behind the A-pillar plastic cover? There is a bit of room behind there and it should really have the same effect as putting it on your roof i would assume.

I have the dual antenna digital tv and it was great to watch the world cup games in the morning on the way to work, but im the same, i really have no use for it any other time
User avatar
johnny5x
 
Posts: 310
Joined: Sun, 31 Jan 2010 7:19 +0000
Location: Canberra ACT

PreviousNext

Return to Tips & Tricks

Who is online

Users browsing this forum: No registered users and 12 guests