Rod's Rig - Round 2

Want to show off what you've done to your rig? or have a custom project to show? Post it up here!

Re: Rod's Rig

Postby rodw on Sat, 08 Aug 2009 6:07 +0000

Quinny23 wrote:Great job.... Hope it all continues to go smoothly.... (And thanks for the pics...) :D


Thanks mate, so far so good.


mmaaxx wrote:good stuff mate, make it look easy.....your reports are always well worth reading.....quality explanations and with pics.

whats the saving estimate on DIY compared to the caddy setup?


Not game to add up the cost, but my initial estimate was $1,100 or so against $1920 for the Caddy one and then I'd have to add a fair bit of finishing touches as that was for the drawer only. Black Widow was $3k from ARB and some of the others might have been $2,400.

Anyway, I think I am pretty much on track with the budget but still have to buy the plywood which is about $45 per sheet for 12mm x 2400x1200 I have not made up my mind if I should use 16mm for the drawer bottoms which is about $65 for the sheet...

Anyway, got down to Ovesco this morning at Nerang and picked up some bits and he told me there was a bolt shop just round the corner so I got all my hardware now. Did not get home tlll about 11:00 so did not get that much done (forgot some bolts until the way home so had to do a U turn across the 8 lane M1 which was annoying....)

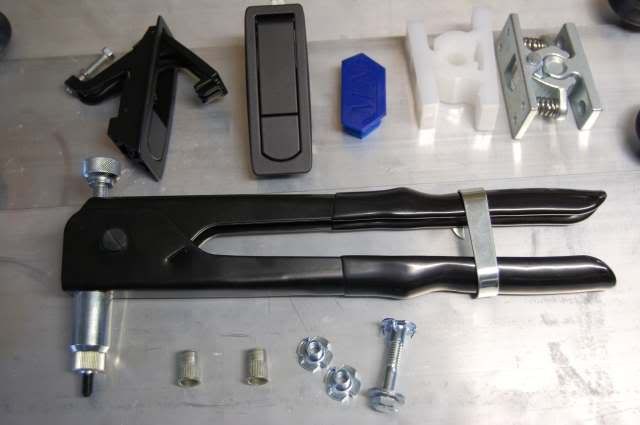
Anyway when I got to Ovesco, they had a 1200 mm drawer all welded up using the Occo rollers so I had a good sample to work off. Here is some of the bits I got:
Image

From top left, first two black things are the flush mount drawer catches, one open and the other closed. You push the bottom button and the handle pops out. Blue thing is the end cap for the Occo track, The next two items are catches and on their sample they used the cheap white plastic one to hold it closed (about $4) and I also bought the metal ones (about $20). They had their drawer set up so there was one plastic catch to keep it shut and another to keep it open...


The pliers gadget is a nutsert tool which cost about $70 plus $15 for each thread die. Thay had another kit there for about $540 but that was a bit over the top for casual use. To use this tool, you drill a 10mm hole in sheet metal (like a Hilux tub) and you then crimp in a M6 thread (dies for smaller sizes an some imperial ones as well). Scotty used a $300 version of this so if you want to see these in use roll back though this thread to my water tank... I bought 50 M6 nutserts at 31 cents each from Ovesco (good choice, they were 70c each at the bolt shop).

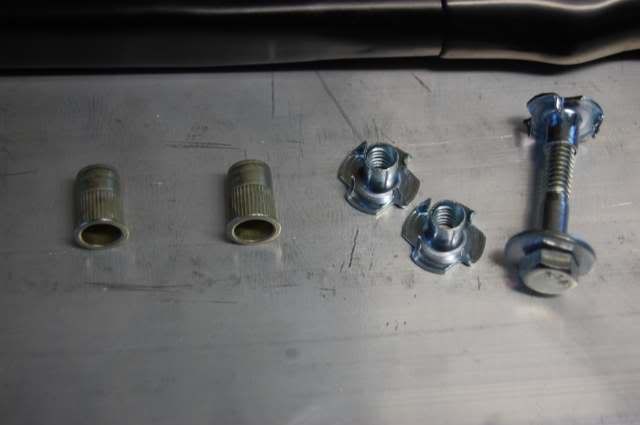
And finally a couple of T nuts that bite into the plywood to bolt the top deck to the Cubelock. I use a 3/4" wood bit in a hand brace to countersink the ply (basically cut out one layer of ply and once you put carpet over the top, they are totally hidden.

Close up of the fasteners (I just got to work out how to crimp in the nutserts):
Image

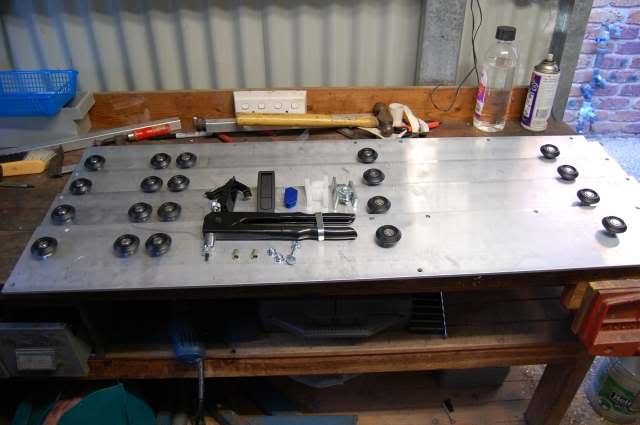
So anyway, I got all of the Occo Rollers fitted basically following the pattern that they had used in their show room example (These are the four plates shown in yesterday's post) with 20 rollers at about $18 each added:
Image

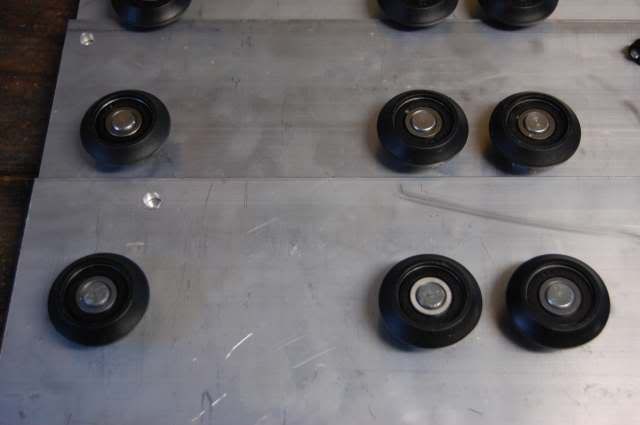
So here is a close up of the rollers at the end:
Image

So the drawer will open as far as the pir of rollers close together. They say that with their sample drawer, they put 200 kg's in the front of the drawer and open it out full length. There will be about 300 mm of the drawer that does not extend.

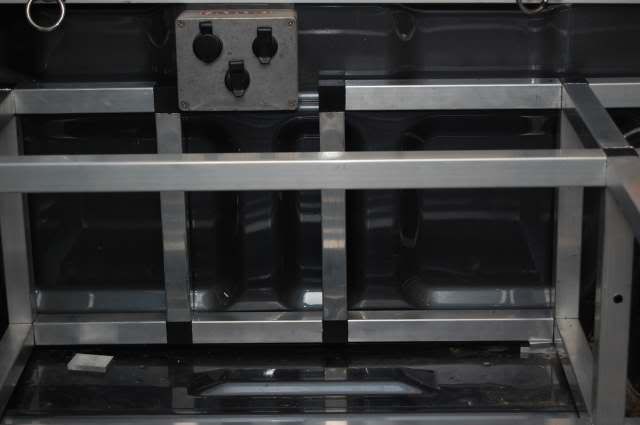
I also spent a fair bit of the day stuffing around with the cubelock, to accommodate the ARB fitted fridge points:
Image

I think eventually I will remove this box and relocate all the fittings onto the end panel of the drawer unit (like the Skull Racing buildup).

Anyway, I thought it was about time I put it all together to make sue it was all good:
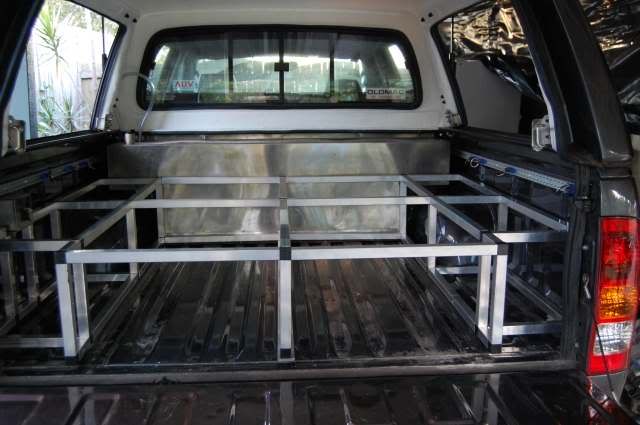
Image

With the measurements I quoted yesterday, the drawers are such a tight fit accross the tub that it was hard to get it all in there, You have to build the top in two pieces, one piece goes from one side to the last drawer runner on the other side and the other piece is the short side wing component with the 220mm cross member. You have to set them up like an A frame tent and then it will all slip into position (with a bit of colourful language). But when you do get it all in place there is no movement at all, hardly need bolting down.

So now, all I have to do is to work out this nutsert thing and fix the frame to the tub. to do this, I will need to dissassemble the top so I can get a drill in there (which I am not looking forward to as it was such a tight fit).

Once that is done, I need to bolt on the top deck and build the drawers. I am paying the price of not having everything on hand before starting construction, there are a couple of things that i might do differently next time round to sort out the catches etc.
User avatar
rodw
 
Posts: 3195
Joined: Tue, 19 Feb 2008 2:00 +0000
Location: Brisbane, QLD


Re: Rod's Rig

Postby Alby on Sat, 08 Aug 2009 6:33 +0000

going good Rod, as Max said you always put in a great effort to show us what you are up to
On the internet you can be anything you want. It is strange that so many people choose to be stupid!
User avatar
Alby
 
Posts: 6673
Joined: Tue, 03 Jul 2007 1:00 +0000
Location: Sydney, NSW

Re: Rod's Rig

Postby rodw on Sun, 09 Aug 2009 6:26 +0000

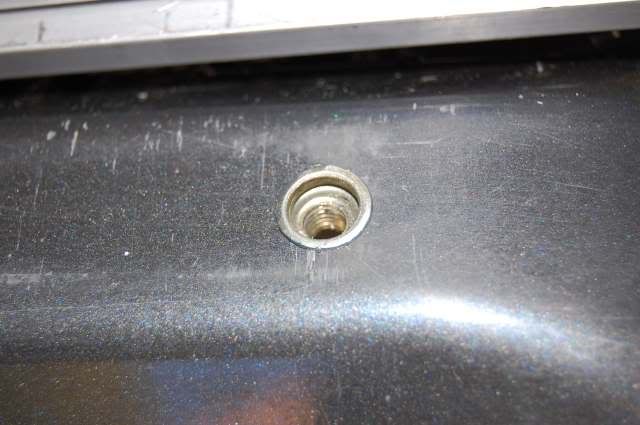
Well, have not got too much to show for today's effort, as I took my son to a Uni open day, but found a couple of hours and I pulled it all out again and drilled all the mounting points and inserted the nutsert fasteners. I started on the centre rail and checked measurements to make sure it was centred in the tub, and drilled a 6 mm hole through the cubelock and into the tub. Then, I had to drill the holes in the tub out to 10 mm to receive the nutserts. I did a couple at the tailgate end to start with and then a couple more to get it all lined up than drilled all the 6mm holes, removed the frame altogether and let loose with the 10mm drill and nutsert tool. This is what I ended up with:

Image

Just make sure you don't drill where there is a cross member under the tub as you won't get the clearance for the nutsert. If you look closely, you will work out where the crossmembers are by observing where the spotwelds are as you can see these on the tub itself.

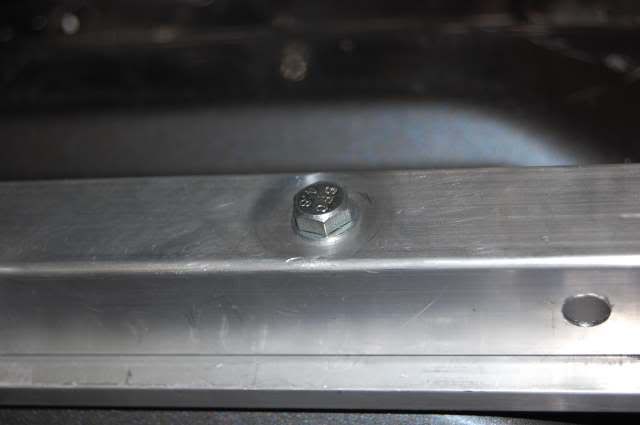
Anyway, then it is a simple job of bolting the Cubelock on with some M6 bolts. I should be using washers, I bought them! the hole to the left is to hold on the plates I mounted the Occo rollers to.

Image

Weighed all the bits so far and it comes to 24.7 kg so far including the Occo tracks that will be mounted to the drawers, (13.9 kg of that is the side plates and rollers). So anyway, the weight will be quite acceptable and I am sure the strength will be there. Show day here Wednesday, so with a bit of luck, I'll have the deck on by the end of the week.
Last edited by rodw on Mon, 10 Aug 2009 8:01 +0000, edited 1 time in total.
User avatar
rodw
 
Posts: 3195
Joined: Tue, 19 Feb 2008 2:00 +0000
Location: Brisbane, QLD

Re: Rod's Rig

Postby Diegothecat on Sun, 09 Aug 2009 6:55 +0000

looks like you have a bit of fun on hands. the dray system is looking good A+ for effort and ingenuity. I'll be tuning in for the updates.
Speed Safely
User avatar
Diegothecat
 
Posts: 659
Joined: Mon, 14 Apr 2008 1:00 +0000
Location: Brisbane, QLD

Re: Rod's Rig

Postby meep on Mon, 10 Aug 2009 9:02 +0000

Rod

How is the drawer system fixed to the tub?

Peter
There are 10 kinds of people in the world - those that understand binary and those that don't.
2006 HiLux Vigo 3.0 - read my iLux blog here
User avatar
meep
 
Posts: 22
Joined: Sun, 05 Jul 2009 8:16 +0000

Re: Rod's Rig

Postby rodw on Tue, 11 Aug 2009 3:40 +0000

meep wrote:Rod

How is the drawer system fixed to the tub?

Peter


Peter, the nutserts shown to the left of this pic
Image
are inserted into a 10mm hole in the tub and crimped in place with the plier tool which give a nice 6mm metric thread in the tub as shown in the last post of mine. Then it is just a simple matter of bolting the frame to the tub with bolts going into the nutsert thread as shown in my last post. You can see I have also put a piece of ally under the middle rail so the side plates that hold the tracks have something to rest on as I did not want the weight to be on the Qubelok which only has 1.2mm thick walls. I'll try and post a pic of a nutsert from the underside.
User avatar
rodw
 
Posts: 3195
Joined: Tue, 19 Feb 2008 2:00 +0000
Location: Brisbane, QLD

Re: Rod's Rig

Postby rodw on Tue, 11 Aug 2009 3:50 +0000

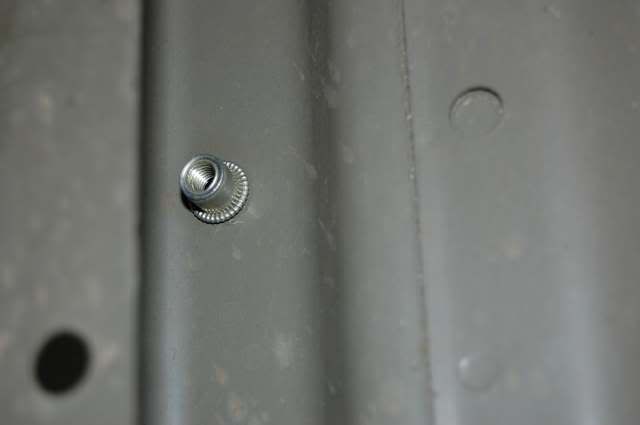
Like this:
Image

You can see how the nutsert has spread out right round the hole and as you tighten a bolt, it can only tighten further. The hole I drilled is the same diameter as the bottom of the nutsert.
User avatar
rodw
 
Posts: 3195
Joined: Tue, 19 Feb 2008 2:00 +0000
Location: Brisbane, QLD

Re: Rod's Rig

Postby rodw on Wed, 12 Aug 2009 4:33 +0000

Geez, what a day today on our Show holiday. Left this morning with a small list of things to do and one of them was to check with the replacement solenoid for my Ironman winch had arrived under warranty at Opposite Lock. (Yes it has not been working). The parts were there and they had an idle mechanic in the workshop and they offered to do it while I waited. They just got it all together and I asked the guy to check it worked before he put it all back together. Of coure it did not work, it must have been the winch so they pulled the bar off anbd removed the winch.

I'm off to Moreton Island on Wednesday and was concerned I would not get it back in time as they had to send it to Ironman for repair. So they rang Ironman at Brendale on the opposite side of Brisbane and they agreed to look at it for me if I took it over. So off I went and waited while they pulled the winch apart, replaced some internals in the soloinod and fixed the motor. Could not get it fitted (probably not that hard) but got it booked in at OL to get it fitted Monday morning). from there, a quick dash back down to Ovesco to pick up some stuff I forgot to buy, off to the bolt shop to get a few bits and on to Bunnings to pick up a sheet of plywood for the top deck of the drawers and the last stop was the pub to pick up a couple of cartons of beer. With a bit of luck, there will still be some left to take with me to Moreton.

So anyway, I think I will be able to get into it on Saturday without any interruptions.
User avatar
rodw
 
Posts: 3195
Joined: Tue, 19 Feb 2008 2:00 +0000
Location: Brisbane, QLD

Re: Rod's Rig

Postby Quinny34 on Wed, 12 Aug 2009 4:54 +0000

LOL... that was one of the best things about my car PC install... a mate had given me the list of stuff to get so there where was only one trip required for a bit that was missing...
FCCW
Application for G##C membership REVOKED
quinny23@newhilux.net
User avatar
Quinny34
Platinum Subscriber
 
Posts: 5169
Joined: Sun, 19 Aug 2007 1:00 +0000
Location: Lavington, NSW

Re: Rod's Rig

Postby rodw on Wed, 12 Aug 2009 6:42 +0000

Quinny23 wrote:LOL... that was one of the best things about my car PC install... a mate had given me the list of stuff to get so there where was only one trip required for a bit that was missing...


I only needed one extra trip really too. My own fault. Silly boy. Bought 1 x 2.8 m length of drawer runner. But if you do the maths 2 drawers by 2 runners x 1.2 metres ong = 4.8 metres so I was well short. I should have written out a list.. and Ovesco is 40 minutes from home (and about 3 hours via Opposite Lock and Ironman).
User avatar
rodw
 
Posts: 3195
Joined: Tue, 19 Feb 2008 2:00 +0000
Location: Brisbane, QLD

Re: Rod's Rig

Postby Quinny34 on Wed, 12 Aug 2009 6:51 +0000

LOL... Poor bastard... Mine was 5 minutes and I had the shits at that... hate getting interupted...
FCCW
Application for G##C membership REVOKED
quinny23@newhilux.net
User avatar
Quinny34
Platinum Subscriber
 
Posts: 5169
Joined: Sun, 19 Aug 2007 1:00 +0000
Location: Lavington, NSW

Re: Rod's Rig

Postby rodw on Fri, 14 Aug 2009 5:37 +0000

Well, been doing a bit after work the last couple of days and am now officially on holidays leading up to my Moreton Island trip but I have got the frame finished and bolted down in the back. Really happy with it, absolutely no movement in the frame (other than the suspension rocking when you shake the frame).

Here is where it is at:

Image

You can see the drawer runners are in and sitting on the rollers I showed you previously.

And here are a few of the bolts holding it in.

Image

I have still got a few braces to add to make sure the top of the frame is rock solid and then I just have to make the deck and the drawers.
User avatar
rodw
 
Posts: 3195
Joined: Tue, 19 Feb 2008 2:00 +0000
Location: Brisbane, QLD

Re: Rod's Rig

Postby Steve9R on Fri, 14 Aug 2009 7:11 +0000

Mate.. Im amazed you havent being using nutcerts in the past..... I have them everywhere.. they are the BEST invention for attaching things..

Steve
User avatar
Steve9R
Valued Contributor
 
Posts: 5248
Joined: Wed, 11 Apr 2007 1:00 +0000
Location: Melbourne, VIC

Re: Rod's Rig

Postby rodw on Fri, 14 Aug 2009 7:59 +0000

Steve9R wrote:Mate.. Im amazed you havent being using nutcerts in the past..... I have them everywhere.. they are the BEST invention for attaching things..

Steve


Agreed, but have you seen the price of the tools to insert them? The tool I got was only about $70 instead of $350-$500 like the others I have seen. I will find a lot of uses for them from here on!
User avatar
rodw
 
Posts: 3195
Joined: Tue, 19 Feb 2008 2:00 +0000
Location: Brisbane, QLD

Re: Rod's Rig

Postby rodw on Sat, 15 Aug 2009 8:27 +0000

Did a bit more ont he drawers today but not got too much to show form my efforts. Conned a mate that knowas more about carpentry than I do to bring his magic Festool saw over but we found onwe of the drawers was not square so had a bit of rework to do. It would seem the tub is not 100% symetrical. oNe side was perfect, the other side I built to the same dimensions and it ended up out od square. Anyway, We are going to have another go at it tomorrow afternoon and with a bit of luck, we'll be closed to finished.
User avatar
rodw
 
Posts: 3195
Joined: Tue, 19 Feb 2008 2:00 +0000
Location: Brisbane, QLD

Re: Rod's Rig

Postby rodw on Sun, 16 Aug 2009 5:42 +0000

Made a bit more progress today. Got the drawers made up and the top deck made with Justin's help. He's got a Festool saw that runs on a track which made sure every cut was perfectly square. This is where we got to.

Image

The drawers are just sitting in there, and not mounted to the rails, but you can see they are looking good. Ended up with drawers 213mm high which is similar to the Black Widows and others at 210mm high. Tomorrow's job is to get the drawers mounted on to the tracks and the deck mounted and that is as far as I will get before we head off to Moreton Island on Wednesday. The drawers will be very light when they are finished. The plan is that I will use some angle iron reinforcement inside the drawers that will be bolted to the sides and corners so they should be to hold 150-200 kg's each.
User avatar
rodw
 
Posts: 3195
Joined: Tue, 19 Feb 2008 2:00 +0000
Location: Brisbane, QLD

Re: Rod's Rig

Postby rodw on Mon, 17 Aug 2009 6:03 +0000

Well, got into it again today. Also went over to Opposite Lock to get my winch installed after Ironman repaired it and I did not have time to put it in myself. Did a bit more on the drawers while I was there. Not happy got there and realised I had left a box of bits at home so had to go back and get them...

Anyway, got enough done so they are useful. Here is a pic with my old Suzuki Storage rack up on top:

Image

One drawer swallowed all of my tools, spare parts and recovery gear and even 16 sand pegs for our Moreton Island trip (not to mention the red toyota cap to put on when recovering Nissans and Tritons. You can see the green recovery bag containing winch extension, snatch strap, 4 shackles, snatch bock, ARB deflator and all the stuff you need. Beside it is my air hose and the towbar tongue. Bit of red under the tent pegs is my tool box, blue box is Kinchrome screwdrivers, under the tent pegs at the front are all parts, jumper leads, and a big heavey jack base plate. The drawer beside it is for the missus and she want to have all the foodtuffs etc in it.

The handles are temporary and are some offcuts of the Occo track. There is another face to go on the front of the drawer with pop up catch and hadle, and will cover them in carpet. Still have to do the fill in plates on the sides of the drawers.

Anyway, it is a big project that is almost done!
User avatar
rodw
 
Posts: 3195
Joined: Tue, 19 Feb 2008 2:00 +0000
Location: Brisbane, QLD

Re: Rod's Rig

Postby Zac on Mon, 17 Aug 2009 6:49 +0000

Looks good Rod. good Job.
I'd rather have a bottle in front of me than a frontal lobotomy!!
User avatar
Zac
 
Posts: 116
Joined: Sun, 23 Sep 2007 1:00 +0000
Location: Atwell, WA

Re: Rod's Rig

Postby rodw on Mon, 17 Aug 2009 8:35 +0000

Zac wrote:Looks good Rod. good Job.


Thanks Zac, here's a pic of the wife's drawer. Got the camp oven at the back of the drawer as well.

Image

I forgot to take a photo of the angle iron bracing in the bottoms of the drawer, You'll have to wait till we come back from Moreton Island.
User avatar
rodw
 
Posts: 3195
Joined: Tue, 19 Feb 2008 2:00 +0000
Location: Brisbane, QLD

Re: Rod's Rig

Postby Quinny34 on Tue, 18 Aug 2009 6:01 +0000

LOL.... his and hers matching drawers... hers full of food... yours full of tools and erecovery gear.. I love it.. :D :D :D
FCCW
Application for G##C membership REVOKED
quinny23@newhilux.net
User avatar
Quinny34
Platinum Subscriber
 
Posts: 5169
Joined: Sun, 19 Aug 2007 1:00 +0000
Location: Lavington, NSW

PreviousNext

Return to Member Build Ups

Who is online

Users browsing this forum: No registered users and 45 guests