I have swapped a couple of emails with Mmaax recently about drawer units after he found a special deal he thought I should have and I decided I might push them higher up the list.
Anyway, had the day off with the missus today as we had the electrician around to wire in some lights in the bathroom and decided to stuff around and get them to sort out the TV wiring in the bedroom by adding an extra power point and pull a HDMI cable through the wall so we can watch dirty movies from the DVD (just joking….) Anyway, after I was forced to accompany the missus to Lifeline to drop off a Corolla full of junk that came out of the linen cupboard. The bathroom reno is officially done!
After lunch I got to do a couple of things I wanted to do. First was to head off to Opposite Lock to sort out a new Solenoid for my Ironman winch which was just clicking (they have since changed the solenoid to a solid state one). I really don’t understand what is holding people like Mmaaxx back with tyre selection, when I got there to OL there was a Subaru Brumby parked outside wearing 35’s.. Sorry I did not have a camera… Not a rig I would choose to go for a drive in though, looked pretty unstable. Anyway sorted out the new part to come over from Ironman for the winch and had a good browse around. Asked Verne if he could do a custom length drawer and he said they could do them from the Department of the Interior http://www.consoles.com.au/ and said they could get drawers up for $100 freight.
I checked out a 3 gal Firestone air tank for fit and it was perfect but missing a couple of drain plugs for my liking so went and checked out the boys at On Track 4WD and before I got into the store I had an audience of three staff checking out my Crusher tyres and Brett the owner taking pics with his mobile phone. Eventually I got their attention away from the tyres and asked them if they had any air tanks, but they didn’t.
So left there and stopped at a window shop to stock up on brownie points with the missus and bought 20 window rollers at $1.00 each, exactly the same as the one I bought from Bunnings the other day for $10.50 each. Amazing what a difference the couple of windows I fitted them to are to open and close now… not to mention the response to the brownie points that accompany the fitting of the parts..
Anyway feeling a bit cocky now with 20 odd brownie points in the tin, I headed back over towards TJM, ARB and Caddy. Checked with TJM about Air tanks and had a couple but not all stock in hand so did not see the right one, so decided I’d head up to Caddy Storage to see if they had a drawer unit for a trial fit we talked about a week ago and come back to ARB on the other side of the road.
The problem I have got with drawers, is that since fitting the water tank, I need a custom built drawer unit.
So I caught up with Harry at Caddy Storage and he scratched around and found a 420mm high x 1230mm long drawer and I gave him a hand to stick it into the back of the ute for a trial fit. This is a bit higher than the 325mm one I was thinking of buying. Geez it was heavy! Rated to carry 150 kgs! Anyway the drawer fitted and when I closed the tailgate I had 1mm to spare! The interesting thing was that with the drawer into position, it was exactly the same height as my water tank so If I used the higher drawer, I would have been able to have a false floor the full length of the tub again. Problem would be that the floor would be about the same height as my side windows which would virtually mean everything needs to be tied down. So by now I was confused and decided not to rush into an order today, and t was too late to stop at ARB, so went home.
My present thinking is that you would not want to buy twin drawers from Caddy, just stick to a single drawer unit to keep the weight down a bit. They are nothing like a Black Widow drawer system (which cost $3k) but I think the fancy carpet covering etc is overkill in the back of a ute where there is a bit of dust around. The options look like being:
1. Offroad Sytstems Custom Drawer (4 week turnaround and take about 3 day s to respond to an email)
2. Department of the Interior ( 2 week turnaround who I have spoken to about consoles recently)
3. Caddy Storage 10 day turnaround and prices include fitting)
4. Build my own using Cubelock and a m1219mm x 180Kg drawer slide from Ovesco (http://www.ovesco.com.au)
Anyway, after some intensive research, I think I will choose between options 3 and 4. The advantage of building my own, I that I would have 100% drawer extension v’s Caddy’s 66% extension. There is about a $500 difference between my DIY version and Caddy. (I know there are cheaper ways to build drawer units than my idea).
There is a certain amount of appeal about having somebody do this for me but the roll your own solution is also appealing. I think I will probably go with the Caddy single drawer system in a 325mm height as I have been doing too many DIY projects round the house recentlyand it would be good to see somebody else do the hard work…. So stay tuned.
Rod's Rig - Round 2
Musings about Drawer units
![]() by rodw on Mon, 03 Aug 2009 7:07 +0000
by rodw on Mon, 03 Aug 2009 7:07 +0000
-

rodw - Posts: 3195
- Joined: Tue, 19 Feb 2008 2:00 +0000
- Location: Brisbane, QLD
Re: Rod's Rig
![]() by Quinny34 on Mon, 03 Aug 2009 7:35 +0000
by Quinny34 on Mon, 03 Aug 2009 7:35 +0000
lol... Whatever you end up with... continue with the write up.. Pics would help though..
Would it have been better 2nd time round to design the tank and draws at the same time...?
Would it have been better 2nd time round to design the tank and draws at the same time...?
-

Quinny34 - Platinum Subscriber
- Posts: 5169
- Joined: Sun, 19 Aug 2007 1:00 +0000
- Location: Lavington, NSW
Re: Rod's Rig
![]() by Hilux Max on Mon, 03 Aug 2009 8:33 +0000
by Hilux Max on Mon, 03 Aug 2009 8:33 +0000
go the deeper draws and the full size false floor...even if you need to tie stuff down on top, you could always use the cube lock stuff you mentioned earlier on the top section to hold stuff in and sorted, its easily removed, and I reckon you'll love the full size false floor.....the deeper draws you can fit some sort of dividers to keep things seprate and in place....either way, I know you analyse your ideas thoroughly before going ahead so whatever you decide to do Im sure it will make you happy and it will work great.....
sorry for making you spend your money again, just wish I could get you to spend some on my rig...LOL
sorry for making you spend your money again, just wish I could get you to spend some on my rig...LOL
The Punisher 2.0 N80 Build - http://www.newhilux.net/phpbb/viewtopic.php?f=119&t=26631
The Punisher 1.0 N70 Build - http://www.newhilux.net/phpbb/viewtopic.php?f=41&t=747&hilit=Punisher
The Punisher 1.0 N70 Build - http://www.newhilux.net/phpbb/viewtopic.php?f=41&t=747&hilit=Punisher
-

Hilux Max - Valued Contributor
- Posts: 12434
- Joined: Sun, 07 Jan 2007 12:00 +0000
Re: Rod's Rig
![]() by Possum on Tue, 04 Aug 2009 3:55 +0000
by Possum on Tue, 04 Aug 2009 3:55 +0000
Just a point to consider when you are looking at draws
I have the outback with a fridge roller I opted for the standard draw not the tradesman ones which are deeper
Glad i did as the hight of the tradsmans one wouldn't fit my fridge under the canopy engel 39l
Even the standard ones you can pack heaps of crap in them
I have the outback with a fridge roller I opted for the standard draw not the tradesman ones which are deeper
Glad i did as the hight of the tradsmans one wouldn't fit my fridge under the canopy engel 39l
Even the standard ones you can pack heaps of crap in them
The problem with doin' nothing is that you never know when youre finished
Brad
Brad
-

Possum - Posts: 258
- Joined: Thu, 12 Jun 2008 1:00 +0000
- Location: Table Top, NSW
Re: Rod's Rig
![]() by tasibrett on Tue, 04 Aug 2009 7:37 +0000
by tasibrett on Tue, 04 Aug 2009 7:37 +0000
Rod I got a pic of mark07sr5 bearing mounts at the quad state get together. The draws were professorially made but look very easy to copy.
]
]
My wife say's I am not completely useless, I can serve as a bad example for others
-
tasibrett - Posts: 410
- Joined: Thu, 02 Oct 2008 5:43 +0000
- Location: Spring hill Tasmania
Re: Rod's Rig
![]() by rodw on Tue, 04 Aug 2009 6:30 +0000
by rodw on Tue, 04 Aug 2009 6:30 +0000
Thanks for the ideas. If I built my own, I was thinking of Ovesco's 1219mm full extension slides

Rated for 181 kg, but at $493.55 they are not cheap. Anyway, I have since found their Occo drawer slides which drops the price per drawer slide to about $200 each.


I think I am going to go the build your own and reckon I can do them for about $1,100; half the weight of the Caddy ones, half the price of the Offroad systems and Dept of Interior ones and 1/3 the price of Black Widow. that does not include the fridge slide, but I got that sorted for now anyway on a 100 kg set of drawer runners.
I don't think height of the drawers is too much of an issue, I have 950mm clearance under the canopy.
Quinny, the drawers were always in the equation and went with the water tank I did because I thought it was the best use of the space available. There would be a lot of wasted space using a commercially available tank and I had the 1219 mm drawer slides from Ovesco in the back of my mind when I specced out the water tank... Putting it under the drawers would have only given me about 50 litres max, I got 107 litres in my tank and the drawers are longer than what I could get away with under the drawers...
Anyway stay tuned...
Rated for 181 kg, but at $493.55 they are not cheap. Anyway, I have since found their Occo drawer slides which drops the price per drawer slide to about $200 each.
I think I am going to go the build your own and reckon I can do them for about $1,100; half the weight of the Caddy ones, half the price of the Offroad systems and Dept of Interior ones and 1/3 the price of Black Widow. that does not include the fridge slide, but I got that sorted for now anyway on a 100 kg set of drawer runners.
I don't think height of the drawers is too much of an issue, I have 950mm clearance under the canopy.
Quinny, the drawers were always in the equation and went with the water tank I did because I thought it was the best use of the space available. There would be a lot of wasted space using a commercially available tank and I had the 1219 mm drawer slides from Ovesco in the back of my mind when I specced out the water tank... Putting it under the drawers would have only given me about 50 litres max, I got 107 litres in my tank and the drawers are longer than what I could get away with under the drawers...
Anyway stay tuned...
-
rodw - Posts: 3195
- Joined: Tue, 19 Feb 2008 2:00 +0000
- Location: Brisbane, QLD
Re: Rod's Rig
![]() by Quinny34 on Tue, 04 Aug 2009 6:46 +0000
by Quinny34 on Tue, 04 Aug 2009 6:46 +0000
Righto... Sounds like your continuing with your original plan... that adds weight to the fact you had it right the first time round... All good...
-
Quinny34 - Platinum Subscriber
- Posts: 5169
- Joined: Sun, 19 Aug 2007 1:00 +0000
- Location: Lavington, NSW
Re: Rod's Rig
![]() by rodw on Tue, 04 Aug 2009 7:58 +0000
by rodw on Tue, 04 Aug 2009 7:58 +0000
Quinny23 wrote:Righto... Sounds like your continuing with your original plan... that adds weight to the fact you had it right the first time round... All good...
Yeh, thought I might have found a short cut but the DIY option will be better.
-
rodw - Posts: 3195
- Joined: Tue, 19 Feb 2008 2:00 +0000
- Location: Brisbane, QLD
Re: Rod's Rig
![]() by rodw on Fri, 07 Aug 2009 12:21 +0000
by rodw on Fri, 07 Aug 2009 12:21 +0000
Well, it has been decided. I am building my own drawers. I have bought the Cubelock and some 6mm x 160mm Ally flat bar to mount the runners onto. Tomorrow morning I am going to duck down to Nerang and pick up some of those Occo runners and wheels. I asked them to cut the flat bar to size for me which was $10 well spent. I have spent about $350 so far and that includes a$60 for an aluminium blade for my drop saw. Tried it last night. 60 teeth blade is a lot better than the 24 tooth one I have used to cut ally in the past!
I spent a couple of nights doodling the design on paper, still no measurements but I had to work out the number of plastic Cublock joiners to buy and this is the only way to do it.
The drawers will be made out of plywood and I will rout in a 20mm wide x 3 mm deep channel into the side of each drawer and insert a matching strip of 3mm x 20mm flat ally along the full length to act as a mounting for the slides. The weight will actually be held by the top edge of this strip rather than just the bolts through into the drawer so it should never come apart. I just go to make sure the bottom won't come out! That should not be too hard. Spoke to Ovesco about the carrying capacity of the Occo system and they reckon they tested each wheel to 150kg before it failed so each drawer should be good for 200-300 kgs.
They should be very light. The Cubelock weighs about 0.3 Kg per metre but the flat bar will come in at about 12kg for the full set. It was abit wider than what I wanted but it was all they had in stock and they gave it to me for the same price of the 125mm stuff I wanted to use. I am hoping the frame will weigh in about 20 kg all up before adding the drawers and deck.
Anyway, might have some pics by the end of tomorrow all going well but got something on on Sunday
Sort of funny really, I am doing this in the oposite order to Crossport (eg. Water tank then Drawers), he is the other way round. Stay tuned.
I spent a couple of nights doodling the design on paper, still no measurements but I had to work out the number of plastic Cublock joiners to buy and this is the only way to do it.
The drawers will be made out of plywood and I will rout in a 20mm wide x 3 mm deep channel into the side of each drawer and insert a matching strip of 3mm x 20mm flat ally along the full length to act as a mounting for the slides. The weight will actually be held by the top edge of this strip rather than just the bolts through into the drawer so it should never come apart. I just go to make sure the bottom won't come out! That should not be too hard. Spoke to Ovesco about the carrying capacity of the Occo system and they reckon they tested each wheel to 150kg before it failed so each drawer should be good for 200-300 kgs.
They should be very light. The Cubelock weighs about 0.3 Kg per metre but the flat bar will come in at about 12kg for the full set. It was abit wider than what I wanted but it was all they had in stock and they gave it to me for the same price of the 125mm stuff I wanted to use. I am hoping the frame will weigh in about 20 kg all up before adding the drawers and deck.
Anyway, might have some pics by the end of tomorrow all going well
Sort of funny really, I am doing this in the oposite order to Crossport (eg. Water tank then Drawers), he is the other way round. Stay tuned.
-
rodw - Posts: 3195
- Joined: Tue, 19 Feb 2008 2:00 +0000
- Location: Brisbane, QLD
Re: Rod's Rig
![]() by Alby on Fri, 07 Aug 2009 1:43 +0000
by Alby on Fri, 07 Aug 2009 1:43 +0000
Good on you Rod, look forward to your pics. (make sure you get a few slipper shots in for me too  )
)
I have plastic bins in my canopy but want to change part of it to drawers for ease of access.
I have plastic bins in my canopy but want to change part of it to drawers for ease of access.
On the internet you can be anything you want. It is strange that so many people choose to be stupid!
-

Alby - Posts: 6673
- Joined: Tue, 03 Jul 2007 1:00 +0000
- Location: Sydney, NSW
Re: Rod's Rig
![]() by rodw on Fri, 07 Aug 2009 9:57 +0000
by rodw on Fri, 07 Aug 2009 9:57 +0000
Well picked I up an extra bit of ally at 4:00 and got into the drawers. Got a lot further tan you expected (probably on account of stilll hard at it while most of you had your slippers on). Everything has gone well and according to plan, but have a couple of minor adjustments to do. I love this Cubelock tguff, so easy to do stuff with it...
So anyway here are a couple of teaser photos:
When you work with this Cubelock, you got to do up a 3d sketch something like this. This is not the actual plan I worked to but I had scanned it along the way so here it is..
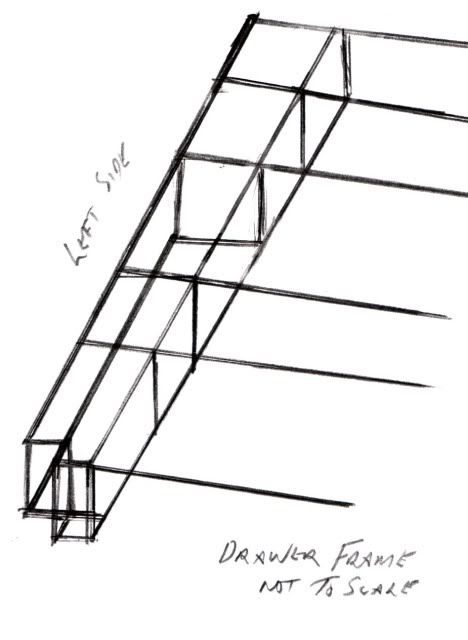
Once I draw this up, I then put a symbol (eg, circle, square, triangle etc) on each join that represents the connector type, (2, way, 3 way, 4 way etc, there is about 6 types) That way you can add them up so you know what to order.
The advantage of using Aluminium is that you can cut it with a wood saw (even 6mm thick stuff is no worries) but you have to make sure that you can do square cuts to use the Cubelock. I started my last project with a hack saw and bought a Ozito drop saw fairly quickly which I broke in about an hour so I took it back and bought a Ryobi 215mm one from Bunnings for about $100. When working with Cubleock, remember that it is 25.4 mm (1") square.
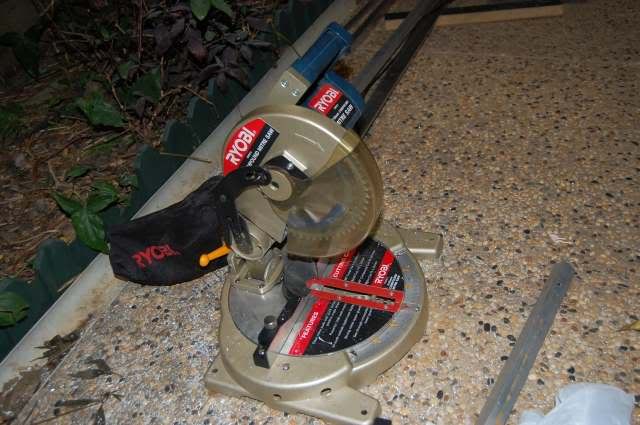
You can cut Ally with any type of wood saw blade even very coarse ones (provided you let the blade spin up to speed before cutting, I used a 24 tooth rip saw blade last time) but I sprung for a 60 tooth aluminium blade this time which is much better.. (cost about $60) But if you had a 60-80 tooth blade, I'd give it a go.
All you need to do with Cubelock is to cut out the lengths and knock it together with a rubber hammer. Because you are always building a cube, once you muck about and get the right dimension, you often need to cut quite a few pieces exactly the same length. I have found you just use one piece as a measuring stick on top of what you are cutting press it up against the stationeray saw blade, remove the measuring stick and go for it!
Anyway, here is what I got done this afternoon:
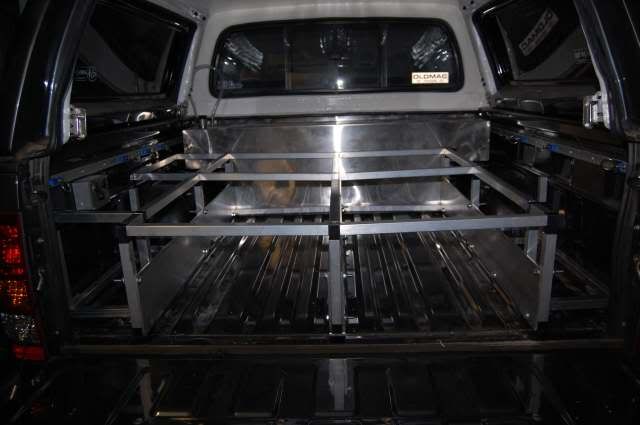
Don't worry about the lopsided top rails, they are just sitting there and not knocked down into place as they'll have to come out again a few times and a couple of the side rails are not in place yet.
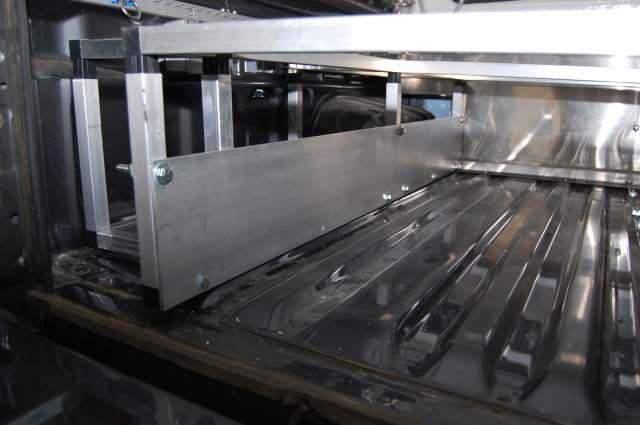
If you look carefuly, you will see that I have the bottom rails resting on three of the raised strips in the tub. The plan is to mount the drawer runners onto the 160mm x 6 mm ally side picees and these are resting on the tub so hter is no weight being taken by the Cubelock and it's plastic connectors. I was a bit concerned about the middle runner as with the 2 x 6mm flat bars, it is wider than the raised strip and I could not work out what to do but I had a brain wave this morning on the way to work and picked up another strip of 6mm x 40mm bar (4 metres long) and cut the centre legs 6mm shorter than the side legs. The centre rail is 25.4mm + 6mm + 6mm wide (37.4mm) so it will fit nicely on the 40mm wide bar.
At the moment, the bolts are finger tight and I will cut off the bolts eventually and replace the nuts with Nyloc ones, but all this will need to be pulled apart again. The drawer slides I will use will either be 19mm or 25mm wide so there will be no problem with clearnce for the bolt heads.
Note that when I drilled the holes in the flat plate, I stacked the 4 pieces on top of each other, centrepunched ach hole positon, G clamped them onto the work banch and drilled them all at once with an electric hand drill rather than my bench press. This worked quite well.
Anyway, If you follow this design, I can tell you now that the critical measurement is the one between the side rails and the centre rail and the magic length is 475mm. The Cubleock piece from the side rail to the edge of the tub is 220mm and that will give you a nice snug fit accross the tray.
Anyway, off to Ovesco at Nerang first thing in the morning and hopefully, I will come home with some drawer slides (provided I like the Occo ones when I see them)
So anyway here are a couple of teaser photos:
When you work with this Cubelock, you got to do up a 3d sketch something like this. This is not the actual plan I worked to but I had scanned it along the way so here it is..
Once I draw this up, I then put a symbol (eg, circle, square, triangle etc) on each join that represents the connector type, (2, way, 3 way, 4 way etc, there is about 6 types) That way you can add them up so you know what to order.
The advantage of using Aluminium is that you can cut it with a wood saw (even 6mm thick stuff is no worries) but you have to make sure that you can do square cuts to use the Cubelock. I started my last project with a hack saw and bought a Ozito drop saw fairly quickly which I broke in about an hour so I took it back and bought a Ryobi 215mm one from Bunnings for about $100. When working with Cubleock, remember that it is 25.4 mm (1") square.
You can cut Ally with any type of wood saw blade even very coarse ones (provided you let the blade spin up to speed before cutting, I used a 24 tooth rip saw blade last time) but I sprung for a 60 tooth aluminium blade this time which is much better.. (cost about $60) But if you had a 60-80 tooth blade, I'd give it a go.
All you need to do with Cubelock is to cut out the lengths and knock it together with a rubber hammer. Because you are always building a cube, once you muck about and get the right dimension, you often need to cut quite a few pieces exactly the same length. I have found you just use one piece as a measuring stick on top of what you are cutting press it up against the stationeray saw blade, remove the measuring stick and go for it!
Anyway, here is what I got done this afternoon:
Don't worry about the lopsided top rails, they are just sitting there and not knocked down into place as they'll have to come out again a few times and a couple of the side rails are not in place yet.
If you look carefuly, you will see that I have the bottom rails resting on three of the raised strips in the tub. The plan is to mount the drawer runners onto the 160mm x 6 mm ally side picees and these are resting on the tub so hter is no weight being taken by the Cubelock and it's plastic connectors. I was a bit concerned about the middle runner as with the 2 x 6mm flat bars, it is wider than the raised strip and I could not work out what to do but I had a brain wave this morning on the way to work and picked up another strip of 6mm x 40mm bar (4 metres long) and cut the centre legs 6mm shorter than the side legs. The centre rail is 25.4mm + 6mm + 6mm wide (37.4mm) so it will fit nicely on the 40mm wide bar.
At the moment, the bolts are finger tight and I will cut off the bolts eventually and replace the nuts with Nyloc ones, but all this will need to be pulled apart again. The drawer slides I will use will either be 19mm or 25mm wide so there will be no problem with clearnce for the bolt heads.
Note that when I drilled the holes in the flat plate, I stacked the 4 pieces on top of each other, centrepunched ach hole positon, G clamped them onto the work banch and drilled them all at once with an electric hand drill rather than my bench press. This worked quite well.
Anyway, If you follow this design, I can tell you now that the critical measurement is the one between the side rails and the centre rail and the magic length is 475mm. The Cubleock piece from the side rail to the edge of the tub is 220mm and that will give you a nice snug fit accross the tray.
Anyway, off to Ovesco at Nerang first thing in the morning and hopefully, I will come home with some drawer slides (provided I like the Occo ones when I see them)
-
rodw - Posts: 3195
- Joined: Tue, 19 Feb 2008 2:00 +0000
- Location: Brisbane, QLD
Re: Rod's Rig
![]() by Quinny34 on Sat, 08 Aug 2009 7:39 +0000
by Quinny34 on Sat, 08 Aug 2009 7:39 +0000
Great job.... Hope it all continues to go smoothly.... (And thanks for the pics...)
-
Quinny34 - Platinum Subscriber
- Posts: 5169
- Joined: Sun, 19 Aug 2007 1:00 +0000
- Location: Lavington, NSW
Re: Rod's Rig
![]() by Hilux Max on Sat, 08 Aug 2009 3:02 +0000
by Hilux Max on Sat, 08 Aug 2009 3:02 +0000
good stuff mate, make it look easy.....your reports are always well worth reading.....quality explanations and with pics.
whats the saving estimate on DIY compared to the caddy setup?
whats the saving estimate on DIY compared to the caddy setup?
The Punisher 2.0 N80 Build - http://www.newhilux.net/phpbb/viewtopic.php?f=119&t=26631
The Punisher 1.0 N70 Build - http://www.newhilux.net/phpbb/viewtopic.php?f=41&t=747&hilit=Punisher
The Punisher 1.0 N70 Build - http://www.newhilux.net/phpbb/viewtopic.php?f=41&t=747&hilit=Punisher
-
Hilux Max - Valued Contributor
- Posts: 12434
- Joined: Sun, 07 Jan 2007 12:00 +0000
Re: Rod's Rig
![]() by rodw on Sat, 08 Aug 2009 6:07 +0000
by rodw on Sat, 08 Aug 2009 6:07 +0000
Quinny23 wrote:Great job.... Hope it all continues to go smoothly.... (And thanks for the pics...)
Thanks mate, so far so good.
mmaaxx wrote:good stuff mate, make it look easy.....your reports are always well worth reading.....quality explanations and with pics.
whats the saving estimate on DIY compared to the caddy setup?
Not game to add up the cost, but my initial estimate was $1,100 or so against $1920 for the Caddy one and then I'd have to add a fair bit of finishing touches as that was for the drawer only. Black Widow was $3k from ARB and some of the others might have been $2,400.
Anyway, I think I am pretty much on track with the budget but still have to buy the plywood which is about $45 per sheet for 12mm x 2400x1200 I have not made up my mind if I should use 16mm for the drawer bottoms which is about $65 for the sheet...
Anyway, got down to Ovesco this morning at Nerang and picked up some bits and he told me there was a bolt shop just round the corner so I got all my hardware now. Did not get home tlll about 11:00 so did not get that much done (forgot some bolts until the way home so had to do a U turn across the 8 lane M1 which was annoying....)
Anyway when I got to Ovesco, they had a 1200 mm drawer all welded up using the Occo rollers so I had a good sample to work off. Here is some of the bits I got:
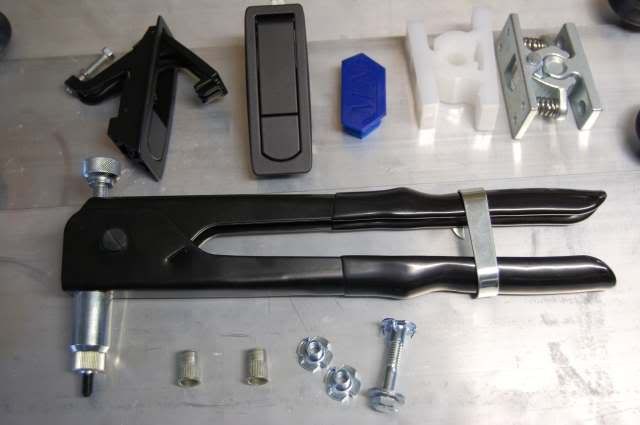
From top left, first two black things are the flush mount drawer catches, one open and the other closed. You push the bottom button and the handle pops out. Blue thing is the end cap for the Occo track, The next two items are catches and on their sample they used the cheap white plastic one to hold it closed (about $4) and I also bought the metal ones (about $20). They had their drawer set up so there was one plastic catch to keep it shut and another to keep it open...
The pliers gadget is a nutsert tool which cost about $70 plus $15 for each thread die. Thay had another kit there for about $540 but that was a bit over the top for casual use. To use this tool, you drill a 10mm hole in sheet metal (like a Hilux tub) and you then crimp in a M6 thread (dies for smaller sizes an some imperial ones as well). Scotty used a $300 version of this so if you want to see these in use roll back though this thread to my water tank... I bought 50 M6 nutserts at 31 cents each from Ovesco (good choice, they were 70c each at the bolt shop).
And finally a couple of T nuts that bite into the plywood to bolt the top deck to the Cubelock. I use a 3/4" wood bit in a hand brace to countersink the ply (basically cut out one layer of ply and once you put carpet over the top, they are totally hidden.
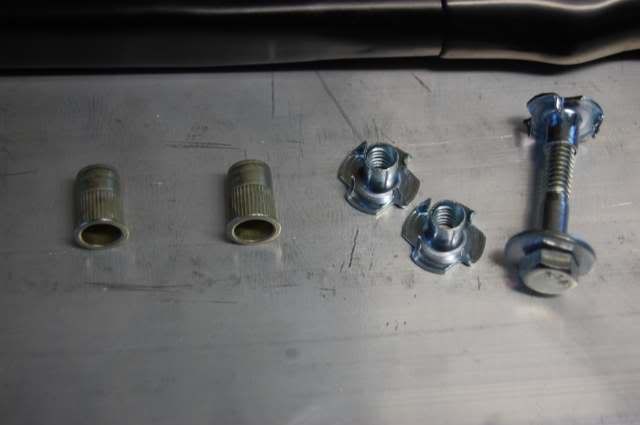
Close up of the fasteners (I just got to work out how to crimp in the nutserts):
So anyway, I got all of the Occo Rollers fitted basically following the pattern that they had used in their show room example (These are the four plates shown in yesterday's post) with 20 rollers at about $18 each added:

So here is a close up of the rollers at the end:
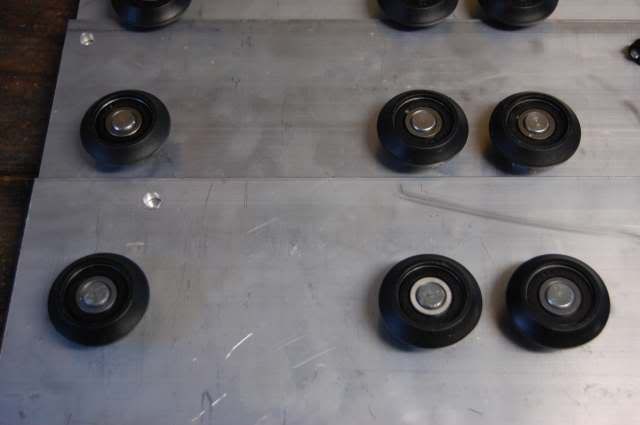
So the drawer will open as far as the pir of rollers close together. They say that with their sample drawer, they put 200 kg's in the front of the drawer and open it out full length. There will be about 300 mm of the drawer that does not extend.
I also spent a fair bit of the day stuffing around with the cubelock, to accommodate the ARB fitted fridge points:
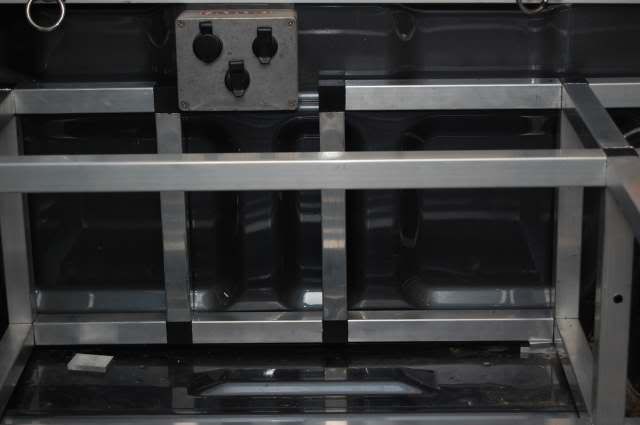
I think eventually I will remove this box and relocate all the fittings onto the end panel of the drawer unit (like the Skull Racing buildup).
Anyway, I thought it was about time I put it all together to make sue it was all good:
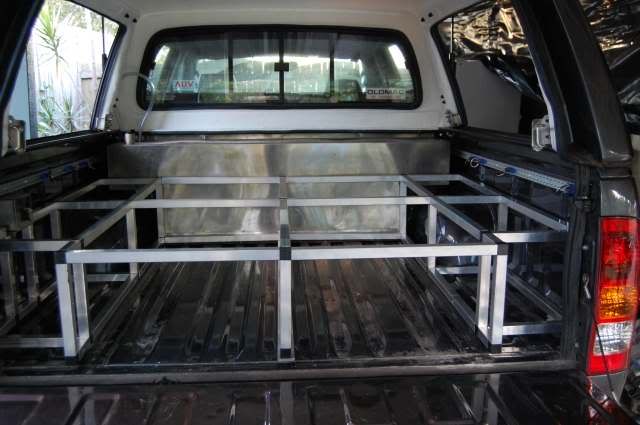
With the measurements I quoted yesterday, the drawers are such a tight fit accross the tub that it was hard to get it all in there, You have to build the top in two pieces, one piece goes from one side to the last drawer runner on the other side and the other piece is the short side wing component with the 220mm cross member. You have to set them up like an A frame tent and then it will all slip into position (with a bit of colourful language). But when you do get it all in place there is no movement at all, hardly need bolting down.
So now, all I have to do is to work out this nutsert thing and fix the frame to the tub. to do this, I will need to dissassemble the top so I can get a drill in there (which I am not looking forward to as it was such a tight fit).
Once that is done, I need to bolt on the top deck and build the drawers. I am paying the price of not having everything on hand before starting construction, there are a couple of things that i might do differently next time round to sort out the catches etc.
-
rodw - Posts: 3195
- Joined: Tue, 19 Feb 2008 2:00 +0000
- Location: Brisbane, QLD
Re: Rod's Rig
![]() by Alby on Sat, 08 Aug 2009 6:33 +0000
by Alby on Sat, 08 Aug 2009 6:33 +0000
going good Rod, as Max said you always put in a great effort to show us what you are up to
On the internet you can be anything you want. It is strange that so many people choose to be stupid!
-
Alby - Posts: 6673
- Joined: Tue, 03 Jul 2007 1:00 +0000
- Location: Sydney, NSW
Re: Rod's Rig
![]() by rodw on Sun, 09 Aug 2009 6:26 +0000
by rodw on Sun, 09 Aug 2009 6:26 +0000
Well, have not got too much to show for today's effort, as I took my son to a Uni open day, but found a couple of hours and I pulled it all out again and drilled all the mounting points and inserted the nutsert fasteners. I started on the centre rail and checked measurements to make sure it was centred in the tub, and drilled a 6 mm hole through the cubelock and into the tub. Then, I had to drill the holes in the tub out to 10 mm to receive the nutserts. I did a couple at the tailgate end to start with and then a couple more to get it all lined up than drilled all the 6mm holes, removed the frame altogether and let loose with the 10mm drill and nutsert tool. This is what I ended up with:
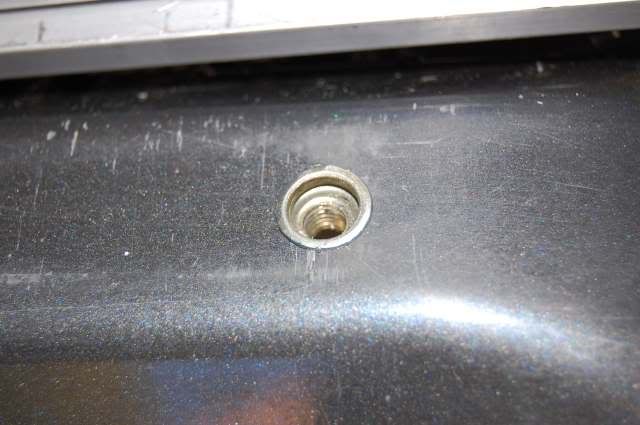
Just make sure you don't drill where there is a cross member under the tub as you won't get the clearance for the nutsert. If you look closely, you will work out where the crossmembers are by observing where the spotwelds are as you can see these on the tub itself.
Anyway, then it is a simple job of bolting the Cubelock on with some M6 bolts. I should be using washers, I bought them! the hole to the left is to hold on the plates I mounted the Occo rollers to.
Weighed all the bits so far and it comes to 24.7 kg so far including the Occo tracks that will be mounted to the drawers, (13.9 kg of that is the side plates and rollers). So anyway, the weight will be quite acceptable and I am sure the strength will be there. Show day here Wednesday, so with a bit of luck, I'll have the deck on by the end of the week.
Last edited by rodw on Mon, 10 Aug 2009 8:01 +0000, edited 1 time in total.
-
rodw - Posts: 3195
- Joined: Tue, 19 Feb 2008 2:00 +0000
- Location: Brisbane, QLD
Re: Rod's Rig
![]() by Diegothecat on Sun, 09 Aug 2009 6:55 +0000
by Diegothecat on Sun, 09 Aug 2009 6:55 +0000
looks like you have a bit of fun on hands. the dray system is looking good A+ for effort and ingenuity. I'll be tuning in for the updates.
Speed Safely
-

Diegothecat - Posts: 659
- Joined: Mon, 14 Apr 2008 1:00 +0000
- Location: Brisbane, QLD
Re: Rod's Rig
![]() by meep on Mon, 10 Aug 2009 9:02 +0000
by meep on Mon, 10 Aug 2009 9:02 +0000
Rod
How is the drawer system fixed to the tub?
Peter
How is the drawer system fixed to the tub?
Peter
There are 10 kinds of people in the world - those that understand binary and those that don't.
2006 HiLux Vigo 3.0 - read my iLux blog here
2006 HiLux Vigo 3.0 - read my iLux blog here
-

meep - Posts: 22
- Joined: Sun, 05 Jul 2009 8:16 +0000
Re: Rod's Rig
![]() by rodw on Tue, 11 Aug 2009 3:40 +0000
by rodw on Tue, 11 Aug 2009 3:40 +0000
meep wrote:Rod
How is the drawer system fixed to the tub?
Peter
Peter, the nutserts shown to the left of this pic
are inserted into a 10mm hole in the tub and crimped in place with the plier tool which give a nice 6mm metric thread in the tub as shown in the last post of mine. Then it is just a simple matter of bolting the frame to the tub with bolts going into the nutsert thread as shown in my last post. You can see I have also put a piece of ally under the middle rail so the side plates that hold the tracks have something to rest on as I did not want the weight to be on the Qubelok which only has 1.2mm thick walls. I'll try and post a pic of a nutsert from the underside.
-
rodw - Posts: 3195
- Joined: Tue, 19 Feb 2008 2:00 +0000
- Location: Brisbane, QLD
Re: Rod's Rig
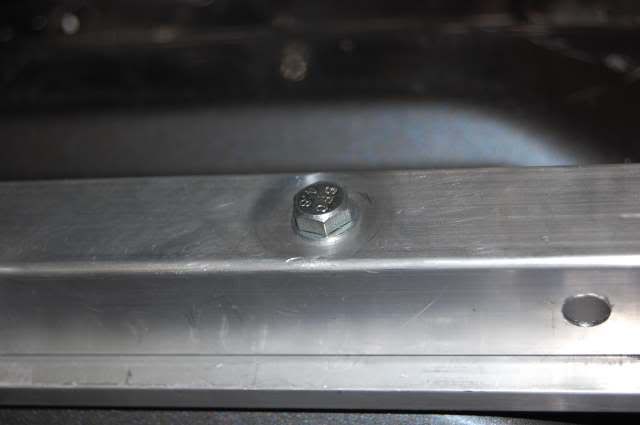
![]() by rodw on Tue, 11 Aug 2009 3:50 +0000
by rodw on Tue, 11 Aug 2009 3:50 +0000
Like this:
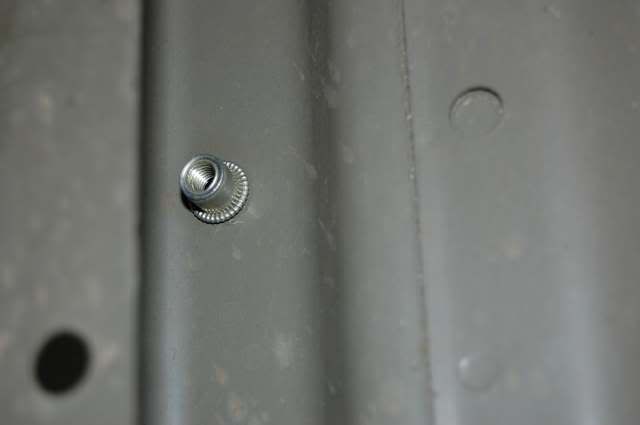
You can see how the nutsert has spread out right round the hole and as you tighten a bolt, it can only tighten further. The hole I drilled is the same diameter as the bottom of the nutsert.
You can see how the nutsert has spread out right round the hole and as you tighten a bolt, it can only tighten further. The hole I drilled is the same diameter as the bottom of the nutsert.
-
rodw - Posts: 3195
- Joined: Tue, 19 Feb 2008 2:00 +0000
- Location: Brisbane, QLD
Who is online
Users browsing this forum: No registered users and 11 guests
![]()