Pov Pack Project, canopy started

Want to show off what you've done to your rig? or have a custom project to show? Post it up here!

Pov Pack Project, canopy started

Postby Thunderbolt on Tue, 27 Nov 2012 4:40 +0000

Goodbye faithful old truck. been to the Cape 3 times, Coburg peninsular, Port Hedland, all over NE Vic mountains, been up Oodnadata , Finke and Tanami track

Image

winch and Ralleye 4000's have been removed for the new truck,
Has ARB lockers,4.88 diff gears, 33x12.5 MTZ's, body lift, winch bar cut and lifted etc,

The new replacement, poverty pack SR 2006
Image

Pulled off the alloy bar and factory bash plates, cut off the factory crappy mild steel tie down points

Image

Making some mods to the Axis mounting plates so I can fit recovery hooks and will lift lines before deciding how to do new bash plate, Thanks to all the guys that have done these mods before ,I'm just copying your work ;)

Cliff
Last edited by Thunderbolt on Thu, 24 Apr 2014 4:43 +0000, edited 4 times in total.
The older I get the better I was

MY BUILD viewtopic.php?f=41&t=16134
User avatar
Thunderbolt
 
Posts: 103
Joined: Thu, 18 Oct 2012 5:30 +0000
Location: Albury


Re: Pov Pack Project

Postby kyle300exc on Tue, 27 Nov 2012 5:58 +0000

Look on the bright side Cliff you'll be a bit more comfortable getting around now. Plenty of us with sr's mate no shame in that :D
Kyle


Never, under any circumstances, take a sleeping pill and a laxative on the same night.
User avatar
kyle300exc
Moderator
 
Posts: 8567
Joined: Mon, 20 Sep 2010 12:32 +0000
Location: Narellan

Re: Pov Pack Project

Postby Thunderbolt on Tue, 27 Nov 2012 6:20 +0000

kyle300exc wrote:Look on the bright side Cliff you'll be a bit more comfortable getting around now.


This one has air con :lol: and a little hole in the radio to plug in my iPhone so I can listen to tunes :shock:

Cliff
The older I get the better I was

MY BUILD viewtopic.php?f=41&t=16134
User avatar
Thunderbolt
 
Posts: 103
Joined: Thu, 18 Oct 2012 5:30 +0000
Location: Albury

Re: Pov Pack Project

Postby TDog on Tue, 27 Nov 2012 6:30 +0000

Thunderbolt wrote:
kyle300exc wrote:Look on the bright side Cliff you'll be a bit more comfortable getting around now.


This one has air con :lol: and a little hole in the radio to plug in my iPhone so I can listen to tunes :shock:

Cliff


Show off!!! My 2003 still has original Toyota tape deck!!

Look forward to watch the new one take shape.
My Build Thread!

Beer O'Clock Hill!
LCMP Camp Road!
Janowen Hills Mud Run!

If you don't mind .......... I have a serious crush on my Hilux!
User avatar
TDog
Platinum Subscriber
 
Posts: 662
Joined: Fri, 03 Feb 2012 4:27 +0000
Location: Marsden, QLD

Re: Pov Pack Project

Postby Thunderbolt on Tue, 27 Nov 2012 9:49 +0000

Trail fit of brackets. Just a bit of grinding and a squirt of paint, turn up some crush tubes, and I can look at fitting the Axis bar

Image

Cliff
Last edited by Thunderbolt on Tue, 27 Nov 2012 2:15 +0000, edited 1 time in total.
The older I get the better I was

MY BUILD viewtopic.php?f=41&t=16134
User avatar
Thunderbolt
 
Posts: 103
Joined: Thu, 18 Oct 2012 5:30 +0000
Location: Albury

Re: Pov Pack Project

Postby Thunderbolt on Tue, 27 Nov 2012 2:11 +0000

Undercoated the bullbar mounting brackets this afternoon. Her's a pic of the Axis bar bracket with the extra lug and holes for the recovery hook

Image

I think I should service the winch next while it's off and then I can start bolting bits on the new truck

Cliff
The older I get the better I was

MY BUILD viewtopic.php?f=41&t=16134
User avatar
Thunderbolt
 
Posts: 103
Joined: Thu, 18 Oct 2012 5:30 +0000
Location: Albury

Re: Pov Pack Project

Postby Thunderbolt on Sun, 02 Dec 2012 3:34 +0000

Servicing the winch was fairly simple. Motor was fine and just needed blowing out and sealing. The gearbox had some rust in it but a good clean with petrol and a little time with some fine wet and dry on the free wheeling surfaces , lots of grease on the gears, and it was good to go. I'm going to replace the steel cable with plasma rope so painted the drum with two coats of cold gal while it was aapart. Got to fit the winch in the bar and fit the bar to the truck today and discovered that the plastic liners and funny factory brackets supporting them look crap and will need chopping, Also may do some sort of guard for bottom of water bottle. Will add some more pic's when I get the spotlights mounted on bar.
Cliff

Image
The older I get the better I was

MY BUILD viewtopic.php?f=41&t=16134
User avatar
Thunderbolt
 
Posts: 103
Joined: Thu, 18 Oct 2012 5:30 +0000
Location: Albury

Re: Pov Pack Project

Postby Thunderbolt on Mon, 03 Dec 2012 4:36 +0000

Drilled a couple of holes in the bar and mounted the Hella 4000 driving lights and decided to take the dog out for a swim

Image

It's screaming out for a big lift and some fat wheels...I'm no.6 on the list for DMS coil overs ;)
The older I get the better I was

MY BUILD viewtopic.php?f=41&t=16134
User avatar
Thunderbolt
 
Posts: 103
Joined: Thu, 18 Oct 2012 5:30 +0000
Location: Albury

Re: Pov Pack Project

Postby Thunderbolt on Mon, 31 Dec 2012 7:27 +0000

Well it's coming together slowly with Xmas and my daughters engagement party distractions. I also got in a bit of flyfishing too :D
Pulled the grille out and fitted the winch and new plasma rope and as I have the long cables decided to mount the control box in the engine bay. After talking to Steve at KSP I came home poorer and with a new lighter more compact solenoid box that I mounted near the battery on a bracket I fabbed. Also fitted and wired Custom Rocker switches for driving lights, in cab winch control and battery isolator solenoid over ride. Got the ARB air locker switches and wiring in too.

Image

Image

Also removed the factory brackets that hold the plastic guard liners below the wings of the Axis bar and trimmed the corners off the steel bits hanging out there was going to cut it back to the top line but changed my mind
Image

I made up a small bracket to attach the plastic liner to stop it flapping and annoying the shit out of me.
Bracket in place and a bit of trimming with the angle grinder and a splash of black paint

Image


Image

Image

Has anyone relocated the washer bottle? As I'm running my second battery under the tray I was thinking of putting an aftermarket washer bottle in the space where the dual battery usually goes

Nice and clean under the bar wings but looks weird with stock wheels :lol:

Next week diff drop bracket and DMS coil overs
Image
The older I get the better I was

MY BUILD viewtopic.php?f=41&t=16134
User avatar
Thunderbolt
 
Posts: 103
Joined: Thu, 18 Oct 2012 5:30 +0000
Location: Albury

Re: Pov Pack Project

Postby Wazza80 on Mon, 31 Dec 2012 9:00 +0000

Axis bar looks the goods.
Awsome job with the recovery hooks mate. Exactlty what i had in mind of doing.
Easier to get the snatchy on quicker when filling up with water :D
Wazza80
 
Posts: 313
Joined: Mon, 05 Nov 2012 6:57 +0000
Location: Deception Bay

Re: Pov Pack Project

Postby Thunderbolt on Mon, 31 Dec 2012 11:38 +0000

Wazza80 wrote:Easier to get the snatchy on quicker when filling up with water :D


exacery!!

Also I only run a 8000lb winch and if I need a double pull with a snatch block I can hook each end of a drag chain on the two hooks, hook the return line onto that, and that distributes the load evenly onto the nose of both chassis rails

Cliff
The older I get the better I was

MY BUILD viewtopic.php?f=41&t=16134
User avatar
Thunderbolt
 
Posts: 103
Joined: Thu, 18 Oct 2012 5:30 +0000
Location: Albury

Re: Pov Pack Project

Postby Thunderbolt on Mon, 14 Jan 2013 6:56 +0000

Now that it's cooled off a bit I got a couple of jobs done on the truck. Stuff working in 40 c heat !!
Got the MR diff relocating brackets in with just a little bit of swearing. The hardest bit was getting the diff in a position where I could get all the bolts started. Seems I was being too gentle, you need to tell it who is boss :D

Image

Woohoo!! DMS struts in place. Also did a bit of linishing for boot clearance (thanks for the tip Steve) and fitted the UCA with extended ball joints

Image

I will be refitting the sway bar after I make some low profile relocation brackets
The older I get the better I was

MY BUILD viewtopic.php?f=41&t=16134
User avatar
Thunderbolt
 
Posts: 103
Joined: Thu, 18 Oct 2012 5:30 +0000
Location: Albury

Re: Pov Pack Project

Postby Thunderbolt on Wed, 13 Feb 2013 5:28 +0000

I have made a little progress. Made and installed the sway bar relocation brackets

Image

Made some extended shackles

Image

Also did a cut and shut on the towbar brackets to lift it about 100mm

Image

The piss poor departure angle in stock form is only about 23 deg. By just adding extended shackles and lifting the tow bar it gets up to a reasonable 29 and this will be increased with larger wheels and reset springs

Image
Image

New wheels :D
Image
The older I get the better I was

MY BUILD viewtopic.php?f=41&t=16134
User avatar
Thunderbolt
 
Posts: 103
Joined: Thu, 18 Oct 2012 5:30 +0000
Location: Albury

Re: Pov Pack Project

Postby kyle300exc on Wed, 13 Feb 2013 6:02 +0000

I like what you have done with the tow bar. I haven't refitted mine since I changed to a tray. May do something similar :D
Kyle


Never, under any circumstances, take a sleeping pill and a laxative on the same night.
User avatar
kyle300exc
Moderator
 
Posts: 8567
Joined: Mon, 20 Sep 2010 12:32 +0000
Location: Narellan

Re: Pov Pack Project

Postby packeteer on Wed, 13 Feb 2013 7:02 +0000

what's the new rubber?
2011 Dual Cab SR5 D4D manual.
build thread
shed page
User avatar
packeteer
 
Posts: 3468
Joined: Wed, 27 Apr 2011 1:49 +0000
Location: Chatswood, Sydney

Re: Pov Pack Project

Postby Monster Rides on Wed, 13 Feb 2013 7:34 +0000

Nice work Cliff... This truck of yours is coming along nicely.

The tyres look like Summit Mud Hogs?


Cheers,
Matt
MONSTER RIDES :: +05 HILUX Specialist

e: sales@monsterrides.com.au
f: http://www.facebook.com/monsterrides
t: 1800 55 44 24
m: 0430 297 444
User avatar
Monster Rides
 
Posts: 1516
Joined: Fri, 26 Jun 2009 7:03 +0000

Re: Pov Pack Project

Postby Thunderbolt on Thu, 14 Feb 2013 4:11 +0000

Thanks guys, yep Summit Mud Hogs in 285x75x16 on Patrol rims. I'm running almost 3" lift in the front and with the plus 10 offset I have no rubbing issues with everyday driving. Will now have to flex it right up and see where I have to trim inner guards. The tyres are from Jappo Donks in Wodonga. Cheap too, saved enough to buy some MR rear shocks when they come out ;)

Cheers
Cliff
The older I get the better I was

MY BUILD viewtopic.php?f=41&t=16134
User avatar
Thunderbolt
 
Posts: 103
Joined: Thu, 18 Oct 2012 5:30 +0000
Location: Albury

Re: Pov Pack Project

Postby bailey762 on Thu, 14 Feb 2013 6:20 +0000

Hey cliff looking real good cant wait to see more
Ash
bailey762
 
Posts: 140
Joined: Sat, 17 Dec 2011 6:13 +0000
Location: Howlong nsw

Re: Pov Pack Project

Postby tomdrivesahilux on Thu, 14 Feb 2013 3:12 +0000

Nice single cab man
tomdrivesahilux
 
Posts: 12
Joined: Wed, 17 Oct 2012 4:45 +0000

Re: Pov Pack Project

Postby Thunderbolt on Sun, 17 Feb 2013 6:30 +0000

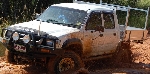
Went to my daughters on friday and took and the muts for a ride in the bush. Headed up into the snow gum country to see how the truck mods perform. It was mostly 2wd forestry tracks with the last climb only needing 4L.


Check out the killer guard dogs
Image

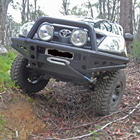
Did a little flexing up to check clearances and definitely need more droop in the rear, still running stock springs :(
Image

Still have about 40mm between stop and chassis. Will need to cut out tie down rail and shift mud guards out and kick them up a bit
Image


Didn't try real hard on the front as I haven't done any trimming in there yet but so far the plus 10 offset wheels are allowing the tyres to clear on most of the bush tracks. I did get a rubbing sound from a front tyre when I did a three point turn on a slope
Image
Image

On bush tracks in 2H it's awesome, however the dickhead Toyota engineers that selected the ratios for diffs must have been on crack. Why would you put a 3.5 diff in a 4wd :?: What I could crawl up in 2nd or 3rd gear in 4L in my old 2.8 now requires 1st gear and minimum of 2000rpm. My old 2.8 had more grunt from idle to 2000 than this thing. My style of bush driving is to put the lockers in and crawl up to and over obstacles rather than charge and bounce with the engine in boost rev range. 4.1 or 4.5 gears are going in the lockers for sure!

Generally I'm pretty happy with it all but still lots to do and money is always in short supply :lol:

Cliff

Edit to add: got a bit of dog food on the way home so the truck has now been chistened with some mud and blood :D
The older I get the better I was

MY BUILD viewtopic.php?f=41&t=16134
User avatar
Thunderbolt
 
Posts: 103
Joined: Thu, 18 Oct 2012 5:30 +0000
Location: Albury

Next

Return to Member Build Ups

Who is online

Users browsing this forum: No registered users and 40 guests