Racor fuel filter
Re: Racor fuel filter
Does the fuel manager 100 series have a primer built into it somewhere?
60% of the time, it works every time
-
Hellbound - Posts: 1167
- Joined: Sun, 09 May 2010 4:06 +0000
Re: Racor fuel filter
Hellbound wrote:Does the fuel manager 100 series have a primer built into it somewhere?
Hi Hellbound
The answer is NO
You have to prime it using the original filter, it takes a few minutes to prime it
-
Swinder - Posts: 237
- Joined: Mon, 20 Feb 2012 2:12 +0000
Re: Racor fuel filter
Hey guys a idea to mount the second filter is if you have a second battery mount it onto the bracket which holds the battery in! Fits just right !
-
esayward - Posts: 61
- Joined: Tue, 05 Feb 2013 5:43 +0000
Re: Racor fuel filter
Swinder wrote:Hellbound wrote:Does the fuel manager 100 series have a primer built into it somewhere?
Hi Hellbound
The answer is NO
You have to prime it using the original filter, it takes a few minutes to prime it
Well now that depends...Yes a hand primer is available. It adds about $80 to the price. I didn't bother and do not think it is needed.
Occupational health and safety officers..Stop messin with Darwin's theory of natural selection... Stupid hippies.
Oggy's build viewtopic.php?f=41&t=19033
Oggy's build viewtopic.php?f=41&t=19033
-

oggy - Moderator
- Posts: 3123
- Joined: Thu, 24 May 2012 6:47 +0000
Re: Racor fuel filter
definatly not needed, you can hand prime on the stock unit.
- qldminer
- Posts: 249
- Joined: Fri, 12 Oct 2012 4:05 +0000
- Location: Middlemount, QLD
Re: Racor fuel filter
I have installed the racor unit which I will shortly write up in this thread but this is the ebay supplier I used who I just noticed is selling the 445R unit at a very good price
http://www.ebay.com/itm/Racor-445r30-Fu ... EL:US:1123
I won;t expand much more at the moment as I will put it all down in my write up.
http://www.ebay.com/itm/Racor-445r30-Fu ... EL:US:1123
I won;t expand much more at the moment as I will put it all down in my write up.
"of all the things I've lost I miss my mind the most"
-

2007Lux - Posts: 381
- Joined: Sat, 13 Nov 2010 10:56 +0000
- Location: Eastern Goldfields, WA
Re: Racor fuel filter
Nice one mate, did you get the water probe / sensor too? and what micron?
Or i should just wait for the full write up
Or i should just wait for the full write up
60% of the time, it works every time
-

Hellbound - Posts: 1167
- Joined: Sun, 09 May 2010 4:06 +0000
Re: Racor fuel filter
yes I have just walked in from the shed installing the probe, just have to wire it through intot he cab. Hey what + did you use? I already have two things piggy backing my cig lighter so I don;t want another.
"of all the things I've lost I miss my mind the most"
-

2007Lux - Posts: 381
- Joined: Sat, 13 Nov 2010 10:56 +0000
- Location: Eastern Goldfields, WA
Re: Racor fuel filter
Bought a cheap 12v light / buzzer of the ebay ...
http://www.ebay.com.au/itm/2pcs-12V-16m ... 895wt_1163
and wired it to accessory line - taped into the electric window wire. Took off the removable lower panel on the drivers side and found a switched on there, think it was either the electric mirrors or something else accessible from behind that panel
60% of the time, it works every time
-

Hellbound - Posts: 1167
- Joined: Sun, 09 May 2010 4:06 +0000
Re: Racor fuel filter
taa windows sounds good. yep got a cheap buzzer and the probe came with a light
"of all the things I've lost I miss my mind the most"
-

2007Lux - Posts: 381
- Joined: Sat, 13 Nov 2010 10:56 +0000
- Location: Eastern Goldfields, WA
Re: Racor fuel filter
Hi All,
I’ve just completed the install of my diesel prefilter/water seperator which I have detailed as best I can below. I am no diesel fuel specialist but have designed my system after researching this and other sites, and also talking to people in person. If you are looking at putting a second filter on you’ll find opinions out there are as diverse as say that of tyres or dual battery set ups. I went with a 30micron prefilter as I like the idea of having a staged filtration system with a good size differential between the two filters. I still believe no one knows the micron size of the OEM one but if Toyota are offering to install 5 micron secondary filters I suspect the primary filter element to be in the 5- 10 micron range??
Mounting location:
Figure 1 - As you can see I have no room on the RHS of my engine bay as I run a dual battery (BCDC1220) with a manual override solenoid to join the batteries if the main happened to fail. So I had to use the left hand side
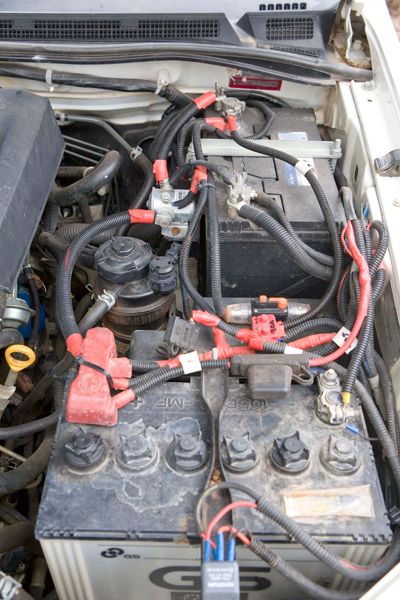
Figure 2 - Engine bay left side has plenty of room as I mounted my compressor under my rear passenger seat.
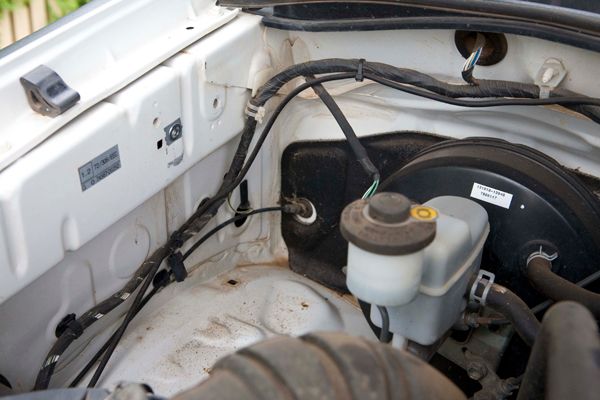
Figure 3 - I managed to use one threaded holes on the engine bay side wall and then I used a nutsert tool to create another one. The grey is from primer paint I applied after drilling the hole
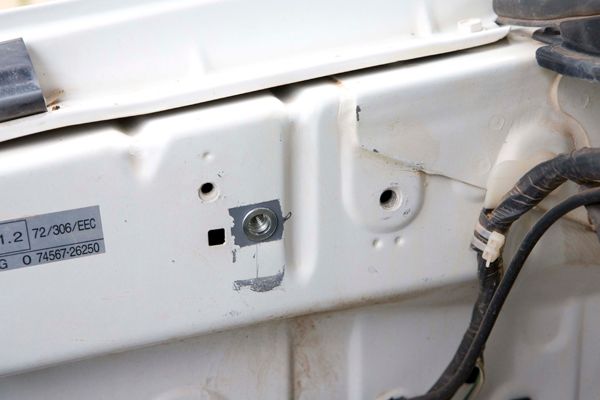
The filter unit: Racor 445R
For full specifications on this unit download this pdf
http://www.parker.com/literature/Racor/ ... Series.pdf
Figure 4 - The filter showing the approx length of 26cm with the fuel restrictor indicator installed. Note the drain valve is the lowest point on the filter unit. The unit I ordered comes standard with a hand primer.
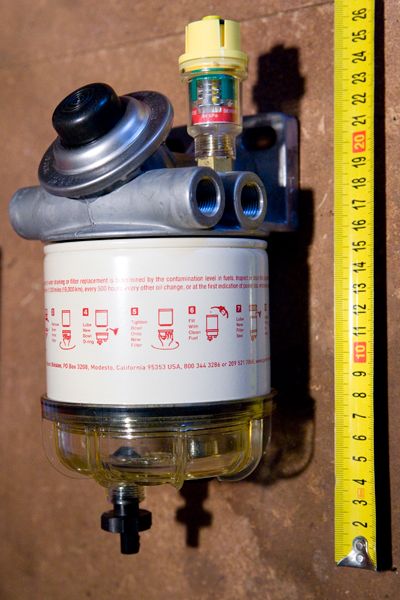
Figure 5 - The fuel restrictor indicator which was included with the filter unit I purchased. I’m guessing as the element gets blocked the vacuum increases thus compressing the spring inside this unit which is attached to an indicator. It will be interesting to see how this behaves over the course of the filter elements first 20k cycle.
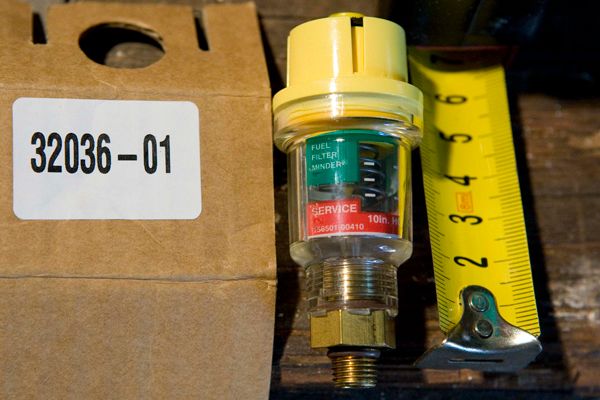
Figure 6 - The unit has two inlet ports and two outlet ports. The unit came with two threaded blanking plugs to block the ports you are not going to use.
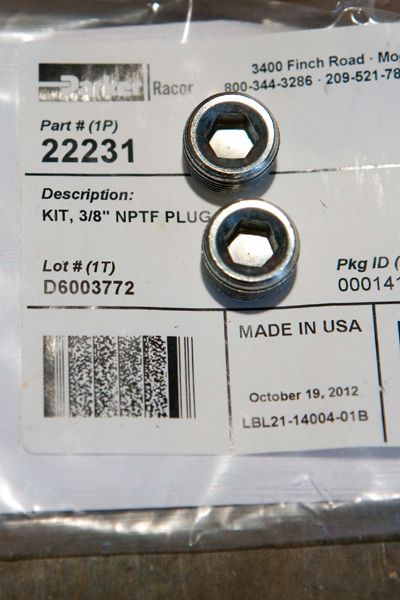
Figure 7 – The two 3/8 NPT 90degree barbed fittings I purchased to attach to the ports.
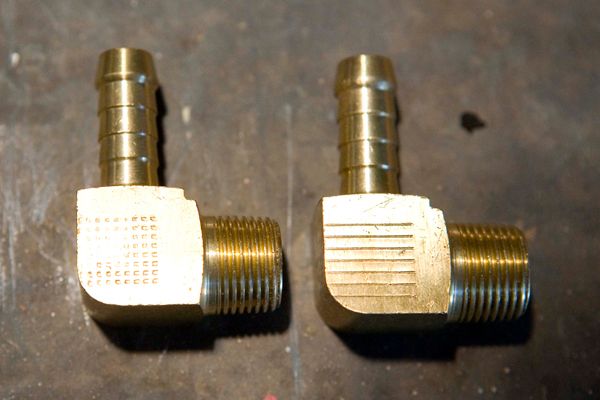
Figure 8 - Use a pipe sealant rather than thread tape when screwing in the fittings as bits of the tape may get into the fuel system.
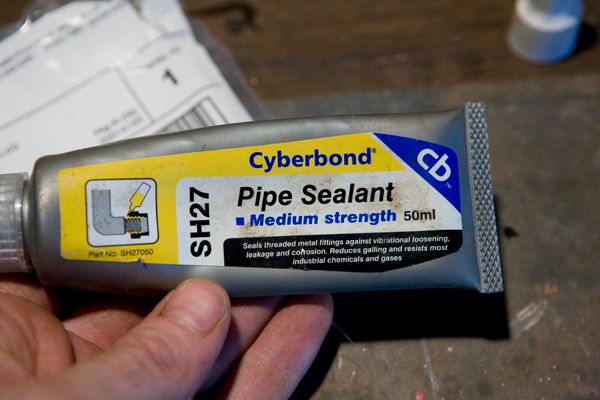
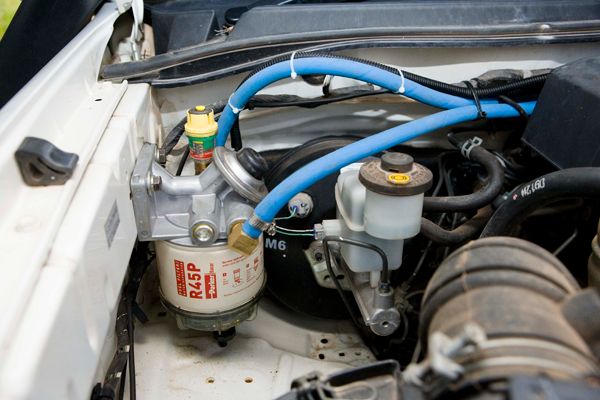
Figure 9 - The mounted unit with hoses threaded high along the fire wall to the OEM filter. Make sure you protect the hose with some large diameter (20mm ish) corrugated conduit as there are a few small bolt ends which protrude through form the cab right next to where I ran the fuel lines. Another point is do not over tighten the hose clamp on the inlet to the OEM filter as it is only plastic. I guess I could have used the original spring clip here?
The water-in-fuel Detection Kit, Part no. RK30880E
For full specifications on this unit download this pdf
http://www.parker.com/literature/Racor/ ... on_Kit.pdf
If getting the water detection probe make sure it is this part number as I accidentally ordered part number RK30694 which is just a probe with no electronics. I wrongly assumed I could simply add a light to this but in the instructions for this part it says a detection module is required. The RK30880E has a resistor built into which triggers the alarm (closes the circuit) when a resistance of 47Ohms is achieved. Before I did any wiring up I first made a test circuit on my work bench and placed the probe in a glass of water to see how it worked and I’m glad to say it does. It does take a 5 -10 seconds to turn off once you remove the probe from the water and dry it manually.
Figure 10 - The RK30880E kit. It has a very nice harness with very robust connectors. The wiring harness comes in two main bits, the probe plus and the wiring harness which joins together with a very good quality plug.
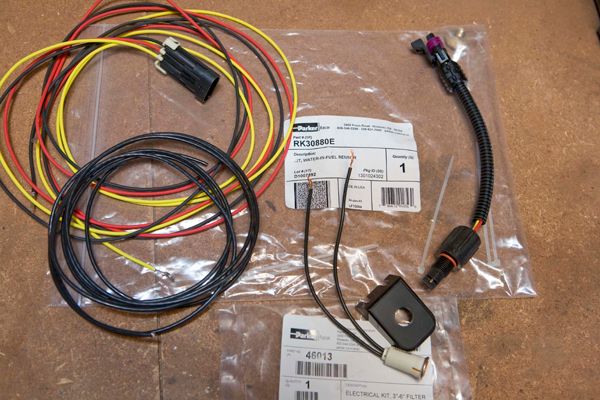
Figure 11 - The wiring diagram for the above pdf with the position of the buzzer I added in parallel with the warning light
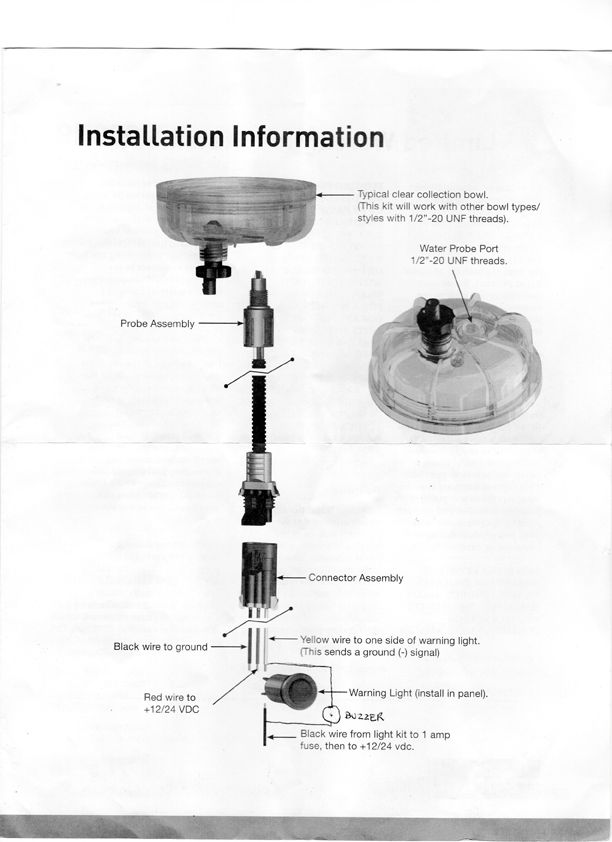
Figure 12 - The end of the probe which screws into the bottom of the water bowl.
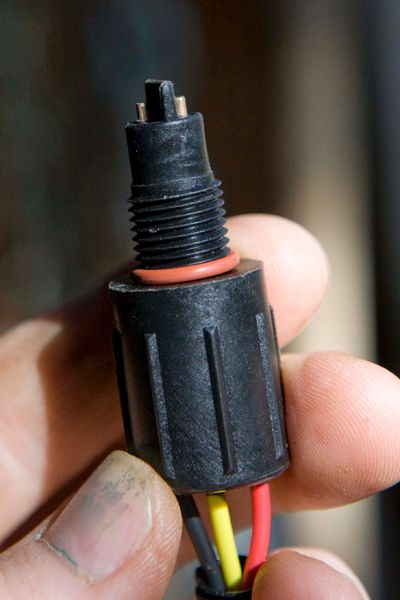
Figure 13 – The female socket attached to the probe
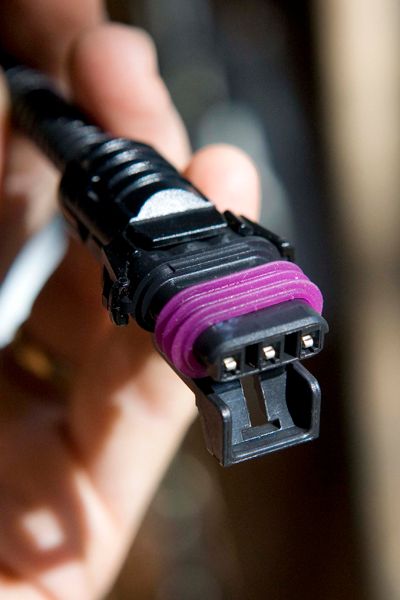
Figure 14 – The male connector. Note there is only three wires (red, black , yellow) which come out of the plug.
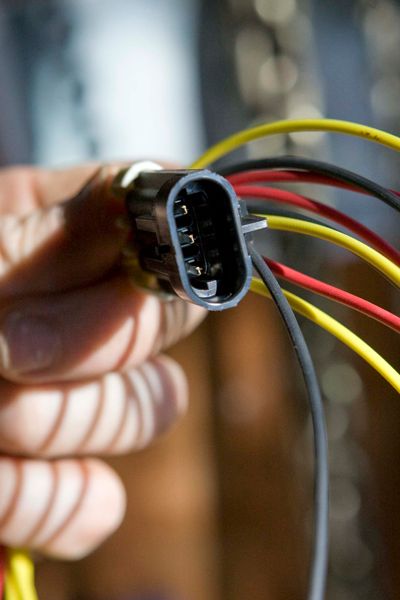
Figure 15 – The warning light which is supplied with the kit
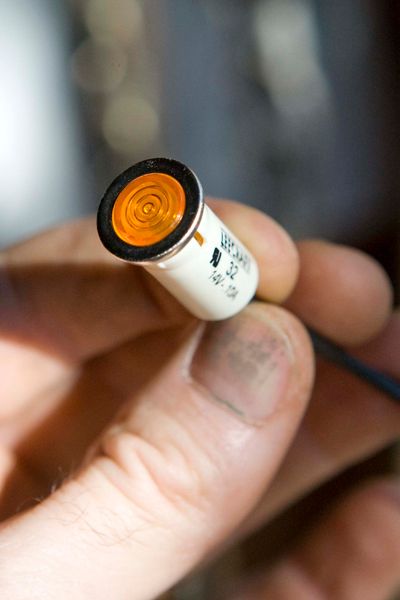
Figure 16 – The 445R unit with the water probe installed
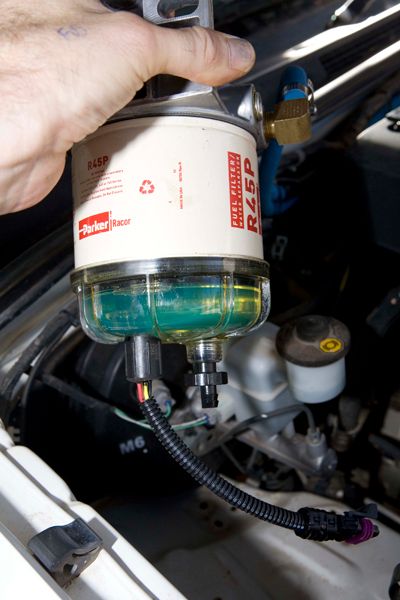
Figure 17 – For a positive power source I used the big blue wire from what I believe is the power mirror circuit located behind the front passenger side kick panel. I spliced both the red wire and one of the wires from the warning light into this. Note in this image the yellow wire spliced into the blue is not the yellow on the supplied loom it is actually an in line fuse holder which then connects to the warning light as per the wiring diagram. The yellow wire from the loom goes to the other side of the warning light. The blue wire is only live when the key is in the ON position and not the ACC or OFF positions
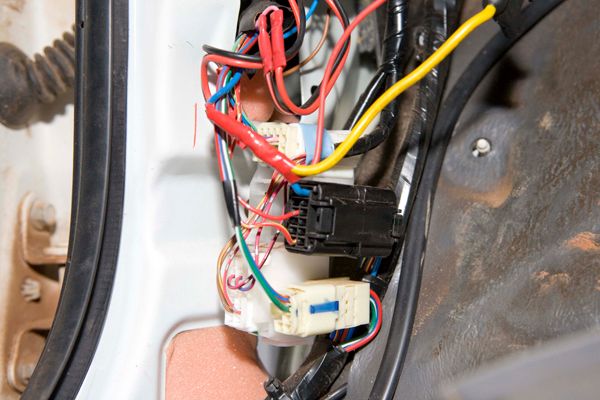
Figure 18 – Testing the circuit. Before I crimped everything up I grounded the yellow wire side of the warning light to simulate the water probe being triggered. It worked as you can see by the bright yellow light. I simply grounded it to the negative of the cigarette ligther. I later found out that when you start your car the light and buzzer is triggerd momentarily which lets you know the circuit is operational.
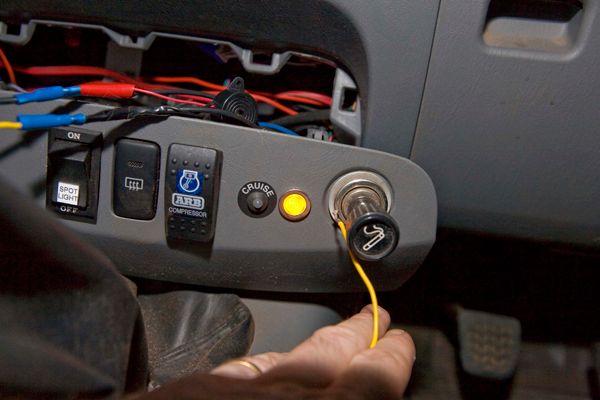
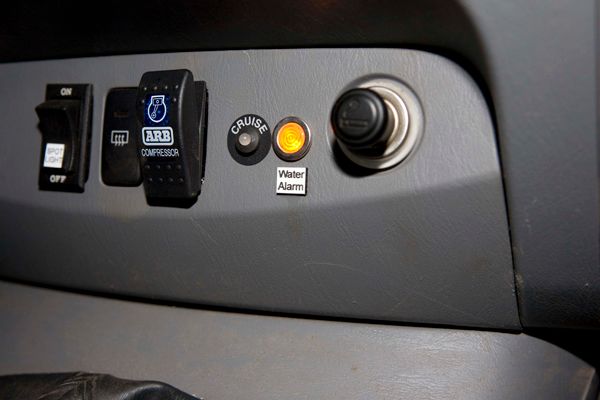
Figure 19 – Installed water in fuel light in dash. The piezo buzzer is behind the panel which I wrapped some electrical tape around to dampen the noise a bit. I finished the job off with a little plastic engraved label I had made at a trophy shop.
Costs:
1. Racor 445R Fuel Filter/Water separator with one 30 micron filter element and vacuum guage $209.35.
2. Two spare filter elements $68.84
3. Water in Fuel Detection Kit Part No RK30880E. I think it was around the $90. It is hard to know as I returned the wrong probe for a refund and then was shipped the correct part.
4. Mini Piezo Buzzer 3-16V $4
5. 2m Fuel line $19. Note I actually got about 2.5m as it was the end of the roll so the guy just gave me the lot which I used all of.
6. 2 x 3/8 90 degree barbed male elbows $14
7. 4 x hose clamps $14
8. 2m split 7mm corrugated conduit $4
9. 1m wire and connectors $2
10. Inline bland fuse holder $6
11. Label for installed warning light
Total of $368 plus $69 for two spare filter elements. All figures are inclusive of postage which was from New York State in the case of the filter unit and accessories.
Conclusions:
This was not a hard install but it did take some planning and sourcing parts from different suppliers. I say it took 3 – 4 hours but I did it over the course of two weeks so it’s hard to tell. The supplier for the racor products I used was
http://stores.ebay.com.au/themarinesupplier
This supplier was very good to deal with and accepted the return of the wrongly order part even though I had opened the package. If you want extra parts like the water probe and filter elements it is best to contact him first to get a price for the total amount. He didn’t actually have the RK30880E part listed on his site but I PMed him and he said he could supply it. Thanks also to previous posters to this thread and other related threads on this forum.
I’ve just completed the install of my diesel prefilter/water seperator which I have detailed as best I can below. I am no diesel fuel specialist but have designed my system after researching this and other sites, and also talking to people in person. If you are looking at putting a second filter on you’ll find opinions out there are as diverse as say that of tyres or dual battery set ups. I went with a 30micron prefilter as I like the idea of having a staged filtration system with a good size differential between the two filters. I still believe no one knows the micron size of the OEM one but if Toyota are offering to install 5 micron secondary filters I suspect the primary filter element to be in the 5- 10 micron range??
Mounting location:
Figure 1 - As you can see I have no room on the RHS of my engine bay as I run a dual battery (BCDC1220) with a manual override solenoid to join the batteries if the main happened to fail. So I had to use the left hand side

Figure 2 - Engine bay left side has plenty of room as I mounted my compressor under my rear passenger seat.

Figure 3 - I managed to use one threaded holes on the engine bay side wall and then I used a nutsert tool to create another one. The grey is from primer paint I applied after drilling the hole

The filter unit: Racor 445R
For full specifications on this unit download this pdf
http://www.parker.com/literature/Racor/ ... Series.pdf
Figure 4 - The filter showing the approx length of 26cm with the fuel restrictor indicator installed. Note the drain valve is the lowest point on the filter unit. The unit I ordered comes standard with a hand primer.

Figure 5 - The fuel restrictor indicator which was included with the filter unit I purchased. I’m guessing as the element gets blocked the vacuum increases thus compressing the spring inside this unit which is attached to an indicator. It will be interesting to see how this behaves over the course of the filter elements first 20k cycle.

Figure 6 - The unit has two inlet ports and two outlet ports. The unit came with two threaded blanking plugs to block the ports you are not going to use.

Figure 7 – The two 3/8 NPT 90degree barbed fittings I purchased to attach to the ports.

Figure 8 - Use a pipe sealant rather than thread tape when screwing in the fittings as bits of the tape may get into the fuel system.

Figure 9 - The mounted unit with hoses threaded high along the fire wall to the OEM filter. Make sure you protect the hose with some large diameter (20mm ish) corrugated conduit as there are a few small bolt ends which protrude through form the cab right next to where I ran the fuel lines. Another point is do not over tighten the hose clamp on the inlet to the OEM filter as it is only plastic. I guess I could have used the original spring clip here?

The water-in-fuel Detection Kit, Part no. RK30880E
For full specifications on this unit download this pdf
http://www.parker.com/literature/Racor/ ... on_Kit.pdf
If getting the water detection probe make sure it is this part number as I accidentally ordered part number RK30694 which is just a probe with no electronics. I wrongly assumed I could simply add a light to this but in the instructions for this part it says a detection module is required. The RK30880E has a resistor built into which triggers the alarm (closes the circuit) when a resistance of 47Ohms is achieved. Before I did any wiring up I first made a test circuit on my work bench and placed the probe in a glass of water to see how it worked and I’m glad to say it does. It does take a 5 -10 seconds to turn off once you remove the probe from the water and dry it manually.
Figure 10 - The RK30880E kit. It has a very nice harness with very robust connectors. The wiring harness comes in two main bits, the probe plus and the wiring harness which joins together with a very good quality plug.

Figure 11 - The wiring diagram for the above pdf with the position of the buzzer I added in parallel with the warning light

Figure 12 - The end of the probe which screws into the bottom of the water bowl.

Figure 13 – The female socket attached to the probe

Figure 14 – The male connector. Note there is only three wires (red, black , yellow) which come out of the plug.

Figure 15 – The warning light which is supplied with the kit

Figure 16 – The 445R unit with the water probe installed

Figure 17 – For a positive power source I used the big blue wire from what I believe is the power mirror circuit located behind the front passenger side kick panel. I spliced both the red wire and one of the wires from the warning light into this. Note in this image the yellow wire spliced into the blue is not the yellow on the supplied loom it is actually an in line fuse holder which then connects to the warning light as per the wiring diagram. The yellow wire from the loom goes to the other side of the warning light. The blue wire is only live when the key is in the ON position and not the ACC or OFF positions

Figure 18 – Testing the circuit. Before I crimped everything up I grounded the yellow wire side of the warning light to simulate the water probe being triggered. It worked as you can see by the bright yellow light. I simply grounded it to the negative of the cigarette ligther. I later found out that when you start your car the light and buzzer is triggerd momentarily which lets you know the circuit is operational.

Figure 19 – Installed water in fuel light in dash. The piezo buzzer is behind the panel which I wrapped some electrical tape around to dampen the noise a bit. I finished the job off with a little plastic engraved label I had made at a trophy shop.

Costs:
1. Racor 445R Fuel Filter/Water separator with one 30 micron filter element and vacuum guage $209.35.
2. Two spare filter elements $68.84
3. Water in Fuel Detection Kit Part No RK30880E. I think it was around the $90. It is hard to know as I returned the wrong probe for a refund and then was shipped the correct part.
4. Mini Piezo Buzzer 3-16V $4
5. 2m Fuel line $19. Note I actually got about 2.5m as it was the end of the roll so the guy just gave me the lot which I used all of.
6. 2 x 3/8 90 degree barbed male elbows $14
7. 4 x hose clamps $14
8. 2m split 7mm corrugated conduit $4
9. 1m wire and connectors $2
10. Inline bland fuse holder $6
11. Label for installed warning light
Total of $368 plus $69 for two spare filter elements. All figures are inclusive of postage which was from New York State in the case of the filter unit and accessories.
Conclusions:
This was not a hard install but it did take some planning and sourcing parts from different suppliers. I say it took 3 – 4 hours but I did it over the course of two weeks so it’s hard to tell. The supplier for the racor products I used was
http://stores.ebay.com.au/themarinesupplier
This supplier was very good to deal with and accepted the return of the wrongly order part even though I had opened the package. If you want extra parts like the water probe and filter elements it is best to contact him first to get a price for the total amount. He didn’t actually have the RK30880E part listed on his site but I PMed him and he said he could supply it. Thanks also to previous posters to this thread and other related threads on this forum.
"of all the things I've lost I miss my mind the most"
-

2007Lux - Posts: 381
- Joined: Sat, 13 Nov 2010 10:56 +0000
- Location: Eastern Goldfields, WA
Re: Racor fuel filter
awesome run through 2007lux
- qldminer
- Posts: 249
- Joined: Fri, 12 Oct 2012 4:05 +0000
- Location: Middlemount, QLD
Re: Racor fuel filter
Thanks for the excellent notes and pix. Looking at doing the same. Where did you run the wires through the fire wall. In my last 4WD, I ran too many wires through one of the grommets in the fire-wall. Each time it rained, the rain water ran down the inside of the fire-wall, and ran over the grommet, it followed the (too-many) wires into the cabin and onto the carpet. I am curious where the safest entry for wiring and aerial leads is on the Hiluxes ?  (photo would help if possible)
-
Tony65 - Posts: 59
- Joined: Sun, 30 Dec 2012 3:43 +0000
- Location: Wallan Victoria
Re: Racor fuel filter
The as far as I know there is one spot and that is on the RHS (as viewed from the front). I have numerous wires running through there and have had no issues with water....yet. Funny you mention this as I was only thinking the other day how many wires can I get through this gromet before it is chocka block. I'm quite sure I cut it a bit in order to get the wores through. To find it head directly back from your fuel filter to the fire wall as you'll see it.
"of all the things I've lost I miss my mind the most"
-

2007Lux - Posts: 381
- Joined: Sat, 13 Nov 2010 10:56 +0000
- Location: Eastern Goldfields, WA
Re: Racor fuel filter
qldminer wrote:awesome run through 2007lux
Cheers. I think it took me longer to write it up than to install
"of all the things I've lost I miss my mind the most"
-

2007Lux - Posts: 381
- Joined: Sat, 13 Nov 2010 10:56 +0000
- Location: Eastern Goldfields, WA
Re: Racor fuel filter
thanks 2007lux. Great detail and the pic's are really helpful. Given me good idea on how to go about installation. You ought to be a teacher go simple instructions
- garry r
- Posts: 37
- Joined: Fri, 22 Feb 2013 7:54 +0000
Re: Racor fuel filter
Hi guys,
what has everyone been paying for the Stanadyne FM100 unit??
Does it come standard with the water detection warning gear? (light and buzzer)
Cheers!
also FYI for everyone....
I work for a top tier, my site is situated out in the Surat Basin, we use a fair bit of shitty fuel, sometimes the utes even cop the crap the machines run off... below is a pic of the fuel filter set-up our site utes run. I spoke to the plant manager the other day and our project has 26 hilux 3.0's, none of which have had an injector failure so far.

- Weekend Warrior
- Posts: 70
- Joined: Thu, 07 Jul 2011 5:50 +0000
Re: Racor fuel filter
that FM100 unit, in that kit you see in that pic is great. it comes with everything needed to install.
one thing i found is one of the wires coming from the OEM fuel filter is a bit tight with that unit, but isnt really a biggy.
one thing i found is one of the wires coming from the OEM fuel filter is a bit tight with that unit, but isnt really a biggy.
- qldminer
- Posts: 249
- Joined: Fri, 12 Oct 2012 4:05 +0000
- Location: Middlemount, QLD
Re: Racor fuel filter
how much did you pay?? if you don't mind me asking?
Also does it come with the warning light/buzzer as standard?
Also does it come with the warning light/buzzer as standard?
- Weekend Warrior
- Posts: 70
- Joined: Thu, 07 Jul 2011 5:50 +0000
Who is online
Users browsing this forum: No registered users and 2 guests

