nice guide!
Where did you end up mounting the GPS antenna? Do you have a photo?
How To - DIG Options TP09X1 Unit Install Part 2 Camera Done!
Re: How To - DIG Options TP09X1 Unit Install
![]() by ormz on Wed, 21 Apr 2010 11:26 +0000
by ormz on Wed, 21 Apr 2010 11:26 +0000
- ormz
- Posts: 4
- Joined: Sun, 07 Mar 2010 10:52 +0000
Re: How To - DIG Options TP09X1 Unit Install
![]() by johnny5x on Thu, 22 Apr 2010 4:25 +0000
by johnny5x on Thu, 22 Apr 2010 4:25 +0000
Cheers Guys
Guntre - i will get a photo up of the finished product after this weekend once reverse camera is installed
Ormz - I just rested the GPS antenna in the space below the unit, didnt actually mount it anywhere and it works fine. Others have mounted it on top of the dash but i dont see a need really unless you were having problems picking up satellites.
-

johnny5x - Posts: 310
- Joined: Sun, 31 Jan 2010 7:19 +0000
- Location: Canberra ACT
Re: How To - DIG Options TP09X1 Unit Install
![]() by hilux_bondy_007 on Thu, 22 Apr 2010 4:54 +0000
by hilux_bondy_007 on Thu, 22 Apr 2010 4:54 +0000
nice work mate, i was looking at these but wasnt sure on how hard install was. thanks on all the details i cant wait for reverse camera install
-

hilux_bondy_007 - Posts: 1138
- Joined: Tue, 15 Jul 2008 1:00 +0000
- Location: Brisbane, QLD
Re: How To - DIG Options TP09X1 Unit Install
![]() by gruntre69 on Thu, 22 Apr 2010 5:16 +0000
by gruntre69 on Thu, 22 Apr 2010 5:16 +0000
efini7 wrote:Cheers Guys
Guntre - i will get a photo up of the finished product after this weekend once reverse camera is installed
Ormz - I just rested the GPS antenna in the space below the unit, didnt actually mount it anywhere and it works fine. Others have mounted it on top of the dash but i dont see a need really unless you were having problems picking up satellites.
You might find on forrested tracks where the signal is weaker you'll want it on the dash.... My little garman notices it when there is a tree canopy above.
-

gruntre69 - Posts: 384
- Joined: Mon, 18 Jan 2010 2:25 +0000
- Location: Perth WA
Re: How To - DIG Options TP09X1 Unit Install
![]() by Steve9R on Thu, 22 Apr 2010 5:37 +0000
by Steve9R on Thu, 22 Apr 2010 5:37 +0000
ormz wrote:nice guide!
Where did you end up mounting the GPS antenna? Do you have a photo?
viewtopic.php?f=8&t=4126&start=20#p54561
-

Steve9R - Valued Contributor
- Posts: 5248
- Joined: Wed, 11 Apr 2007 1:00 +0000
- Location: Melbourne, VIC
Re: How To - DIG Options TP09X1 Unit Install
![]() by MADDOG on Fri, 23 Apr 2010 6:15 +0000
by MADDOG on Fri, 23 Apr 2010 6:15 +0000
Nice write up efini7. I found no need to disconnect a/c or hazard lights. I just let the fascia hang down and could access everything I needed to. As for the GPS antenna, I did what Possum did, which is using double sided tape stick the antenna on top of the air duct under the dash. Pretty much where Steve9R has his but under the dash. I have had my unit for 4 months now or roughly 18000kms and have never had a problem with weak signals. The radio reception though, well that's a different story 
-

MADDOG - Posts: 3954
- Joined: Fri, 18 Sep 2009 7:33 +0000
- Location: Warburton, Vic
Re: How To - DIG Options TP09X1 Unit Install
![]() by Steve9R on Fri, 23 Apr 2010 8:31 +0000
by Steve9R on Fri, 23 Apr 2010 8:31 +0000
MADDOG wrote:Nice write up efini7. I found no need to disconnect a/c or hazard lights. I just let the fascia hang down and could access everything I needed to. As for the GPS antenna, I did what Possum did, which is using double sided tape stick the antenna on top of the air duct under the dash. Pretty much where Steve9R has his but under the dash. I have had my unit for 4 months now or roughly 18000kms and have never had a problem with weak signals. The radio reception though, well that's a different story
did you buy the booster ? that improved my signal immensly..
Steve
-
Steve9R - Valued Contributor
- Posts: 5248
- Joined: Wed, 11 Apr 2007 1:00 +0000
- Location: Melbourne, VIC
Re: How To - DIG Options TP09X1 Unit Install
![]() by MADDOG on Fri, 23 Apr 2010 8:46 +0000
by MADDOG on Fri, 23 Apr 2010 8:46 +0000
Steve9R wrote:
did you buy the booster ? that improved my signal immensly..
Steve
No I didn't. That was on ebay wasn't it. I'll have to search through the old thread. Currently I have to program the stations at work in Ringwood. By the time I get home I've only got a couple of stations and they are scratchy. The only station I get clearly at home is 774am ABC. But that's OK, I like listening to it because I'm a cranky old bitch.
-
MADDOG - Posts: 3954
- Joined: Fri, 18 Sep 2009 7:33 +0000
- Location: Warburton, Vic
Re: How To - DIG Options TP09X1 Unit Install
![]() by Steve9R on Fri, 23 Apr 2010 11:24 +0000
by Steve9R on Fri, 23 Apr 2010 11:24 +0000
MADDOG wrote:Steve9R wrote:
did you buy the booster ? that improved my signal immensly..
Steve
No I didn't. That was on ebay wasn't it. I'll have to search through the old thread. Currently I have to program the stations at work in Ringwood. By the time I get home I've only got a couple of stations and they are scratchy. The only station I get clearly at home is 774am ABC. But that's OK, I like listening to it because I'm a cranky old bitch.
yeah get em on ebay or supercheap sell em for $25 as well (same price as ebay)..
Steve
-
Steve9R - Valued Contributor
- Posts: 5248
- Joined: Wed, 11 Apr 2007 1:00 +0000
- Location: Melbourne, VIC
Re: How To - DIG Options TP09X1 Unit Install
![]() by cjfish on Fri, 23 Apr 2010 11:55 +0000
by cjfish on Fri, 23 Apr 2010 11:55 +0000
Regarding the radio reception. I was getting crappy reception in and around Brisbane with the std aerial and std head unit in an SR. I put a GME AM/FM areial on the bull bar and plugged this into the head unit and what a difference. Maybe an external after market aerial might work for you. I agree that a FM booster will do the same but I also wanted better reception for AM (only to listen to the footy and the cricket). It also solved the problem of taking the std aerial out on the roller door when reversing out of the garage.
Cheers,
CJ
Cheers,
CJ
- cjfish
- Posts: 59
- Joined: Wed, 05 Aug 2009 7:24 +0000
- Location: Brisbane
Re: How To - DIG Options TP09X1 Unit Install
![]() by MADDOG on Fri, 23 Apr 2010 12:25 +0000
by MADDOG on Fri, 23 Apr 2010 12:25 +0000
cjfish wrote:Regarding the radio reception. I was getting crappy reception in and around Brisbane with the std aerial and std head unit in an SR. I put a GME AM/FM areial on the bull bar and plugged this into the head unit and what a difference. Maybe an external after market aerial might work for you. I agree that a FM booster will do the same but I also wanted better reception for AM (only to listen to the footy and the cricket). It also solved the problem of taking the std aerial out on the roller door when reversing out of the garage.
Cheers,
CJ
I had no problems with radio reception with the std aerial and std head unit in my SR. And I always had the aerial extended less than 150mm. Now I can have it fully extended and it is still shite. I think we should be talking about this on the original DIG Options GPS thread rather than clutterring efini7's install thread.
-
MADDOG - Posts: 3954
- Joined: Fri, 18 Sep 2009 7:33 +0000
- Location: Warburton, Vic
Re: How To - DIG Options TP09X1 Unit Install
![]() by Steve9R on Fri, 23 Apr 2010 2:09 +0000
by Steve9R on Fri, 23 Apr 2010 2:09 +0000
yeah.. I think really these two threads need to be merged..
-
Steve9R - Valued Contributor
- Posts: 5248
- Joined: Wed, 11 Apr 2007 1:00 +0000
- Location: Melbourne, VIC
Re: How To - DIG Options TP09X1 Unit Install
![]() by clae81 on Fri, 23 Apr 2010 3:22 +0000
by clae81 on Fri, 23 Apr 2010 3:22 +0000
Do dig options supply the camera cable that runs from the head unit to the camera? Just waiting on the delevery of my TP09x1
Clae.
-

clae81 - Posts: 40
- Joined: Sun, 28 Oct 2007 1:00 +0000
- Location: Alexandra Hills, QLD
Re: DIG Options GPS
![]() by juzo on Sat, 24 Apr 2010 4:14 +0000
by juzo on Sat, 24 Apr 2010 4:14 +0000
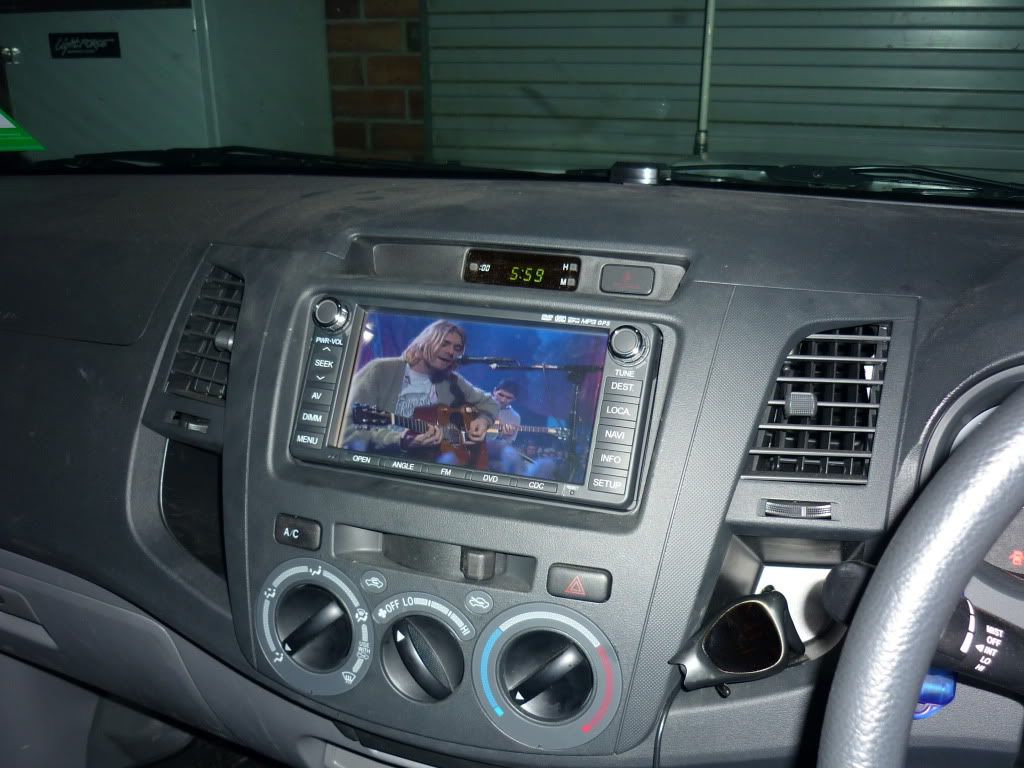
Ok, i just installed my unit from matt, i went for the more expensive option (vms copy)
So far, i'd go so far to say it's the best money i've spent so far on my rig, i couldn't be happier.
Matt was very helpful and i'd recommend this mod to anyone who's still sitting on the fence.
Here's a pic of it after the intall, nirvana in new york goes well!
So far, i'd go so far to say it's the best money i've spent so far on my rig, i couldn't be happier.
Matt was very helpful and i'd recommend this mod to anyone who's still sitting on the fence.
Here's a pic of it after the intall, nirvana in new york goes well!
-

juzo - Posts: 60
- Joined: Fri, 26 Feb 2010 2:39 +0000
- Location: south west vic.
Re: DIG Options GPS
![]() by Alby on Sat, 24 Apr 2010 6:23 +0000
by Alby on Sat, 24 Apr 2010 6:23 +0000
Looks nice,well done
On the internet you can be anything you want. It is strange that so many people choose to be stupid!
-

Alby - Posts: 6673
- Joined: Tue, 03 Jul 2007 1:00 +0000
- Location: Sydney, NSW
Re: How To - DIG Options TP09X1 Unit Install
![]() by gruntre69 on Sat, 24 Apr 2010 8:04 +0000
by gruntre69 on Sat, 24 Apr 2010 8:04 +0000
Yep I vote, keeping this thread for install only....
-
gruntre69 - Posts: 384
- Joined: Mon, 18 Jan 2010 2:25 +0000
- Location: Perth WA
Re: How To - DIG Options TP09X1 Unit Install
![]() by matske on Sun, 25 Apr 2010 4:55 +0000
by matske on Sun, 25 Apr 2010 4:55 +0000
Anybody got Like any protection for the glare from the sun on the screen mine is hard to see
-

matske - Posts: 1003
- Joined: Wed, 17 Oct 2007 1:00 +0000
- Location: robina, QLD
Re: How To - DIG Options TP09X1 Unit Install
![]() by asmo on Sun, 25 Apr 2010 8:16 +0000
by asmo on Sun, 25 Apr 2010 8:16 +0000
clae81 wrote:Do dig options supply the camera cable that runs from the head unit to the camera? Just waiting on the delevery of my TP09x1
Yes everything is supplied cable with power wire in one...nothing to buy.
-
asmo - Posts: 180
- Joined: Thu, 04 Feb 2010 11:36 +0000
- Location: South West WA
Re: How To - DIG Options TP09X1 Unit Install
![]() by johnny5x on Sun, 25 Apr 2010 3:43 +0000
by johnny5x on Sun, 25 Apr 2010 3:43 +0000
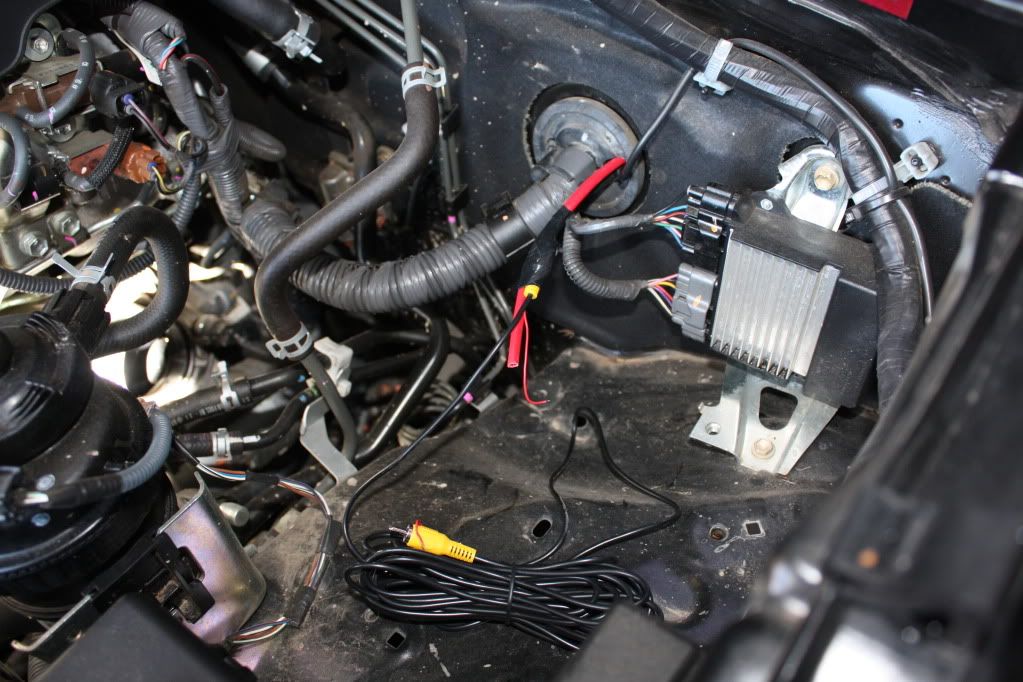
Ok finally installed the reversing camera today, took me about 4 hours. Longest part was running the cable underneath the car and cable tying it.
First of all you need to remove the glovebox. Open the glove box and on each of the sides squeeze the glovebox inwards so the tabs on either side pop out and then the glovebox easily comes out. Now you will need to locate a grommet in the firewall in your engine bay that you will use to run the yellow plugged RCA cable through. I used the grommet near the second battery space on the left hand side of the vehicle. I shoved a screw driver through the grommet to make a hole. I then had some spare cable lying around so i shoved that through the hole. Once this is done, you can tape the yellow RCA cable to the wire and then pull the cable through to the interior. You only need around one metre of the RCA cable inside the interior. I used some automotive silicon to make sure the hole i created in the grommet was sealed nicely.
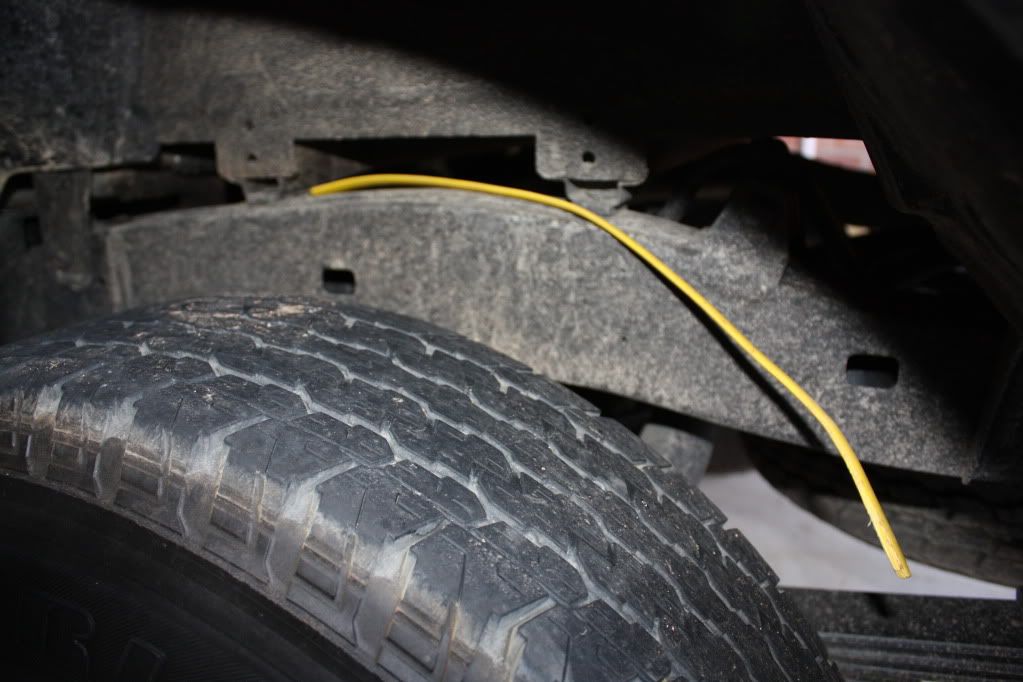
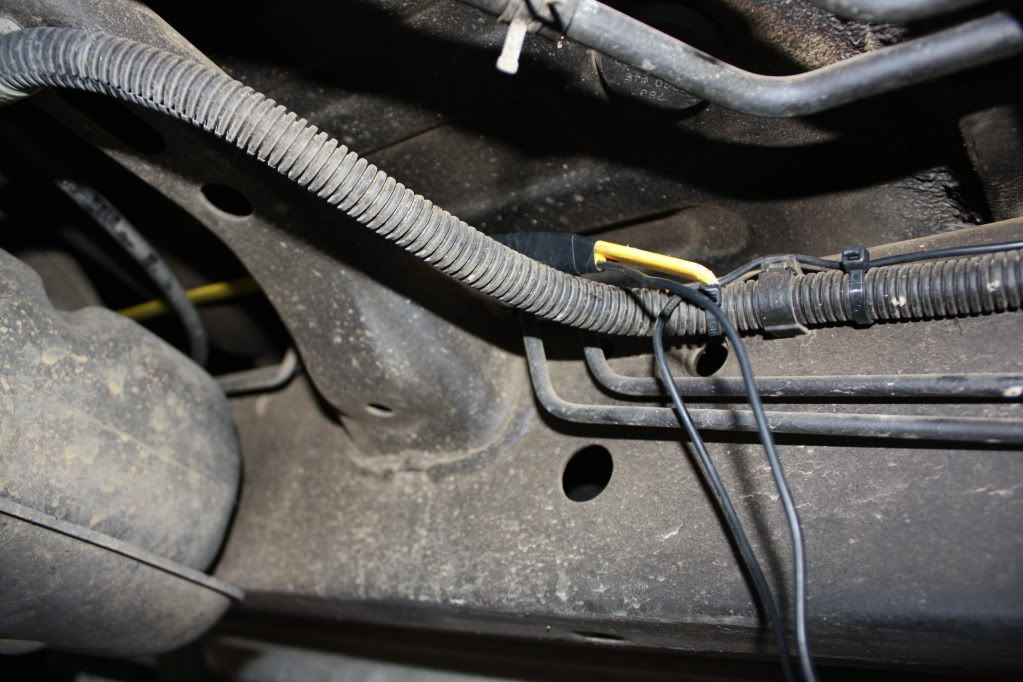
Next thing is to run the other end of the cable down the firewall and underneath the car. I ran mine along the left hand side of the vehicle with the fuel line and then along the wiring harness half way along the car. Cable tie as you go pretty often to make sure it is secure. I ran my cable above everything whenever i could to prevent sticks and what not snagging the cable. I also used black ties to make it more stealth. If you choose this same route, you will find the fuel tank gets in the way. I used some yellow tongue (im a sparky so have it lying around, if you have sparky mates good idea to borrow it off them or if you know any chippys ask them to get you some off some tongue and groove boarding) or you could use push rods or anything stiff and skinny. I poked the yellow tongue above the fuel tank and followed the length of the chassis rail until the other end popped out over the rear left wheel. Tape the RCA cable to the yellow tongue, get on the other end and pull the rest of the RCA cable through and cable tie as you go.
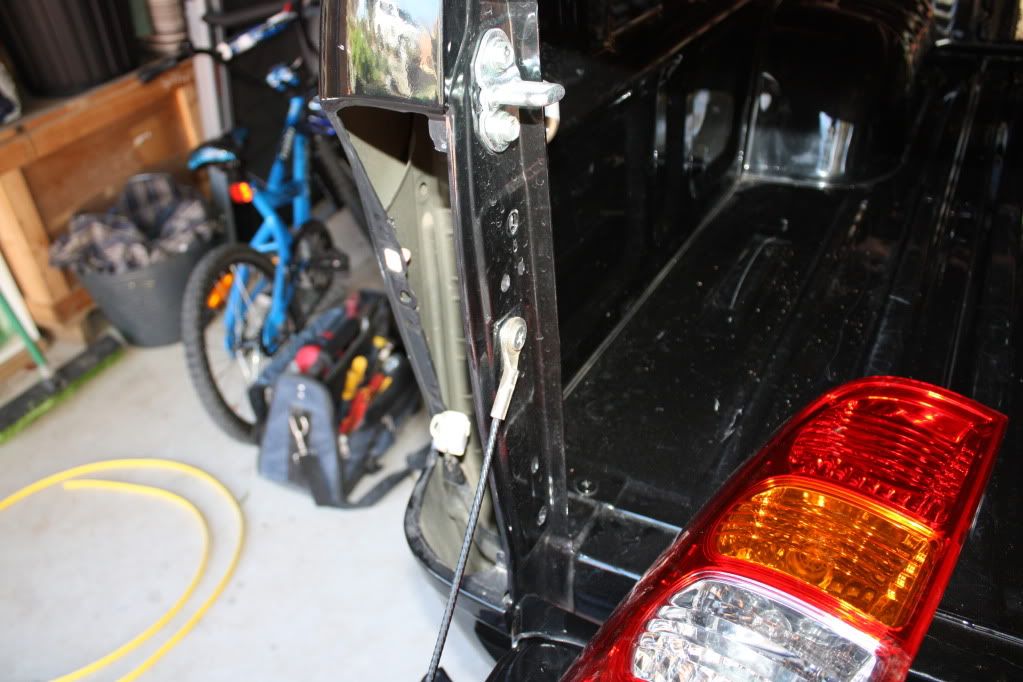
Now you need to remove the rear left hand light assembly. Open your tail gate and there will be two 10mm bolts in the side. Remove these and then pop the tail light out and disconnect the white plug from the bottom.
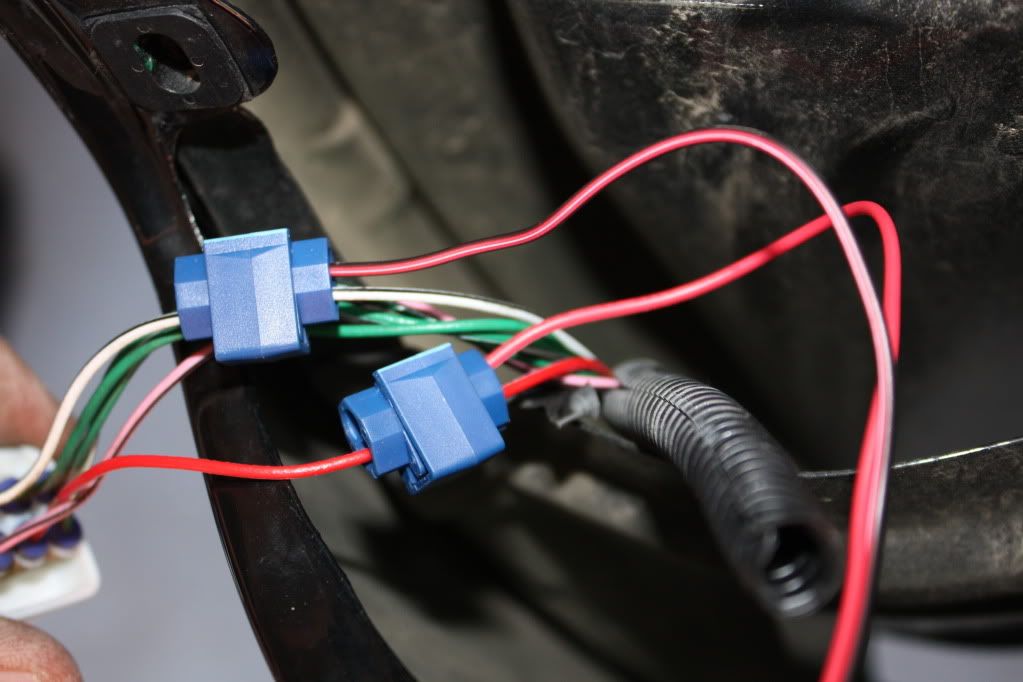
Now you need to locate the reverse light wires. Look at the two wires going into the back of the reverse light and note their colours. Im not sure if all hilux series are the same but my colours were as follows.
Male Plug
---------
Reverse light positive = red/blue stripe
Reverse light negative = white/black stripe
Follow these wires to the male plug side and see which pins they go into. Then look at the female plug pins and see where they correspond and you can work out which wire is for what. Easy. If you wanted to be totally sure you could use a multimeter but this is by far the easiest way to work it out.
For my car....
Female Plug
-----------
Reverse light positive = red/white stripe
Reverse light negative = white/black stripe
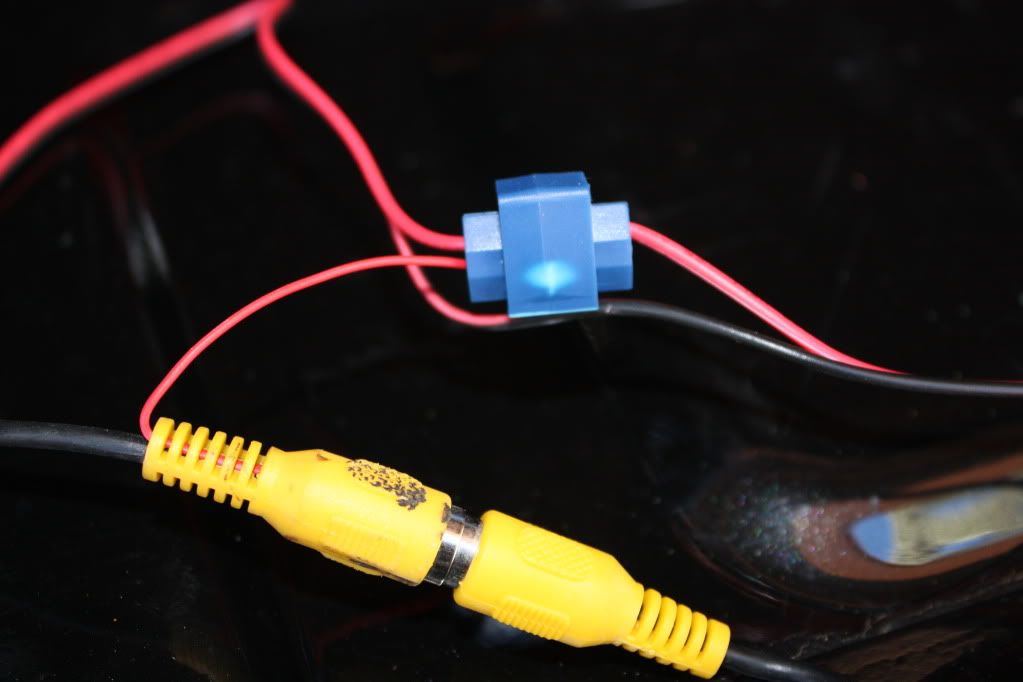
You now need to get the cables that came with the unit that have the red and red/black cable connected to a small black box with a skinny female plug on the other end and a yellow RCA female plug. This is the cable that connects to the camera and turns on the camera when reverse is selected. Use wire connectors to splice into the reverse light cables or use bullet connectors. Do as follows.
Connect the red camera cable to the positive of the reverse light. Now you can do this on the light assembly side or the car side, i did it on the car side so instructions will reflect that. So i connected the red camera cable to the red/white stripe cable as above.
Connect the red/black stripe cable to the negative of the reverse light. So you would connect the red/black stripe camera cable to the white/black stripe cable.
Now somewhere along the camera cable you need to divide the two parrellel wires and you will need to tap into the red positive cable with the thin red cable that is running along the yellow RCA cable we earlier ran underneath the car. Again use a wire connecter to crimp into the positive red wire of the camera cable with the thin red cable on the yellow RCA cable. This provides the signal that goes back to the unit to tell it that reverse has been selected and to turn the CAM display on the unit.
OK so now all the wiring in the rear has been done. So cable tie it neatly to where ever you can to keep it up and out of the way. Its also a good idea to wrap all your electrical connections with electrical tape for some added protection.
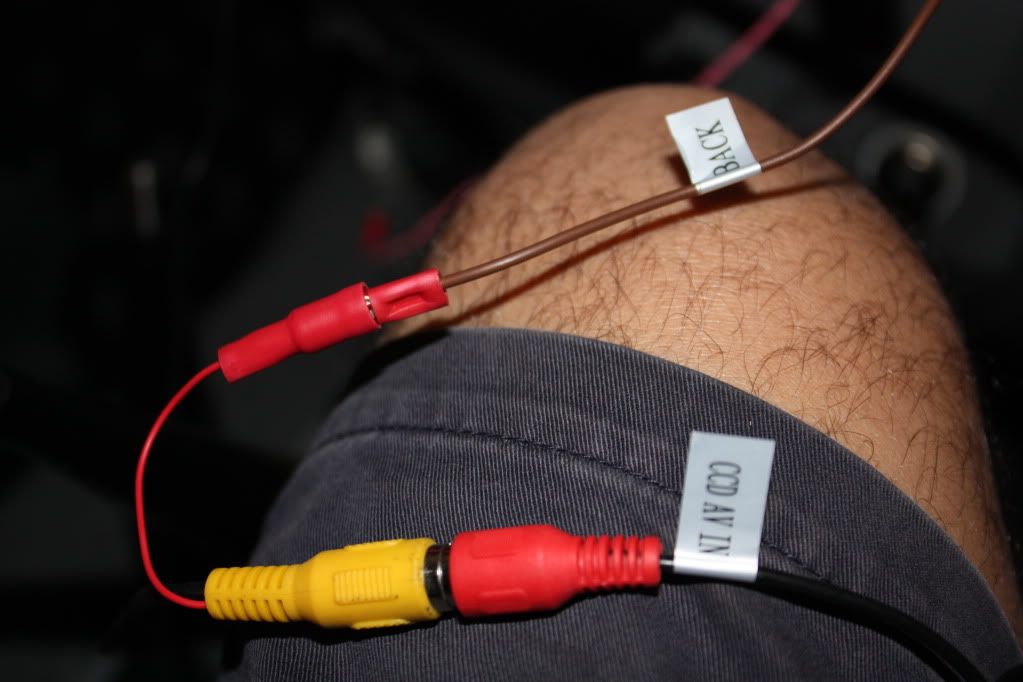
Now with the head unit removed, you need to run the metre of the yellow plugged RCA cable that we ran earlier into the interior up into the space where the head unit goes. You will need to plug the yellow RCA plug into the female RCA plug labelled CCD AV IN. The thin red wire that runs with this cable needs to be connected to the BROWN cable labelled CAR BACK. This is the wire that received the signal from the reverse light telling it to switch the CAM display on.
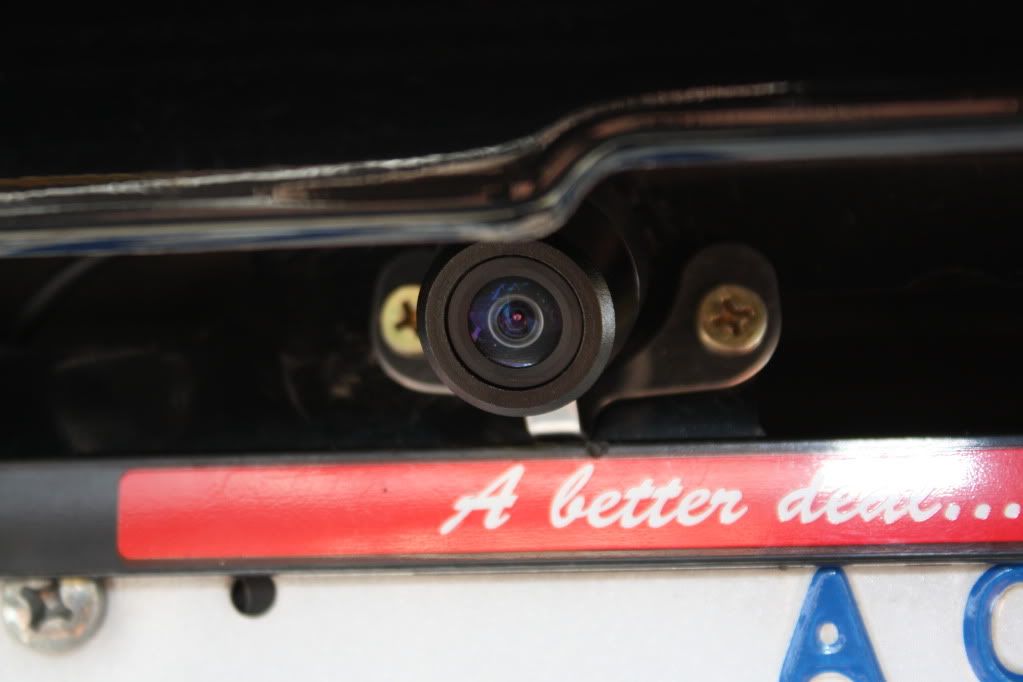
Now you can go back to the rear of the car and plug the camera into the wiring harness we earlier wired up and choose a location for it to go. I used blue tac to mount the camera to work out where i wanted it to go. After playing around with it i decided best location was above number plate on the left hand side of the centre hole used to mount the tool to lower the spare wheel. You can bend the camera mount to suit the angle you want. Also you can rotate the lens to adjust the horizontal level of the picture. Takes some fiddling around but you will get there. I then pre-drilled the holes using a drill and screwed some tec screws to permanently mount the camera. Once screwed and mounted you can play adjust things to get the best angle of view.
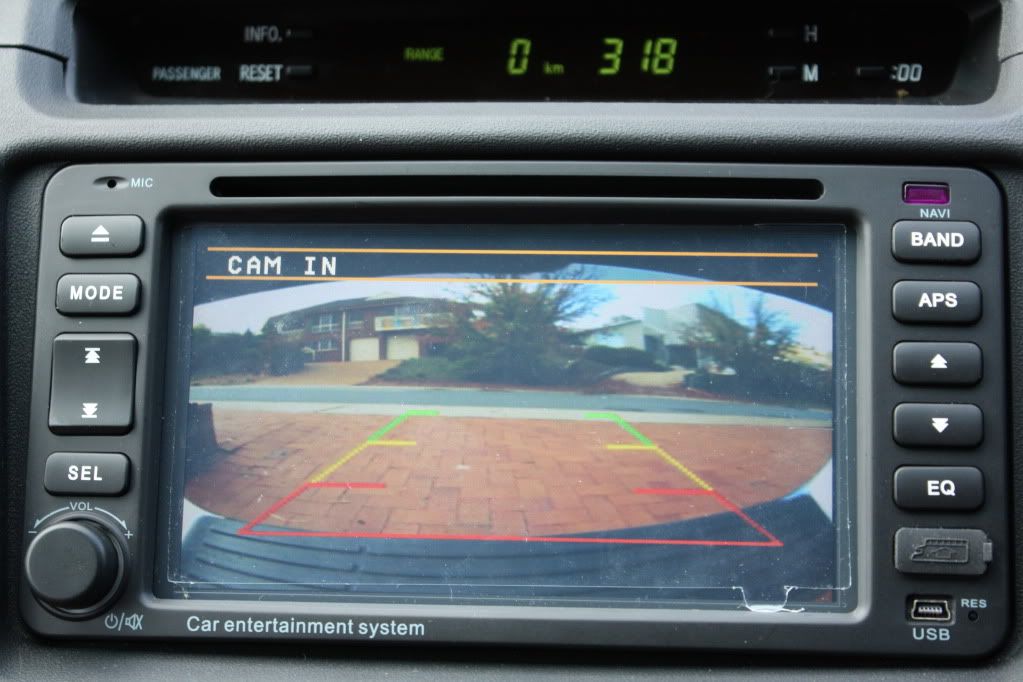
You can now screw the unit back in and put all the trimming back on and reinstall the glove box. Job done and looks great! It really is quite easy just takes some time.
Once i receive my digital tv tuner i will do another write up. In regards to the GPS antenna, i just chose to let mine sit under the unit just resting there, if i open my glove box i can access the antenna easily and bring it up and out from behind the dash if i do need to get a better signal if the need ever arises but for now it works fine every time.
Good luck!
First of all you need to remove the glovebox. Open the glove box and on each of the sides squeeze the glovebox inwards so the tabs on either side pop out and then the glovebox easily comes out. Now you will need to locate a grommet in the firewall in your engine bay that you will use to run the yellow plugged RCA cable through. I used the grommet near the second battery space on the left hand side of the vehicle. I shoved a screw driver through the grommet to make a hole. I then had some spare cable lying around so i shoved that through the hole. Once this is done, you can tape the yellow RCA cable to the wire and then pull the cable through to the interior. You only need around one metre of the RCA cable inside the interior. I used some automotive silicon to make sure the hole i created in the grommet was sealed nicely.
Next thing is to run the other end of the cable down the firewall and underneath the car. I ran mine along the left hand side of the vehicle with the fuel line and then along the wiring harness half way along the car. Cable tie as you go pretty often to make sure it is secure. I ran my cable above everything whenever i could to prevent sticks and what not snagging the cable. I also used black ties to make it more stealth. If you choose this same route, you will find the fuel tank gets in the way. I used some yellow tongue (im a sparky so have it lying around, if you have sparky mates good idea to borrow it off them or if you know any chippys ask them to get you some off some tongue and groove boarding) or you could use push rods or anything stiff and skinny. I poked the yellow tongue above the fuel tank and followed the length of the chassis rail until the other end popped out over the rear left wheel. Tape the RCA cable to the yellow tongue, get on the other end and pull the rest of the RCA cable through and cable tie as you go.
Now you need to remove the rear left hand light assembly. Open your tail gate and there will be two 10mm bolts in the side. Remove these and then pop the tail light out and disconnect the white plug from the bottom.
Now you need to locate the reverse light wires. Look at the two wires going into the back of the reverse light and note their colours. Im not sure if all hilux series are the same but my colours were as follows.
Male Plug
---------
Reverse light positive = red/blue stripe
Reverse light negative = white/black stripe
Follow these wires to the male plug side and see which pins they go into. Then look at the female plug pins and see where they correspond and you can work out which wire is for what. Easy. If you wanted to be totally sure you could use a multimeter but this is by far the easiest way to work it out.
For my car....
Female Plug
-----------
Reverse light positive = red/white stripe
Reverse light negative = white/black stripe
You now need to get the cables that came with the unit that have the red and red/black cable connected to a small black box with a skinny female plug on the other end and a yellow RCA female plug. This is the cable that connects to the camera and turns on the camera when reverse is selected. Use wire connectors to splice into the reverse light cables or use bullet connectors. Do as follows.
Connect the red camera cable to the positive of the reverse light. Now you can do this on the light assembly side or the car side, i did it on the car side so instructions will reflect that. So i connected the red camera cable to the red/white stripe cable as above.
Connect the red/black stripe cable to the negative of the reverse light. So you would connect the red/black stripe camera cable to the white/black stripe cable.
Now somewhere along the camera cable you need to divide the two parrellel wires and you will need to tap into the red positive cable with the thin red cable that is running along the yellow RCA cable we earlier ran underneath the car. Again use a wire connecter to crimp into the positive red wire of the camera cable with the thin red cable on the yellow RCA cable. This provides the signal that goes back to the unit to tell it that reverse has been selected and to turn the CAM display on the unit.
OK so now all the wiring in the rear has been done. So cable tie it neatly to where ever you can to keep it up and out of the way. Its also a good idea to wrap all your electrical connections with electrical tape for some added protection.
Now with the head unit removed, you need to run the metre of the yellow plugged RCA cable that we ran earlier into the interior up into the space where the head unit goes. You will need to plug the yellow RCA plug into the female RCA plug labelled CCD AV IN. The thin red wire that runs with this cable needs to be connected to the BROWN cable labelled CAR BACK. This is the wire that received the signal from the reverse light telling it to switch the CAM display on.
Now you can go back to the rear of the car and plug the camera into the wiring harness we earlier wired up and choose a location for it to go. I used blue tac to mount the camera to work out where i wanted it to go. After playing around with it i decided best location was above number plate on the left hand side of the centre hole used to mount the tool to lower the spare wheel. You can bend the camera mount to suit the angle you want. Also you can rotate the lens to adjust the horizontal level of the picture. Takes some fiddling around but you will get there. I then pre-drilled the holes using a drill and screwed some tec screws to permanently mount the camera. Once screwed and mounted you can play adjust things to get the best angle of view.
You can now screw the unit back in and put all the trimming back on and reinstall the glove box. Job done and looks great! It really is quite easy just takes some time.
Once i receive my digital tv tuner i will do another write up. In regards to the GPS antenna, i just chose to let mine sit under the unit just resting there, if i open my glove box i can access the antenna easily and bring it up and out from behind the dash if i do need to get a better signal if the need ever arises but for now it works fine every time.
Good luck!
-
johnny5x - Posts: 310
- Joined: Sun, 31 Jan 2010 7:19 +0000
- Location: Canberra ACT
Who is online
Users browsing this forum: No registered users and 20 guests
![]()